.avif)
Whipped Cream Stabilizers: Comparing 12 Methods


Whipped Cream is a fantastic option for topping pies, piping onto cupcakes, or even frosting and filling cakes. It also offers unique advantages: it's easy and quick to make, creates some of the lightest dessert textures, and has a not-too-sweet, dairy-forward flavor. However, as a component for desserts, and particularly when used as a frosting, the trade-offs include significant stability issues, including leaking, deflating/collapse, and melting.
.avif)
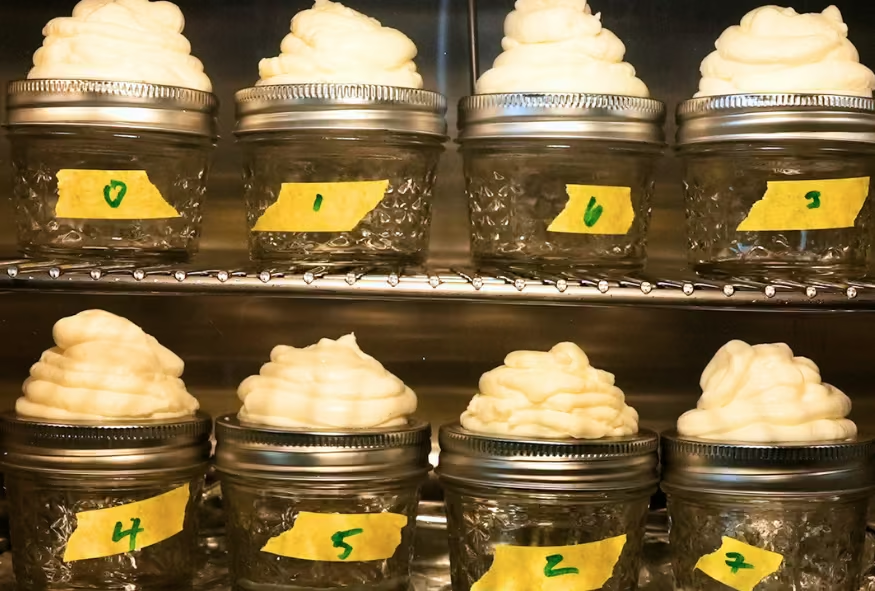
The good news is that you can minimize these issues by stabilizing the whipped cream. This guide compares twelve whipped creams: one unstabilized control and eleven different stabilization methods, including gelatin, Whip It/Sahnesteif, Instant ClearJel, instant pudding, Greek yogurt, mascarpone, cream cheese, cream of tartar, two types of milk powder, and a food processor method.
To preface, there’s no wrong way (or even “best way,” as some claim) to stabilize whipped cream. Some stabilizers work better than others, and the best choice depends largely on how you plan to use the whipped cream. My site's premise is that different solutions work for different problems. And that’s just it… We’ll figure out how each stabilizer works so you can choose the right one for your needs.
What is a “Whipped Cream Stabilizer”? Why do we want to stabilize whipped cream?
Stabilizers are ingredients that interact with ingredients in the cream to help whipped cream <span class="def-term" data-term="foam">foam</span> last longer by reducing melting, leaking, and deflation.
Whipped cream is an aerated foam held intact by semi-solid milkfat <span class="def-term" data-term="globule"> globules </span> in the cream. These milk fats hold onto air bubbles, creating the light, airy texture. However, this interaction isn't inherently stable. Whipped cream can lose air, leak liquid, or collapse over time or under pressure. Warm temperatures can make it even less stable because the milk fat softens, weakening the structure that holds the foam in place.
Many fantastic ways can stabilize whipped cream. Whipped Cream Stabilizers, although often grouped into a single category, act in different ways and therefore impart different textural, flavor, and stability characteristics to the final whipped cream. My goal here is to help us define those differences so that choosing the right stabilizer makes a little more sense.
If this is your first foray into whipped cream frostings, I highly recommend reading the introduction to my Master Recipe for Whipped Cream first, as it covers how the whipped cream foam works.
However, if you’ve used whipped cream frosting before and are ready to choose your new stabilizer, let’s get started!
How I Tested Each Stabilized Whipped Cream
In all my experiments, I test frosting stability by applying different measured stresses to each type. Then I make comparisons.
Stability is a word I see thrown around a lot when describing frostings. (“This frosting has great stability!” etc.) But we need to get a little more specific here…it’s like saying “You should go to that restaurant because it is so good!”
Huh? Good how? Is it the food? The service? How does it compare to other places we like?
Context matters, which is why I write these comparison guides. So when I talk about the stability of frostings, this is what you should think about:
- What happens when we leave the frosting out for a couple of hours at room temperature?
- Does it leak fluid or deflate over time?
- Can it handle heavy cake layers, such as a dense chocolate fudge cake?
- Does it pipe detailed designs well?
- Can it smear easily into a smooth surface without visible air pockets/indentations?
To answer these questions, I designed experiments to determine the characteristics that keep frostings stable. I focused on three different stresses or conditions we often encounter when using whipped cream.
Heat Stress: How do the stabilized whipped creams hold up at 90°F/32°C?
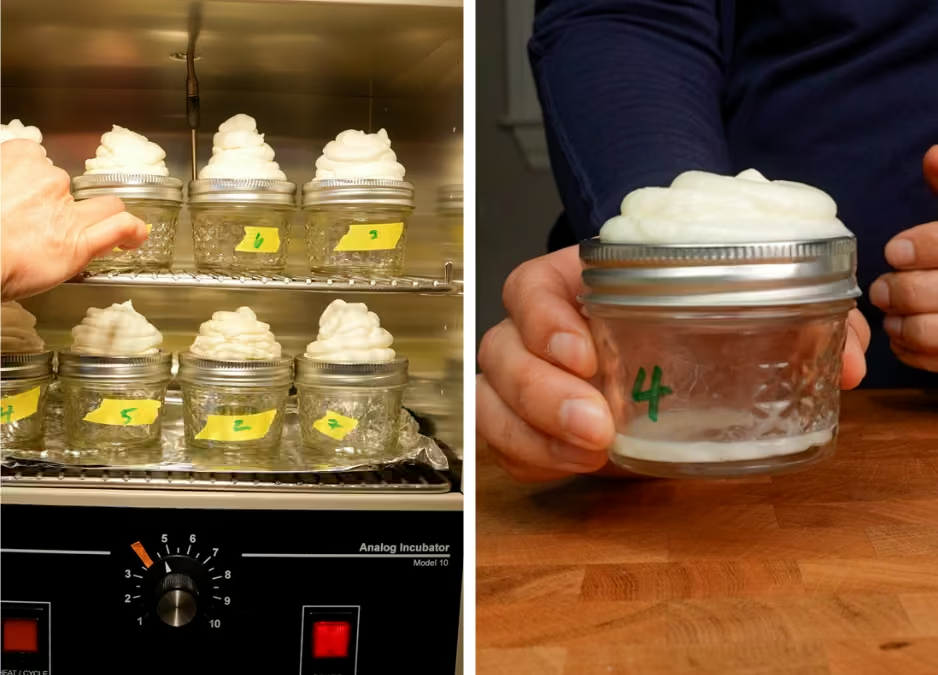
Experiment Design: I acquired a new incubator just for this experiment (and to test other frostings, too!) My incubator holds a consistent temperature over prolonged periods. This prevents fluctuations and gives us more accurate temperature-related data.
I created these “artificial cupcakes,” which are essentially glass jars. I removed the flat lid that sits atop the jar, replaced it with wire mesh (basically the flexible material used to cover porch doors), and screwed the ring back on to keep it in place. I then piped the same weight of whipped cream onto each jar so any leakage could be collected in the jar below and measured.
I tested each stabilized whipped cream at 90°F/32°C.
How I measured results: Fluid leakage indicates that the whipped cream is becoming less stable. As the foam weakens, it can release some of the liquid that was previously held within its structure. I measured the leftover fluid in each jar in grams. I first compared each whipped cream’s measured performance to the control and expressed the results as percentages. I then used the range of results across all the whipped creams tested to develop the 1-to-5 rating system shown on the frosting cards.
Pressure (Weight-Bearing) Stress: How well do stabilized whipped cream frostings maintain structure under a fixed weight?
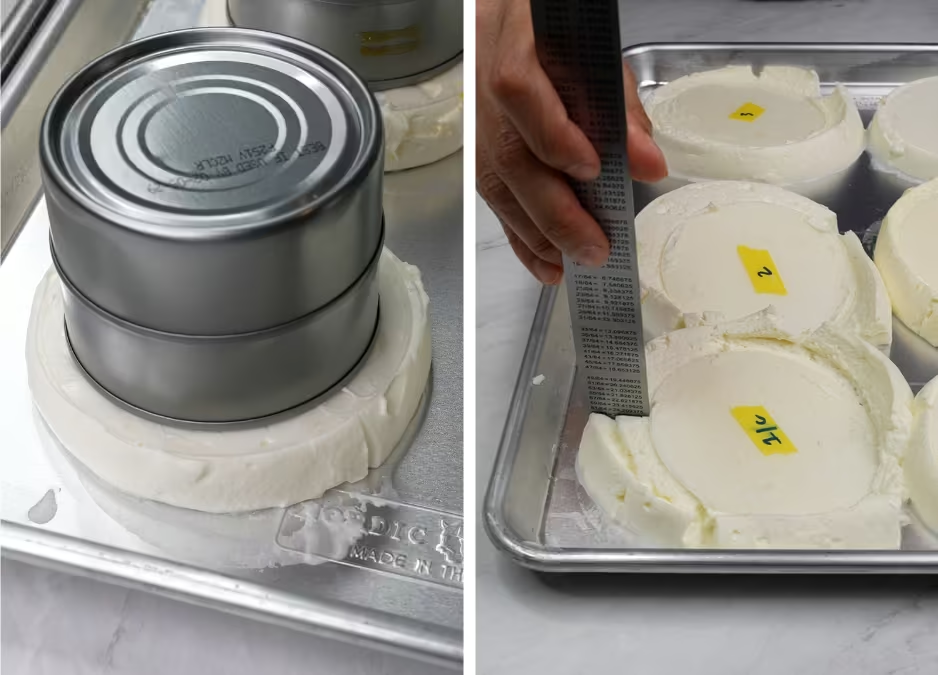
Experiment Design: To measure the ability of each stabilized whipped cream to stand up to pressure, I simulated a “mini cake” by applying an equal amount (via weight) of stabilized whipped cream in between two clear acrylic disks approximately 10cms/3.9 inches in diameter.
I then added two cans of tuna (360 grams) to the top of each “mini cake” and let it sit for 3 hours at room temperature (78°F/26°C). I chose this weight because, if we scale the weight per area of frosting for, say, a 6-inch cake, this is roughly equivalent to 810 grams of cake atop this frosting as a filling, or about 1.4 kg of cake on top of an 8-inch cake.
I know you’re probably not measuring the weight of your cakes and fillings, but these are realistic cake weights for regular cakes with frostings and toppings, and I wanted to push the stabilized whipped creams to their breaking point so we could clearly see the differences.
How I measured results: As the mini cakes sit under pressure, the whipped cream can lose structure and compress. Eventually, the weight of the tuna cans may cause the foam to deform and lose height. I measured compression at 4 points along the acrylic disk, since they were all lopsided, then averaged the results. I measured the starting height of each whipped cream sample, then measured how much it compressed under the fixed weight. This let me compare the percentage of height lost for each sample.
Again, I first compared each whipped cream’s measured performance to the control and expressed the results as percentages. I then used the range of results across all the whipped creams tested to develop the 1-to-5 rating system shown on the frosting cards.
📌Important: All room-temperature tests were completed in less than 3 hours, which is within my personal comfort range for keeping whipped-cream foods out. For reference, the USDA recommends refrigerating it after 2 hours at room temperature. I keep my refrigerator at 38 °F and use just-made whipped cream straight from the fridge before I start my test, taking measurements throughout the 3 hours. Ideally, this is the window of time in which we need to know how stable the whipped cream is.
Piping/Smoothing (Performance) Stress: How well does the stabilized whipped cream smooth and hold sharp piping details?
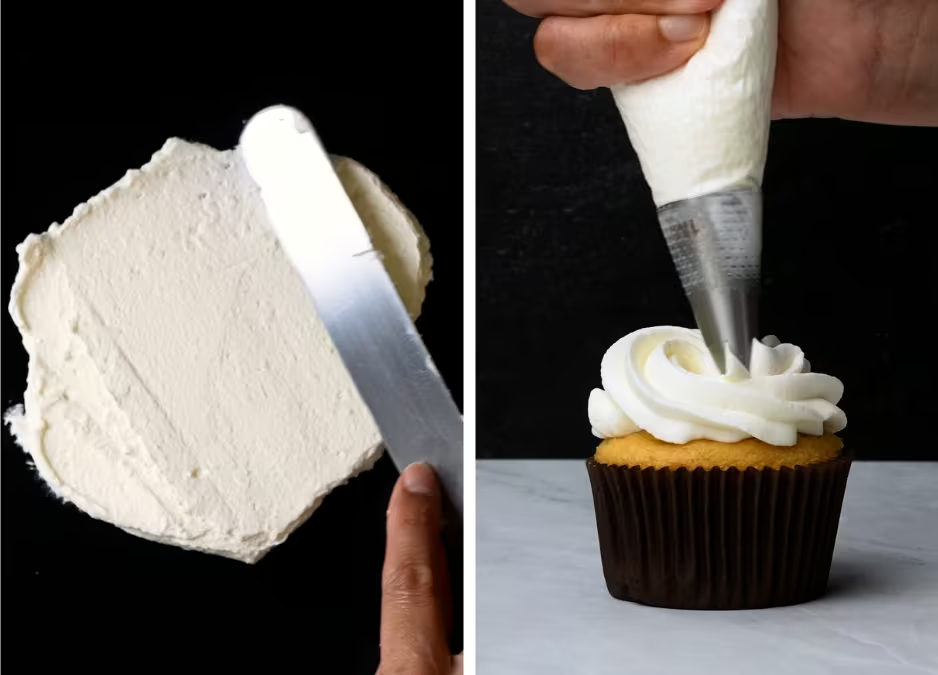
Experiment Design: To test each whipped cream's decorating abilities, I smeared each freshly made stabilized whipped cream frosting onto a flat acrylic surface and piped it onto a cupcake. I used a Wilton 1M tip for all my piping tests so everything stayed consistent and I could see how sharp the edges formed.
How I measured results: This experiment’s data is more observational and qualitative, but it will be helpful for you visually, as you can determine the final texture, sheen, and sharpness of the piping. Again, I converted these observations to a numerical value (1 to 5, with 1 being the poorest) based on how the whipped creams performed across all tests.
How to understand my ranking system:
Heat and Weight Pressure tests are quantitative because I measured how much fluid leakage, overflow, compression, etc. Piping and smoothing are qualitative because I observed how they performed. I then analyzed all the numbers against the control sample to give more universal labels that are easy to read on frosting cards. They are:
📌 IMPORTANT: My rating system is specific to each major frosting category. That is, I am ranking how well these whipped cream frostings perform relative to other whipped cream frostings.
A 5/5 - Excellent ranking means it performed best among all the whipped cream frostings on this page, whereas a 1/5 - Very Poor ranking means it performed the worst.
I’m not comparing whipped cream frosting results to buttercreams or ganaches, because those are completely different functional systems and therefore have different baseline stabilities.
Generally speaking, probably most buttercreams and ganaches will blow whipped cream out of the water in terms of stability (in probably every category).
Remember, the tradeoff for using a whipped cream frosting over buttercreams and ganaches is texture and flavor. You trade some stability for a lighter texture, typically less sweetness, and often more delicate flavors.
Here are the 12 stabilized whipped creams I tested:
In all cases, I used 36% milkfat heavy whipping cream containing heavy cream, milk, <span class="def-term" data-term="carrageenan">carrageenan</span>, mono- and diglycerides. I added 5% (<span class="def-term" data-term="bakers-percentage">baker's percentage</span> against the heavy cream) of powdered sugar to each test to simulate a sweet whipped cream frosting. Here are the stabilizers:
<h3 id="Control">1 | Whipped Cream with No Extra Stabilizers (Control)</h3>
The whipped cream <span class="def-term" data-term="control">control</span> for this set of experiments contains no baker-added stabilizers. (US whipped cream typically contains manufacturer-added stabilizers, “What is Whipped Cream,” in the intro section.) Since we added nothing, this whipped cream is bright white with a classic sweetened-whipped-cream flavor. You can add vanilla to make it a “Chantilly Cream,” which also turns the whipped cream an off-white to cream color, depending on the color of your extract.
.avif)
How it works: Whipped cream without baker-added stabilizers gets most of its structure from cold, partly solid milkfat globules. During whipping, these globules partially stick together, forming a network that supports the air bubbles. Manufacturer-added emulsifiers and stabilizers can provide additional stability in different ways.
Whipped cream in the US typically comes with emulsifiers such as monoglycerides and stabilizers such as carrageenan. These help the heavy cream maintain its <span class="def-term" data-term="emulsion">emulsion</span> during manufacturing and sale by resisting separation, ensuring we get a homogeneous, thick cream. Carrageenan increases viscosity and reduces separation, while the monoglycerides affect how well the milkfat globules interact during whipping.
Piping Stress: 3/5 - Moderate
This whipped cream frosting, with no baker-added stabilizers, had a medium-light density that was a bit difficult to manage because it was on the softer side, even when chilled. I still managed to pipe my swirl, but the edges were less distinct, so that knocked a couple points off.
Smoothing Stress: 4/5 - Good
Whipped cream made with heavy whipping cream smoothed beautifully. It took very few passes with a palette knife to create a super shiny, smooth surface. This may be because we’re not adding another ingredient; no added particles, gels, or thickeners alter the cream’s texture.
Pressure Stress: 2/5 - Poor
Air made up about 52% of the final whipped cream volume, one of the highest aeration levels of all the whipped creams I tested. It was the loftiest, airiest foam, and it was also more susceptible to deflating and collapsing. When I placed the tuna cans on top of the cream, it lost a whopping 47% in height from its initial height after 3 hours at room temperature - one of the highest levels of collapse from all the whipped creams I tested.
Heat Stress: 2/5 - Poor
Whipped Cream without any additional stabilizers generally doesn’t handle heat stress well, but it’s good to know our baseline. At 90°F, about 12% of its starting mass drained out as liquid, compared with 7% at 80°F. It was also one of the few that actually lost fluid while it sat in the refrigerator overnight (3% loss), whereas most of the others didn’t lose any at all. Keep these numbers in mind because, as our control, we’ll compare everything we do for the remaining stabilization methods against them.
Do choose Whipped Cream w/ no extra stabilizers if:
- You need something quick + easy. This basic version really only needs two ingredients (heavy whipping cream and sugar - maybe vanilla if you’re fancy) and can be made in less than 10 minutes.
- Your dessert needs an unstructured topping. This is the recipe I use when I want luscious whipped cream I can scrape onto a pie (like my pumpkin pie!), cheesecake, single-layer cake, or to fill a trifle.
- You want a super smooth finish. This recipe smooths very nicely.
Don’t choose Whipped Cream w/ no extra stabilizers if:
- You are filling or frosting a heavy cake. It cannot withstand as much pressure and will bulge out between cake slices.
- You need a whipped cream frosting to hold its shape at higher ambient temperatures; this one showed one of the highest liquid drainage compared to the others.
Recipes for Whipped Cream Frosting with no baker-added stabilizers:
- Master guide to Whipped Cream Frosting with no baker-added stabilizers (has 3 and 4 ½ cup recipes)
- Vanilla Chiffon Cake with Whipped Cream (8-inch with two layers)
- Earl Grey Chiffon Cupcakes with Vanilla Whipped Cream (2 dozen)
<h3 id="Gelatin">2 | Gelatin-stabilized Whipped Cream</h3>
Gelatin is an animal-derived protein made by partially breaking down collagen from connective tissues such as skin and bones. Bakers typically use it in sheet or granule (powder) form, which comes in varying strengths. In my tests, gelatin provided some of the highest temperature and pressure resistance, although it had some caveats for decorating and smoothing. At the amount used here, the gelatin did not noticeably change the whipped cream's flavor or color.
.avif)
How it works: Gelatin forms a protein-based gel network in The Water that reinforces the whipped cream foam.
Gelatin-stabilized whipped cream is made by creating a protein-based network (or <span class="def-term" data-term="gel">gel</span>) that supports the whipped cream foam from within. It starts by hydrating (also called “blooming”) dried gelatin in cold water. Then gently heat the hydrated protein mixture to dissolve the gelatin fully. Then add this highly concentrated gelatin-water mixture to the whipped cream, which disperses the proteins evenly throughout the foam. As the gelatin cools, parts of its protein chains associate with one another, forming a three-dimensional gel network that holds water and provides additional structure.
Piping Stress: 4/5 - Good
This gelatin-stabilized whipped cream frosting has a great body, which makes it easy to pipe and manipulate. The only caveat is that if the gelatin-based protein network isn't evenly dispersed, it clumps fairly easily. You can see in my piping that the edges have slight deformations from the clumping.
Smoothing Stress: 1/5 - Very Poor
Uneven dispersion of the gelatin-based proteins will be obvious when you try to smooth it onto a cake. This cream scored lower because you are racing against the clock: you have to get it onto the cake and smooth it out somewhat before the gelatin fully sets. Even when moving quickly, the final smoothed-out whipped cream was the least smooth of those I tested.
Pressure Stress: 5/5 - Excellent
Air made up about 50% of the final whipped cream volume, compared with 52% for the control. This produced a nice, airy foam, while the gelatin network added thickness and body. And here is where this stabilization method excels: with only a 12% loss in height, this one was the best at maintaining its shape, even with the heavy tuna cans on top.
Heat Stress: 5/5 - Excellent
Gelatin-stabilized whipped cream scored #1 for best heat resistance. At 90°F/32°C, about 3% of its starting mass drained out as liquid, compared with 12% for the control.
Do choose Whipped Cream Stabilized with Gelatin if:
- You need a sturdy filling; this one doesn’t smooth out very nicely, *but* it will work wonders inside a cake where you aren’t going for looks, just function.
- You are piping simple designs. Sharp edges won’t be as apparent, but you’ll still get nice-looking, sturdy piping designs.
- You need something that can resist higher room temperatures.
Don’t choose Whipped Cream Stabilized with Gelatin if:
- You need a super smooth finish. Unless you time it exactly right (based on the temperature of the cream vs. the gelatin) and work very quickly, the finish will likely be uneven and mottled-looking.
- You are a vegetarian; gelatin is derived from animal collagen.
Recipes for Gelatin-Stabilized Whipped Cream Frosting:
- 4 ½ cup recipe for Whipped Cream Frosting stabilized with gelatin (enough for an 8-inch, 2-layer cake)
- Classic Chocolate Cake with Vanilla Whipped Cream stabilized with Gelatin (8-inch cake with 2 layers)
<h3 id="Whip-It">3 | Whip It-Stabilized Whipped Cream</h3>
Whip It (or Sahnesteif) is a commercially available powder added near the end of whipping that adds a light firmness to the final whipped cream. One benefit I’ve found, compared with some other starch-based stabilizers, is that it disperses easily into the heavy cream without noticeable clumping. For this reason, along with its flavorless and colorless attributes, it is one of my favorite and probably most-used whipped cream stabilizers.
.avif)
How it works: Whip It/Sahnesteif thickens the water in the heavy cream, which helps reduce drainage and support the whipped cream foam.
Whip It/Sahnesteif is a white powder made from dextrose, modified cornstarch, and tricalcium phosphate. Modified cornstarch is the main stabilizing ingredient. Here, “modified” means the <span class="def-term" data-term="starch">starch</span> is processed after it is taken from corn, so it works differently in food. This can be done using physical, chemical, or enzyme-based methods. In Whip It, the modified cornstarch can thicken the water-based part of the whipped cream without needing heat. When we mix the powder into the cream, the starch absorbs water and increases the <span class="def-term" data-term="viscosity">viscosity</span>, or thickness, of the liquid. This gives the whipped cream more body and helps it hold its shape.
Piping Stress: 5/5 - Excellent
Whipped Cream Stabilized with Whip It/Sahnesteif has the ideal texture for piping. It has a wonderful body that feels nice in the piping bag and lets me pipe a finely textured swirl cleanly.
Smoothing Stress: 4/5 - Good
This variation also has a great texture for smoothing with a little practice.
Pressure Stress: 5/5 - Excellent
“Air made up about 50% of the final whipped cream volume, compared with 52% for the control. It was very similar to the control with a lofty, airy mouthfeel. Under pressure, it lost only 17% of its initial height, compared with 47% for the control.
Heat Stress: 4/5 - Good
At 90°F/32°C, about 6% of its starting mass drained out as liquid, compared with 12% for the control.
Do choose Whipped Cream stabilized with Whip It/Sahnesteif if:
- You need an easy-to-use stabilizer. I always keep a couple packets of Whip It in my pantry. When you’re making your whipped cream, just sprinkle it over the top near the end of the whipping step, and you’re done!
- You want a stabilizer you can depend on to fill a cake (and hold up layers) and frost the outside very nicely. This one does both fairly well.
Don’t choose Whipped Cream stabilized with Whip It/Sahnesteif if:
- You don’t have access to it. Honestly, I couldn’t find any major negative points; the hardest part is sometimes finding it.
Recipes for Whipped Cream Frosting Stabilized with Whip It/Sahnesteif:
- 4 ½ cup recipe for Whipped Cream Frosting (enough for an 8-inch, 2-layer cake)
- Matcha Vanilla Cake with Vanilla Whipped Cream Frosting stabilized with Whip It (8-inch cake with 2 layers)
<h3 id="ClearJel">4 | Instant ClearJel-Stabilized Whipped Cream</h3>
Instant ClearJel is pure modified starches with no other ingredients. It’s a powerful, fast way to thicken liquids and does an excellent job adding firm body and structure to whipped cream foam. Instant ClearJel contains only modified food starch, so it doesn’t noticeably add flavor or color to the whipped cream.
.avif)
How it works: Instant ClearJel thickens the water-based portion of heavy cream, reducing drainage and giving the whipped cream foam extra support against collapse.
Instant ClearJel is a pure form of modified food starch. In this context, “modified” means the starch has been pregelatinized, allowing it to absorb water and thicken liquids without heat. As the starch absorbs water and swells, it forms a <span class="def-term" data-term="starch-gel">starch gel</span> in the cream's water-based portion. This holds water, thickens the liquid, and helps the whipped cream hold its shape and reduce drainage.
Because Instant ClearJel absorbs water and thickens quickly, it can clump if it isn't evenly dispersed before it hydrates. Mixing it thoroughly with powdered sugar before adding it to the cream helps separate the starch particles so they hydrate more evenly.
Piping Stress: 5/5
This whipped cream piped exceedingly well and will give you detailed designs if needed.
Smoothing Stress: 4/5
This one was a little trickier to smooth because the quickly thickened cream could sometimes feel slightly gooey. I could still achieve a smooth finish, but thorough mixing was especially important to avoid visible clumps.
Pressure Stress: 5/5
Instant ClearJel whipped cream was one of the top performers with weight stress, losing only 17% of its initial height compared to 47% of the control.
Heat Stress: 5/5
It was also a top performer at higher temperatures. Instant ClearJel is formulated to maintain its thickening ability across a relatively wide temperature range. In my test, about 4% of its starting mass drained out as liquid, less than half as much as the control.
Do choose Whipped Cream stabilized with Instant ClearJel if:
- You need a flavorless, colorless option to stabilize your whipped cream
- You need a whipped cream for heavier cake layers; this one performed well in the pressure and heat experiments.
Don’t choose Whipped Cream stabilized with Instant ClearJel if:
- You need a super smooth finish. You can achieve it, but Instant ClearJel is a powerful starch stabilizer that works quickly, and if you don't measure correctly and mix thoroughly, you will get a clumpy finish.
Recipes for Whipped Cream Frosting with Instant ClearJel:
- 4 ½ cup recipe for Whipped Cream Frosting (enough for an 8-inch, 2-layer cake)
- Lemon Butter Cake with Vanilla Whipped Cream stabilized with ClearJel (add some blueberries!!) (8-inch 2-layer cake)
<h3 id="Instant-Pudding">5 | Instant Pudding-Stabilized Whipped Cream</h3>
Adding instant pudding mix to whipped cream is an excellent, accessible, and cost-effective way to stabilize whipped cream. It adds body, thickness, and color. It also adds a nice, light flavor you can customize based on the pudding mix you use.
.avif)
How it works: Instant pudding mix contains modified starch and other ingredients that thicken and structure the water-based portion of heavy cream, reducing drainage and supporting the whipped cream foam.
Instant pudding mix is a powder used to make flavored puddings by adding milk and letting it set. A typical instant pudding mix contains a combination of sugars, modified food starch, <span class="def-term" data-term="emulsifier">emulsifiers</span>, salts, and flavorings. The main thickening ingredient is modified food starch, which absorbs water and thickens the cream's water-based portion. Some instant pudding mixes also contain phosphate salts that interact with milk proteins and help create additional structure. Together, these ingredients add body to the whipped cream and help reduce drainage.
Two types of pudding mixes are generally available: instant pudding and cook-and-serve varieties. Use the instant version, because its ingredients are designed to thicken cold liquid without cooking.
Piping Stress: 5/5 - Piping
Instant pudding adds some body to the cream, which piped well.
Smoothing Stress: 4/5 - Good
Starch-thickened water can feel gooey, which sometimes made smoothing difficult. It’s still pretty easy to work with.
Pressure Stress: 4/5 - Good
Instant pudding whipped cream was right in the middle for pressure stability, losing around 28% of its initial height (compared to 47% of the control). However, you can increase the pudding mix for a firmer filling, though this will also change the texture and may make the cream harder to smooth.
Heat Stress: 5/5 - Excellent
At 90°F/32°C, about 4% of its starting mass drained out as liquid, compared with 12% for the control.
Do choose Whipped Cream stabilized with Instant Pudding if:
- You need whipped cream with excellent pipability. This one is gorgeous to top cupcakes.
- You need whipped cream that withstands higher temperatures. This whipped cream was among the lowest-draining samples at 90°F/32°C.
- You want to experiment with flavors. Just choose a different pudding mix flavor (cookies ‘n cream, cheesecake, or chocolate would be great choices)
Don’t choose Whipped Cream stabilized with Instant Pudding if:
- You don’t prefer the flavors used in pudding mixes. Many pudding mixes use a combination of natural and artificial flavorings, and this will carry over to the final whipped cream.
- You need a pure white whipped cream. Even vanilla instant pudding imparts a yellow/cream hue to the final whipped cream.
Recipes for Whipped Cream stabilized with Instant Pudding:
- 4 ½ cup recipe for Instant Pudding Stabilized Whipped Cream Frosting (enough for an 8-inch, 2-layer cake)
- Vanilla Almond White Cake with Vanilla Whipped Cream stabilized with Instant Pudding (8-inch, 2-layer)
<h3 id="Greek-Yogurt">6 | Greek Yogurt-Stabilized Whipped Cream</h3>
Adding Greek yogurt to whipped cream imparts a lovely, light yogurt flavor and a pure white color. It lightens the texture by decreasing the overall fat content of the whipped cream. However, because it adds a substantial amount of water to the whipped cream foam, I typically use Greek Yogurt-stabilized whipped cream for low-structure, low-pressure applications (topping pies or single-layer cakes) or pair it with a starch-based stabilizer to enhance overall stability for more demanding applications.
.avif)
How it works: Greek yogurt adds a thick, acid-set milk-protein gel to the whipped cream, adding body and helping support the foam.Greek yogurt is a thick, concentrated style of yogurt traditionally made by removing some of the watery <span class="def-term" data-term="whey">whey</span>. This concentrates the milk proteins and creates a thick protein-gel network that holds water and gives the yogurt its characteristic body. When added to whipped cream, this protein-rich gel adds thickness and structure. However, Greek yogurt also adds water and dilutes the overall milkfat concentration, so it doesn't reinforce the whipped cream as strongly as some other stabilizers in this guide.
Piping Stress: 3/5 - Moderate
Pipes are ok, but they tend to soften as you keep working with them. If you work quickly, you can get fair piping, but I’d recommend chilling the whipped cream as often as you can to keep it firmer.
Smoothing Stress: 4/5 - Good
Whipped cream stabilized with Greek Yogurt smooths great. The yogurt's thick protein-gel structure may contribute to its nice body and smooth surface.
Pressure Stress: 4/5 - Good
Air made up about 48% of the final whipped cream volume, compared with 52% for the control. However, it performed moderately poorly in the pressure test after I added my tuna cans, losing around 32% of its initial height.
Heat Stress: 1/5 - Very Poor
This was the worst-performing stabilizer in the heat tests, with about 15% of its starting mass draining out as liquid on average. Additionally, this version and the control were the only samples that drained liquid while sitting in the refrigerator overnight: Greek yogurt lost about 4% of its starting mass, compared with 3% for the control. This makes sense, since Greek Yogurt increases water and lowers the fat content of the final whipped cream.
Do choose Whipped Cream stabilized with Greek Yogurt if:
- Your dessert needs an unstructured topping. Even though this whipped cream leaked the most in my trials, it’s still minor and doesn’t deter me, since I still use it often in trifles and as a simple topping for its wonderful flavor.
- You want an even lighter textured whipped cream with a tangy yogurt taste.
- You love yogurt!
Don’t choose Whipped Cream stabilized with Greek Yogurt if:
- You are filling or frosting a heavy cake. It cannot withstand as much pressure and will surely bulge out between cake slices.
- You need a whipped cream frosting to hold its shape at higher ambient temperatures; among the stabilized versions, this one had the most liquid drainage in my heat tests.
Recipes for Whipped Cream stabilized with Greek Yogurt:
- 4 ½ cup recipe for Greek Yogurt Whipped Cream Frosting (enough for an 8-inch, 2-layer cake)
- Vanilla Chiffon Sheet Cake with Vanilla Greek Yogurt Whipped Cream (9x13 pan)
<h3 id="Mascarpone">7 | Mascarpone-stabilized Whipped Cream</h3>
Mascarpone pairs well with whipped cream. As a thickened soft cheese, it creates a denser foam with a wonderfully nutty dairy flavor and slightly off-white color. Mascarpone's thick texture makes it an excellent filling for cakes and for piping intricate designs. However, it can be difficult to smooth on the outside of a cake.
.avif)
How it works: Mascarpone adds its dense fat-and-protein structure to the whipped cream, giving the foam more body and helping it resist compression and collapse.
Mascarpone is a soft, rich Italian cheese made by heating and acidifying cream so its milk proteins <span class="def-term" data-term="coagulation">coagulate</span>. Then drain the watery whey, leaving a thick, concentrated matrix of milkfat, proteins, and water. Because of this, it tends to clump if you don't incorporate it correctly, or worse, separate into water and fat, which can be difficult to work with.
The best method I’ve found is to gradually add the whipped cream to the mascarpone, essentially lightening the mascarpone first, rather than adding the mascarpone directly to the whipped cream. This incorporates mascarpone's dense fat-and-protein structure into the foam, giving the final whipped cream more body and helping it support the air bubbles.
Piping Stress: 5/5 - Excellent
The proteins and fats in the mascarpone give this whipped cream a substantial body, which is a dream to pipe.
Smoothing Stress: 2/5 - Poor
The thicker, denser texture of the mascarpone mixture made it more difficult to spread into a perfectly smooth surface. In fact, this was the most difficult whipped cream I tested to smooth.
Pressure Stress: 5/5 - Excellent
Mascarpone whipped cream was one of the top performers at holding up weight, losing only 17% of its height compared to 47% for the control.
Heat Stress: 2/5 - Poor
At 90°F/32°C, about 11% of its starting mass drained out as liquid, putting mascarpone near the bottom of my heat test. At 80°F/27°C, it performed moderately better, with about 4% drainage compared with 7% for the control.
Do choose Whipped Cream stabilized with Mascarpone if:
- You need a strong cake filling. This one should hold up well in heavier cakes, if needed.
- Your dessert (pie, cheesecake, etc.) needs a structured topping.
- You need super crisp piping. Use the firm peak modification of the recipe for best results.
Don’t choose Whipped Cream stabilized with Mascarpone if:
- You need a super smooth finish on the outside of your cake. You can do it, but it takes patience.
- You need a whipped cream frosting to perform especially well at higher ambient temperatures; despite its excellent pressure resistance, this version had relatively high liquid drainage at 90°F/32°C.
Recipes for Whipped Cream Frosting Stabilized with Mascarpone:
- 4 ½ cup recipe for Whipped Cream Frosting Stabilized with Mascarpone (enough for an 8-inch, 2-layer cake)
- Chocolate Indulgence Cake with Whipped Cream Frosting Stabilized with Mascarpone (8-inch, 2 layers)
<h3 id="Cream-Cheese">8 | Cream Cheese-stabilized Whipped Cream</h3>
Cream cheese whipped cream has a delicious, tangy, not-too-sweet flavor. This variation is popular because it offers a cream cheese flavor many people love without the heaviness often associated with butter-rich cream cheese frostings; this whipped cream version is super light and fluffy.
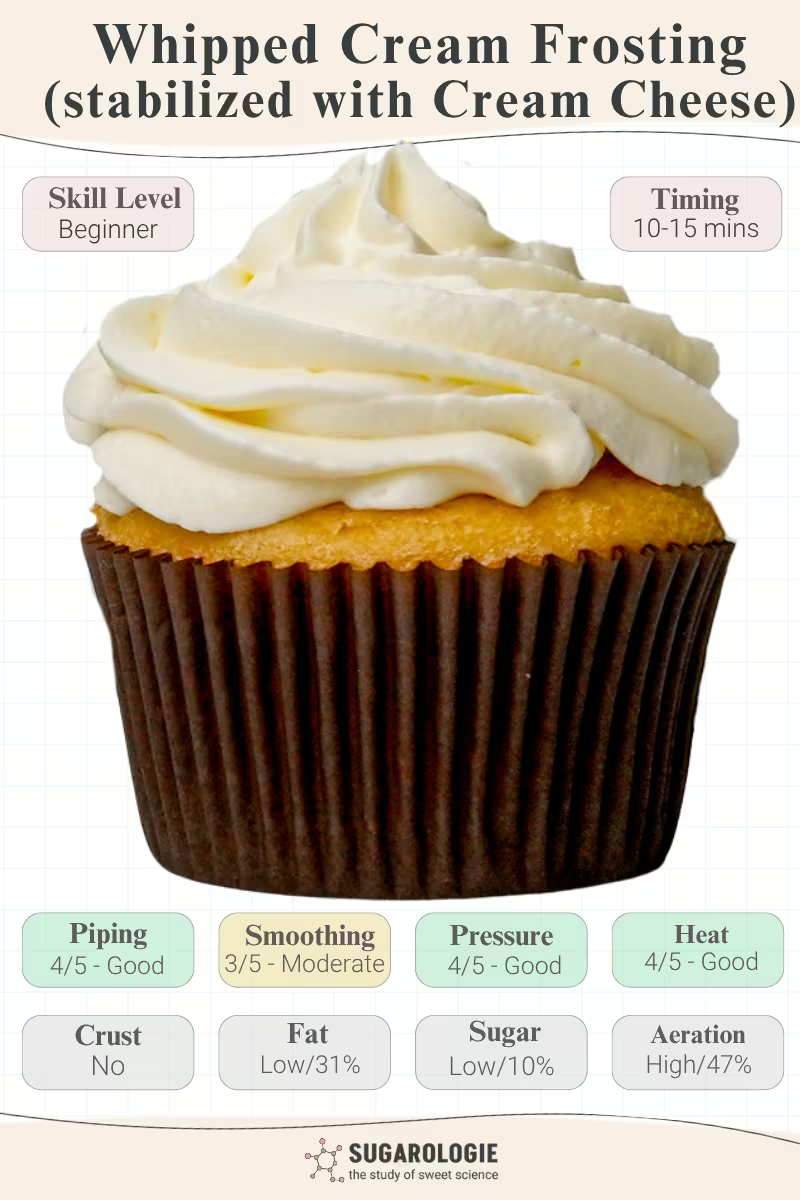
How it works: Cream cheese adds a dense fat-and-protein structure to the whipped cream, while its added hydrocolloids help hold onto water and reduce drainage.American cream cheese is typically made from milk and cream. Lactic acid bacteria are added and acidify the mixture, which coagulates the proteins. Commercial cream cheeses also commonly contain gums (<span class="def-term" data-term="hydrocolloid">hydrocolloids</span>) that bind the excess water and give the cheese its thick, spreadable texture.
When you mix cream cheese into whipped cream, its fat-and-protein structure adds body, while the hydrocolloids can help thicken the mixture and hold onto some of the water.
Piping Stress: 4/5 - Good
This whipped cream piped nicely, but the edges were a bit blurred and could be sharper for detail.
Smoothing Stress: 3/5 - Moderate
Creating a smooth surface wasn't as easy with this version. I found the cream cheese mixture slightly tackier and more difficult to spread evenly once aerated.
Pressure Stress: 4/5 - Good
Under pressure, it lost about 23% of its initial height, roughly half the 47% loss of the control.
Heat Stress: 3/5 - Good
The cream cheese samples averaged about a 6% loss of starting mass, drained out as liquid, compared with 12% for the control.
Do choose Whipped Cream stabilized with cream cheese if:
- You love cream cheese frosting but don’t like the sweeter, heavier butter-based versions; this one is ethereally light with substantially less sugar.
- You need a bit more heat resistance. In my tests, this version had substantially less liquid drainage than the control at elevated room temperatures.
Don’t choose Whipped Cream stabilized with cream cheese if:
- You don’t like cream cheese; this one has a very pronounced tangy flavor.
- You are new to smoothing with whipped creams; it’s a bit more challenging to get a smooth surface
Recipes for Whipped Cream Frosting Stabilized with Cream Cheese:
- 4 ½ cup recipe for Cream Cheese Stabilized Whipped Cream Frosting (enough for an 8-inch, 2-layer cake)
- Ube Coconut Chiffon Cake with Cream Cheese Stabilized Whipped Cream (8-inch, 2 layers)
<h3 id="Cream-of-Tartar">9 | Cream of Tartar with Whipped Cream</h3>
Cream of tartar is a fine white acidic powder also called potassium bitartrate, a salt of tartaric acid that naturally forms during winemaking. Cream of tartar is an excellent (and cheap!) acidic ingredient I always keep handy for acidifying mixtures. Some bakers also use it to stabilize whipped cream. However, my experiments showed that it didn’t provide much benefit in the pressure or heat tests.
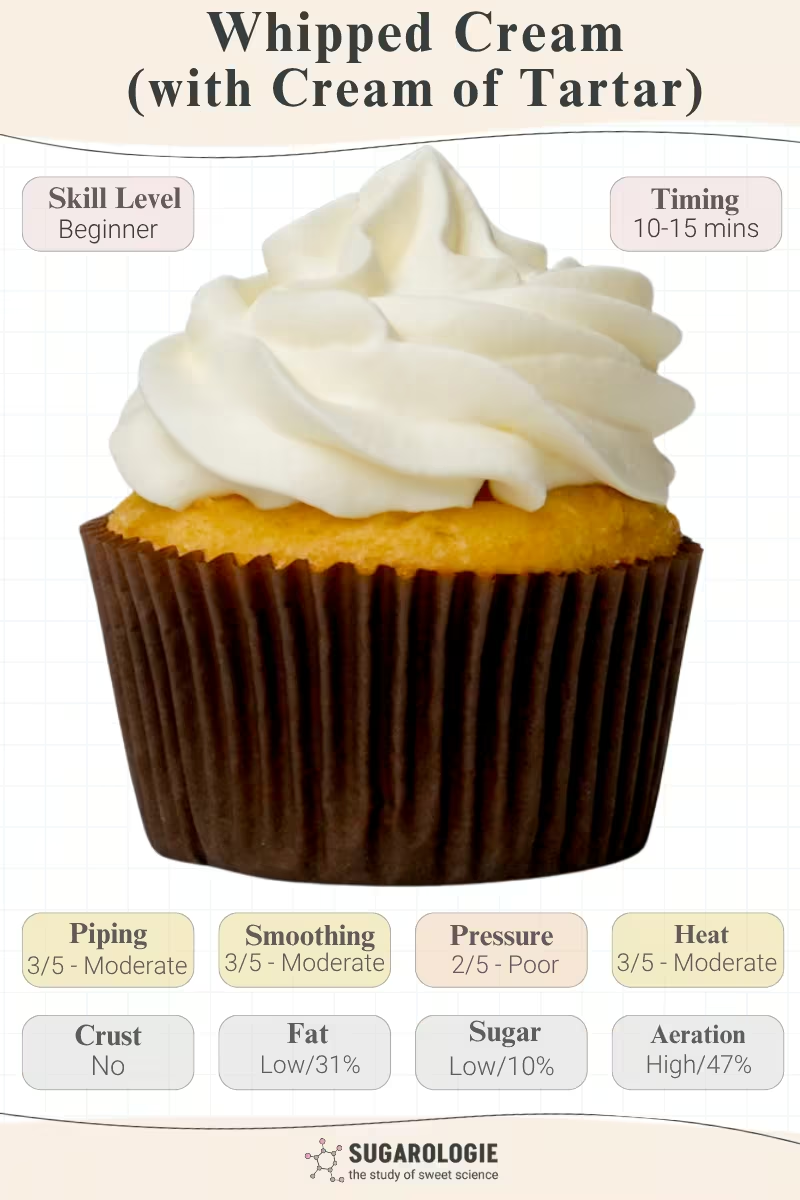
How it works: Cream of tartar increases the acidity of the whipped cream, which may slightly change how the milk proteins interact. However, because whipped cream gets most of its structure from its milkfat network, this provides only mild stabilization.
Cream of tartar is acidic, so adding a small amount lowers the cream's pH. Changes in acidity can affect the electrical charges on milk proteins and change how they interact with one another. If milk becomes acidic enough, its proteins can eventually coagulate, or stick together.
Piping Stress: 3/5 - Moderate
This whipped cream was usable for piping, but it didn't have the firm body or sharp definition of the stronger stabilizers.
Smoothing Stress: 4/5 - Moderate
Cream of tartar performed better for smoothing. The whipped cream stayed soft enough to spread easily, and I could create a relatively smooth surface.
Pressure Stress: 2/5 - Poor
Cream of tartar provided very little improvement under pressure. It lost only slightly less height (41%) than the control (47%), suggesting that the small change in acidity did not add much strength to the whipped cream.
Heat Stress: 2/5 - Moderate
Across the heat tests, about 8% of the cream-of-tartar sample’s starting mass drained out as liquid, compared with about 9% for the control. In other words, cream of tartar did not substantially improve the whipped cream's ability to hold onto water at higher temperatures.
Do choose Whipped Cream with Cream of Tartar if:
- You want a simple add-on that keeps the whipped cream soft and fairly easy to smooth.
Don’t choose Whipped Cream with Cream of Tartar if:
- You need strong pressure or heat resistance. In my tests, cream of tartar performed only slightly better than the control in both areas.
To use Whipped Cream stabilized with a Cream of Tartar:
I consider Cream of Tartar an add-on ingredient since it seems to contribute weakly to whipped cream stability. If you still want to use cream of tartar, you could pair it with a stronger stabilizer such as Whip It, Instant ClearJel, or instant pudding mix, although I did not test those combinations here.
To use cream of tartar, add ¼ teaspoon/0.75 grams per ½ cup/122 grams of liquid heavy cream before whipping, then proceed with the rest of the recipe as written.
<h3 id="Nonfat-Milk-Powder">10 | Nonfat Milk Powder with Whipped Cream</h3>
Dried nonfat milk powder is a popular stabilizer for whipped cream. It adds a wonderful dairy-forward flavor, and in my tests it had very specific benefits: it produced an exceptionally smooth finish. It reduced liquid drainage at higher temperatures, but it performed poorly for piping and did not improve pressure resistance.
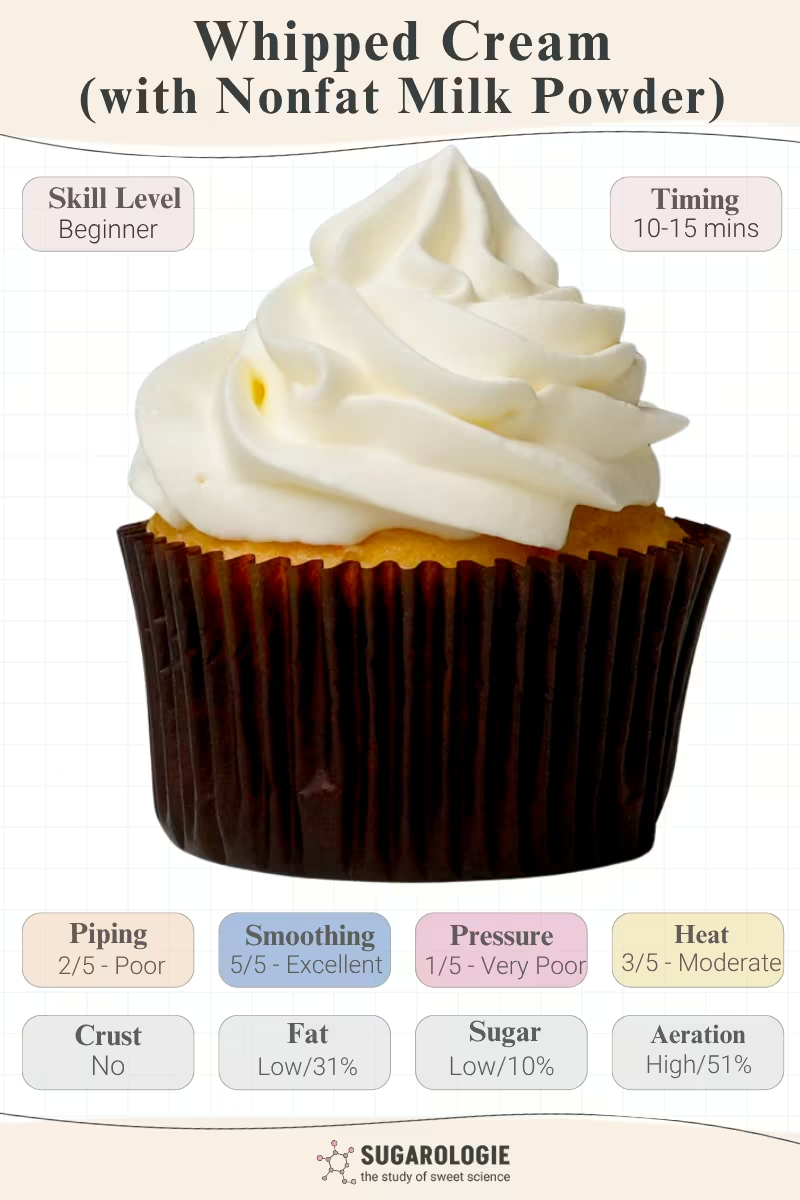
How it works: Nonfat milk powder adds concentrated milk proteins, <span class="def-term" data-term="lactose">lactose</span>, and other milk solids to the cream's water-based portion. These extra solids can add body and help the foam hold onto liquid.
Nonfat milk powder is essentially skim milk with most of its water removed, so it contains concentrated milk proteins, milk sugar (lactose), and minerals with very little fat. When we add it to whipped cream, these milk solids dissolve or disperse into the cream's water-based portion. The extra proteins and dissolved solids may increase the body and help slow liquid drainage, but in my tests they did not make the whipped cream stronger under pressure.
Piping Stress: 2/5 - Poor
This whipped cream frosting performed poorly when piping. It softened easily in the bag while I was trying to pipe.
Smoothing Stress: 5/5 - Excellent
Both milk powders I tested performed extremely well in the smoothing tests. The added milk solids may contribute to the cream's body and texture, which could help explain the smoother finish I observed.
Pressure Stress: 1/5 - Very Poor
Under pressure, this whipped cream lost about 52% of its initial height, compared with 47% for the control. In other words, nonfat milk powder did not improve load-bearing stability in my test.
Heat Stress: 4/5 - Moderate
At 90°F/32°C, about 6% of its starting mass drained out as liquid, compared with 12% for the control.
Do choose Whipped Cream with Nonfat Milk Powder if:
- You need a very smooth whipped cream; this one yielded the most beautiful, shiny surface.
- You want to add smoothness or dairy flavor alongside another stabilizer. I would pair this with a stronger option such as Whip It, gelatin, Instant ClearJel, or instant pudding, although I did not test those combinations in this comparison.
Don’t choose Whipped Cream with Nonfat Milk Powder if:
- You need a strong cake filling. This version actually lost slightly more height under pressure than the control, so that I wouldn't depend on it for load-bearing structure.
To use Whipped Cream with a Dried Nonfat Milk Powder:
I consider nonfat milk powder an “add-on” ingredient for whipped cream when you want a smoother finish or its dairy-forward flavor. If I needed stronger stabilization, I would pair it with one of the stronger stabilizers in this article, although I did not test those combinations in this comparison.
To use nonfat milk powder, add 1 teaspoon/4 grams of sifted nonfat milk powder per ½ cup/122 grams of liquid heavy cream before whipping, then proceed with the rest of the recipe as written.
<h3 id="Buttermilk-Powder">11 | Sweet Cream Buttermilk Powder with Whipped Cream</h3>
Sweet cream buttermilk powder is one of my favorite ingredients, and I use it in many recipes for its ice cream-like flavor. Milk powders are often cited as stabilizers for whipped cream; however, I found that sweet cream buttermilk powder, while imparting a wonderful flavor, performed poorly in my piping, pressure, and heat tests.
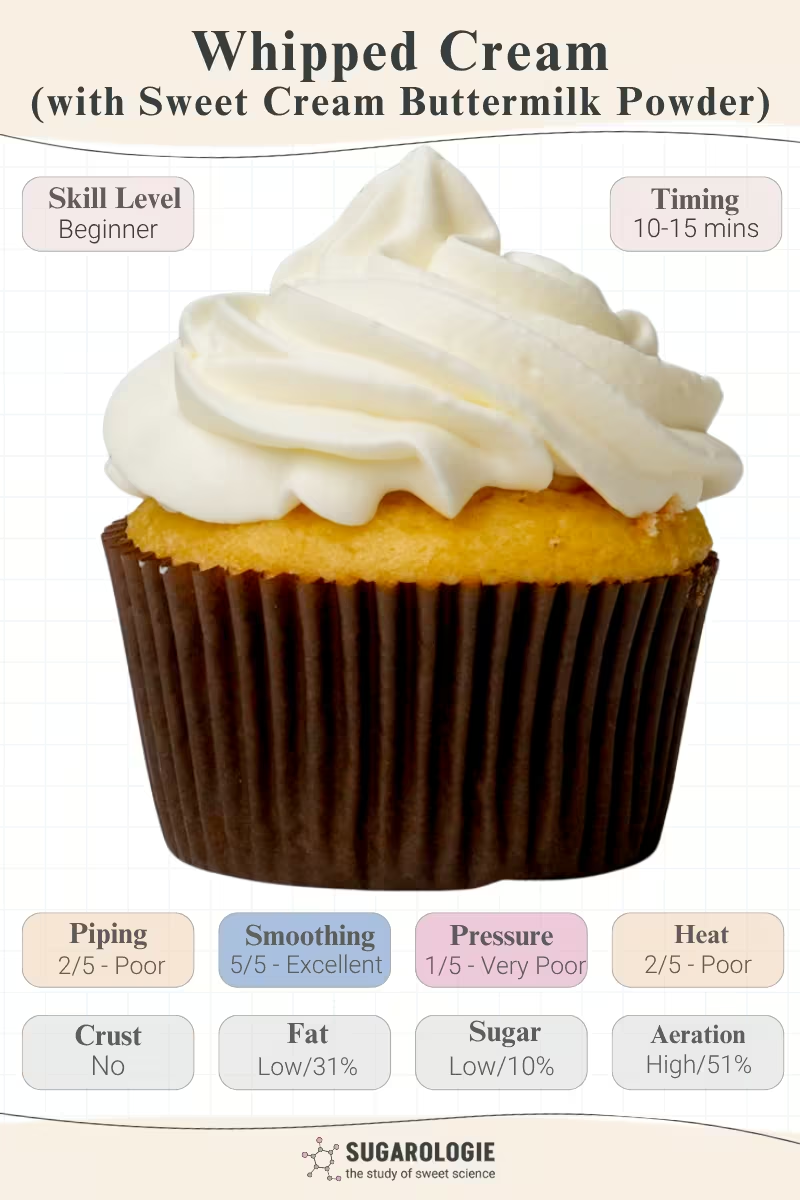
How it works: Sweet cream buttermilk powder adds concentrated milk proteins, lactose, milkfat, and other dairy solids to the whipped cream. These added solids can change the cream's body and texture, although in my tests they provided very little additional structural stability.
Sweet cream buttermilk is the liquid left behind after cream is churned into butter. Drying this liquid produces a powder rich in milk proteins, <span class="def-term" data-term="lactose">lactose</span>, minerals, and a small amount of milkfat. Adding the powder increases the concentration of dairy solids in the whipped cream without adding much additional water. In my tests, this produced a beautifully smooth texture and added a wonderful dairy flavor, but it did not improve resistance to pressure or heat.
Note: Cultured buttermilk powders are generally more acidic than sweet cream buttermilk powder and may behave differently in whipped cream. I haven't tested them yet, though, so I can't say whether the extra acidity improves stability.
Piping Stress: 2/5 - Poor
This whipped cream frosting performed poorly when piping. It softened easily in the bag while I was trying to pipe.
Smoothing Stress: 5/5 - Excellent
Both milk powders I tested performed extremely well in the smoothing tests. The added milk solids may contribute to the cream's body and texture, which could help explain the smoother finish I observed.
Pressure Stress: 1/5 - Very Poor
Under pressure, this version lost about 55% of its initial height, compared with 47% for the control. Sweet cream buttermilk powder therefore did not improve load-bearing stability in my test.
Heat Stress: 2/5 - Poor
Sweet cream buttermilk powder performed poorly in the heat tests and did not reduce liquid drainage compared with the control at any of the temperatures I tested.
Do choose Whipped Cream with Sweet Cream Buttermilk Powder if:
- You need a very smooth whipped cream; this one yielded the most beautiful shiny surface.
- You want to add smoothness or dairy flavor alongside a stronger stabilizer, although I did not test those combinations in this comparison.
- You want a wonderful ice cream-like flavor for your whipped cream.
Don’t choose Whipped Cream with Sweet Cream Buttermilk Powder if:
- You need a strong cake filling or strong heat resistance. This sweet cream buttermilk powder did not improve either pressure resistance or liquid drainage compared with the control.
To use Whipped Cream with Sweet Cream Buttermilk Powder:
I consider sweet cream buttermilk powder an “add-on” ingredient for whipped cream when you want a smoother finish or its distinctive dairy flavor. If I also needed stronger stabilization, I would pair it with one of the stronger stabilizers in this article. Although I haven’t tested every combination, I have used sweet cream buttermilk powder with Whip It with great success.
To use sweet cream buttermilk powder, add 1 teaspoon/4 grams of sifted sweet cream buttermilk powder per ½ cup/122 grams of liquid heavy cream before whipping, then proceed with the rest of the recipe as written.
<h3 id="Food-Processor">12 | Food Processor Whipped Cream</h3>
A food processor may seem like an odd choice for making whipped cream, but I learned this technique many years ago from Rose Levy Beranbaum in The Pie and Pastry Bible. Unlike a whisk, the food processor blade isn't very efficient at incorporating air, so it produces a whipped cream with less aeration and a denser, thicker texture. The mechanical action still helps the partly solid milkfat globules stick together and form the fat network that gives whipped cream its structure.
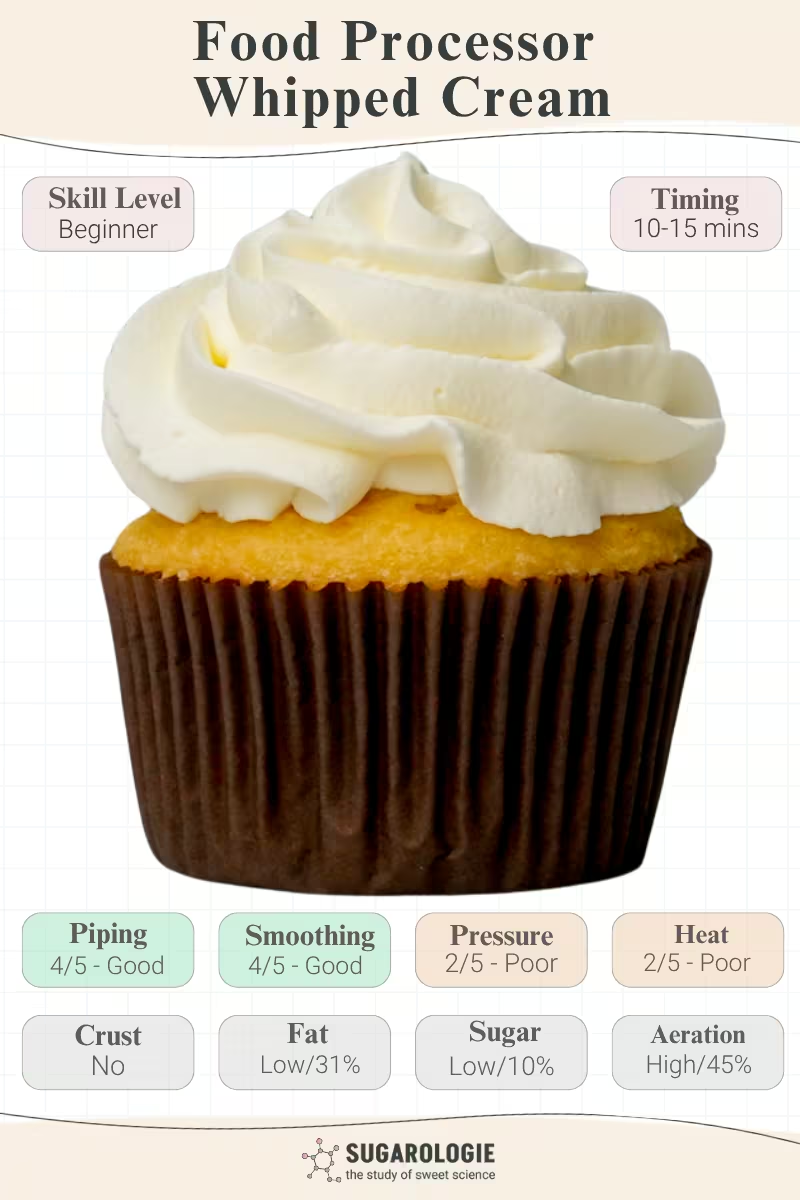
How it works: A food processor incorporates less air than a whisk while still providing enough mechanical action to build the milkfat network. With less air incorporated, the final whipped cream is denser and thicker.
In my tests, that denser texture helped with piping and smoothing, but it didn't translate into much additional pressure or heat stability. For that reason, I consider the food processor an alternate whipping method rather than a true whipped cream stabilizer.
Piping Stress: 4/5 - Good
The denser whipped cream had plenty of body and piped nicely.
Smoothing Stress: 4/5 - Good
The denser texture was also easy to smooth into an even surface.
Pressure Stress: 2/5 - Poor
Under pressure, this whipped cream lost about 45% of its initial height, compared with 47% for the control. In other words, using a food processor provided very little improvement in load-bearing stability.
Heat Stress: 2/5 - Poor
At 90°F/32°C, about 8% of its starting mass drained out as liquid, compared with 12% for the control.
Do choose Food Processor Whipped Cream if:
- You’re piping cupcakes. Its dense, thick texture gives it good body for piping in low-pressure applications.
- Your dessert needs an unstructured topping. This is the recipe I use when I want luscious, creamy whipped cream I can scrape onto a pie or to fill a trifle.
- You want a super smooth finish.
Don’t choose Food Processor Whipped Cream if:
- You are filling or frosting a heavy cake. It cannot withstand as much pressure and will bulge out between cake slices.
- You need a whipped cream frosting that can handle high pressure or heat. The food processor provided almost no improvement in pressure stability and only a modest improvement in liquid drainage at 90°F/32°C.
To use Food Processor Whipped Cream:
You can use the food processor method with the control recipe or with many of the more stable whipped cream recipes in this guide. I would avoid using it for my cream cheese and mascarpone versions because the intense mechanical action can make these mixtures easier to overprocess or separate.
Add the ingredients in the same order as directed in the recipe, but use a food processor instead of a mixer. Pulse just until the cream reaches the texture you want, and stop as soon as it thickens, because the food processor works very quickly.
Step by step:
Video
If you would like to see these experiments in action, I highly suggest my video:
Honors Members Section
This extra material is accessible to Sugarologie Honors members.
Become a member to view extended research notes, technique analysis, and supplemental materials! Learn more about Sugarologie Honors here.
Already a member?
Before starting the recipe, please read this!
Measure by weight, if possible.
Measuring by weight is the best way for you to replicate my recipes. I develop recipes using ingredients (even liquids) measured in grams, which is why you see them listed first in the recipe cards. For measurements under 5 grams, I will typically only list the volumetric measurements (teaspoons, etc.), as most home scales are not precise for such small weights.
In most cases, I have converted grams to volumetric measurements (aka US customary units) for bakers who prefer this method. However, the measurements are not as precise and may have awkward proportions. The recipes should still work, but for the ultimate precision, try to use weight.
This is the OXO scale I use daily. I also purchased this budget version of a good scale, which I keep at my Mom’s house for baking. If you’re interested in other tools I use for my baking, I’ve compiled a list here.
Use room temperature ingredients.
All my ingredients should be used at room temperature, or 65-75 °F/18-24 °C. I will always indicate if you need something outside this range. If no details are given, room temperature is the default.
Pay attention to the ingredient descriptions.
I try not to be brand-specific, but I will always note an interesting result from a type of ingredient, be it negative or positive.
A specific note regarding salt: I use Diamond Crystal Kosher salt for everything on this site except for frostings. In frostings, you want the salt to dissolve more easily, and kosher salt tends to leave granules behind. If you substitute table salt (more finely granulated) for recipes that list kosher salt, you must use half the volume indicated in my recipes.
Substitutions are hard.
That said, substitutions aren’t impossible but can be the toughest part of recipe development. Small swaps, like reduced-fat milk (2% fat) for whole milk (3.5% fat), usually work fine. However, bigger changes—such as replacing oil with applesauce or sour cream with Greek yogurt—can significantly impact texture and density.
Be wary of general, all-purpose substitutions in baking; I find that usually there is never a one size-fits-all solution. I carefully select ingredients for my recipes, so for the best results, start with the original recipe and modify with caution.
Read all the recipe instructions before beginning.
I’m in the “Pre-read the Chapter before Class Lecture” club... and I invite you to join! Baking new recipes can be intimidating, so let’s set you up for success. I want you to think about timeframes. Most fillings and frostings can be made ahead of time, and give you an extra day for mental space. Also, as you become a more proficient baker, you can anticipate and recognize steps. (“Oh, this has a meringue step, so I’ll need an extra clean bowl…” etc.) Ensure you go down the ingredient list and have everything at the right temperature.
.avif)
.avif)
.avif)
.png)


Recipe Card - Adriana's Notes


Got room for more dessert?
Subscribe to my Crumby Data newsletter! I share behind-the-scenes looks at recipe development, flavor testing for the Cakeculator, and life as a content creator. It’s free, lands in your inbox every few weeks, and you can unsubscribe anytime...no strings attached :)
Feel free to take a look at previous newsletters here!

.ico)