.avif)
Vegan Chocolate Fudge Cake with Plant-based Dark Chocolate Buttercream


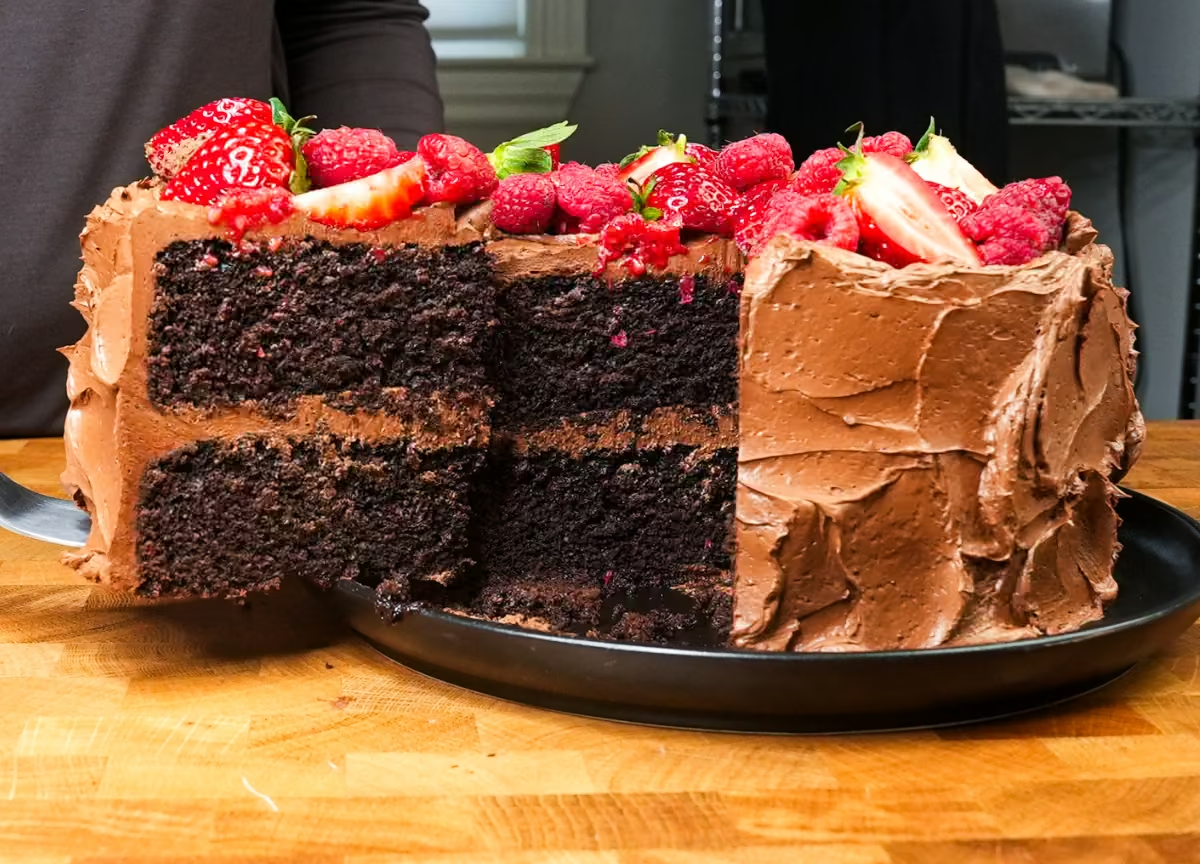
My vegan chocolate fudge cake is incredibly moist with a supremely fudgy crumb and deeply robust chocolate flavor. It’s topped with my plant-based Chocolate American Dreamy Buttercream, which is silky smooth and creamy. Top it all off with some berries for a hit of freshness and acidity. This is the ultimate vegan chocolate cake for those who love a fudgy texture and intense chocolate flavor.
Fudgy chocolate cakes like this one are what I call low-effort high-reward baking. Because of the ingredients and method, these chocolate cakes are typically pretty forgiving. With super moist batters, even if you overbake a tad, you’ll likely still end up with a great chocolate cake, whereas underbaking yields a fudgier texture.
Now, to preface, as an omnivore, I am not your conventional vegan baker. Actually, to be honest, I’m not a conventional baker in probably most circumstances ;) However, I do love vegan cuisines and experimenting in the realm of baking sciences. So I’d love to take this opportunity to offer my perspectives and ideas on vegan baking in hopes that you’ll find your new favorite chocolate cake!
.avif)
Typically, in vegan cakes, a surplus of starch (or other types of polysaccharides, such as xanthan gum or flax eggs) is used to replace the function of eggs. But I have yet to try a cake made with those ingredients that has a fluffy, aerated texture I love in a great homemade cake. Instead, I find that the crumb structure is still quite weak and mushy/pasty when eaten. Through my experiments, I see this in cakes that lack sufficient protein structure.
To address this, in my vegan cakes, I use two types of protein to help build structure and give them an airy and fluffy yet resilient texture. The first is chickpea powder, which offers a great balance of mild flavor and protein content for structure. The second is gluten, which, I know, sounds out of place when talking about a cake, but it does indeed help with the crumb structure when used in moderation. When both gluten and chickpea flour are used together, you get a cake with a firmer, more solidified crumb structure that doesn’t instantly turn to mush when you eat it.
I cover more of the basics on how these protein adjustments affect vegan cakes in my Vegan Vanilla Cake Master Recipe. For now, we’ll move on to other aspects of this chocolate cake specifically.
What is the flavor of my vegan chocolate cake?
Chocolate is generally a very overpowering ingredient, which is a great thing if that’s what you’re going for in a cake. And this is one of those cakes because it uses a high ratio of Dutch-processed cocoa powder in the batter, with not much else competing with the flavor. Even the chickpea powder flavor is completely masked if you’re worried about that; it is an unapologetically rich-flavored chocolate cake.
.avif)
For the vegan chocolate buttercream, I used a Dark Chocolate bar from Trader Joe’s, which also helps the frosting err on the side of not too sweet. This complements the rich cocoa-forward cake very well. Top it all off with some fresh berries, and you have the ultimate showstopper of a homemade chocolate cake.
What ingredients do you need to make my vegan chocolate fudge cake?

UNSWEETENED DUTCH-PROCESSED COCOA POWDER
Cocoa powder is the sole chocolate ingredient in this cake. There are many types of cocoa powder one can use in baking, and in this recipe, I will be using Dutch-processed cocoa for its mellow, rich flavor and neutral pH.
Structurally, cocoa powder plays a significant role in vegan chocolate cakes. There’s a reason why there's a good amount of vegan chocolate cakes out there (perhaps you’ve heard of or made the famous “wacky cake”). Cocoa powder helps hold the crumb structure together via starches, but more importantly, adds a bit of fat and fiber, which gives the crumb texture. (If it were all starch, it would have a “mushier” texture.)
WATER
We’ll use water in two different places and at two different temperatures in this recipe. First, boiling with the cocoa powder breaks open the starch granules, starts thickening, and releases powerful aromatic compounds. And second, we’ll add it directly to a bit of flour to enhance gluten formation.
CHICKPEA (GARBANZO BEAN) FLOUR
Protein is essential for structure, and chickpea powder is a great way to add protein to a cake while offering a milder flavor. When hydrated, it forms a gel-like network that can boost fluffiness in vegan cakes. It also lends a mild nutty flavor, though it is largely masked by the deep, robust chocolate from the cocoa powder.
VEGETABLE OIL
Oils are essential for tenderness, richness, and a long-lasting, moist texture in cakes.
VANILLA EXTRACT + SALT
Both of these ingredients will enhance the overall chocolate flavor.
ALL-PURPOSE FLOUR
I only have one bowl picture above, but we’ll add the flour in two distinct steps in this recipe. We’ll use a smaller amount to form a bit of gluten, which will initiate the cake's structure and aeration. The second, larger amount will be used for its starches, which help improve the crumbs' overall fluffiness.
DARK BROWN SUGAR
You can use either dark or light brown sugar for this cake, but I find that dark adds a nice molasses flavor to the final cake.
BAKING POWDER
I like using baking powder in my chocolate cakes rather than a mixture of baking soda and vinegar, which seems common, not just for chocolate cakes but also for vegan baking. With baking soda and vinegar, the acid-base reaction that creates CO2 gas and therefore aeration in your batter starts immediately upon mixing. Baking powders are “double-acting,” meaning they produce CO2 once water is added and even more as the batter heats up. This is ideal for vegan cakes because we’ll use the initial burst of CO2 during mixing and the second during baking to achieve a fluffier crumb.
Step by step:
BAKE THE VEGAN CHOCOLATE FUDGE CAKE LAYERS:
STEP 1 | Preheat the oven and prepare the pans.
Move your oven rack to the middle position and preheat to 350 °F (180 °C). Butter or spray the insides of two 8" cake pans and line the bottoms with parchment circles.
STEP 2 | Make the cocoa paste and flour paste.
WHY:
Cocoa paste:
Prepping cocoa powder in boiling water before using it in a dessert is called blooming. And this does a few things.
First, it enhances the cake’s chocolate flavor by releasing aromatic compounds into the water. I’m a huge fan of creating complex flavors in ingredients before baking with them (e.g., browning butter or toasting nuts via the Maillard reaction). Baking in an oven sometimes isn't hot enough or for long enough to perform these reactions.
Second, this high temperature breaks down the starch granules in cocoa powder, initiating the gelatinization process. This is why the mixture thickens as you whisk. In the final cake, this pre-gelatinization contributes to a fudgy-creamy bite, ideal for a chocolate cake. Chickpea flour adds protein and helps with structure, so we’ll hydrate those in the cocoa powder paste.
Gluten Paste:
For this step, we’ll develop a bit of gluten using some flour and water. In my experiments, I’ve found that doing this step creates a taller rise and, therefore, a fluffier cake. (See my experiments in my Vegan Vanilla Cake Master Recipe.)
HOW:
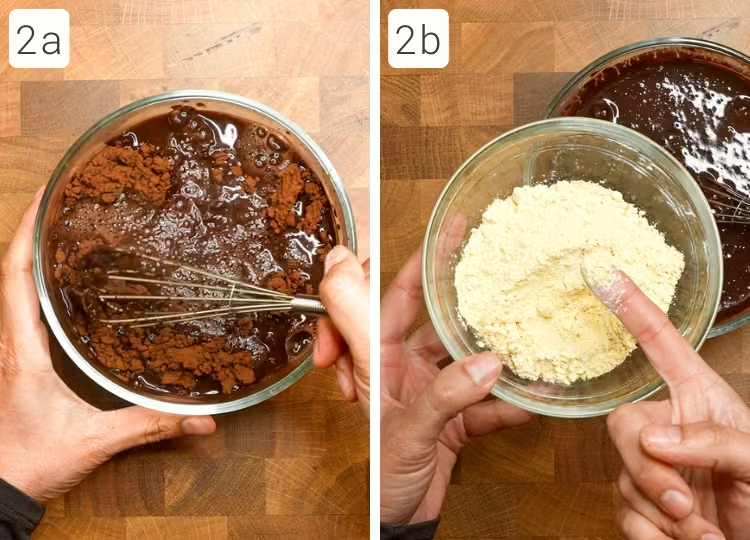
In a medium heatproof bowl, whisk Dutch-processed cocoa powder with boiling water until smooth. The mixture will get thicker, and the chocolate smell should intensify. Let stand for 5 minutes (2a). Whisk in chickpea flour (2b).

Then whisk in the oil, vanilla, and salt (2c,d).
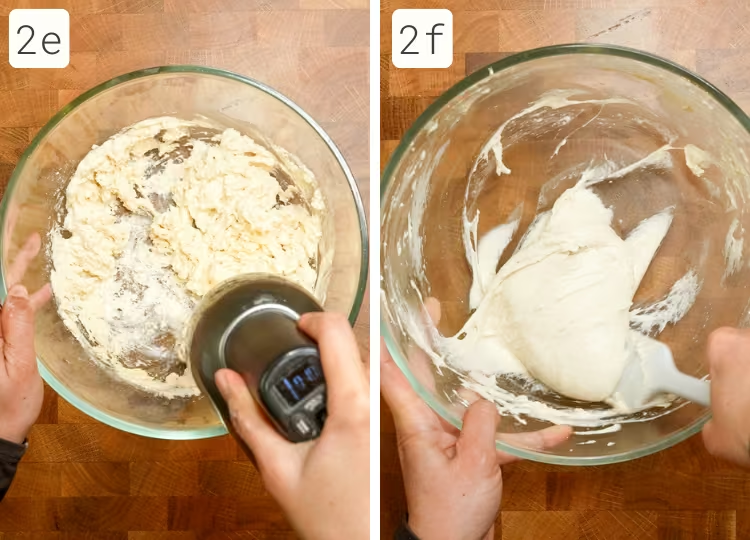
In a separate large bowl, mix all-purpose flour (labelled “for the paste”) with room-temperature water (2e) on medium-high speed for 2–3 minutes until the paste becomes smooth, sticky, and forms a loose ball (2f).
STEP 3 | Combine the cocoa paste with the flour paste.
WHY:
The gluten paste is quite cohesive and may resist mixing, so we’re going to add the ingredients to help loosen it gradually. First, we’ll add the cocoa paste and mix until it forms a gooey mass.
HOW:
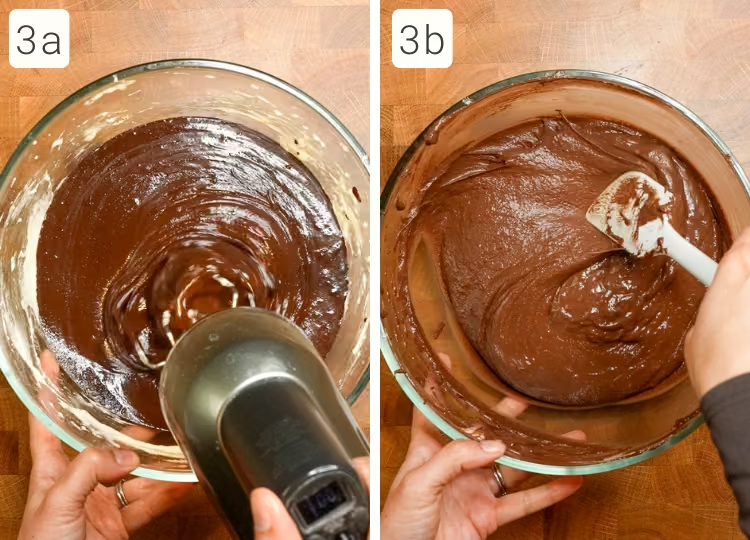
Add the cocoa paste to the flour paste and mix vigorously for at least 1 minute (3a), or until fully combined into a cohesive, somewhat tacky-gooey batter (3b).
STEP 4 | Add remaining ingredients.
WHY:
Now that the gluten is more evenly distributed, we can add the remaining ingredients as we would in a standard chocolate cake batter. We’ll add the brown sugar, which adds sweetness and moisture due to its molasses content. Baking powder introduces gas for lift, and the second flour addition balances batter thickness and supports a tender crumb.
HOW:
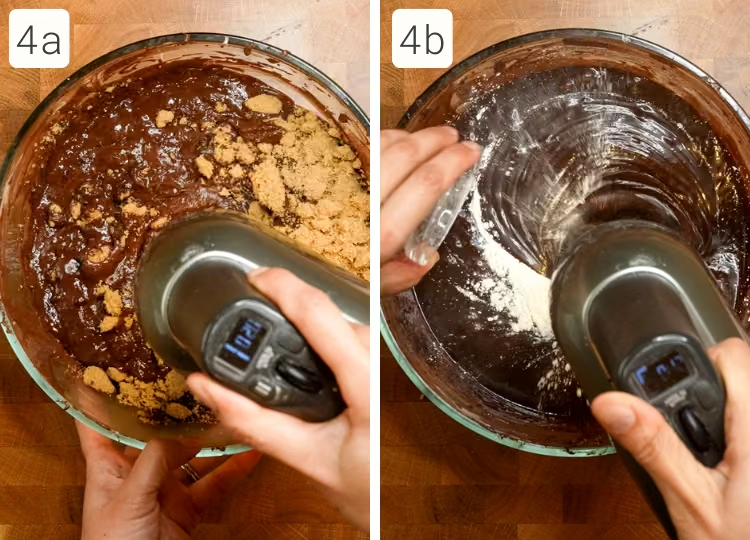
Add the brown sugar (4a) and baking powder (4b) to the batter, then mix for 1 minute.
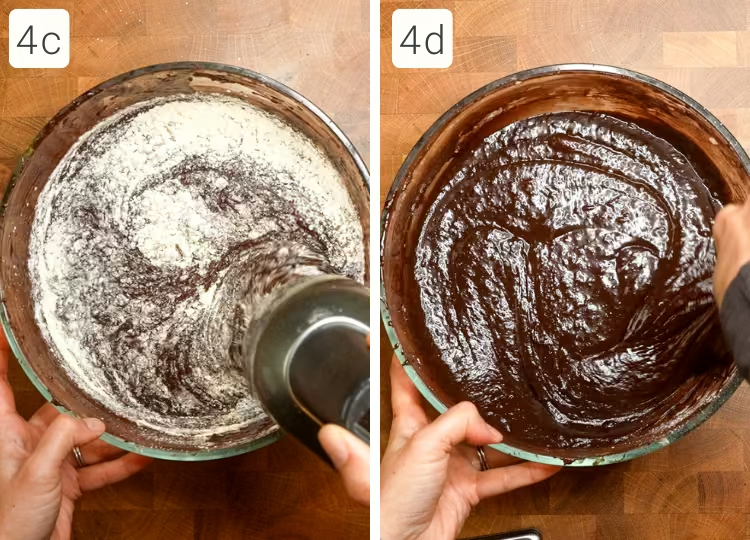
Gently fold in the remaining all-purpose flour (labelled “for batter”) (4c) just until incorporated (4d).
STEP 5 | Bake and assess doneness.
WHY:
Vegan cakes often bake more slowly and can be fragile as they set. This is due to the types of proteins and starches used, which set at higher temperatures than those in traditional cakes that use eggs. Relying on visual and tactile cues before poking avoids deflation from premature testing.
HOW:
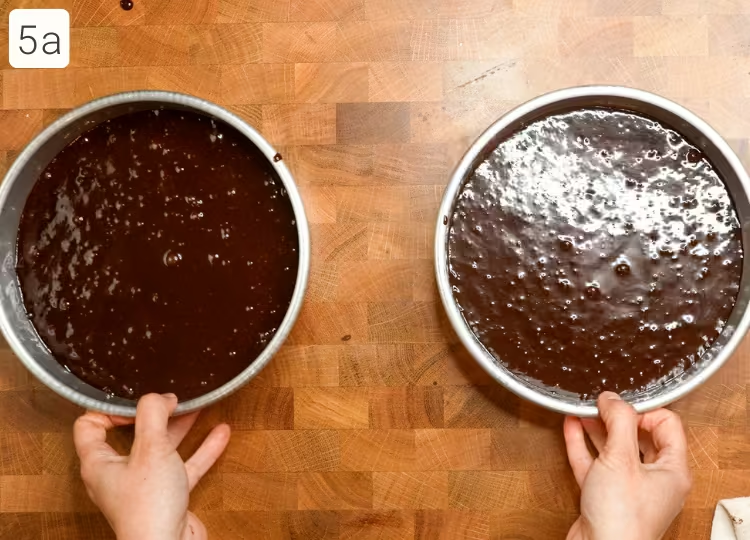
Divide the batter evenly between the prepared pans (5a). Bake for 50–55 minutes.
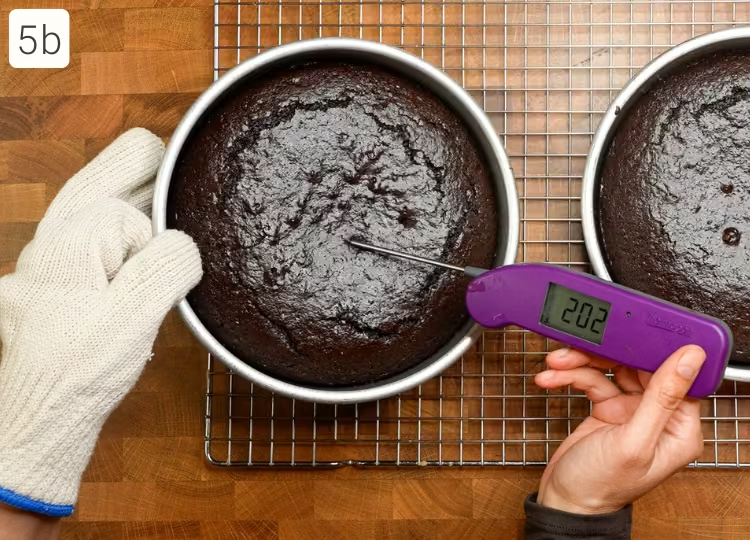
The cakes are done when the surface is slightly domed with edge cracks, doesn’t jiggle when shaken, and feels firm but soft when gently pressed. If needed, confirm doneness with a skewer (no wet crumbs) or thermometer (200–205 °F / 93–96 °C) (5b).
STEP 6 | Cool, unmold, and prepare for assembly.
WHY:
When the pans are *just* cool enough to handle, I remove the cakes and wrap them gently in plastic wrap. This retains their moisture until I’m ready to assemble the layer cake.
HOW:

Let cakes cool in the pans on a wire rack until they’re safe to handle. Slide a knife around the edges, invert onto a rack or platter, and peel off the parchment. If not frosting immediately, wrap in plastic once mostly cool to prevent drying. Ensure the cakes are completely cooled before assembling.
MAKE THE VEGAN CHOCOLATE AMERICAN DREAMY BUTTERCREAM:
I’m going to cover making this buttercream very briefly because I will have a more in-depth master guide for it soon. It’s very similar to my non-vegan Chocolate American Dreamy Buttercream, so feel free to hop over there to get more details.
STEP 1/2 | Hydrate the cocoa powder/Melt some chocolate.
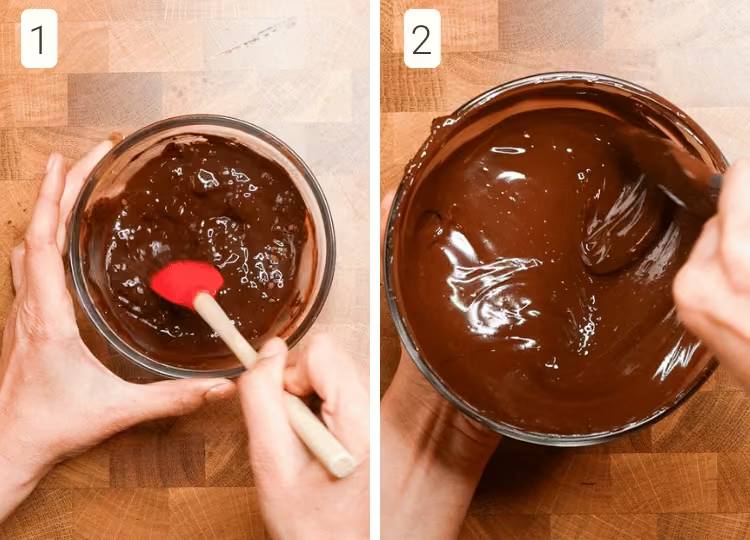
Sift the Dutch-processed cocoa into a small bowl. Pour in the boiling water and stir until smooth (1).
Chop a dark chocolate bar into small, chocolate chip-sized pieces and add to a heatproof bowl. Microwave at 50% power in 30-second intervals, stirring after each, until about 75% melted. Then stir until fully melted (2).
Let the chocolate cool until the bowl is no longer hot to the touch (80–90°F / 27–32°C), but the chocolate remains liquid.
STEP 3 | Smooth out the vegan butter.
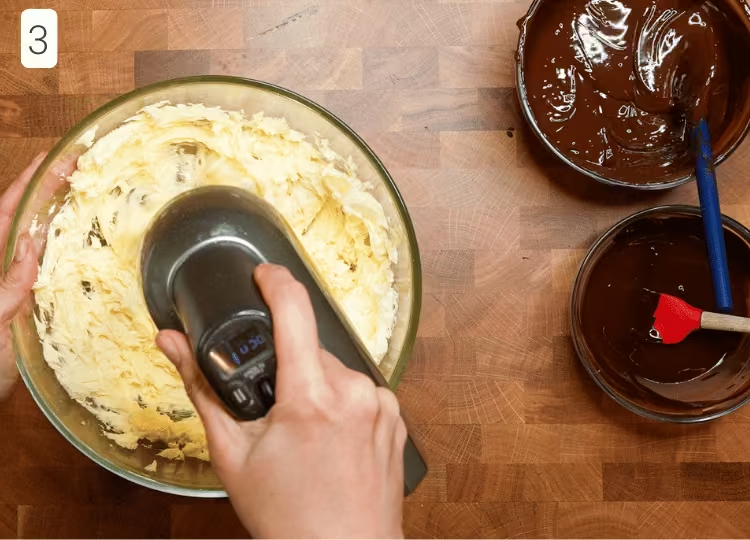
Add vegan butter sticks to the bowl of a stand mixer (or a large bowl if using a hand mixer). Mix on low to break it up, then whip on high until smooth and creamy.
STEP 4 | Add chocolates to vegan butter.
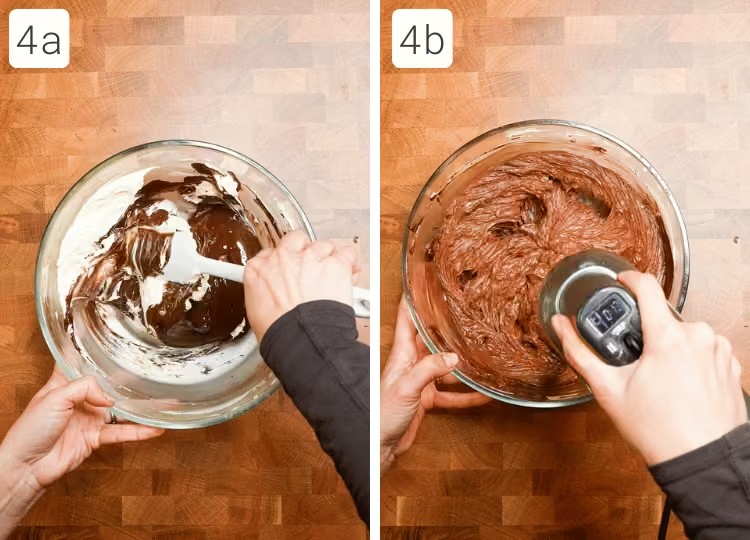
Scrape the cooled, melted chocolate into the whipped butter and stir briefly by hand (4a). Then whip on high speed for a few minutes, pausing once to scrape down the sides of the bowl.
Add the cooled cocoa paste and whip again on high, scraping as needed, until the mixture appears slightly paler and thicker (4b).
STEP 5 | Adjust for taste and smooth out the frosting.

Taste the buttercream to assess sweetness. Add half the powdered sugar and salt, mix, and taste (5a). (Optional) If using a stand mixer, switch to the paddle attachment and mix on low to smooth out air bubbles.
If the buttercream feels too soft, chill the bowl in the fridge for 5 minutes, then mix again until smooth and creamy (5b).
Assemble the layer cake:
STEP 1 | Add the first layer of cake.
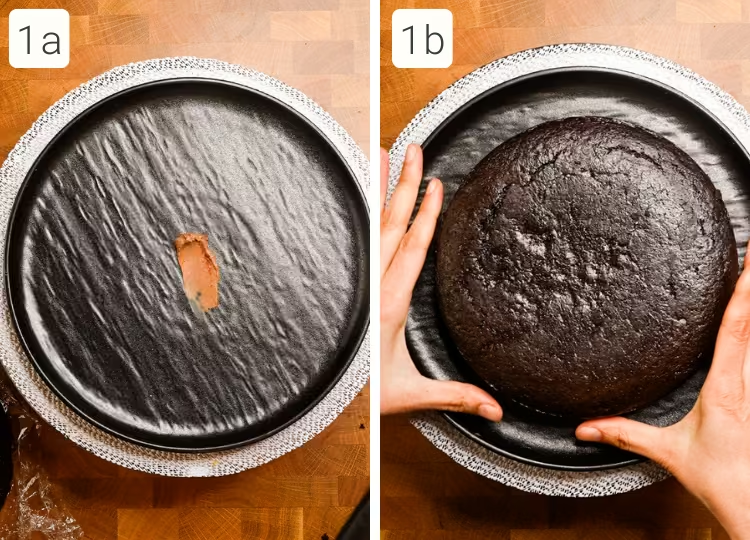
Add a smear of frosting to a large plate, cake board, or platter that is at least 10 inches in diameter (1a). Center the first layer of cake onto your plate (1b).
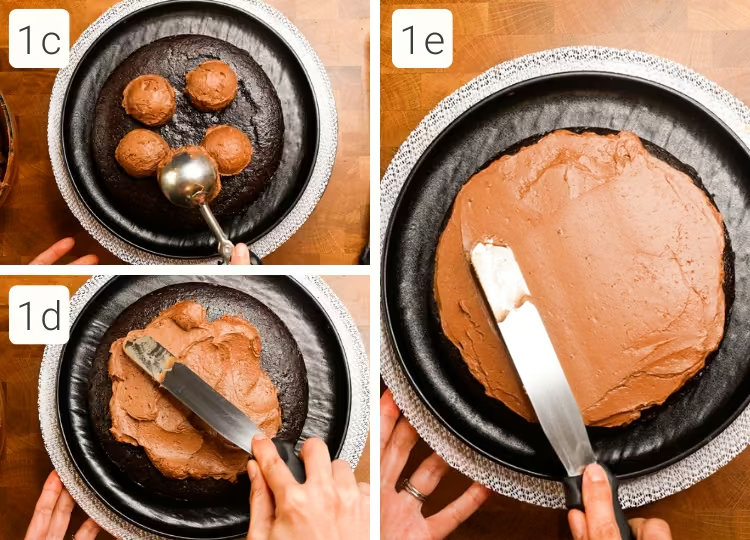
Add about 1 ½ cups of frosting to the top of the cake layer (1c) and use a spatula to spread it evenly (1d,e).
STEP 2 | Add the second layer of cake.

Gently place the second cake layer on top of the frosting, positioning the flat bottom side (from the pan) facing up (2a). Apply light pressure with your hands to ensure the layer sits evenly. Lower your eye level to check alignment. Because we put the two cake tops together, there will be a gap in the center of the cake, which you can fill with some frosting (2b). (I had some extra, so I did a crumb coat on the top layer of the cake, but that’s actually the next step. :) )

Smooth out the spackling in the center so it’s level with the sides of the cake, and you have a perfect cylinder (2c).
STEP 3 | Apply a crumb coat.
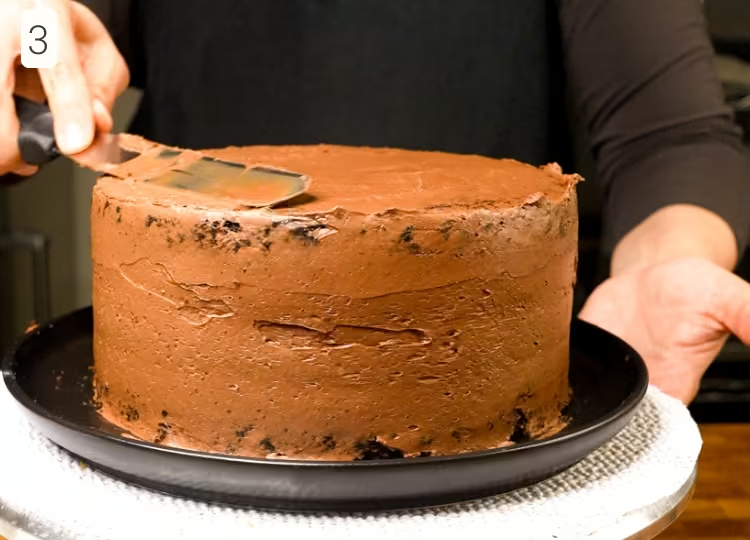
Spread a very thin layer of frosting over the entire surface of the cake. The coat should be thin enough that you may still see some cake underneath. Don’t worry about neatness; this is just the base layer.
STEP 4 | Apply a top coat of frosting.
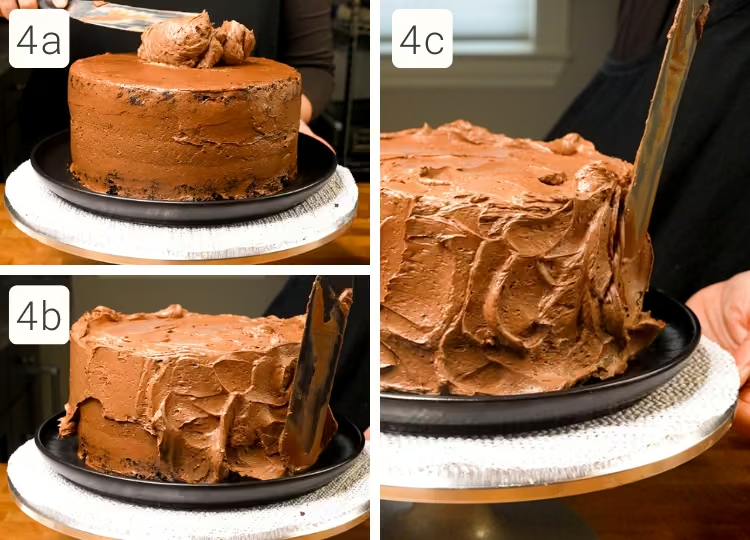
Spread a generous layer of frosting over the top of the cake (4a), then work your way down the sides (4b). If you used a hand mixer to make your frosting, it’s often really hard to get out all the air bubbles for a smooth top layer, so I like to go for a more casual frosting style. This is one of them - you just add little swirls of frosting along the side until everything is covered (4c). Do a layer on the top, but don’t do anything fancy because we’re going to cover it with berries.
STEP 5 | Add fresh berries.
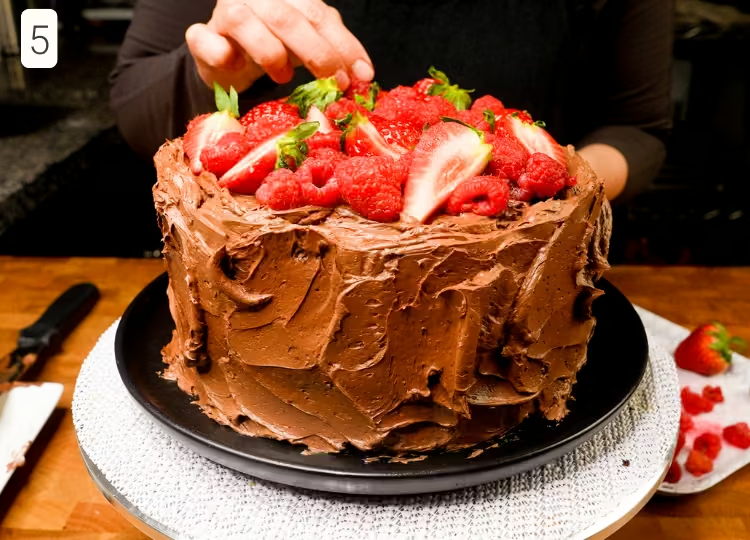
Pile fresh berries on top of the cake, evenly covering the entire surface.
Video
Honors Members Section
This extra material is accessible to Sugarologie Honors members.
Become a member to view extended research notes, technique analysis, and supplemental materials! Learn more about Sugarologie Honors here.
Already a member?
Before starting the recipe, please read this!
Measure by weight, if possible.
Measuring by weight is the best way for you to replicate my recipes. I develop recipes using ingredients (even liquids) measured in grams, which is why you see them listed first in the recipe cards. For measurements under 5 grams, I will typically only list the volumetric measurements (teaspoons, etc.), as most home scales are not precise for such small weights.
In most cases, I have converted grams to volumetric measurements (aka US customary units) for bakers who prefer this method. However, the measurements are not as precise and may have awkward proportions. The recipes should still work, but for the ultimate precision, try to use weight.
This is the OXO scale I use daily. I also purchased this budget version of a good scale, which I keep at my Mom’s house for baking. If you’re interested in other tools I use for my baking, I’ve compiled a list here.
Use room temperature ingredients.
All my ingredients should be used at room temperature, or 65-75 °F/18-24 °C. I will always indicate if you need something outside this range. If no details are given, room temperature is the default.
Pay attention to the ingredient descriptions.
I try not to be brand-specific, but I will always note an interesting result from a type of ingredient, be it negative or positive.
A specific note regarding salt: I use Diamond Crystal Kosher salt for everything on this site except for frostings. In frostings, you want the salt to dissolve more easily, and kosher salt tends to leave granules behind. If you substitute table salt (more finely granulated) for recipes that list kosher salt, you must use half the volume indicated in my recipes.
Substitutions are hard.
That said, substitutions aren’t impossible but can be the toughest part of recipe development. Small swaps, like reduced-fat milk (2% fat) for whole milk (3.5% fat), usually work fine. However, bigger changes—such as replacing oil with applesauce or sour cream with Greek yogurt—can significantly impact texture and density.
Be wary of general, all-purpose substitutions in baking; I find that usually there is never a one size-fits-all solution. I carefully select ingredients for my recipes, so for the best results, start with the original recipe and modify with caution.
Read all the recipe instructions before beginning.
I’m in the “Pre-read the Chapter before Class Lecture” club... and I invite you to join! Baking new recipes can be intimidating, so let’s set you up for success. I want you to think about timeframes. Most fillings and frostings can be made ahead of time, and give you an extra day for mental space. Also, as you become a more proficient baker, you can anticipate and recognize steps. (“Oh, this has a meringue step, so I’ll need an extra clean bowl…” etc.) Ensure you go down the ingredient list and have everything at the right temperature.
.avif)

.avif)


Vegan Chocolate Fudge Cake with Vegan Chocolate American Dreamy Buttercream
Vegan Chocolate Fudge Cake:
(makes two 8-inch round layers, approx 1.75 inches tall)
- 128 g (1 ⅓ cups) unsweetened Dutch-processed cocoa powder*
- 360 g (1 ½ cups) boiling water
- 60 g (8 tablespoons) chickpea flour**
- 162 g (13 tablespoons) oil (any vegetable oil, such as canola or avocado)
- 4 teaspoons vanilla extract
- 2 ½ teaspoons salt
- 161 g (1 ⅓ cups) all-purpose flour, unbleached (for paste)
- 158 g (⅔ cup) room temperature water
- 533 g (2 ½ cups) brown sugar, dark
- 4 teaspoons baking powder
- 161 g (1 ⅓ cups) all-purpose flour, unbleached (for batter)
Vegan Chocolate American Dreamy Buttercream:
(makes about 4 ½ cups):
- 27 g (5 ¼ tablespoons) unsweetened Dutch-processed cocoa powder*, sifted if lumpy
- 63 g (5 ¼ tablespoons) boiling water
- 360 g (12 ⅔ ounces) vegan dark chocolate***
- 339 g (1 ½ cups) unsalted plant-based butter sticks, softened slightly
- 120 g (1 cup) powdered sugar, sifted if lumpy
- ¼ teaspoon fine salt
For Decorating:
- assorted berries, washed and dried (optional)
Bake the Vegan Chocolate Fudge Cake:
- Preheat the oven and prepare the pans.
Move your rack to the middle position. Preheat the oven to 350 °F (180 °C).
Butter or spray with oil the insides of two 8" cake pans and line the bottom with a circle of parchment paper.
- Prepare the cocoa powder paste.
In a medium heatproof bowl or cup, whisk Dutch-processed cocoa powder with boiling water until smooth and lump-free. Let it stand for about 5 minutes to allow the cocoa to bloom. Whisk in the chickpea flour until combined, then add the oil, vanilla, and salt. Set aside. - Mix the flour paste.
In a separate large mixing bowl, combine the all-purpose flour (labelled “for the paste”) with the room-temperature water. Mix on medium-high speed for about 2-3 minutes. The mixture will be clumpy at first, then gradually smooth as gluten develops. You’re done mixing when the paste is soft, sticky, and forms into a loose ball. - Mix the remaining ingredients into the flour paste.
Add the cocoa paste to the flour paste and mix for at least 1 full minute or until everything is combined. The flour paste may give you a hard time, and you may not want to mix with the cocoa powder paste - just keep mixing until it does.
Add the brown sugar and baking powder and mix for an additional minute. Gently mix in the remaining all-purpose flour (labelled “for batter”) just until incorporated.Evenly distribute the batter into the prepared pans. - Bake for about 50-55 minutes.
Generally, vegan cakes take a little longer to bake. Poking the surface of the cake too early (with a skewer or thermometer) can cause the center to sink, so I suggest using visual cues to assess doneness first, then try a poke test if needed.
You’ll know the cake is done when it has a slightly domed surface with slight cracks along the perimeters. When you shake the pan, the centers should not jiggle. Pressing gently on the surface of the cake with your fingertip should indent slightly but feel somewhat firm.
After this, you may attempt a poke test with a skewer, which should not have any crumbs attached. If you’d like to use a thermometer, this cake is done around 200-205 F/93-96°C.
Move the pans to a wire rack and allow them to cool slightly in their pans. - Remove cakes from their pans.
I remove cakes from their pan while they are still slightly warm to preserve moisture.
Once the cake pan has cooled enough to handle (though it's usually still warm enough for me to wear gloves), slide a knife around the perimeter of the cake to loosen the edges. Place a large platter or wire rack on top of the pan and flip it upside down. The cake should fall right out, and you can peel the parchment off the bottom. You can leave the cakes out if your frosting is done, and you're immediately moving to assembly. Usually, if it's more than 30 minutes, I will wrap the cake in plastic to reduce moisture loss.
For your sanity and the structure of the final cake, please ensure the cakes are completely cooled before proceeding to assembly.
Make the Vegan Chocolate American Dreamy Buttercream:
- Hydrate the cocoa powder.
Sift the Dutch-processed cocoa into a small bowl. Pour in the boiling water and stir until smooth. Let it cool while you prepare the other ingredients. - Melt the chocolate.
If you use bar chocolate, chop it into small pieces (chocolate chip-sized is fine) and add them to a heatproof bowl.
Microwave method: Heat at 50% power in 30-second intervals, stirring each time until about 75% melted. Then, stir until fully melted.
Water bath method: Bring a small pan of water to a simmer, then remove from heat. Place the heatproof bowl directly in the water and let the chocolate melt, stirring occasionally. Avoid water contact to prevent seizing.
Set aside to cool until the bowl is no longer hot to the touch (80–90°F/27–32°C if using a thermometer) but is still liquid. - Smooth out the vegan butter.
Add the vegan butter sticks to the bowl of a stand mixer (or a large bowl, if using a hand mixer). Using the whisk attachment (or a hand mixer), mix on low to break it up, then whip on high until smooth and creamy. - Add chocolates to vegan butter.
Scrape the cooled, melted chocolate into the butter, then mix briefly by hand. Whip on high speed for a few minutes, stopping once to scrape down the bowl.
Add the cocoa paste and whip on high for a few more minutes, scraping as needed. Once emulsified, the frosting will appear slightly paler and thicker. - Adjust for taste and smooth out the frosting.
Taste the buttercream for sweetness - the amount of sugar you’re going to add here depends on the type of chocolate you used and your sweetness preference.
Add half the powdered sugar and salt, mix and taste. You can add the remaining sugar if desired. Once you’re satisfied with the flavor, whip on high for a full minute.
If you’re using a stand mixer, you can switch to the paddle attachment and mix on low to smooth out air pockets.
Depending on the chocolate used, the buttercream may seem loose at first. Lower cocoa percentages create a softer texture. If you like it as is, use it immediately and chill the frosted cakes for 30 minutes to set.
For a firmer consistency, briefly chill the bowl in the fridge (about 5 minutes), then mix until smooth and creamy.
Assemble the layer cake:
- Add the first layer of cake.
Place one layer of chocolate cake onto a large plate, cake board, or platter at least 10 inches in diameter. Add about 1 ½ cups of frosting to the top of the cake layer, and use a spatula to spread it as evenly as possible. - Add the second layer of cake.
Now, place the other layer gently on top of the frosting. I like to ensure that I have a flat surface for the final top of my cake, so that is usually the bottom of the cake layer against the pan,n rather than the round top from baking. This will help you get a cleaner look for the final cake.
Use your hand to apply gentle pressure to ensure the cake sits evenly. I get down to eye level and check the sides to make sure they’re lined up, too.
Now take some small bits of frosting to fill the gap between the first and second layers. This is so the cake sits evenly. - Apply a crumb coat.
A super-thin layer of frosting will help prevent crumbs on the outside of the cake. And this is a crumby soft cake, so this step is important. Apply a super-thin layer of frosting over the entire surface of the cake. My crumb coats are so thin, I can see the cake underneath. - Apply a top coat of frosting.
You should now have a generous amount to apply to the outside of your cake. I like to swirl the frosting all over the cake, starting with the top, then the sides. Once it’s completely covered, you can back and refine the swirls a bit. - Add fresh berries.
Pile the berries on top of the cake, covering the entire surface. This is a rich cake, so it’s really nice to get some freshness and acidity from the berries, and this ensures every slice will get some fruit.

Recipe Card - Adriana's Notes
Adriana’s Notes
*Dutch-processed (European-style) cocoa has a darker, sometimes reddish hue, compared to natural cocoa. This color change is due to alkalization, a process that neutralizes acidity, resulting in a smoother, mellower chocolate flavor.
**Chickpea flour is a finely ground powder made from dried chickpeas (also known as garbanzo beans). You can use either product labeled “chickpea/garbanzo bean flour” or “besan.” The latter is slightly stronger in protein power, yielding a slightly higher rise for your cake, but it is also more “beany” in flavor. For the cake above, I used Bob's Red Mill Chickpea Flour.
***This recipe works with any form of chocolate - bars, chips, or callets. If you’re using a bar, just chop it into chip-sized pieces so it melts more easily.
With vegan ingredients, you’re probably used to looking at labels :) So, along with ensuring it’s plant-based, look for emulsifiers (listed as "soy lecithin" or "sunflower lecithin"), which help the frosting from a tighter/smoother mixture.
As for the flavor, you can use all kinds except white, with a higher percentage on the label indicating more cocoa-based ingredients and therefore a stronger chocolate flavor. I highly suggest a semi-sweet type chocolate (sometimes labelled 52-65%), as a bittersweet chocolate will yield a very cocoa-forward, less-sweet frosting, unless that’s your thing.
.avif)
.avif)

Got room for more dessert?
Subscribe to my Crumby Data newsletter! I share behind-the-scenes looks at recipe development, flavor testing for the Cakeculator, and life as a content creator. It’s free, lands in your inbox every few weeks, and you can unsubscribe anytime...no strings attached :)
Feel free to take a look at previous newsletters here!
.ico)
%20(1200%20x%20864%20px).avif)