.png)
.png)
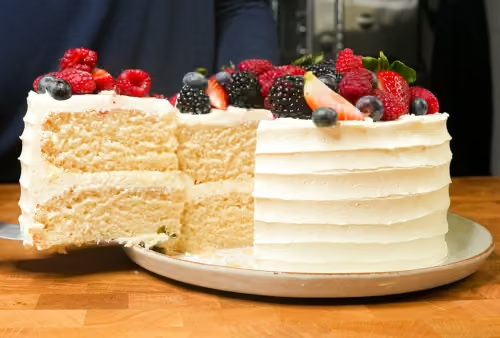
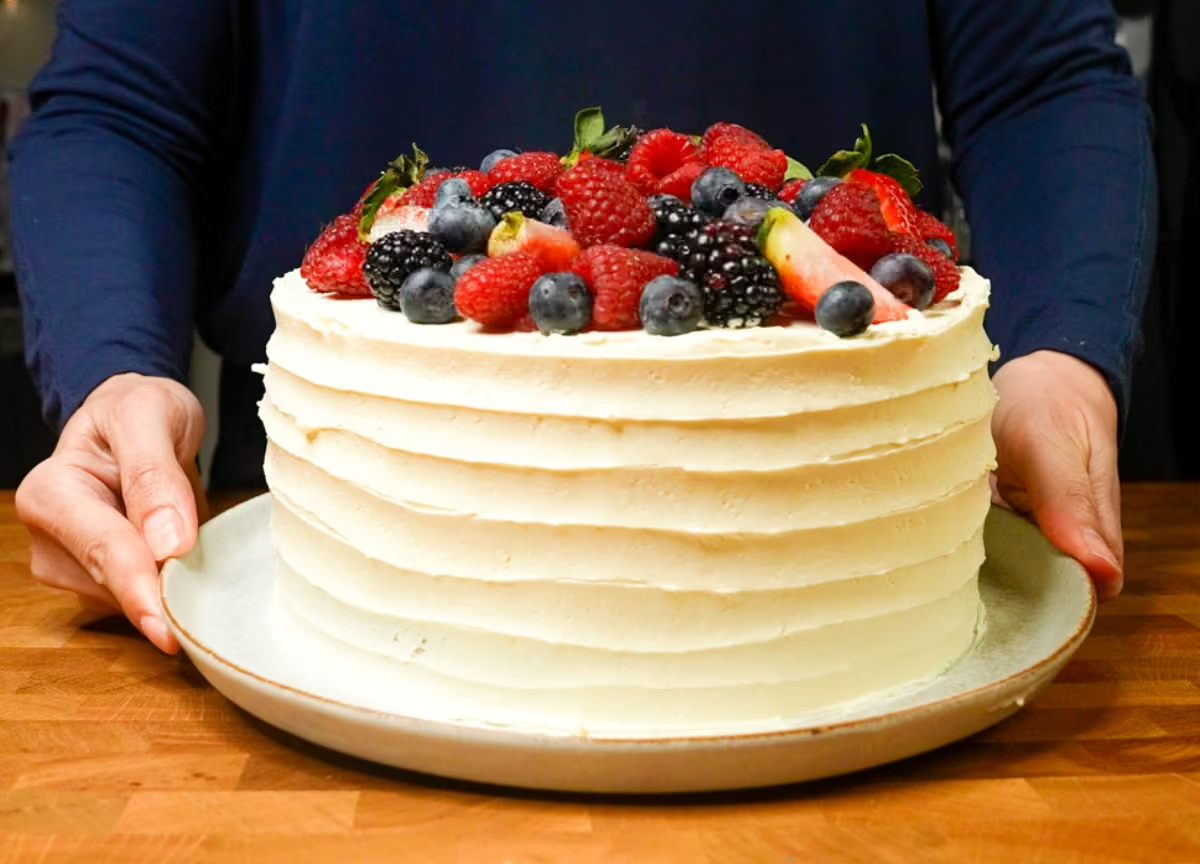
Vegan Vanilla Cake with Plant-Based Vanilla Buttercream


My vegan vanilla cake is super moist, with a melt-in-your-mouth, fluffy crumb and rich, aromatic vanilla flavor. It’s filled and frosted with my Vegan Vanilla American Dreamy Buttercream, and this plant-based version is just like all my frostings on my site: silky smooth and not too sweet. Top this cake off with some fresh berries, and you’ll get a spectacular cake worthy of any celebration.
%20(1200%20x%20864%20px)%20(1).avif)
There’s often the stigma that vegan cakes are inferior to non-vegan cakes. I’m going to do my best to dispel that stigma with a bit of science + experimentation. I’ve been working on this for a while and am excited to present some great ideas that you can even transfer to other aspects of vegan (or even traditional) baking. And to preface, I’m going to reference those conventional (non-vegan) vanilla cakes quite a bit, because that served as my control for designing this cake.
Now, when I start development of a cake recipe, I focus on two (big) things:
- flavor/taste; and
- texture.
And when it comes to flavor, I’m usually not too intimidated because I try to get to a level of understanding of the molecular makeup of ingredients (and therefore how it contributes to taste/flavor perception) to address any shortcomings in that department. This cake does have flavor curveballs, however, and I’ll get to that in a second.
Let’s start with what I think is the bigger issue: the structure and texture of vegan cakes. And this is the case where looks can be deceiving (for both the recipe developer and the home baker following a vegan recipe), because although some cakes appear to bake up light and fluffy, they turn gummy or pasty in your mouth when you eat them. And in my opinion, that just defeats the whole purpose and experience of eating a great homemade cake. So, how to fix this?
What If Vegan Cakes Aren’t Inferior… Just Under-Engineered?
Let’s start with an analogy: If you think of a cake like a simple tiny house, there are parts of the house (or ingredients) that function in certain ways to hold the house up.
And I know that houses are hollow, but for this example, let’s pretend that this house is filled, solid - like a solid cake 🙂 (Also, this is very general as the molecules listed can perform multiple functions, but for simplicity’s sake, I’ll just go over the primary function of each one as it pertains to cake recipes.)
- Proteins act as the scaffolding, or skeleton, that provides the frame of the house.
- Starches are the squishy insulation that can support the scaffolding and fill in the spaces between it.
- Then there are, of course, other components like fats, sugars, and water (or proteins that don’t participate in the scaffolding), which help with different aspects of the cake, but structurally they typically need support rather than serving as the support. So think of them as being held in place in the scaffolding matrix.
In vegan recipes, eggs are omitted because they are derived from animals. But they are among the strongest sources of protein in baking and a main component of scaffolding.
And what I’m seeing in most vegan cake recipes is that more starch (in the form of flour) is often added to compensate for this lack of protein, since starch can have some structural properties. (There are also other methods, such as using a flax/seed based proteins, etc. but I think starch replacers are more common.)
However, flour has weaker structural capabilities, making the cake inherently less stable. That’s because starches undergo what’s called “gelatinization.” I know this sounds like “gelatin,” which is derived from animal collagen, but gelatinization, when used in the context of starches, refers to the thickening that occurs when starches expand in liquids. And gelatinization is just not as robust as the interaction that proteins, particularly egg proteins, undergo when exposed to heat (coagulation).
However, if you use starches as a protein substitution, you absolutely can get a cake that bakes up looking somewhat normal - fluffy crumbs spread throughout what can be a dense to somewhat open crumb structure. Back to the house analogy, you can probably build some semblance of a “house structure” by squishing together some insulation. You could just pile things up and squish them together, and they may stick, but how stable is that structure?
With the cake, you’ll know exactly how fragile a starch-structured scaffolding is because when you handle the cake, it breaks apart very easily. And when eaten, it is quite mushy, which makes sense. It has so much gelatinization (usually in the form of flour) that it offers no resistance when eaten and turns to mush immediately.
So then, we are confronted with one of the oldest vegan dilemmas, albeit the “cake edition”: where are we getting our protein? Turns out, we just need to find the right ones.
The Vegan Cake Experiments
In my experiments, I’ve found that two different categories of protein can help vegan cakes with structure:
- Legume-based proteins; and
- Gluten.
Let’s cover legume-based proteins first.
My inspiration for this idea came while eating dosas, which are traditionally made with lentils (I love dosas!). And I figured there’s no need to reinvent the wheel here - when looking for vegetarian sources of protein, the South Asians have mastered this for millennia. I just had to find it, so I did a bit of research on high-protein flours to find the most accessible one that would work best for a vanilla cake.
The two that I narrowed down and worked with the most were soy flour and chickpea flour.
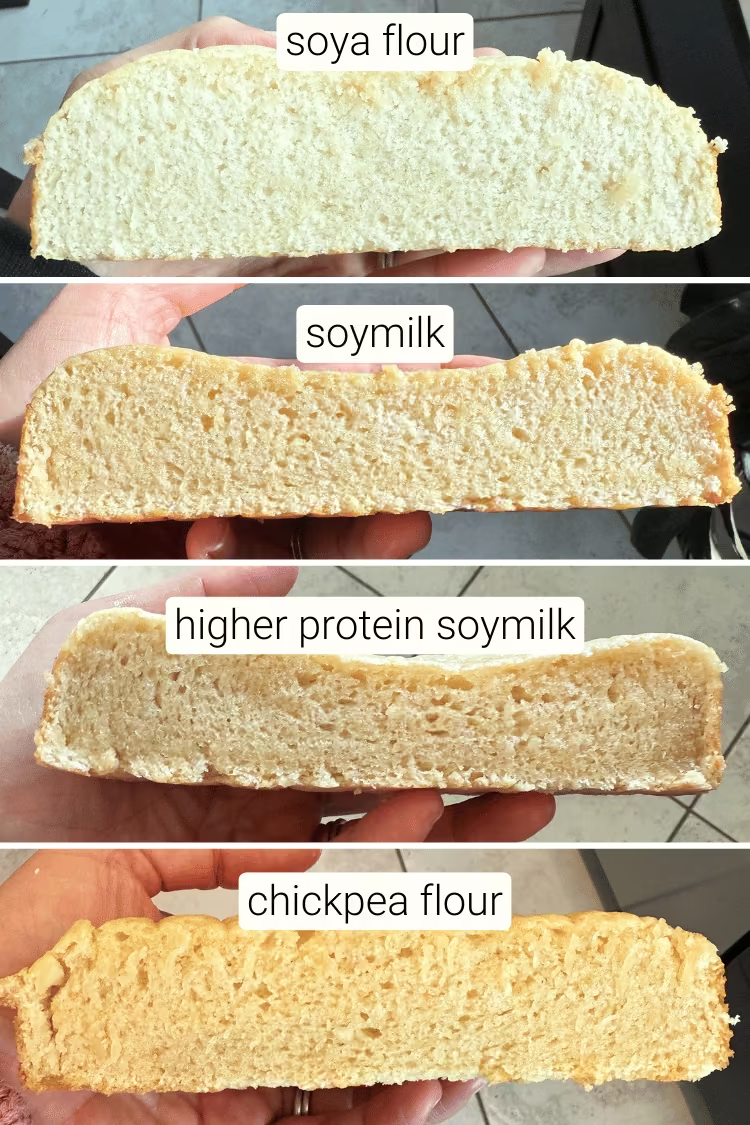
Soya flour was a clear winner structurally. It produced fluffy crumbs, but oh man, did it have a very green-vegetal (almost bitter?) flavor in the cake. And this is coming from someone who has eaten tofu and all kinds of soy products her whole life - I couldn’t get past the flavor no matter what I tried. Given the amount I had to add to the cake batter to get the result you’re seeing, there is a trade-off in taste. I just wasn’t sure if that was going to fly with you all.
I was so entranced by soy flour’s strength that I tried different types of soymilks, thinking it could do the job without the strong flavor. But something is happening to my beloved soy proteins during the pasteurization of these milks that impairs their ability to build structure in the cake. You can see that because the centers of the cakes were caving inwards.
Could you go out and milk your own soybeans to bypass this effect? Perhaps - but that’s a lot of work for a singular ingredient in a cake. And no, we can’t use tofu - that’s already pre-coagulated, and with cakes, we need something that will set up as it bakes.
So I scrapped the soya flour and moved on to chickpea flour, which has less protein but is far milder in flavor. It struck the right balance of structure and flavor, but I had to experiment with the flour concentrations; I figured that out in the next set of experiments and you'll see the chickpea cakes are a little taller as a result.
And you can see that it’s not nearly as fluffy or tall as the soybean flour cake, but I was already experimenting with another source of protein that helped with this: gluten.
Wait, aren't we supposed to prevent gluten formation in cakes?
I know this goes against everything we’ve been taught about cakes - we do everything in our power to reduce gluten, e.g., lower-protein flours like cake flour, bleaching flour to destroy the proteins, and mixing as little as possible to prevent the proteins from sticking together. And I still think that is very true - but limited to traditional types of cakes where you can rely on things like eggs for background structure.
I have been working with yeast-leavened breads for the past year, hoping to develop recipes by refining my enriched breads and tinkering with sourdough. And so, of course, I have been researching as much as I can regarding microbial fermentation, dough structure, etc.
And gluten is such an interesting topic because sometimes it is *the* structural scaffolding in recipes that don’t have to have other sources of protein (e.g., sourdough doesn’t contain eggs but usually only water, yeast, flour + salt)
So I thought - why not try adding gluten to these vegan cake recipes? And I found gluten helps give the cake structure a bit of a boost. The thing is, it only works in conjunction with another source of protein, which leads me to think it helps with initial aeration and structuring. In contrast, the chickpea protein is helping solidify the structure. You can see this down below:
.avif)
The other thing is that you have to use only a portion of the flour - if you use all the flour to develop gluten, then yeah, you’ll get an overly chewy texture that overpowers any semblance of fluffiness in a cake crumb. But I’ve figured out the ratio. of how much flour to use for us, and I’ll annotate it very carefully in the recipe card down below.
What is the flavor of my Vegan Vanilla Cake?
As written, my vegan vanilla cake has a slight butteriness, a hint of sweet floral vanilla, and a subtle nuttiness from the chickpea powder.
Now, the chickpea flavor is going to be a little bit different if you’re not used to it - but if you’re into vegan foods, you probably are! As an omnivore myself, I find the flavor very mellow, slightly savory and nutty, and quite pleasant.
However, some bakers may want to reduce the “beany-ness”, so let me teach you how the level and type of extracts can determine how much (if any) of the chickpea flavor remains.
.avif)
No extract (control): light beany flavor
Real Vanilla extract (Kirkland Signature): light beany flavor with vanilla aroma
Butter-Vanilla extract (LorAnn): light butter, light vanilla, very light beany flavor
Butter extract (LorAnn): Butter forward, slightest trace of bean flavor
Buttery Sweet Dough (LorAnn): tastes like a buttery sugar cookie, with a slight trace of bean flavor
Ube extract (Butterfly): ube forward, slightest trace of bean flavor
I’ve also tried:
almond extract (McCormick) with vanilla (not pictured): almond forward, with a slight trace of bean flavor
Cake Batter (McCormick): Oh goodness, this was not good, in my opinion. It was quite strange in an artificial way - and I don’t mind artificial vanilla at all, but there was a chemical-like aftertaste to it that I didn’t enjoy.
My favorite? Butter and vanilla extracts, as I wrote in my recipe. (Sweet buttery dough is such a wonderful flavor too - and I liked it so much I used it in my frosting.) I also have a really cool flavor booster for this cake, so let's get into the ingredeints!
What ingredients do you need to make my Vegan Vanilla Cake?
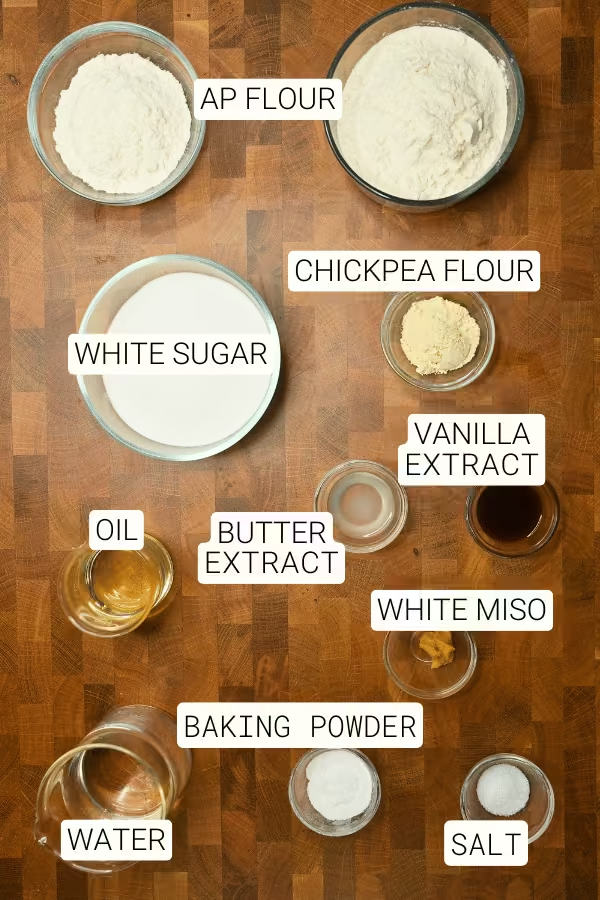
UNBLEACHED ALL-PURPOSE FLOUR
There are two bowls of flour pictured because this recipe uses flour in two ways. The smaller bowl is used to build a gluten network, and the larger bowl provides the cake with starches, giving it fluffiness and volume.
CHICKPEA FLOUR OR BESAN
Chickpea flour and besan are finely ground powders of garbanzo beans. Without an extra source of protein, vegan cakes often have a mushy texture, and I’ve found that chickpea flour offers a less-msuhy cake texture and lighter flavor.
I’m finding the labelling for this product to sometimes be a bit non-specific, but I think generally, besan is a powder from split brown chickpeas, whereas chickpea powder is from white chickpeas. You can use either one, but in my experiments, besan typically has more protein and therefore yields a slightly taller cake; the trade-off is a stronger “beany” aroma (still delicious). With either one, you’ll get a somewhat mellow “beany” aroma to the cake that can be easily masked with extracts if you want.
WATER
Water hydrates the flour to initiate gluten development, dissolves the sugars, and helps gelatinize the starches. It’s important to use room-temperature water, as this allows the batter reach the right temperature before it hits the oven, ensuring a more even and fluffier rise.
SUGAR
White sugar is the primary source of sugar and, therefore, sweetness for this cake.
BAKING POWDER
For this cake, we’ll need a double-acting baking powder. This chemical leavening agent produces carbon dioxide first when hydrated and again when heated, making the batter rise.
WHITE MISO PASTE
As an optional flavoring ingredient, white miso paste adds umami and depth from fermented soybeans and rice. You can omit this ingredient, as it will not affect the cake's structure or texture, but I do enjoy it in this cake.
Conventional egg-based vanilla cakes have a savory-umami undertone, which I find lacking in vegan desserts. Umami-based ingredients are not typically common for sweet-based baking, but used in moderation will add a depth of flavor complexity that I find absolutely delicious.
OIL
I tried a few different fats and oils in this cake batter, and vegetable oil performed best. It’s 100% lipids and did not interfere with the rise or crumb.
VANILLA EXTRACT / BUTTER EXTRACT
Vanilla is essential for flavoring this cake, but on its own, it’s a very light flavor that really acts as a flavor booster. I really like using butter extract alongside vanilla to get that genuine “vanilla cake” flavor.
SALT
Salt enhances all other flavors by suppressing bitterness and balancing sweetness.
Step by step:
BAKE THE VEGAN VANILLA CAKE LAYERS:
STEP 1 | Preheat the oven and prepare the pans.
Move your rack to the middle position. Preheat the oven to 350 °F (180 °C). Spray the insides of 8" cake pans with oil and line the bottom of each with a circle of parchment paper.
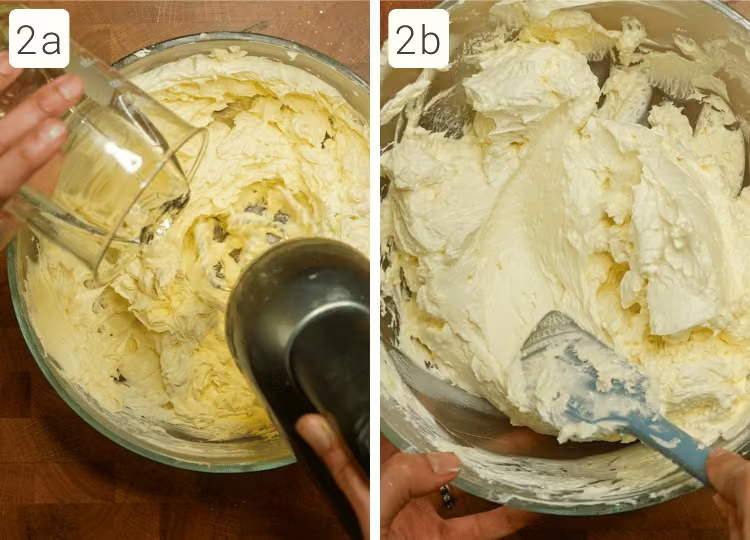
STEP 2 | Mix the gluten paste.
WHY:
To help build the cake’s structure, we will begin creating some gluten by mixing all-purpose flour and water. This partially denatures (or unfolds) the gluten-forming proteins (gliadin and glutenin) and allows them to adhere to one another, forming an elastic network.
HOW:
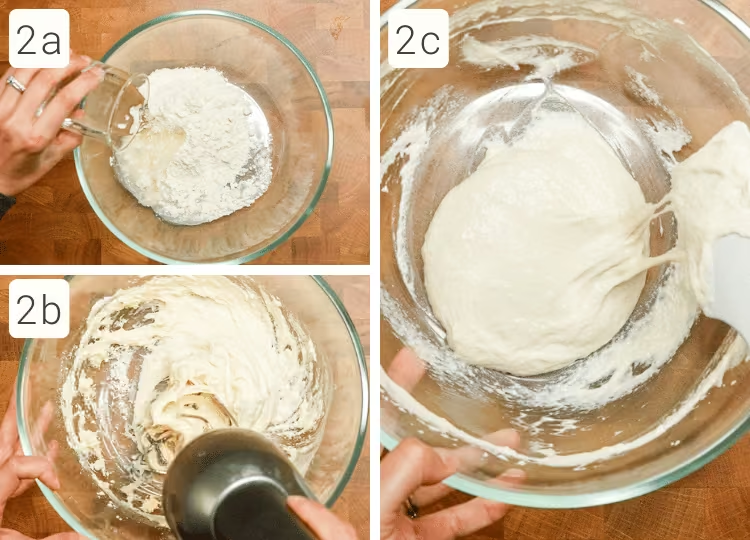
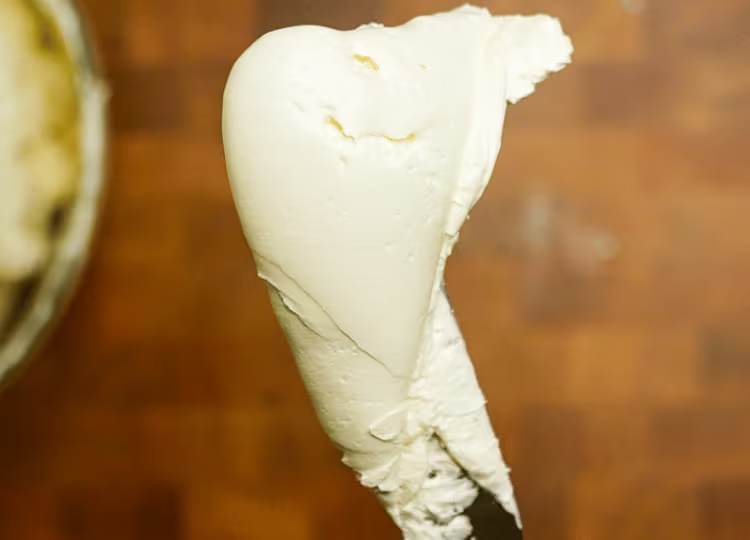
In a separate large mixing bowl, combine the all-purpose flour (labelled “for gluten paste”) with the water (labelled “for gluten paste”) (2a). Mix on medium-high speed for about 2–3 minutes (2b), until the mixture transitions from clumpy to a soft, sticky, loose ball (2c).
STEP 3 | Combine the wet ingredients with the gluten paste.
WHY:
The gluten paste tends to stick together, so it’s best to add the other water-based ingredients one at a time to loosen it. Once all the water is added, it’s much easier to incorporate the oils and extracts, creating a thickened liquid base for the rest of the batter.
Also, you may be wondering why we add the baking powder so early - that’s because we need to get the aeration process started since there are no other sources of aeration. (Aeration = bubbles in batter = fluffiness in cake structure) Baking powder is “double acting,” meaning it will begin carbon dioxide production when it hits water and produce even more when exposed to oven heat.
HOW:
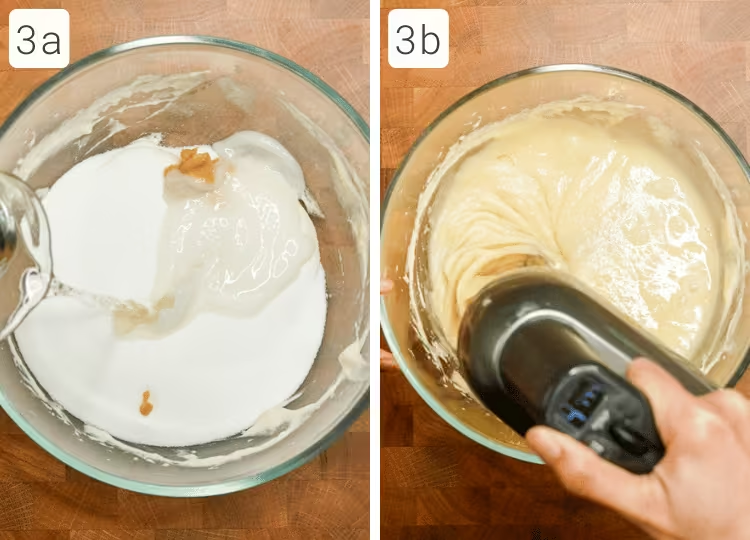
Add the white sugar, baking powder, white miso paste (if using), and a splash of the water (labelled “for batter”) (3a) to the gluten paste and mix on low speed to loosen the ball. Add the remaining water and mix until no visible chunks of gluten paste remain—about one minute (3b).
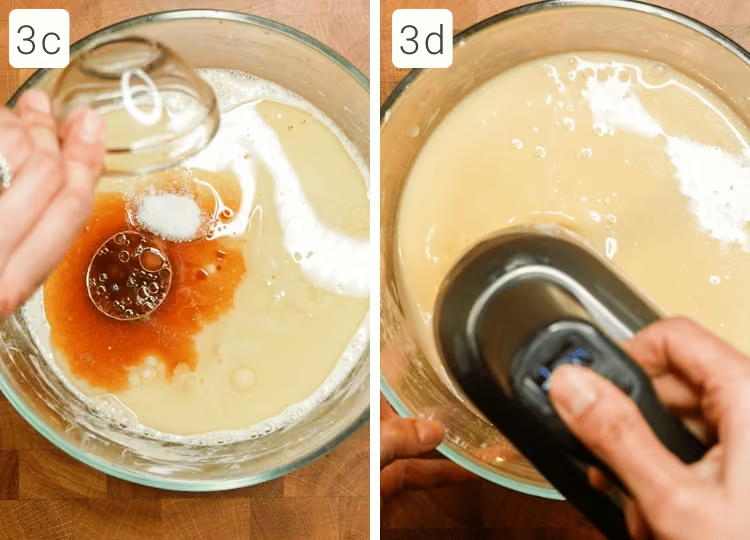
Then add oil, extracts, and salt (3c) and mix on medium-high speed for one more minute (3d).
STEP 4 | Sift in the dry ingredients.
WHY:
Sifting prevents clumps in the all-purpose flour and chickpea powder and evenly distributes the powders, which helps ensure a uniform rise.
HOW:
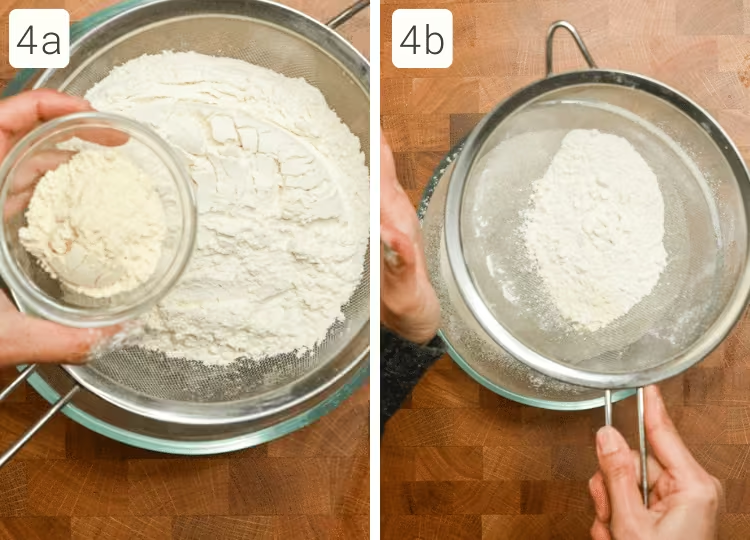
In another small bowl, sift in the all-purpose flour (labelled “for the batter”) and chickpea flour (4a,b). Whisk the dry ingredients together for about 30 seconds.
STEP 5 | Mix everything.
WHY:
First we added some flour in step one, and that harnessed the power of gluten to help form the cake's structure. In this step, we're going to add even more flour, not for gluten but with the main purpose of providing starches. These serve more of a secondary structural role, helping gelatinize and fill out the cake crumb. And because we’re adding lots of flour, it’s best to do it in small portions to prevent clumping.
Mixing this way is often called the “muffin” or “single-bowl” method because we combine the wet and dry ingredients in one bowl; this is a common technique for making muffins.) This is a popular mixing method when the recipe calls for oil (or melted butter) rather than a fat, such as butter or shortening.
HOW:

Add the dry ingredients to the cake batter in 4-5 additions (5a), mixing on low speed after each addition (5b). Once everything is added, mix for another 10-20 seconds on low speed (5c).
STEP 6 | Fill the pans.
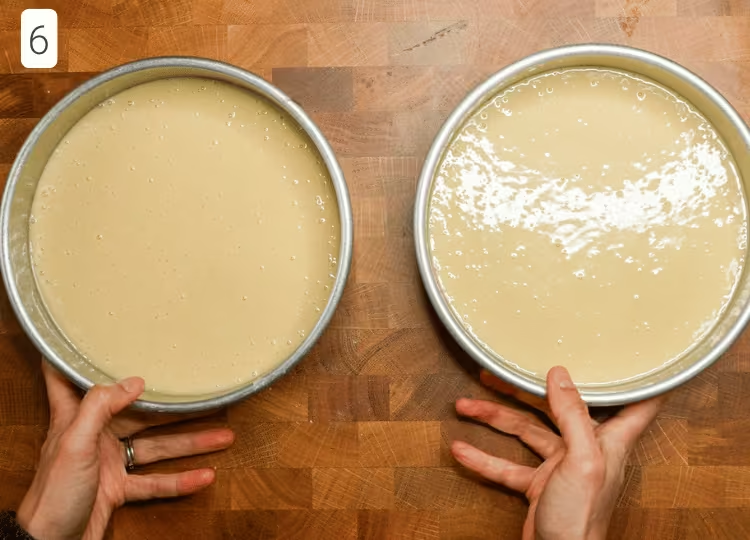
Evenly distribute the batter into the prepared cake pans.
STEP 7 | Bake the cakes.
WHY:
My vegan cakes take longer to bake than their conventional ones. And that’s because the structure of this vegan cake depends on:
1) the gelatinization of starches,
2) the setting of the gluten network we built in Step 2, and
3) The setting of chickpea protein.
As far as I’ve researched, most of these occur at higher temperatures than the settings for egg-based proteins. And because the crumb structure is slightly more fragile and can deflate the cake, it’s best to assess doneness via visual cues, then test using a skewer or thermometer.
HOW:
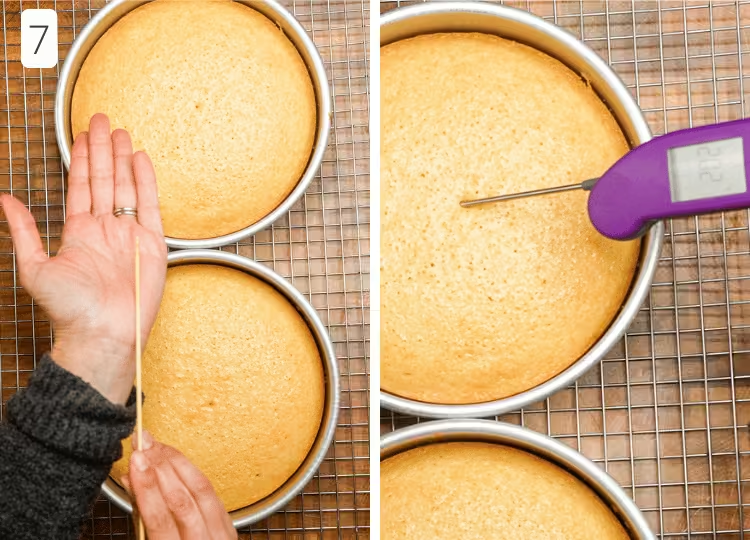
Bake for 50–55 minutes. Avoid poking the cake until visual cues suggest it’s done: a slightly domed and shiny top, no jiggle when shaken, and a surface that feels firm with a slight indentation when pressed. If needed, test doneness with a skewer (no crumbs) or a thermometer (200–205 °F / 89–91 °C).
STEP 8 & 9 | Cool and remove the cakes.
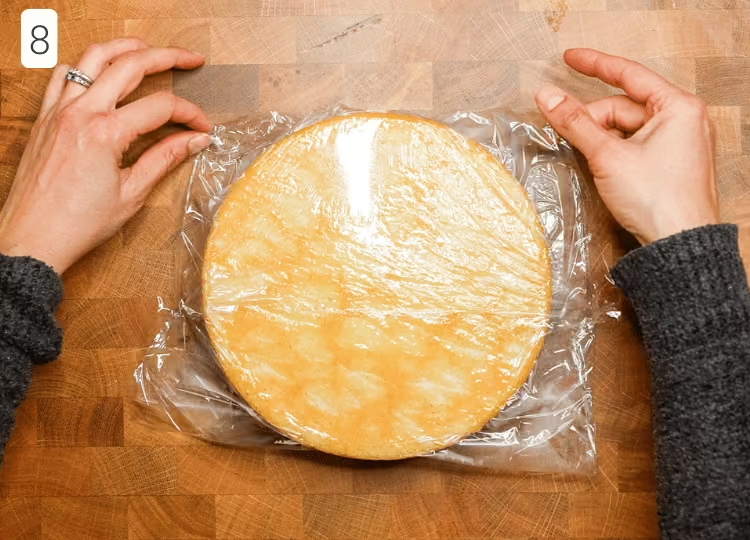
WHY:
I allow cakes to cool in the pan for a very short time, which prevents collapse during removal. I also wrap them in plastic, which reduces steam loss and preserves moisture.
HOW:
Place the pans on a wire rack and let the cakes cool in the pans.
Once the pans are cool enough to touch, slide a knife around the edge to loosen the cake. Invert onto a wire rack or plate. Peel off the parchment. If you’re frosting immediately, leave the cakes out. If waiting longer than 30 minutes, wrap them in plastic to minimize moisture loss.
Ensure cakes are fully cooled before the assembly step.
MAKE THE VEGAN VANILLA AMERICAN DREAMY BUTTERCREAM:
I’m going to cover making this buttercream very briefly because I will have a more in-depth master guide for it soon. It’s very similar to my non-vegan American Dreamy Buttercream, so feel free to hop over there to get more details on the types of syrups you can use.
STEP 1/2 | Whip the plant-based butter with sugar.
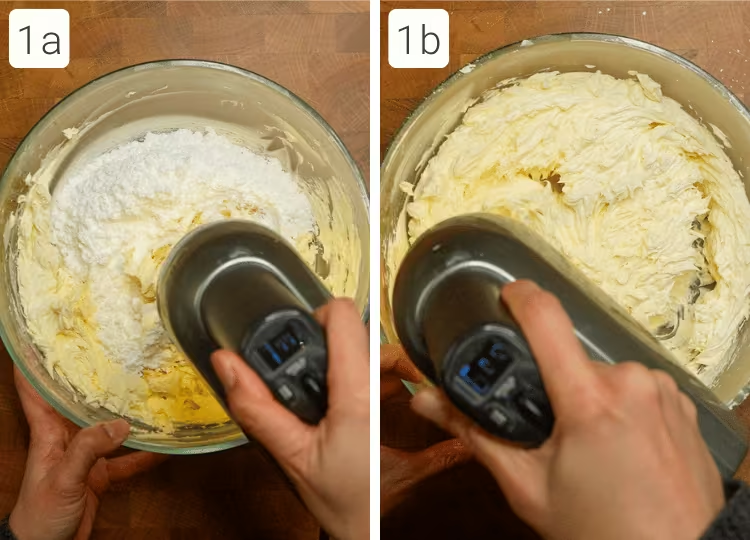
Add the slightly softened butter to the bowl of a stand mixer fitted with the whisk attachment. Mix on high speed for about 2 minutes, then add powdered sugar, extracts, and salt (1a). Mix on high speed until smooth and creamy (1b).
STEP 3 | Gradually emulsify the sugar syrup.
Add the syrup in 3–4 additions (I’m using corn syrup here), stopping the mixer to add a small amount each time. Mix at medium speed with the whisk attachment until fully incorporated, then add more, scraping down the bowl as needed. Once all the syrup is added, mix on high speed for a full minute to ensure complete emulsification.
STEP 4 | Adjust sweetness, texture, and final finish.
Taste the frosting and adjust the sweetness by adding powdered sugar in small increments. Adjust vanilla, salt, or plant-based milk/cream as needed, then mix on low speed for at least one final minute before using.
ASSEMBLE THE CAKE:
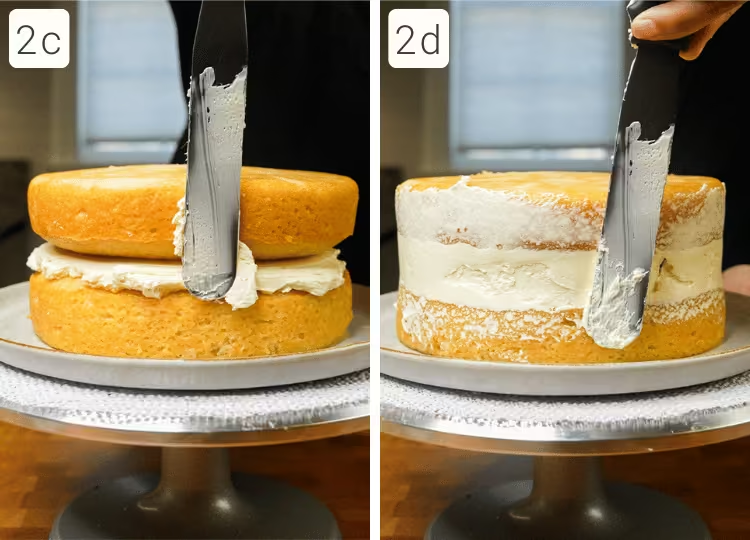
STEP 1 | Add the first cake layer.
Spread a touch of frosting onto a large plate, cake board, or platter at least 10 inches in diameter (1a). Place a layer of cake on the plate (1b).
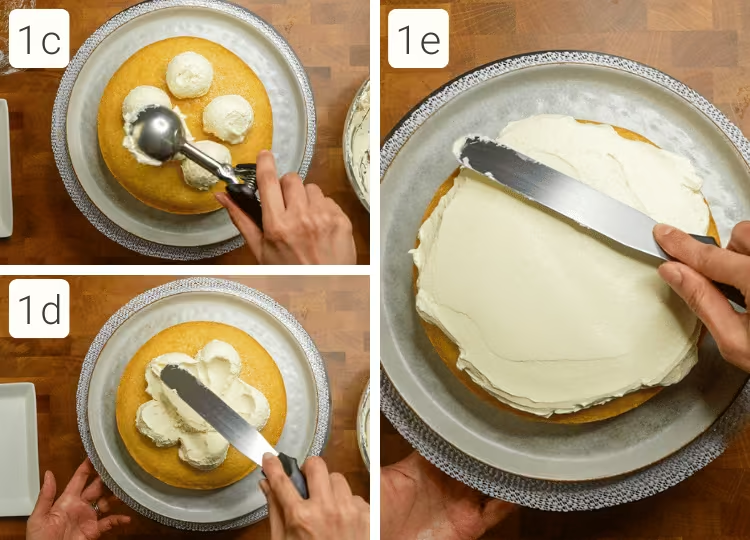
Add about 1½ cups of frosting to the first layer (1c) and spread it as evenly as possible with a spatula (1d,e).
STEP 2 | Add the second layer of cake.
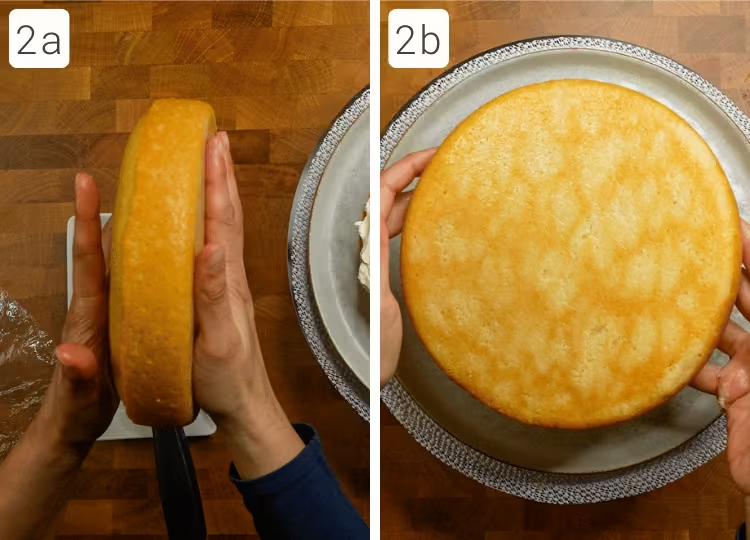
Now we have to place the second layer on. See how there’s a rounded top and a flat bottom of the cake layer? (2a) Gently place the second cake layer on top, positioning the flat side (the bottom of the baked layer) facing up to create a smooth final surface. Press gently with your hand to settle the cake, then get down to eye level to check alignment. (2b)
And because we put rounded tops against each other, there will naturally be a gap between the layers (2c). Let’s spackle those in using small amounts of frosting to fill any gaps between the layers so the cake sits evenly (2d).
STEP 3 | Apply the crumb coat.
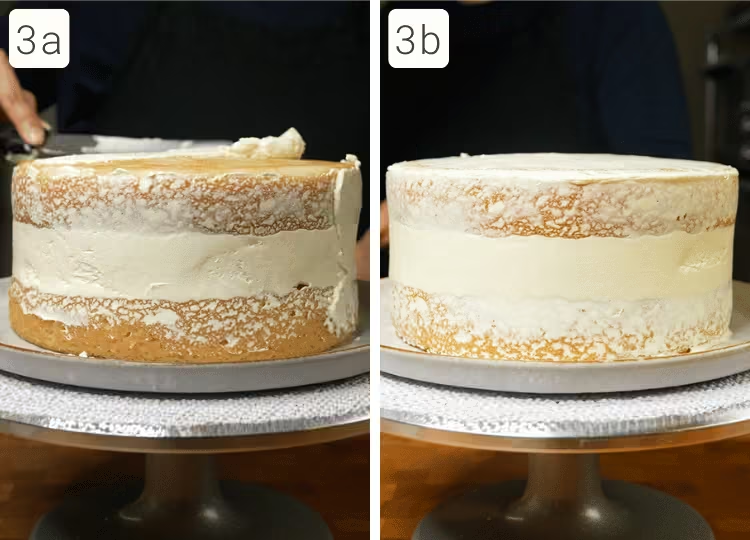
Starting with the top, apply a very thin layer of frosting over the entire cake, then lightly coat the sides (3a). Use much less frosting than you think—you should be able to see the cake through the frosting (3b).
STEP 4 | Apply the final coat of frosting.
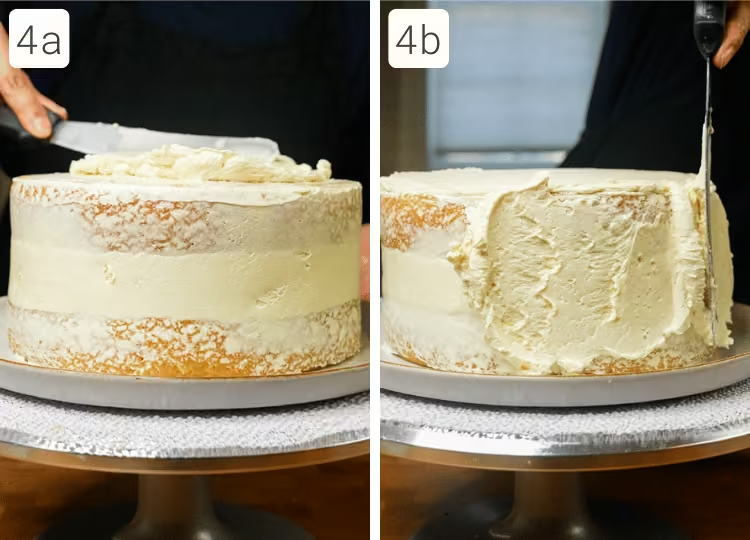
Apply a generous layer of frosting to the top of the cake (4a), then to the sides until fully covered (4b).
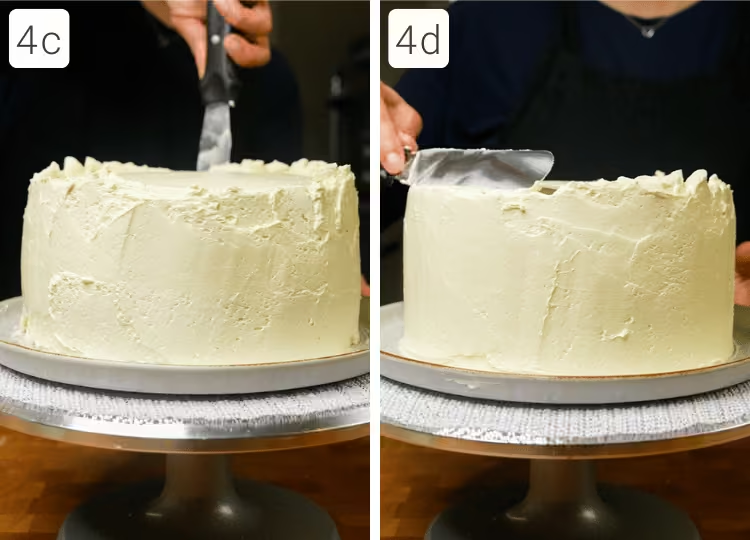
Smooth the frosting by turning the plate while keeping your spatula or knife steady (4c). While the top doesn’t need to be perfect since it will be covered, you can clean up the upper edges by pulling excess frosting inward toward the center (4d).
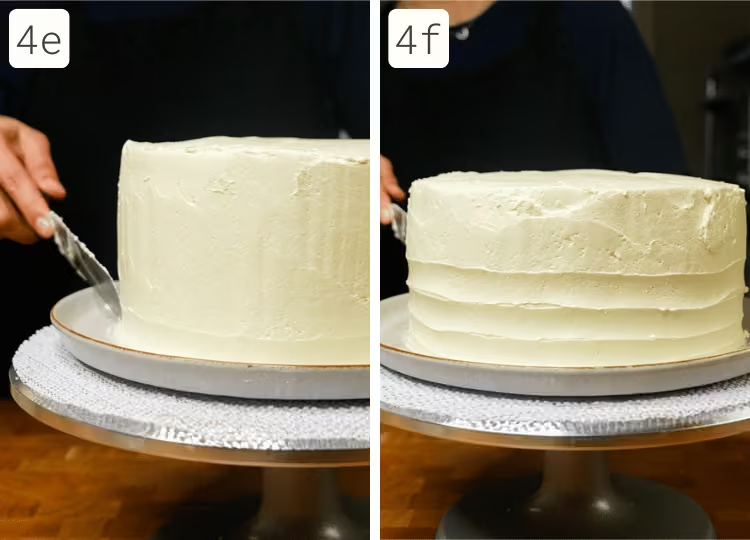
If you used a hand mixer to make your frosting, it’s usually quite difficult to get all the air bubbles out, so my advice is to do a more casual frosting style rather than a completely smoothed-out look. This is one such style - just take your knife and slowly move it upwards towards the top of the cake while turning the plate.
STEP 5 | Finish with fresh berries.
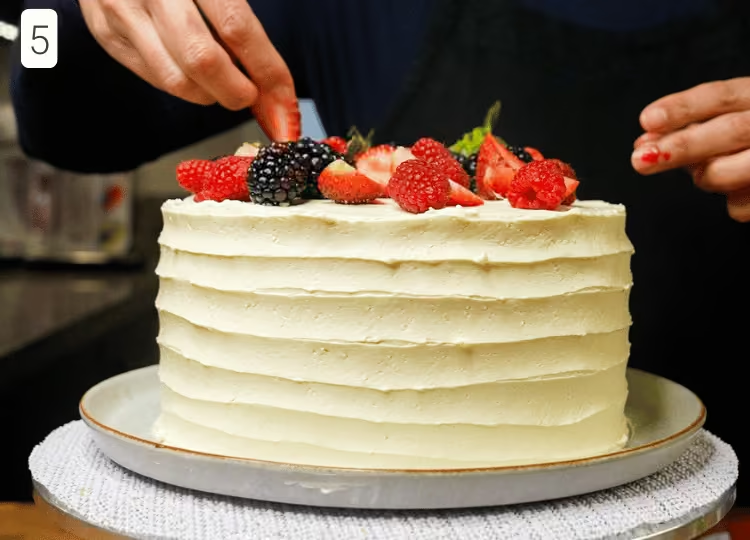
Pile fresh berries on top of the cake, covering the entire surface and stacking them as high as you like.
Did you know that you can create your own cake recipe with Cakeculator?
My Cakeculator tool allows you to modify cake recipes so you can bake the one you want. The options I selected to create this recipe are:
Cake Flavor: Vegan Vanilla
Pan Size: 8" (20.3cm) round, 2-layer
Frosting Flavor: Vegan Vanilla American Dreamy Buttercream
Frosting Level: Medium Coverage
Here are some great suggestions for you to experiment with:
One dozen Vegan Vanilla Cupcakes with Vanilla American Dreamy Buttercream (this recipe makes the FLUFFIEST vegan cupcakes!)
Chocolate Indulgence Cake with Vanilla American Dreamy Buttercream, 2 layers, 8-inch rounds (not vegan as the cake has eggs, but it is dairy-free!)
Video
Honors Members Section
This extra material is accessible to Sugarologie Honors members.
Become a member to view extended research notes, technique analysis, and supplemental materials! Learn more about Sugarologie Honors here.
Already a member?
Before starting the recipe, please read this!
Measure by weight, if possible.
Measuring by weight is the best way for you to replicate my recipes. I develop recipes using ingredients (even liquids) measured in grams, which is why you see them listed first in the recipe cards. For measurements under 5 grams, I will typically only list the volumetric measurements (teaspoons, etc.), as most home scales are not precise for such small weights.
In most cases, I have converted grams to volumetric measurements (aka US customary units) for bakers who prefer this method. However, the measurements are not as precise and may have awkward proportions. The recipes should still work, but for the ultimate precision, try to use weight.
This is the OXO scale I use daily. I also purchased this budget version of a good scale, which I keep at my Mom’s house for baking. If you’re interested in other tools I use for my baking, I’ve compiled a list here.
Use room temperature ingredients.
All my ingredients should be used at room temperature, or 65-75 °F/18-24 °C. I will always indicate if you need something outside this range. If no details are given, room temperature is the default.
Pay attention to the ingredient descriptions.
I try not to be brand-specific, but I will always note an interesting result from a type of ingredient, be it negative or positive.
A specific note regarding salt: I use Diamond Crystal Kosher salt for everything on this site except for frostings. In frostings, you want the salt to dissolve more easily, and kosher salt tends to leave granules behind. If you substitute table salt (more finely granulated) for recipes that list kosher salt, you must use half the volume indicated in my recipes.
Substitutions are hard.
That said, substitutions aren’t impossible but can be the toughest part of recipe development. Small swaps, like reduced-fat milk (2% fat) for whole milk (3.5% fat), usually work fine. However, bigger changes—such as replacing oil with applesauce or sour cream with Greek yogurt—can significantly impact texture and density.
Be wary of general, all-purpose substitutions in baking; I find that usually there is never a one size-fits-all solution. I carefully select ingredients for my recipes, so for the best results, start with the original recipe and modify with caution.
Read all the recipe instructions before beginning.
I’m in the “Pre-read the Chapter before Class Lecture” club... and I invite you to join! Baking new recipes can be intimidating, so let’s set you up for success. I want you to think about timeframes. Most fillings and frostings can be made ahead of time, and give you an extra day for mental space. Also, as you become a more proficient baker, you can anticipate and recognize steps. (“Oh, this has a meringue step, so I’ll need an extra clean bowl…” etc.) Ensure you go down the ingredient list and have everything at the right temperature.
.avif)

%20(1).png)


Vegan Vanilla Cake with Vegan Vanilla American Dreamy Buttercream
For Vegan Vanilla Cake:
(makes two 8-inch round layers, approx 1.75 inches tall)
- 120 g (1 cup) all-purpose flour, unbleached (for gluten paste)
- 120 g (½ cup) water, room temperature (for gluten paste)
- 450 g (2 ¼ cups) white sugar
- 4 teaspoons baking powder
- 8 g (2 teaspoons) white miso paste*
- 360 g (1 ½ cups) water, room temp (for batter)
- 149 g (¾ cup) oil (any flavorless vegetable-based)
- 4 teaspoons butter extract**
- 3 teaspoons vanilla extract***
- 2 teaspoons salt
- 319 g (2 ⅔ cups) all-purpose flour, unbleached
- 20 g (2 ¾ tablespoons) chickpea flour or besan****
For Vegan Vanilla American Dreamy Buttercream:
(makes about 4 ½ cups):
- 510 g (2 ¼ cups) unsalted plant-based butter sticks⟡, softened slightly
- 120 g (1 cup) powdered sugar (1), unsifted ok if not clumpy
- 8 g (1 ½ teaspoons) vanilla extract
- 5 g (1 teaspoon) butter extract (optional, but delicious)
- ⅛ teaspoon fine sea salt (to taste, start with a pinch)
- 312 g (1 cup) sugar syrup⟡⟡
- 30 g (¼ cup) powdered sugar (2), optional
- 30 g (2 tablespoons) plant-based milk or creamer (optional)⟡⟡⟡
For Decorating:
- assorted berries, washed and dried (optional)
Bake the Vegan Vanilla Cake:
- Preheat the oven + prepare the pans.
Move your rack to the middle position. Preheat the oven to 350 °F (180 °C).
Spray with oil the insides of two 8" cake pans and line the bottom with a circle of parchment paper.
- Mix the gluten paste.
In a separate large mixing bowl, combine the all-purpose flour (labelled “for gluten paste”) with the water (labelled “for gluten paste”). Mix on medium-high speed for about 2-3 minutes. The flour and water will be clumpy at first, then gradually stick together and smooth out as gluten develops. You’re done mixing when the paste can form a soft, sticky, loose ball. - Combine the wet ingredients with the gluten paste.
Add the white sugar, baking powder, white miso paste (if using), and a splash of the water (labelled “for batter”) to the gluten paste, and mix on low speed until everything is well mixed.
Add the remaining water in a steady stream until all is used, then mix on medium speed for 30 seconds.
Add the oil, extracts, and salt and mix for an additional minute on medium-high speed.
Set this aside. - Sift in the dry ingredients.
In another small bowl, sift in the all-purpose flour (labelled “for the batter”) and chickpea flour. Whisk the dry ingredients together for about 30 seconds. - Mix everything.
Add the dry ingredients to the cake batter in 4-5 additions, mixing on low speed after each addition. Once everything is added, mix for another 10-20 seconds on low speed. - Fill the pans.
Evenly distribute the batter into the prepared pans. - Bake for about 50-55 minutes.
Generally, vegan cakes take a little longer to bake. Poking the surface of the cake too early (with a skewer or thermometer) can cause the center to sink, as the cake is more delicate. I suggest using visual cues to assess doneness first, then try a poke test.
You’ll know the cake is done when it has a slightly domed, shiny surface. When you shake the pan, the centers should not jiggle. Pressing gently on the cake's surface with your fingertip should leave a slight indentation, but it should feel somewhat firm. After this, you may attempt a poke test with a skewer, which should not have any crumbs attached. With a thermometer, this cake is done around 200-205 F/89-91°C. - Cool the cakes.
Move the pans to a wire rack and allow them to cool in the pans. Some cakes will deflate slightly (particularly the chiffons), but all my cakes are designed to be cooled while resting upright in the pans. - Remove cake from the pan.
I remove cakes from their pan while they are still slightly warm to preserve moisture. Once the cake pan has cooled enough to handle, slide a knife around the perimeter of the cake to loosen it, then carefully invert the pan onto a wire rack or plate. The cake should fall right out, and you can peel the parchment off the bottom. You can leave the cakes out if your frosting is done, and you're immediately moving to assembly. Usually, if it's more than 30 minutes, I will wrap the cake in plastic to reduce moisture loss. The cakes must be completely cooled before moving on to the assembly.
Make the Vegan Vanilla American Dreamy Buttercream:
- Prepare the Frosting Butter.
Add the slightly softened plant-based butter to the stand mixer bowl (or a large bowl, if using a hand mixer). Using the whisk attachment (or a hand mixer), mix on low to break it up, then whip on high until smooth and creamy.
Add the powdered sugar (1), extracts, and a small pinch of salt to the butter, whisking again at medium-high speed for 1-2 minutes more.
- Add the sugar syrup incrementally.
Add the syrup in 3 to 4 additions. Stop the mixer, add a small amount, then mix at medium speed with the whisk attachment. Repeat until all the syrup is incorporated, scraping down the bowl a couple of times for even mixing.
Mix at high speed for 1 minute after adding all the syrup. Since corn syrup is clear, it can be hard to tell when it’s fully emulsified, so set a timer and mix for the full minute. - Adjust frosting for sweetness and density.
Adding this second amount of sugar will make your buttercream slightly looser. You can easily adjust the buttercream back to a firmer consistency by adding a little softened vegan butter.
Taste the frosting; the amount of powdered sugar you add in this step is dependent on the type of sugar syrup you use (some are sweeter than others) and your preference for sweetness. You can add more powdered sugar or none at all, depending on your preferred sweetness. If it tastes okay, move on to Step 4.
If you would like it sweeter, add powdered sugar (2) in small increments, tasting as you go until you reach the desired sweetness. Once you have the desired sweetness, mix on high speed for 30 seconds to 1 minute. - Adjust frosting for texture and flavor.
Taste the frosting; if it's too buttery, add the plant-based liquid one tablespoon at a time until the desired consistency is reached. Adjust salt and extracts as needed.
If you’re working on a stand mixer, switch to the paddle attachment and smooth the frosting at low speed for a few minutes to remove large air pockets. If you’re using a hand mixer, switch to using a spatula to press and smear the frosting against the side of the bowl. It’s not nearly as effective as the stand mixer, but it should work a little at smoothing things out.
Assemble the layer cake:
- Add the first layer of cake.
Place the flat side of one cake against a large plate, cake board, or platter at least 10 inches in diameter. Add about 1 ½ cups of frosting to the top of the cake layer, and use a spatula to spread it as evenly as possible. - Add the second layer of cake.
Now, place the other layer gently on top of the frosting. I like to ensure I have a flat surface for the final top of my cake, so I use the bottom of the cake layer against the pan rather than the round top from baking. This will help you get a cleaner look for the final cake.
Use your hand to apply gentle pressure to ensure the cake sits evenly. I get down to eye level and check the sides to make sure they’re lined up, too.
Now take some small bits of frosting to fill the gap between the first and second layers. This is so the cake sits evenly and forms a perfect cylinder. - Apply a crumb coat.
Starting at the top, apply a super-thin layer of frosting to help prevent crumbs from forming on the outside of the cake. You will often need much less than you think. My crumb coats are so thin, I can see the cake underneath. - Apply a top coat of frosting.
You should now have a generous amount to apply to the outside of your cake. I start with a layer, working from the top down, then the sides. Once it’s completely covered, go back and smooth it out by turning the plate while keeping the knife still. You don’t need to neaten the top since it will be covered with berries, but I still like to clean up the upper edges by pulling the frosting sticking up toward the center with a knife. - Add fresh berries.
Pile the berries on top of the cake, covering the entire surface and piling as high as you like.

Recipe Card - Adriana's Notes
*White miso paste is a thick paste made of fermented white soybeans and provides a very slight umami flavor that is often missing from vegan cakes. It’s absolutely not essential in that its presence or absence will not impact the texture or structure of the cake in any way. It’s more of a “nice to have” ingredient, and I’ll often use it if I already have it in my fridge, as it adds a more complex flavor profile to the final vanilla cake.
**Butter extract is an essential base flavor for this cake. Without it, the cake will taste a tad “green/vegetal” from the chickpeas. My favorite extract so far is LorAnn Butter Bakery Emulsion, which is a vegan product. Their Butter-Vanilla extract is also good, though a little light on the butter flavor, and their Buttery Sweet Dough extract is very delicious, tasting like buttery sugar cookies. You can view the results of this experiment in the introductory section of this recipe.
***This is a vanilla cake, so you can use vanilla here, or really highlight the butter flavor by adding extra butter extract. I also like to use almond extract, but it's strong, so I use only half the amount of vanilla called for in this recipe. Ube is also delicious, and you can use the full amount listed in place of vanilla.
****Chickpea flour is a finely ground powder made of dried and ground chickpeas (also known as garbanzo beans). You can use either product labeled “chickpea/garbanzo bean flour” or “besan.” The latter is slightly stronger in protein power, yielding a slightly higher rise for your cake, but it is also more “beany” in flavor. For the cake above, I used Bob's Red Mill Chickpea Flour.
⟡You can use most plant-based butters, just ensure they are available in stick form and therefore are formulated to be more stable or solid at room temperature. I used Country Crock Unsalted Plant Butter sticks for the recipe pictures above.
⟡⟡There are several types of sugar syrups you can use in this buttercream. In my photographs above, I’ve used light corn syrup. If you’d like to use another type of syrup, refer to my American Dreamy Buttercream master guide. Even though this is a vegan recipe, the sugar syrup substitutions are the same.
⟡⟡⟡If, at the end of mixing, you find your buttercream is too thick/heavy/overly buttery, you can add the plant-based milk/creamer. Start with one tablespoon, whisk on high speed, and taste it. You can keep doing this until you like the texture and taste.
.avif)
.avif)

Got room for more dessert?
Subscribe to my Crumby Data newsletter! I share behind-the-scenes looks at recipe development, flavor testing for the Cakeculator, and life as a content creator. It’s free, lands in your inbox every few weeks, and you can unsubscribe anytime...no strings attached :)
Feel free to take a look at previous newsletters here!
.ico)