.avif)
Beautiful Chocolate-Covered Strawberries: Your Complete Guide


My chocolate-covered strawberries are a dream to eat with a creamy, soft luxurious chocolate coating that contrasts with the acidic, juicy ripe berry inside. My method requires no tempering and can be made with any style of chocolate (dark, milk, or white). Texturally, it’s almost like eating a strawberry coated in a soft ganache - yet it firms and dries up 100% so that you can package or display them just like regular chocolate covered strawberries..
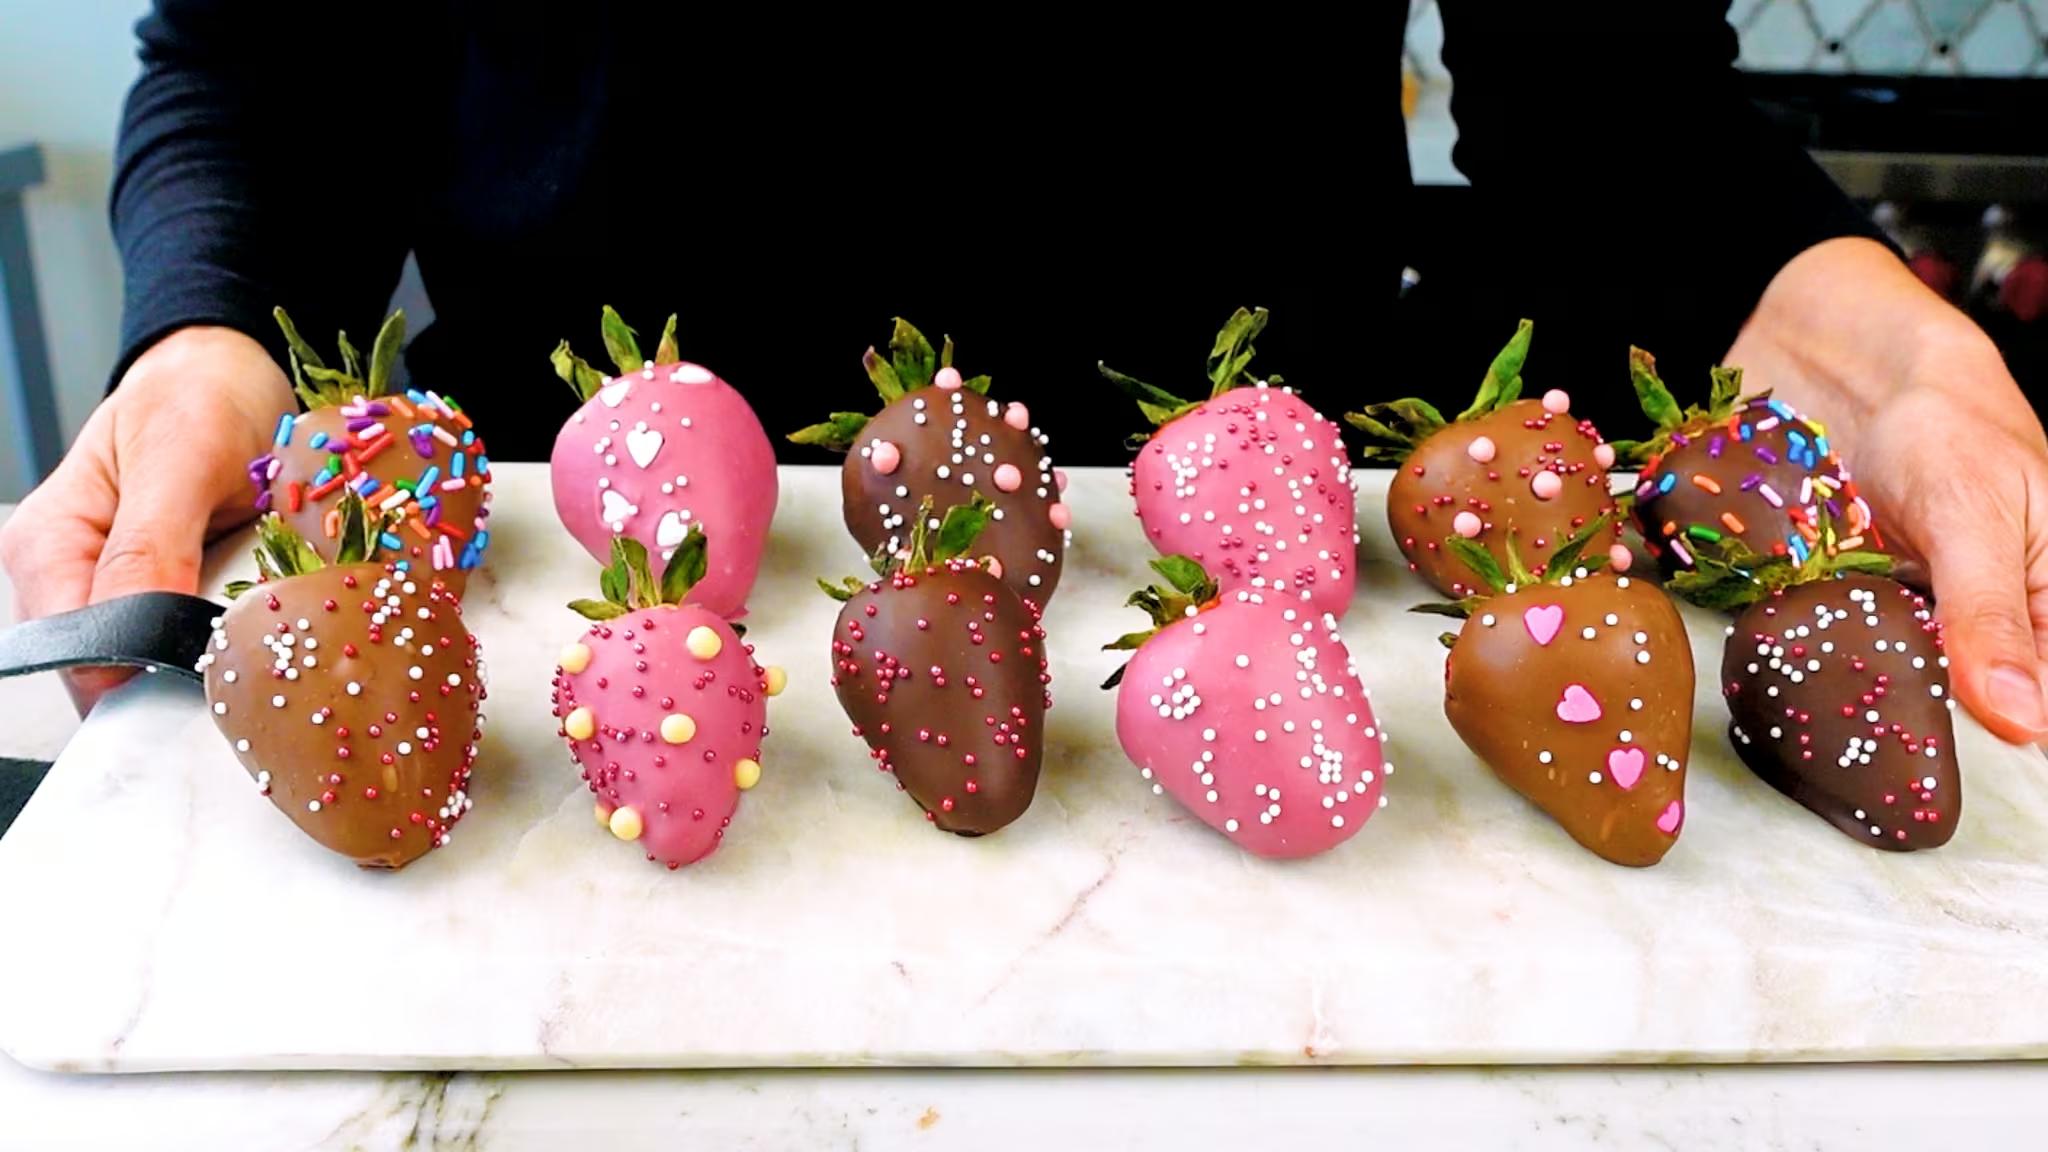
This method works so well and gives the best results for the price and effort - I won’t make chocolate covered strawberries any other way. I make them for my kid’s birthday parties, adult work parties I have to schlep the whole family to, and I even made a huge tray of these for my sister’s wedding.
What is the flavor/taste/texture of my chocolate-covered strawberries?
You can use almost any chocolate flavor (dark, milk, white, or even ruby, as pictured above), so the final flavor and taste will vary depending on your choice.
Usually, as strawberry season progresses and the berries get sweeter, I tend to prefer darker, less-sweet chocolates. Early on in the season or with cheaper grocery store berries (sometimes that’s all we can get!), milk chocolate pairs extraordinarily well, since it’s a little sweeter.
There are a few ways to make chocolate-covered strawberries. You can melt:
- Real chocolate, which usually comes in bars or big discs (called callets). Examples include a Ghirardelli or Lindt bar.
- Compound chocolates or candy coating, such as Wilton’s Candy Melts or Almond Bark. These can be found at your local grocery store. Candy coating is not considered real chocolate because it typically does not contain any cocoa butter.
- A mix of both real and compound chocolates.
So what is the difference between these 3 methods? I’ve summarized them in the table below:

To summarize, using real chocolate is the most expensive way to coat strawberries. It tastes amazing, but it requires a bit more work and tools because of the tempering steps.
Compound chocolate is the cheapest and easiest option since it’s just a melt-and-dip coating, but the flavor can come across as artificial.
Combining both chocolates gives us the best of both worlds - no tempering and lower cost, yet a great flavor. Using both chocolates also alters the final texture, which I’ll show you in the next section.
Strawberry dipped in 100% Callebaut (real chocolate)
.avif)
Using real chocolate creates a beautiful berry with a shiny finish. This is because I tempered the chocolate, meaning I raised the temperature really high, then brought it back down to a low temperature to build the fat crystals. It’s got the best chocolate flavor and creaminess.
Cocoa butter melts at around body temperature, which is why real chocolate has such a luxurious texture. When the knife cuts into the berry, the chocolate cracks, and the hard shell breaks off the ripe strawberry.
Strawberry dipped in 100% Wiltons Candy Melts (compound chocolate)
.avif)
This strawberry is dipped in Wilton’s candy melts; notice the slight matte finish of the shell. And because it contains no cocoa butter, we don’t have to temper it - it’s definitely the easiest to work with. As for the flavor, some people like it, though others may find it a little artificial with a waxy (rather than creamy) texture. As the knife cuts into the chocolate, there’s a dullness rather than a crack, and it also falls off the berry.
Strawberry dipped in a mix of Callebaut and Wiltons Candy Melts
.avif)
Here’s a berry with a 75%/25% mixture of real chocolate (Callebaut 811) and Wilton’s Candy Melts in Dark Chocolate. It cuts very easily and stays adhered to the berry. When you bite into it, it’s creamy yet firm with a wonderful chocolate flavor. This probably happens because the fats in the Candy Melts are interfering with the ability of the cocoa butter to form its more stable-crackly structure, as we saw in the all-real-chocolate berry earlier.
What a dream to eat - a juicy berry with a soft and creamy chocolate coating that tastes amazing.
What ingredients will you need to make chocolate-covered strawberries?
1 | FRESH STRAWBERRIES
Try to find fully ripe berries, which offer more sweetness and aroma. Larger berries are more luxurious-looking but can sometimes be hard to eat. I like medium-sized berries the best for this project.
2 | REAL CHOCOLATE
Real chocolate, by definition, must contain two ingredients: cocoa mass/solids/liquor and cocoa butter, as indicated on its nutritional labels. This gives the chocolate a smooth melt and a glossy, snappy coating when tempered. For covering strawberries, you can use dark, milk, or white chocolate, depending on your sweetness preference. Real chocolate comes in many forms: bars, callets (little discs), or even chips, which I’ll get to in a second.
3 | COMPOUND CHOCOLATE
This type of chocolate is also commonly referred to as “candy/confectionery coatings” or “candy wafers,” although you may be more familiar with commercial names such as “Wilton Candy Melts.” These are not really chocolate because they contain vegetable fats instead of cocoa butter, so they melt and set easily without tempering. These types of candies come in several flavors; however, you should choose one that matches your real chocolate, e.g., a dark chocolate bar with a dark compound candy coating.
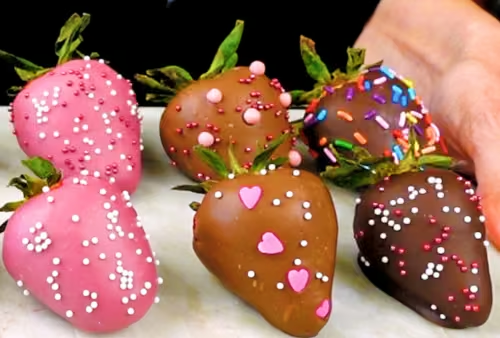
4 | ASSORTED SPRINKLES, SANDING SUGARS, OR CHOCOLATE PEARLS
Feel free to leave your strawberries plain, but decorating them is quite easy, and I’ll show you down below. These decorative toppings add texture, color, and crunch.
Can you use chocolate chips to make chocolate-covered strawberries?
You can. It depends on what type of chip you’re using, though. You’ll get the best results if you look for “real chocolate” chips that list both cocoa mass/solids/liquid and cocoa butter in the ingredients. For example, these Costco chocolate chips down below could work:
.avif)
It’s likely that even though your chocolate chips have the requisite cocoa ingredients to qualify as real chocolate, they may have a different fluidity and setting temperature than bar chocolate. That’s because manufacturers design products for their primary use case, which, for chips, is typically baking them into something, e.g., cookies.
Chocolate chips are exposed to very high temperatures very quickly, so manufacturers often add different ratios of cocoa butter along with possibly higher-melting-point fats to withstand that burst of heat, helping maintain the chip shape in the baked goods.
I don’t want the fact that you only have access to chips to be the reason you can’t have some great chocolate-covered strawberries. Just try to buy the highest-quality chips you can (I know, chocolate is expensive 😞) and watch the textures in the step-by-step below to ensure we’re on the same page.
💡 The altered ratio and types of fats are also why chocolate chip cookies using chips usually spread LESS than those with chopped bar chocolate. The bar chocolate, if it’s real chocolate, uses cocoa butter, which has a lower melting point. In other words, it melts much more easily, so in turn, the cookie will spread MORE.
Step by step:
STEP 1 | WASH AND DRY THE FRESH BERRIES
WHY:
To ensure the berries are clean, I like to rinse with a vinegar-water solution, which creates a mildly acidic environment that helps inhibit microbial growth. Drying thoroughly is critical because chocolate won’t stick well to wet surfaces. Water can also cause melted chocolate to seize (harden and clump).
HOW:
.avif)
Rinse your berries and soak them for a few minutes in a large bowl filled with cold water and a generous splash of vinegar (1a).
.avif)
Carefully hand-dry the berries and place them on another clean paper towel to air-dry completely (1b). Keep them out at room temperature. If the berries are cold and you try to dip them, the chocolate may set before it can form a nice, smooth surface on the berry.
STEP 2 | PREPARE YOUR WORK AREA AND INGREDIENTS
WHY:
The chocolate needs to be still un-set for the toppings to stick; the chocolate can set quickly so have sprinkles set aside and ready before dipping starts. Also, the toothpicks are essential. Dipping strawberries just using their leaves is a guaranteed way to make a huge mess, so inserting two toothpicks into the ends ensures you get a super firm grip on the berry for dipping.
HOW:
.avif)
Lay out all your sprinkles in small bowls. I like to use cupcake liners. Any type of sprinkle should work great, but I think the little pearls (nonpareils or “hundreds and thousands”) look really fancy. I also have some pink CrisPearls in this picture.
Line a tray or a flat plate with wax paper, parchment paper, or foil.
Once the strawberries are dry, insert two toothpicks into the stem end and place them back onto the paper towels.
STEP 3 | MELT YOUR CHOCOLATE
WHY:
Using a microwave is the easiest and fastest way to melt chocolate for this project. You can also use a double boiler or a metal bowl set atop a pot of boiling water. Just follow the same visual cues to heat until 90%.
For the microwave, which I’m demonstrating below, heating it in short bursts with frequent stirring distributes the heat for even melting. And because we’re using a portion of compound chocolate, full-on tempering is not required. We can do pseudo-tempering: melt all the chocolate together until only a few lumps remain, then stir until fully melted.
HOW:
.avif)
Combine both real and compound chocolates in a deep, microwave-safe bowl or cup (3a). The larger discs are my compound chocolate (Ghirardelli melting wafers). Notice how they have a white cast on them; this is ok, it’s just sugar blooming and won’t affect the final coating. The smaller discs (also called “callets”) are a fancier type of Callebaut 811 chocolate.
Microwave on high (1200W) for 20-second intervals, stirring thoroughly between each interval (3b). Do this for 1 minute total. At first, you may think it’s not doing anything, but keep heating and stirring. This helps distribute heat evenly throughout the chocolate, so it melts evenly. After about 1 minute, switch to 10-second intervals and watch the chocolate very carefully.
.avif)
Once about 90% of the chocolate is melted, stop microwaving. Notice how there are still some lumps left in the chocolate (3c)? This is where you’ll stop heating. Next, stir continuously until the remaining lumps melt. In the end, your chocolate should run easily off the spatula (3d).
STEP 4 | DIP STRAWBERRIES
WHY:
Dipping strawberries goes really quickly once you get the hang of it - just start with the largest berries to make the most of the chocolate’s depth before it gets lower. Decorating immediately helps sprinkles adhere before the chocolate hardens.
HOW:
.avif)
Gather the leaves and hold a strawberry using the two toothpicks (4a). Dip it into the melted chocolate (4b).
.avif)
Let the excess chocolate drip off while holding it above the bowl (4c). If using sprinkles, hold the dipped berry over the sprinkle container (4d).
.avif)
Gently shower the chocolate with sprinkles (4e). Place the finished berry on the prepared tray (4f).
.avif)
Repeat with remaining strawberries (4g).
How to store chocolate covered strawberries?
Generally, I like to eat these the day that I make them, or at most within 24 hours. And usually, if that’s the case, I will keep them out at room temperature until serving.
Here are some tips on how to store them:
- Keep them cool: Store the strawberries in a cool place, away from direct sunlight and heat sources. The ideal temperature is between 50-60°F/10-15.5°C.
- Avoid excess humidity: Excess humidity can cause chocolate to melt or become sticky. Store the strawberries in an airtight container on dry paper towels.
- Refrigerate for up to 24 hours: Place them chocolate-side up with a little space between each to avoid smearing. Add a second paper towel layer on top if stacking is necessary, though single-layer storage is best.
To minimize condensation on the berries (which is often inevitable with refrigerated chocolate-covered strawberries) bring the container to room temperature by removing it from the fridge and leaving the lid on for about 15-30 minutes. Then remove the top and let it sit for another 15 minutes.
.avif)
If you ever see chocolate-covered strawberries sitting in a red liquid, that likely means they are a bit old. You can see here, in these berries made the day before, that the paper towels underneath are turning pink. You can still eat them if you trust the source; for instance, I would totally still serve these because the berries inside are perfectly fine and not shrunken due to the moisture loss. BTW, you see those water droplets (picture on the right)? That’s fine too - I just let the berries sit out, and the water will eventually evaporate.
So why do chocolate covered strawberries leak? What’s happened is that the sugar in the chocolate has pulled the water out from the berry. This creates a sugar syrup that pools beneath the berry. If you’re ever macerating berries for a berry topping, i.e, mixing berries in sugar and letting that sit to top a dessert, this is what’s happening. That takes a bit of time to happen, depending on how much sugar you use, but for chocolate-covered strawberries, it’s an indication that they weren't dipped within the past 8-12 hours.
Video
Honors Members Section
This extra material is accessible to Sugarologie Honors members.
Become a member to view extended research notes, technique analysis, and supplemental materials! Learn more about Sugarologie Honors here.
Already a member?
The really great thing about this whole method is that you don’t even have to temper the chocolate, which is one of the more difficult things to learn about in the world of desserts. Conventional chocolate tempering ensures that the chocolate sets properly.
The main stabilizing component in chocolate is fat, which needs to arrange itself in a very specific way to harden. This is otherwise known as crystallization, which I know can be an odd name, but in scientific contexts, crystallization refers to something having a very specific, ordered structure.
And I think the fact that this method relies on a bit of science for understanding and troubleshooting can trip some bakers up.
But the take home message is we can direct the proper arrangement of the fat, and therefore the texture or “hardness” of chocolate via temperatures.
There are different fats and they set up at different temperatures, so we’re essentially destroying the structure (using a high temperature) and then rebuilding it (from a lower temperature). It’s a little bit like tiny lego blocks. And that’s the gist of it! I left lots of detail out for our sanity right now, since it’s not necessary for you to make these strawberries.
Another cool thing to know is that the reason we can get these strawberries to set properly is that we do what I call a pseudo-tempering, where we heat to destroy everything and then leave a small portion of the chocolate unmelted to act as the “seed” or the starting point on which to build the fat properly. We don’t have to be persnickety about it, so no thermometers and stuff like that since we are cutting the cocoa butter fat in the chocolate with the assorted vegetable fats from the compound chocolate. Still, I find this method works best nonetheless.
Here is a video walking you through the process below. Each step in this video will match the recipe card, so be sure to watch the chocolate's consistency to get it right.
Before starting the recipe, please read this!
Measure by weight, if possible.
Measuring by weight is the best way for you to replicate my recipes. I develop recipes using ingredients (even liquids) measured in grams, which is why you see them listed first in the recipe cards. For measurements under 5 grams, I will typically only list the volumetric measurements (teaspoons, etc.), as most home scales are not precise for such small weights.
In most cases, I have converted grams to volumetric measurements (aka US customary units) for bakers who prefer this method. However, the measurements are not as precise and may have awkward proportions. The recipes should still work, but for the ultimate precision, try to use weight.
This is the OXO scale I use daily. I also purchased this budget version of a good scale, which I keep at my Mom’s house for baking. If you’re interested in other tools I use for my baking, I’ve compiled a list here.
Use room temperature ingredients.
All my ingredients should be used at room temperature, or 65-75 °F/18-24 °C. I will always indicate if you need something outside this range. If no details are given, room temperature is the default.
Pay attention to the ingredient descriptions.
I try not to be brand-specific, but I will always note an interesting result from a type of ingredient, be it negative or positive.
A specific note regarding salt: I use Diamond Crystal Kosher salt for everything on this site except for frostings. In frostings, you want the salt to dissolve more easily, and kosher salt tends to leave granules behind. If you substitute table salt (more finely granulated) for recipes that list kosher salt, you must use half the volume indicated in my recipes.
Substitutions are hard.
That said, substitutions aren’t impossible but can be the toughest part of recipe development. Small swaps, like reduced-fat milk (2% fat) for whole milk (3.5% fat), usually work fine. However, bigger changes—such as replacing oil with applesauce or sour cream with Greek yogurt—can significantly impact texture and density.
Be wary of general, all-purpose substitutions in baking; I find that usually there is never a one size-fits-all solution. I carefully select ingredients for my recipes, so for the best results, start with the original recipe and modify with caution.
Read all the recipe instructions before beginning.
I’m in the “Pre-read the Chapter before Class Lecture” club... and I invite you to join! Baking new recipes can be intimidating, so let’s set you up for success. I want you to think about timeframes. Most fillings and frostings can be made ahead of time, and give you an extra day for mental space. Also, as you become a more proficient baker, you can anticipate and recognize steps. (“Oh, this has a meringue step, so I’ll need an extra clean bowl…” etc.) Ensure you go down the ingredient list and have everything at the right temperature.
.avif)
.avif)

.avif)

Chocolate-Covered Strawberries
- 454 g (16 ounces) fresh, ripe strawberries, room temperature
- 170 g (6 ounces) real chocolate, bar or callets*
- 57 g (2 ounces) compound chocolate**
- Assorted sprinkles, sugar, or chocolate pearls (optional)
EXTRA MATERIALS:
- Toothpicks for holding the strawberries while dipping
- Tray with parchment/wax/foil to dry the strawberries
NOTE: If you’re making dark chocolate berries, use dark real chocolate and dark compound chocolate. Same goes for milk or white - try to match both flavors for the real and compound chocolate.
- Wash and dry the fresh berries.
Rinse your berries and, optionally, place them into a large bowl filled with cold water and a healthy splash of vinegar. This will help prevent mold growth. Let that sit for a couple of minutes.
Rinse the berries again under cold water and hand-dry with a paper towel, ensuring you get the stem regions well. Place them on another paper towel to dry completely.
Keep them out at room temperature. If the berries are cold and you try to dip them, the chocolate may set before it can form a nice, smooth surface on the berry. - Prepare your work area and ingredients.
If you’d like to decorate your strawberries with sprinkles, it’s important to set out all the sprinkles, as they must be applied immediately after dipping the strawberries in chocolate.
Place each type of sprinkles in a small bowl or cupcake liner.
Set aside a drying tray lined with wax paper, parchment paper, or foil. This will ensure the strawberries dry neatly and can be easily picked up when dry.
The strawberries should now be somewhat dry. Take two toothpicks and insert them into the stem end of the strawberry. Repeat with all the strawberries.
If you’re using a chocolate bar for your real chocolate portion, chop it into chip-sized pieces. - Melt your chocolate.
Add both the real and compound chocolates to a heatproof bowl or cup. Make sure you pick a container that is deeper rather than wider. If it’s too wide, the melted chocolate won’t be deep enough to dip the larger strawberries.
Heat in the microwave on high power (1200 Watts) for 20-second intervals, stirring between each step. The first few times, it may feel like nothing is melting, but stirring is essential to distribute the heat throughout the chocolate evenly.
After the first minute, heat on 10-second intervals, stirring with a silicone spatula between each heating step. Do this until after mixing, and you notice that 90% of the chocolate is melted. You should still see some lumps of unmelted chocolate.
At this point, don’t microwave any further, but instead, melt the remaining chocolate by stirring continuously to distribute the heat slowly. This may take up to an additional minute of stirring, depending on the type of chocolate you have.
The chocolate should be smooth and run off the spatula very easily - almost like a thicker house paint consistency. - Dip Strawberries.
I like to start with my largest strawberries, since the container is nice and full of chocolate. Grab one using the two toothpicks, gathering the stems so they don't touch the chocolate. You can tip the container so it’s a bit deeper, then push the strawberry into the chocolate, pulling it up and twisting to ensure it’s almost completely covered, up to the stem.
When the strawberry is covered in chocolate, hold it above the container to let the excess chocolate slide off, jiggling it a bit to help.
If you’re decorating the strawberries with sprinkles, hold one over the sprinkle container and gently drop some onto the wet chocolate. Place the finished strawberry on the prepared tray.
Repeat with all the strawberries.
If you feel like the chocolate is getting too firm in your cup for dipping, place it back into the microwave for 5 seconds and stir. Repeat this until the chocolate is nice and fluid.
These are best consumed within 24 hours of making.

Recipe Card - Adriana's Notes
*Real chocolate contains cocoa solids, sugar, and cocoa butter. Most chocolate bars are made with real chocolate, and I like to use Trader Joe’s Pound Plus Bars because they're good-quality chocolate for the price. A note here on chocolate chips: yes, some types are considered real chocolate, and you can try to use them. Read my note about them in the ingredients section and be sure to check my photographs above.
**Compound chocolate, otherwise known as candy coating chocolate, is not considered real chocolate because it doesn’t contain cocoa butter, but usually vegetable fats. Popular brands include Wilton’s Candy Melts, Ghirardelli Melting Wafers, Merckens, or Almond Bark Candy Coating.
Recommended Sugar Lab Recipes + Experiments


Got room for more dessert?
Subscribe to my Crumby Data newsletter! I share behind-the-scenes looks at recipe development, flavor testing for the Cakeculator, and life as a content creator. It’s free, lands in your inbox every few weeks, and you can unsubscribe anytime...no strings attached :)
Feel free to take a look at previous newsletters here!
.ico)