.avif)
Easy Soft Pretzels (no lye bath)


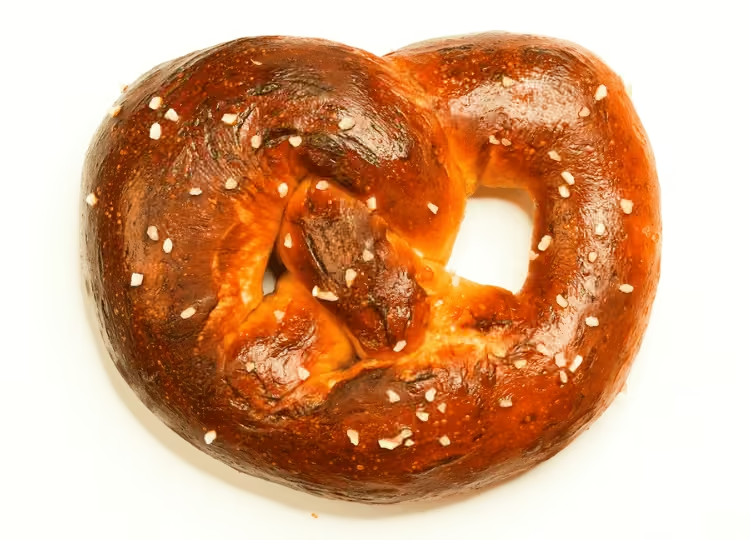
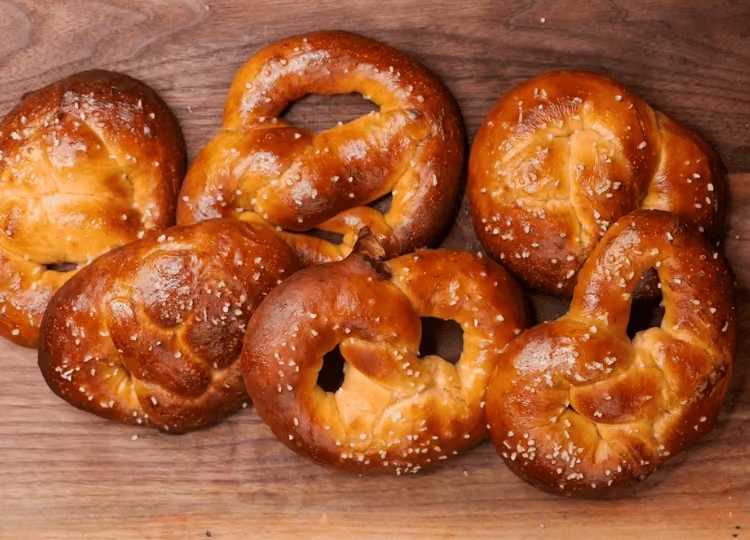
My Easy Soft Pretzels have a super-flavorful, browned exterior and a cottony-soft, buttery interior. It’s a great beginner-friendly recipe as the dough is easy to make and shape. Additionally, instead of using a lye bath, we’ll heat baking soda for our alkaline bath.
To back up for a second, generally, lye baths are my favorite way to make pretzels. The high-alkaline bath reacts with the dough to form aromatic compounds during baking that are distinctly “pretzel.” It’s a relatively quick process that produces the most beautifully browned, shiny-matte crusts. However, I know some find it intimidating because lye is a corrosive chemical. Or perhaps, you don’t have access to lye.
To address this, I wanted to post a more accessible pretzel recipe that doesn’t use a lye bath and still tastes amazing. So instead, we will be heating some baking soda (sodium bicarbonate). This is a super laid-back process that essentially drives off the water, yielding a more concentrated alkaline powder (sodium carbonate). I make the “baked” soda in the downtime while the dough is rising. Additionally, dipping is far less intimidating as the solution is less corrosive.
But that's only half the equation to get the full pretzel experience...
Classic pretzels also have a shiny crust from the high alkaline lye bath. And although the "baked" soda is pretty alkaline, it’s not quite high enough to get the same effect. You may see some pretzel recipes that boil the pretzel dough prior to baking to create the shine, but I’ve opted for an easier route - an egg wash. Not only does it give the pretzels a beautiful, shiny finish, but the proteins in the eggs also intensify the Maillard reaction by adding a bit more protein.
What is the texture and flavor of my Easy Soft Pretzels?
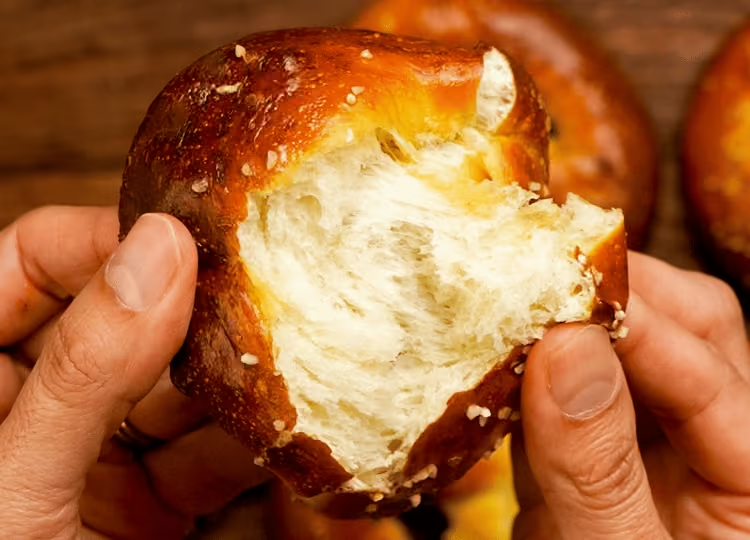
My Easy Soft Pretzels have a chewy crust with a cottony-soft, shreddy-fluffy texture. As they sit out, the crusts soften as the interior hydration migrates outwards.
What ingredients will you need to make my Easy Soft Pretzels?
The flavor of these pretzels is classic - there’s the alkaline crust, with yummy bits of coarse salt. The interior has a slight buttery note but is not sweet.

WARM WATER
Hydrates the flour and activates the yeast. Water allows gluten proteins to link together and form structure, while also dissolving sugars and salts so they distribute evenly. The warm temperature helps yeast wake up without overheating and damaging the cells.
INSTANT YEAST
The most common types of baker’s yeast here in the US are Active Dry or Instant Yeast. I prefer Instant Yeast as it’s a fast-acting strain of Saccharomyces cerevisiae that’s slightly more concentrated. Active dry often contains dead yeast cells, which is why you have to use more in recipes that call for instant yeast. I annotate that for you below if you’re using Active Dry.
Yeast comes in the form of desiccated granules, which are made up of thousands of dormant yeast cells. To wake them up from their slumber, we hydrate them in a comfy, warm bath. The yeast,t of course, is hungry, so they eat sugars contained in your dough and produce byproducts in the form of carbon dioxide, which expands the dough and creates its airy structure.
UNBLEACHED ALL-PURPOSE FLOUR
The flour is the primary source of structure for this bread, via starches, protein, and a bit of fiber. You can use bread flour, which has a slightly higher protein content and therefore generates more gluten, which forms the structural network inside the bread, resulting in a chewier texture. But I find all-purpose flour gives me the soft, yet chewy texture I like in a pretzel.
UNSALTED BUTTER
My pretzel dough is slightly enriched, meaning it contains just a bit of fat and sugar. The fat is coming from butter, which tenderizes the dough by coating some gluten strands and limiting excessive toughness. Butter also contributes flavor and richness, and helps prevent the dough from sticking too much during handling.
WHITE SUGAR
I use white granulated sugar for my pretzel recipe because it offers the best sweetness and airiness. I tested brown sugar, and that worked, but it didn’t produce a typical pretzel texture - it was way too soft (more like a cinnamon roll, and very deliberate reason I use brown sugar in my cinnamon roll recipe ;) ). Brown sugar contains more hygroscopic (water-attracting) sugars, which can make the dough softer.
DIASTATIC MALT POWDER
You’ll often see many pretzel recipes that call for diastatic malt powder. This cream-colored powder is called a “dough conditioner” because it alters the final texture, crumb structure, browning, and flavors of your bread. And it does so because it contains malt diastase, an enzyme naturally found in barley.
If you ever see “ase” at the end of a word (examples: diastase, lactase, amylase) when reading science-y stuff, that’s an indication that you’re dealing with an enzyme. Enzymes are proteins that perform a specific function - I like to think of them as little tools. In this case, we’re dealing with “scissors” in that the diastase is cutting long starches in your dough into smaller sugars.
So, how does this affect the final dough?
More small sugars = more fermentation = more CO2 = loftier bread.
Also, more small (aka reducing) sugars = more Maillard reaction = browner crust.
So, if you want soft, super-flavorful, deep-brown pretzels, diastatic malt powder is a great addition.
SALT
The presence of salt is important for yeast-leavened doughs because it not only strengthens the gluten structure but also regulates yeast activity. Salt slows fermentation slightly, improves flavor development, and prevents overproofing. If you’ve ever forgotten salt in a bread recipe (did that once with sourdough), you’ll see the yeast working faster than usual. Also, your bread won’t taste as good :(
NOT PICTURED:
BAKING SODA
When baked, sodium bicarbonate converts into sodium carbonate, which is more alkaline. This higher pH level helps create the deep brown color and signature pretzel flavor by accelerating the Maillard reaction. Baking concentrates and strengthens its chemical effect for the dipping bath.
EGG WASH
To emulate the shiny crust on a traditional German-style pretzel, we’ll use an egg wash. Instead of relying on starches to gelatinize, we’ll use egg coagulation on the surface to create shine, browning, and flavor.
COARSE OR PRETZEL SALT (OPTIONAL)
Adds texture and concentrated bursts of salinity. The large crystals dissolve slowly, providing contrast to the chewy crust. Over time, salt can draw moisture from the pretzel’s interior through osmosis.
Step by step:
STEP 1 | Bake (concentrate) your baking soda.
WHY:
Heating baking soda converts sodium bicarbonate into sodium carbonate, which is more alkaline. The higher pH results in more intense Maillard browning, which is quite similar to that of pretzels made with the classic lye solution.
HOW:
Preheat the oven to 300°F/150°C. Do not use any fan-assisted heat (convection, etc.) during baking, as it will blow the powder around in your oven. Line a sheet pan with some foil. (This helps remove the powder from the sheet post-baking.)
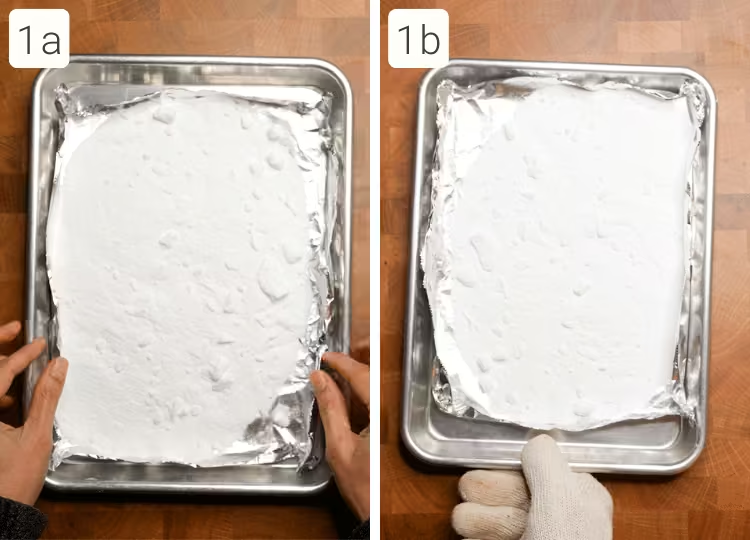
Sift your baking soda onto your pan. If you sift here, it will be tremendously easier to avoid lumps when adding the soda to water to make the bath (1a).
Bake for one hour. You’ll see it may not look very different post-baking (1b), but you have essentially concentrated the baking soda. You will have extra so that you can keep the excess in a properly labeled/dated airtight jar. Sodium carbonate is not as corrosive as lye, but you still shouldn’t be rubbing it into your skin or onto your eyeballs. Just be sure to keep it away from pets and children; I keep mine in a glass jar labelled with the name (sodium carbonate) and date. Keeps for about one month.
STEP 2 | Disperse the yeast in water.
WHY:
Dry yeast (instant or active dry) that we typically use in baking comes in granular form. (The granules look like tubular grains of sand.) Each granule contains thousands of microscopic yeast cells clumped together. I like to add the granules to warm water to evenly disperse the cells, so they create a nice, poofy rise throughout my dough. This step is not actually required for instant yeast, but it is essential for active dry yeast, which contains clumps of dead yeast cells. It’s best to hydrate and break open all those clumps in water so the dead particulates fall off, exposing the live ones so they can work properly.
💡Science Tip: Pay attention to the temperature of your water. I microwave and use a thermometer to ensure it’s around 100 °F (37 °C). Don’t go above 110°F/43°C, or you may slow the yeast down or even kill it. Yeast is a living organism and has an ideal working environment, including temperature. Just like you and I probably study and work more efficiently between 65-75°F (18-24 °C), this species of yeast is most efficient between 75-95°F/24-35°C, which is the temperature of the dough after all the ingredients have been added. It’s happy and healthy and will metabolize (or consume and process) the sugars in your dough. The more sugar it consumes, the more CO2 it creates. So happy yeast = poofy dough!
HOW:
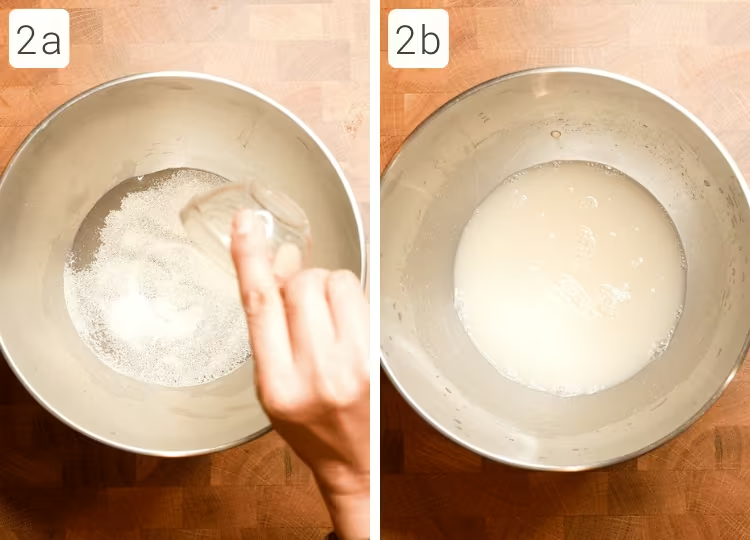
Add the warm water and yeast to the bowl of a stand mixer (or large bowl if mixing by hand) (2a). Use the dough hook (or a whisk) to stir the yeast until it is hydrated and (mostly) evenly distributed (2b). The water will look cloudy when the yeast is more evenly distributed.
STEP 3 | Form the dough ball.
WHY:
Before we can start building structure (or gluten) in the dough, we have to mix everything. And all bread doughs are different; some build a bit of gluten first and then add fatty ingredients (like a brioche), but this pretzel dough is not very enriched (i.e., containing extra fat, sugars, and protein) and has relatively low hydration (around 53%). So it’s much easier to add everything to the bowl until we can form a somewhat tacky ball- often referred to as a “shaggy mass” in bread recipes. Everything is smooshed together, but it is far from containing any type of structure for a nice, aerated bread.
HOW:
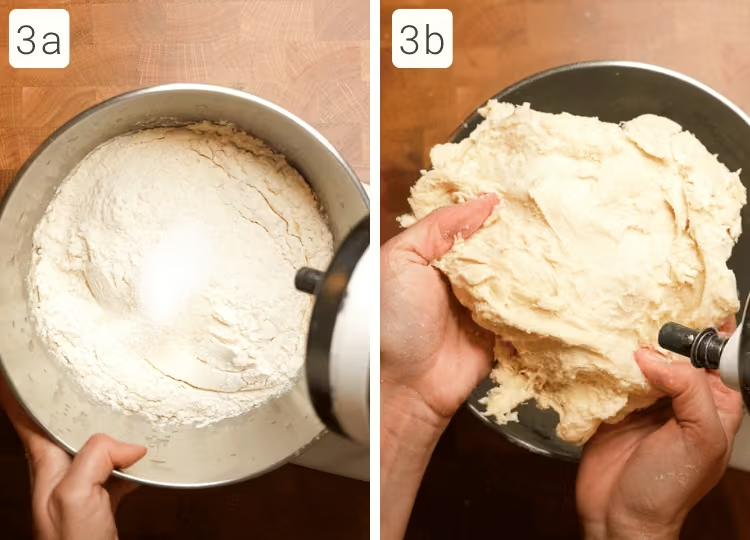
Add the flour, melted butter, brown sugar, diastatic malt powder, and kosher salt (3a). I use my dough hook on low speed to mix everything initially. Then I scrape the sides down clean and use my hands to ensure all the flour is picked up, forming the dough into a shaggy ball (3b). If you're kneading by hand, just form the dough into a somewhat cohesive ball.
STEP 4 | Develop gluten in the dough.
WHY:
Now that we have all the ingredients in an unorganized mass, we have to build a structure so the dough can properly hold air as it ferments. We do this by building gluten, a network of organized flour proteins that form a loose net that can hold air. Adding water and kneading builds this net, and you’ll see the shaggy mass turn into a smoother, more elastic dough.
We’re going to go to high gluten development - that means we’ll continue to knead (or mix with the dough hook) until the dough is very stretchy and you can see light through a thinned piece of dough (also referred to as a “windowpane test.”) I like high gluten developed pretzels; they’re easier to roll into shapes and dip, and they have a lovely cottony-soft interior when baked.
HOW:

I use my Kitchenaid mixer on setting 3 for about 5–8 minutes. Look at my finished dough - it’s so strong that it wrapped itself around the dough hook (4a). It’s also much smoother than when I started. You can also do this manually on the counter by hand if you like, for the same amount of time. Knead until you reach high gluten development; with a windowpane test using wet fingers, you should be able to see light through the dough without it breaking (4b).
This process, especially when using a stand mixer, keeps the dough nice and warm. You can take the dough's temperature here if you like - mine is usually around 85°F/29°C, ideal for fermentation in the next step. This is also called DDT (desired dough temperature) and helps determine how long to ferment dough or troubleshoot if your dough isn’t rising. Again, it’s not necessary to do this, particularly because this dough is super forgiving, but I thought I’d drop this bit of info here if you’re a bread nerd.
STEP 5 | Bulk ferment the dough.
WHY:
We’ve handled the dough quite aggressively, so now it’s time to let the gluten relax and for fermentation to do its thing. During fermentation, yeast produces carbon dioxide and organic acids, which expand the dough and build flavor. As for the relaxation part - the proteins actually get pretty wound up during mixing - that’s the beauty of its elastic function, and allowing the dough to relax allows these proteins to release a bit of that tension. That way it’s easier to roll into pretzels for the next step. And make sure you cover that bowl - otherwise your dough will develop a hard skin, and it won’t be able to stretch and grow as it needs to.
HOW:
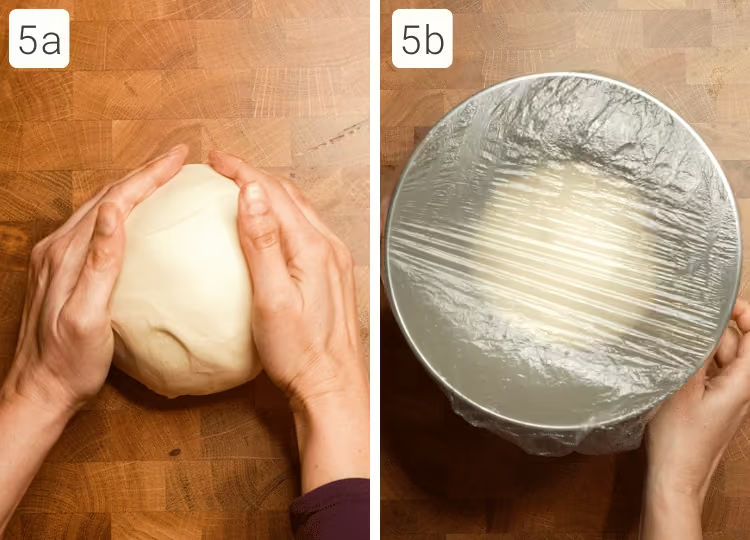
Remove the dough briefly to coat the bowl with a bit of oil. I like to shape the dough into a ball before putting it back (5a). Cover and allow to ferment (rise) in a warm spot for about an hour, or until it has doubled in size (5b). I have a proofing setting on my oven, and after an hour at 85°F/29°C, it has doubled in size in my bowl.
Meanwhile, line two trays with parchment paper and lightly brush them with oil (or spray them). This prevents the pretzels from sticking to the baking sheet.
STEP 6 | Shape the dough into pretzels.
WHY:
Although you can really shape pretzel bread however you like, classic pretzels have a shape that prioritizes a large surface area. With more of the bread’s exterior exposed to heat, the outer crust can brown more readily. This flavors every bite of the pretzel with the characteristic alkaline taste for which pretzels are known.
HOW:
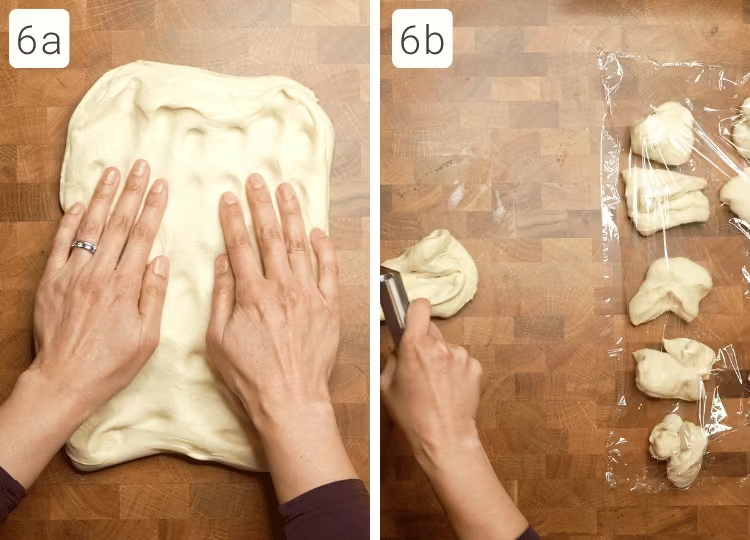
Place your dough onto your counter and gently press out the air a little (6a). I know this is called punching down (or, more technically, “de-gassing”), but I don’t literally punch the dough. You’ve worked so hard to create a beautiful dough - it seems strange to do that. (A bit performative for videos, maybe?)
As this dough is slightly enriched and has a bit of butter, it should not stick to your counter. If it does, you can add a light dusting of flour. Divide your dough into 12 individual pieces. (That’s about 75 grams each, if you want to get nerdy about it). Cover with plastic wrap to prevent them from drying out (6b).
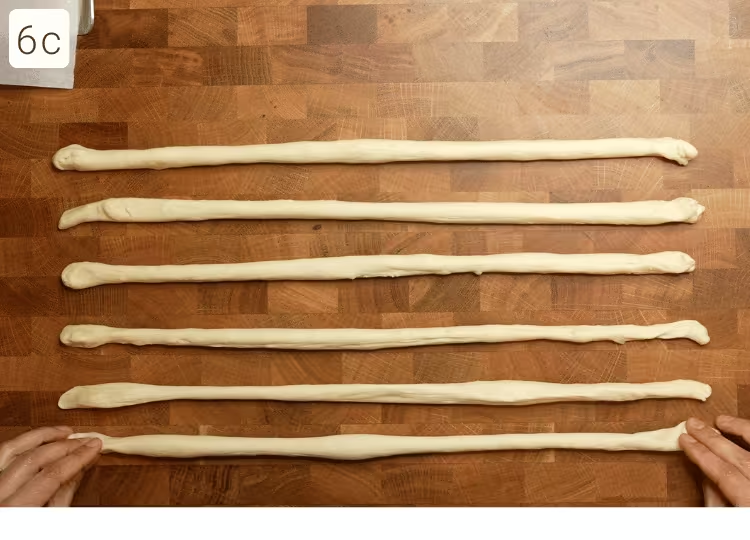
I work with 6 pieces at a time, rolling the first one 18-24 inches, then using that as the guide to roll the others (6c). The longer your rope, the skinnier the pretzel with larger holes; the shorter your rope, the more your pretzel bakes with fewer gaps and is more “bun-like.”
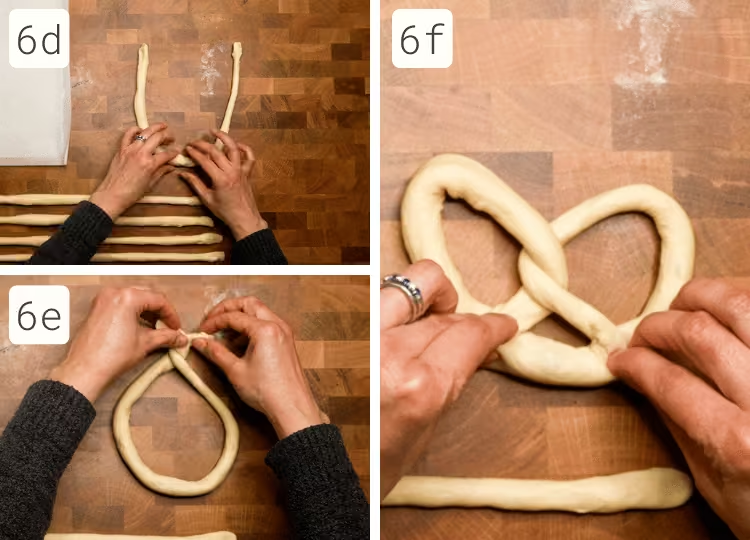
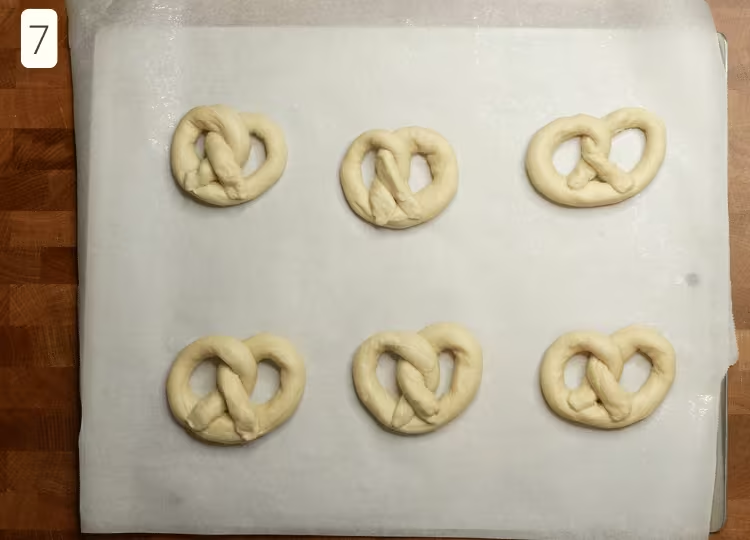
Starting with the first rope of dough you made, form the letter "U" (6d). Take the two legs and cross them twice (6e), then pull the legs down over the base of the "U", pressing gently so they stick (6f). Lay your pretzels on your greased sheets. Repeat with the other ropes.
STEP 7 | Rest the pretzels.
WHY:
This short rest allows the gluten to relax slightly so the pretzels hold their shape during dipping. I also like to leave my pretzels uncovered because they form a skin that makes them a bit easier to handle. They shouldn’t really get poofy at all, like some other breads. If that happens, they will be a pain to dip. And don’t worry, they will still get nice fluffy interiors when baked.
HOW:
Do not cover (it will hold up a little better in the bath), and let it rest at room temperature on their baking pans for another 20–30 minutes. I usually let it rest until it's time to set up my dipping station and preheat the oven in the next step.
STEP 8 | While the pretzels rest, prepare the oven and the bath.
WHY:
An alkaline bath raises the pH of the pretzel’s exterior, enhancing Maillard browning and yielding that signature pretzel color and flavor. There are a few ways to make an alkaline bath, and I’ve tested most of them (except for the boiling lye bath - even as a mad scientist I have no desire to run that experiment in my house). My favorite is the cold lye bath - but I understand that can be intimidating, so my second favorite, which is a bit easier and honestly, gets you 90% of the way there, is a cold baked soda bath.
HOW:
After we’ve preheated the oven to 425°F/220°C, we can make our alkaline bath using the baked soda we set aside from Step 1. Add 500 g (2 cups) of cold water to a non-reactive container. (Stainless steel or Pyrex glass should be fine.)
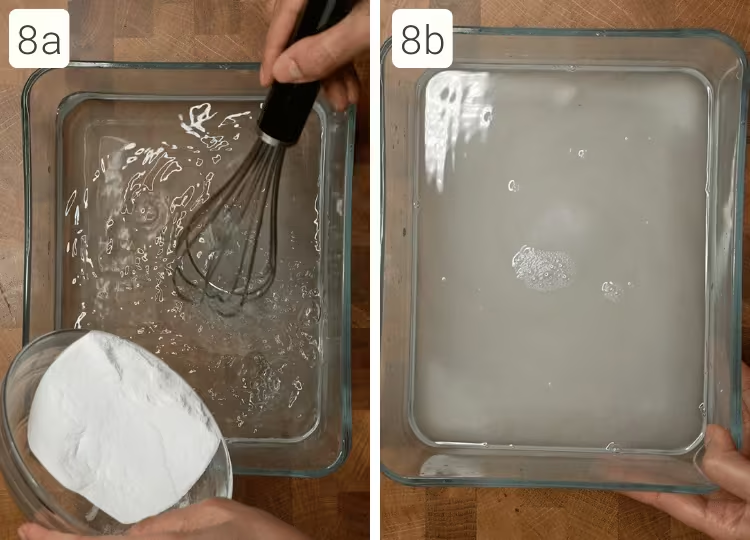
You know how we sifted the baking soda in step 1? That is one way to avoid annoying clumps in your alkaline bath. Those clumps are really hard to dissolve and can stick to your pretzels. Part two in making this alkaline bath is to add the soda very slowly to the water while whisking the entire time (8a). In other words, don’t dump all the baked soda at once.
Even when I do this, I’ll still get some clumps, and I’ll just fish those out with my strainer. You don’t want them sticking to the wet pretzel dough, because they won't taste very good if they bake onto the pretzel.
The finished alkaline bath should be cloudy, and it’s ok if there’s some residual powder at the bottom (8b).
STEP 9 | Dip your pretzels.
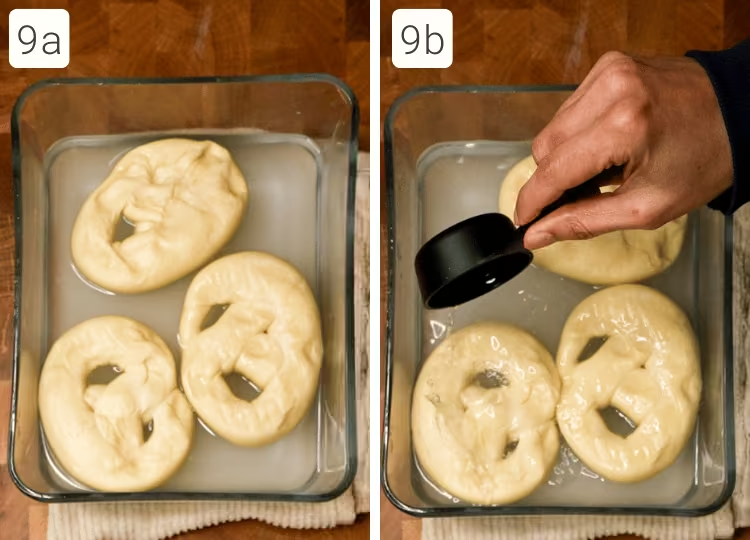
Use your hands to gently pick up each pretzel and add it to the baked soda bath, face down (9a). Use a slotted spoon to submerge the pretzels, ensuring they are covered, and occasionally spoon the solution onto them (9b). Leave them in the bath for 3 minutes. I like to do three pretzels at a time, but that will depend on the size of your alkaline bath container. (BTW, my pretzels are slightly overproofed here; yours will likely not be as chubby.)
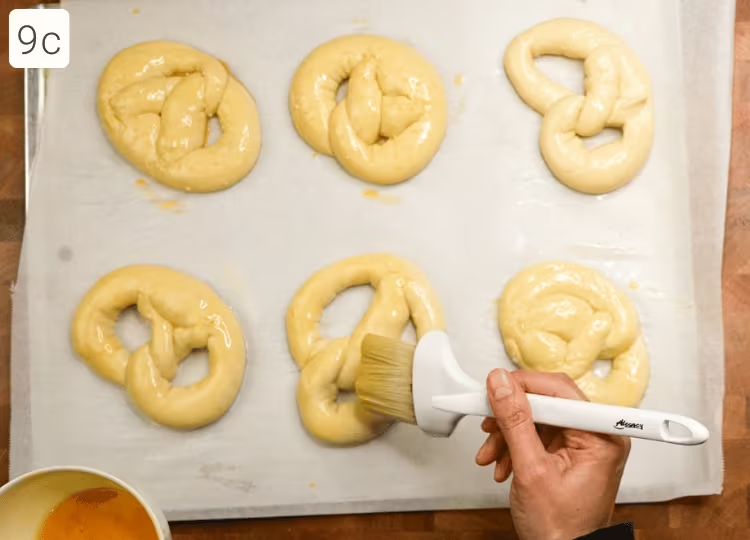
Remove each pretzel, allowing the solution to drain, and flip them right side up onto the same baking sheet. Lightly brush the surface of each pretzel with egg wash (9c).
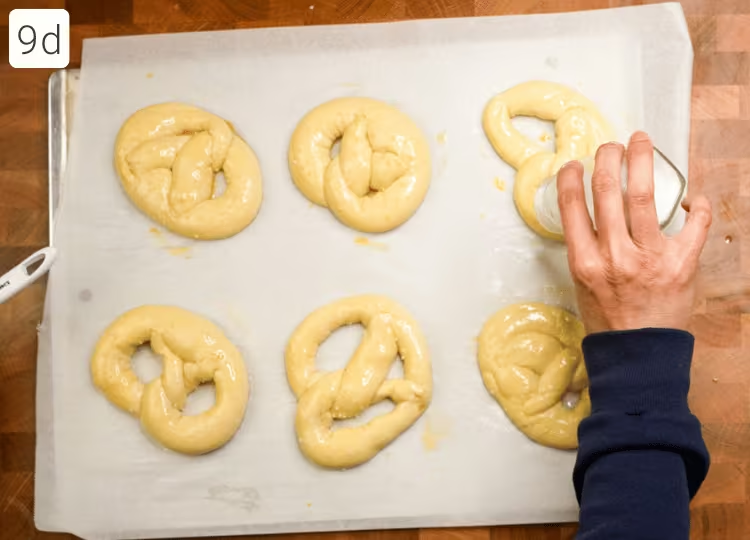
Sprinkle lightly with pretzel or coarse salt if you are serving these the same day (9d). (Leaving coarse salt on baked pretzels for more than 24 hours draws moisture from the pretzel's interior outward, creating blisters of salt on the pretzel's surface.)
STEP 10 | Bake for 8–12 minutes.
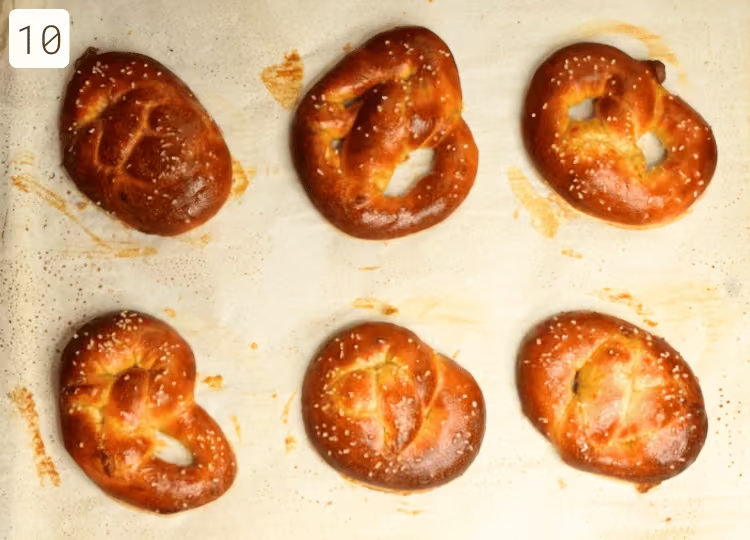
Bake for 8–12 minutes. The pretzels are done when they are slightly puffed and golden brown. Use a spatula to move the pretzels to a cooling rack to cool completely.
Video
Honors Members Section
This extra material is accessible to Sugarologie Honors members.
Become a member to view extended research notes, technique analysis, and supplemental materials! Learn more about Sugarologie Honors here.
Already a member?
How and why a Sodium Carbonate bath works as a no-lye pretzel bath
To properly emulate a traditional lye-dipped pretzel, I had to identify the changes that occur in the dough under highly alkaline conditions.
I think the most obvious is the deep brown color. This drastic color change is due to the Maillard Reaction, which occurs more readily in alkaline environments. It’s the same reason why baking soda is added to chocolate chip cookies, lest they remain pale during their short baking period. And the more alkaline, the more quickly it browns.
The extreme alkalinity also messes with the surface starches of the pretzels, causing them to gelatinize. This is why the surfaces are shiny. Heat also gelatinizes starches (via a slightly different mechanism), which is why bagels are shiny and why some pretzel recipes that use baking soda also call for a boiling-water bath. (The baking soda is not alkaline enough to gelatinize the starches themselves.)
Then there are the flavor changes. Alkaline foods are something I think about quite often because they’re more scarce than their acidic counterparts. Yet, they do have their place in foods, and pretzels are a really great example of that. You can’t have pretzel flavor without the bread's alkaline outer surface.
I’ve tried multiple scenarios and combinations of baking soda, heat, ingredients, and baking time to find the easiest way to replicate a lye bath. In all scenarios where I used only baking soda (sodium bicarbonate), the pretzel flavor was too diluted. The alkalinity isn't high enough to create that characteristic pretzel flavor.
.avif)
The best I tried? A ‘baked’ baking soda bath. By heating baking soda in an oven, you essentially concentrate it by removing water and making sodium carbonate - a much stronger alkaline ingredient (Thanks, Harold McGee!) It’s pretty simple: I bake my soda while the bread is rising, since that’s an inactive time in the recipe anyway.
I've done away with the boiling-water bath. I find it to be an extra step, and you can get the same result by haphazardly brushing the pretzels with egg wash. We can’t emulate the gelation of starches via alkilization with heat - the flavor is not the same.
So instead, I’m swapping the gelation of starches with the coagulation of proteins - both yield a shiny result. In addition, the egg wash enhances the Maillard reaction by adding extra proteins, so it’s a win-win for me.
If you're up for the full pretzel experience, you could also try my Authentic Pretzel Recipe, which uses a lye bath.
Before starting the recipe, please read this!
Measure by weight, if possible.
Measuring by weight is the best way for you to replicate my recipes. I develop recipes using ingredients (even liquids) measured in grams, which is why you see them listed first in the recipe cards. For measurements under 5 grams, I will typically only list the volumetric measurements (teaspoons, etc.), as most home scales are not precise for such small weights.
In most cases, I have converted grams to volumetric measurements (aka US customary units) for bakers who prefer this method. However, the measurements are not as precise and may have awkward proportions. The recipes should still work, but for the ultimate precision, try to use weight.
This is the OXO scale I use daily. I also purchased this budget version of a good scale, which I keep at my Mom’s house for baking. If you’re interested in other tools I use for my baking, I’ve compiled a list here.
Use room temperature ingredients.
All my ingredients should be used at room temperature, or 65-75 °F/18-24 °C. I will always indicate if you need something outside this range. If no details are given, room temperature is the default.
Pay attention to the ingredient descriptions.
I try not to be brand-specific, but I will always note an interesting result from a type of ingredient, be it negative or positive.
A specific note regarding salt: I use Diamond Crystal Kosher salt for everything on this site except for frostings. In frostings, you want the salt to dissolve more easily, and kosher salt tends to leave granules behind. If you substitute table salt (more finely granulated) for recipes that list kosher salt, you must use half the volume indicated in my recipes.
Substitutions are hard.
That said, substitutions aren’t impossible but can be the toughest part of recipe development. Small swaps, like reduced-fat milk (2% fat) for whole milk (3.5% fat), usually work fine. However, bigger changes—such as replacing oil with applesauce or sour cream with Greek yogurt—can significantly impact texture and density.
Be wary of general, all-purpose substitutions in baking; I find that usually there is never a one size-fits-all solution. I carefully select ingredients for my recipes, so for the best results, start with the original recipe and modify with caution.
Read all the recipe instructions before beginning.
I’m in the “Pre-read the Chapter before Class Lecture” club... and I invite you to join! Baking new recipes can be intimidating, so let’s set you up for success. I want you to think about timeframes. Most fillings and frostings can be made ahead of time, and give you an extra day for mental space. Also, as you become a more proficient baker, you can anticipate and recognize steps. (“Oh, this has a meringue step, so I’ll need an extra clean bowl…” etc.) Ensure you go down the ingredient list and have everything at the right temperature.
.avif)

.avif)


Easy Soft Pretzels
"Baked" Soda
- about 1 ½ cups (336 g) of baking soda
Pretzel Dough
- 296 g (1 ⅓ cups) warm tap water (about 100-105°F/38-41°C)
- 3.75 g (1 ¼ teaspoons) instant yeast*
- 540 g (4 ½ cups) unbleached all-purpose flour
- 49 g (3 ½ tablespoons) unsalted butter, melted
- 30 g (2 tablespoons) white sugar
- 1 ½ teaspoons diastatic malt powder**
- 1 ½ teaspoons kosher salt (I use Diamond Crystal, for table salt - use ¾ teaspoon)
Toppings
- 1 large egg, whisked for egg wash
- Coarse or pretzel salt (optional)
- Pearl sugar (optional)
Baked Soda Bath
- 500 g (about 2 cups) cold water
- 100 g (about ½ cup) baked soda***
- Bake (concentrate) your baking soda.
(This is mostly hands-off, so I start this process and then work on the dough while the baking soda is baking.)- Preheat the oven to 300°F/150°C. Do not use any fan-assisted heat (convection, etc.) during baking, as it will blow the powder around in your oven.
- Line a sheet pan with some foil. (This helps remove the powder from the sheet post-baking.) Sift the baking soda onto the pan.
- Bake for one hour. Set a timer! That way, you can move on with the recipe, as this is baking.
- When finished, set aside to cool***. Avoid touching it with your bare hands. Although it is less corrosive than lye, it may still irritate your skin.
You will have extra so that you can keep the excess in a properly labeled/dated airtight jar. Keep away from pets and children. Keeps for about one month.
- Disperse the yeast in water.
Add the warm tap water and yeast to the bowl of a stand mixer (or large bowl if mixing by hand). Use the dough hook (or a whisk) to stir the yeast until it is hydrated and (mostly) evenly distributed. - Form the dough ball.
Add the flour, melted butter, brown sugar, diastatic malt powder, and kosher salt. I use my dough hook to get the mixture going, and then my hands to form the dough into a shaggy ball. If you're kneading by hand, just form the dough into a somewhat cohesive ball. - Develop gluten in the dough.
I use my stand mixer on setting 3 for about 5-8 minutes. You can also do this manually on the counter by hand if you like, for the same amount of time. Knead until you reach high gluten development. When you’re finished, the dough should be incredibly smooth and elastic, and you should be able to form it into a firm ball. - Bulk ferment the dough.
Remove the dough briefly to coat the bowl with a bit of oil. Put the dough ball back, cover, and allow to ferment (rise) in a warm spot for about an hour, or until it has doubled in size.
(For reference, I have a proofing setting on my oven, and after an hour at 85°F/29°C, it has doubled in size in my bowl.)
Meanwhile, line two trays with parchment paper and lightly brush them with oil (or spray them). - Shape the dough into pretzels.
Place your dough onto your counter and press out the air a little. It has a good amount of butter and is not overly sticky, so it should not stick to your counter. If it does, you can add a light dusting of flour.
Divide your dough into 12 individual pieces. (That’s about 75 grams each, if you want to get nerdy about it). I like to make little fat logs so they’re easier to roll into long pieces later. Cover with plastic wrap to prevent them from drying out.
To make a pretzel shape, form a long rope by rolling the dough on the counter to about 18-24 inches. The longer your rope, the skinnier the pretzel; the shorter your rope, the more your pretzel bakes with fewer gaps and is more “bun-like.”
Form the letter "U". Take the two legs and cross them twice, then pull the legs down over the base of the "U", pressing gently so they stick. Lay your pretzels on your greased sheets. - Rest the pretzels.
Do not cover (it will hold up a little better in the bath), and let it rest for another 20-30 minutes. I usually let it rest until I’ve set up my dipping station and preheated the oven, then proceed to the next step. You don’t want them to get really poofy - they will be a pain to dip and deflate when baked. If you see them getting poofy, put them in the fridge to slow down when you prep Step 8. - While the pretzels rest, prepare the oven and the bath.
Place a rack in the center of your oven and preheat to 425°F (220 °C).
Prepare the baked soda bath:
Add 500 g (2 cups) of cold water to a non-reactive container - stainless steel or Pyrex glass should be fine. To prevent clumping, don’t dump all the baked soda at once. Add the baking soda very slowly to the water while whisking continuously.
Even when I do this, I’ll still get some clumps, and I’ll just fish those out with my strainer. You don’t want them sticking to the wet pretzel dough, because they won't taste very good if they bake onto the pretzel. - Dip your pretzels.
Use your hands to gently pick up a pretzel and place it in the alkaline bath, face down. Use the spoon to submerge the pretzels, ensuring the backs get a bit of the solution by spooning it onto them occasionally. Keep them in the bath for 3 minutes. They must remain upside down throughout to achieve maximum browning on their surfaces.
Remove each pretzel, allowing the baked soda solution to drain, and flip them right side up onto the same baking sheet. Lightly brush the surface of each pretzel with whisked egg wash.
Sprinkle lightly with pretzel or coarse salt (or pearl sugar) if you are serving these the same day. (Leaving coarse salt on baked pretzels for more than 24 hours draws moisture from the pretzel's interior outward, creating blisters of salt on the pretzel's surface.) - Bake for 8-12 minutes.
The pretzels are done when they are slightly puffed and deep golden brown. If you temp your bread, I like my pretzels with an interior temperature of 195-200°F/91-93 °C.
Use a spatula to move the pretzels to a cooling rack to cool completely.

Recipe Card - Adriana's Notes
*If you only have active dry yeast, use 1 ½ teaspoons in place of the instant yeast. It’s more important to disperse (or bloom) the yeast in warm water, so make sure to stir well during that step and let it sit for about 5 minutes before moving on with the recipe.
**The recipe will work without diastatic malt powder, which is optional, but it really helps make outstanding pretzels. They will be browner on their exteriors with a soft, cottony texture inside.
***Baked soda, or sodium carbonate, is also known as washing soda. You’ll want to take normal-level precautions, such as keeping it away from your eyes. If you have sensitive skin, use a spoon for dipping the pretzels. Avoid reactive surfaces such as aluminum in the alkaline bath, and also know that if the solution comes into contact with seasoned stone surfaces, it will remove the seasoning.
To dispose of your dipping solution, just run it down the drain with plenty of cold water.
Recommended Sugar Lab Recipes + Experiments
%20(1).png)
.avif)

Got room for more dessert?
Subscribe to my Crumby Data newsletter! I share behind-the-scenes looks at recipe development, flavor testing for the Cakeculator, and life as a content creator. It’s free, lands in your inbox every few weeks, and you can unsubscribe anytime...no strings attached :)
Feel free to take a look at previous newsletters here!
.ico)
