.avif)
Milk Bread Cinnamon Rolls: Your Complete Guide to Perfect Rolls Every Time


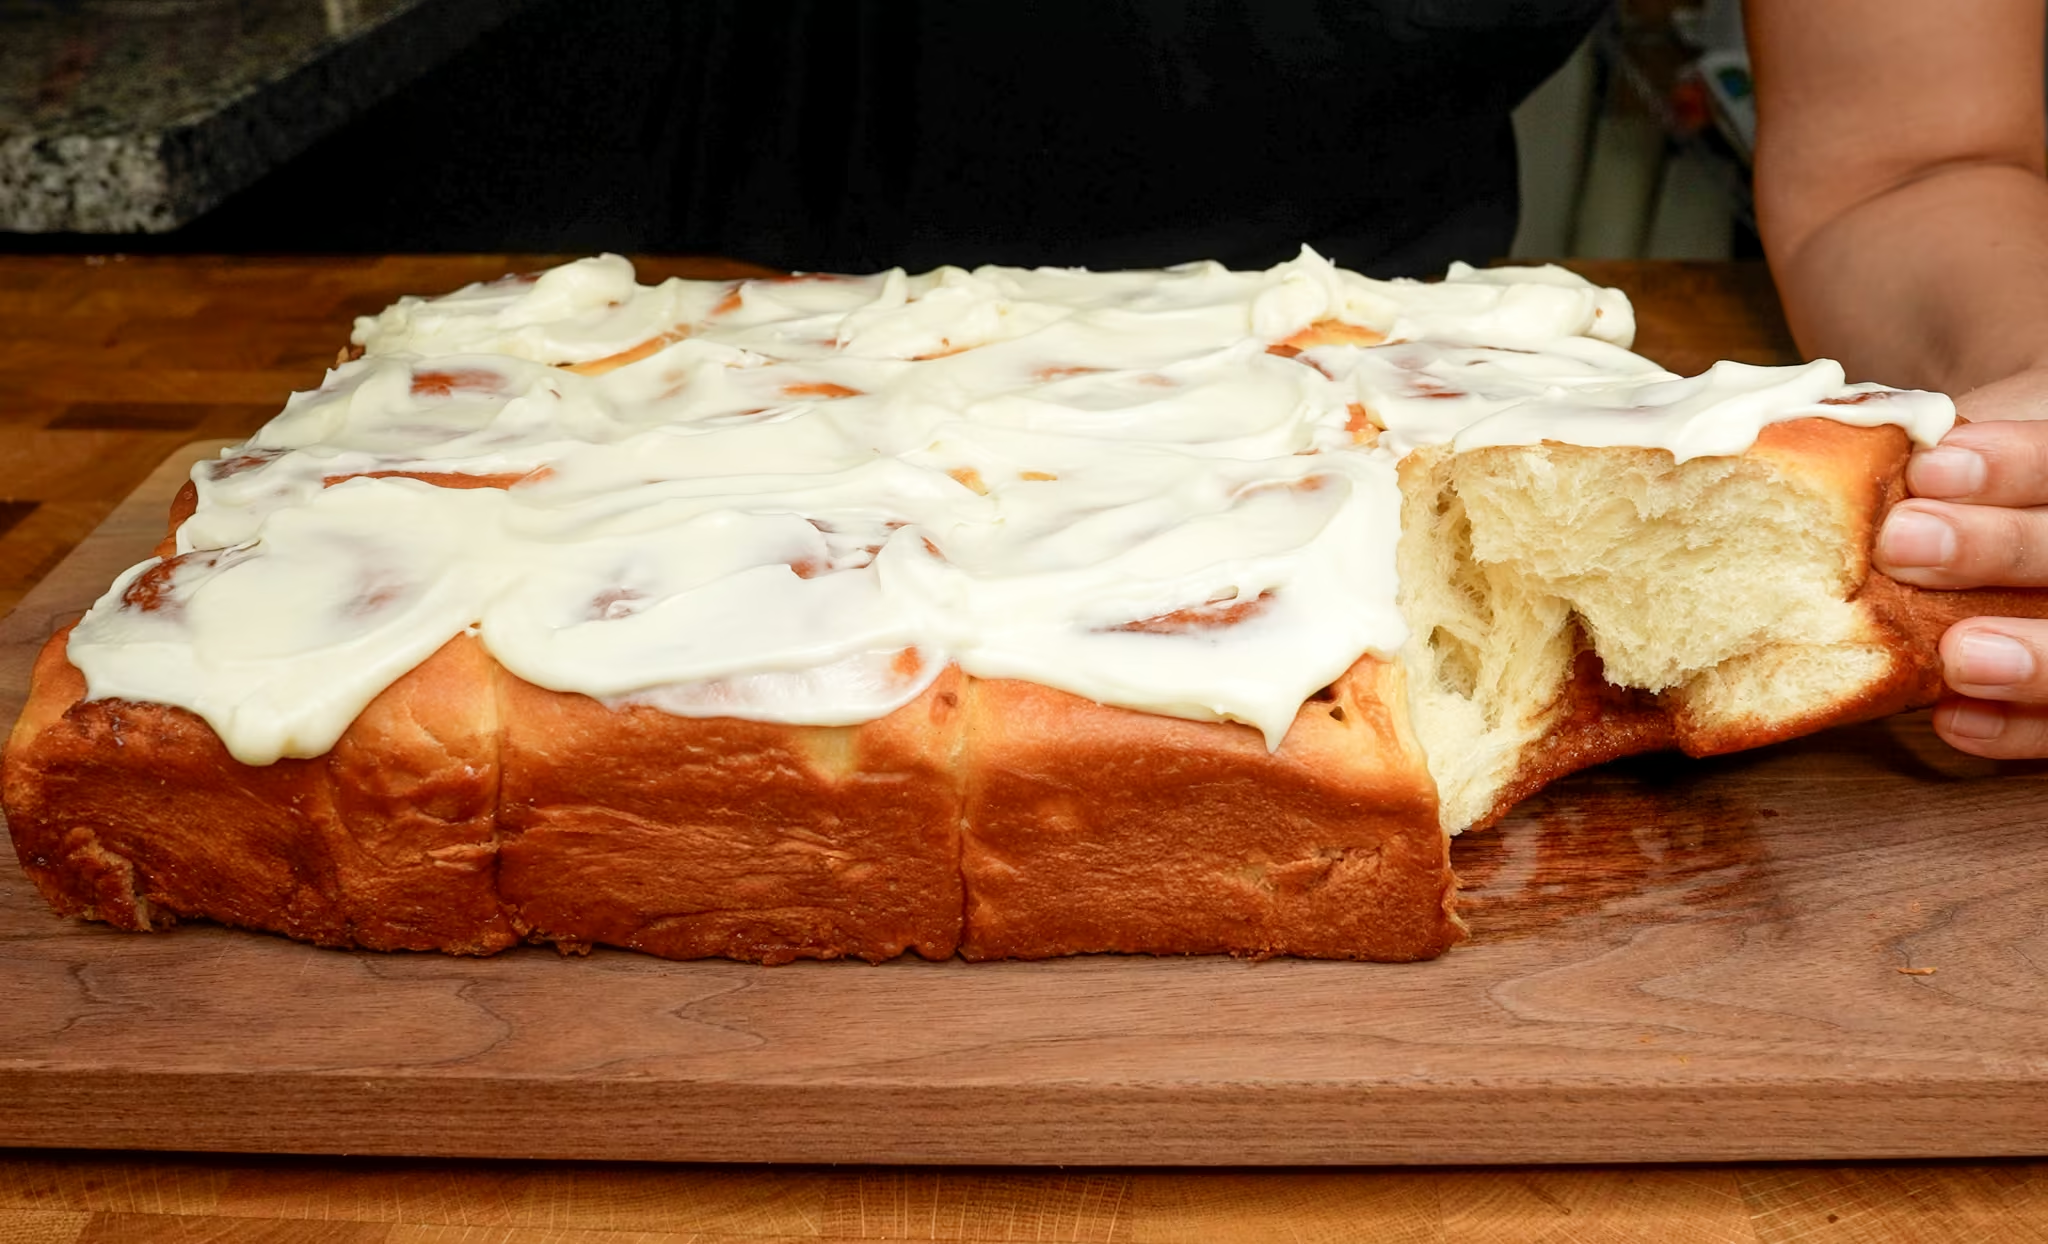
My milk bread cinnamon rolls are cottony-soft, filled with generous swirls of cinnamon-brown sugar, and topped with a tangy cream cheese frosting. Whether you’re new to bread making or ready to level up your rolls, this post will help you understand every step of making cinnamon rolls so they come out perfect for you every time.
This is one of my master recipes—which means it goes beyond the basic formula and dives deep into the foundational science of milk bread dough. We’ll cover the key stages of mixing, fermentation, shaping, and baking, so you’ll not only know how to make them, but why each step matters.
This also means that this recipe is ready for innovation! I have enough foundational knowledge to make some cool adjustments, especially for flavor modification. That's going to come later on, so stay tuned. In the meantime, let's go over these amazing rolls!
What is the flavor/taste/texture of my Milk Bread Cinnamon Rolls?
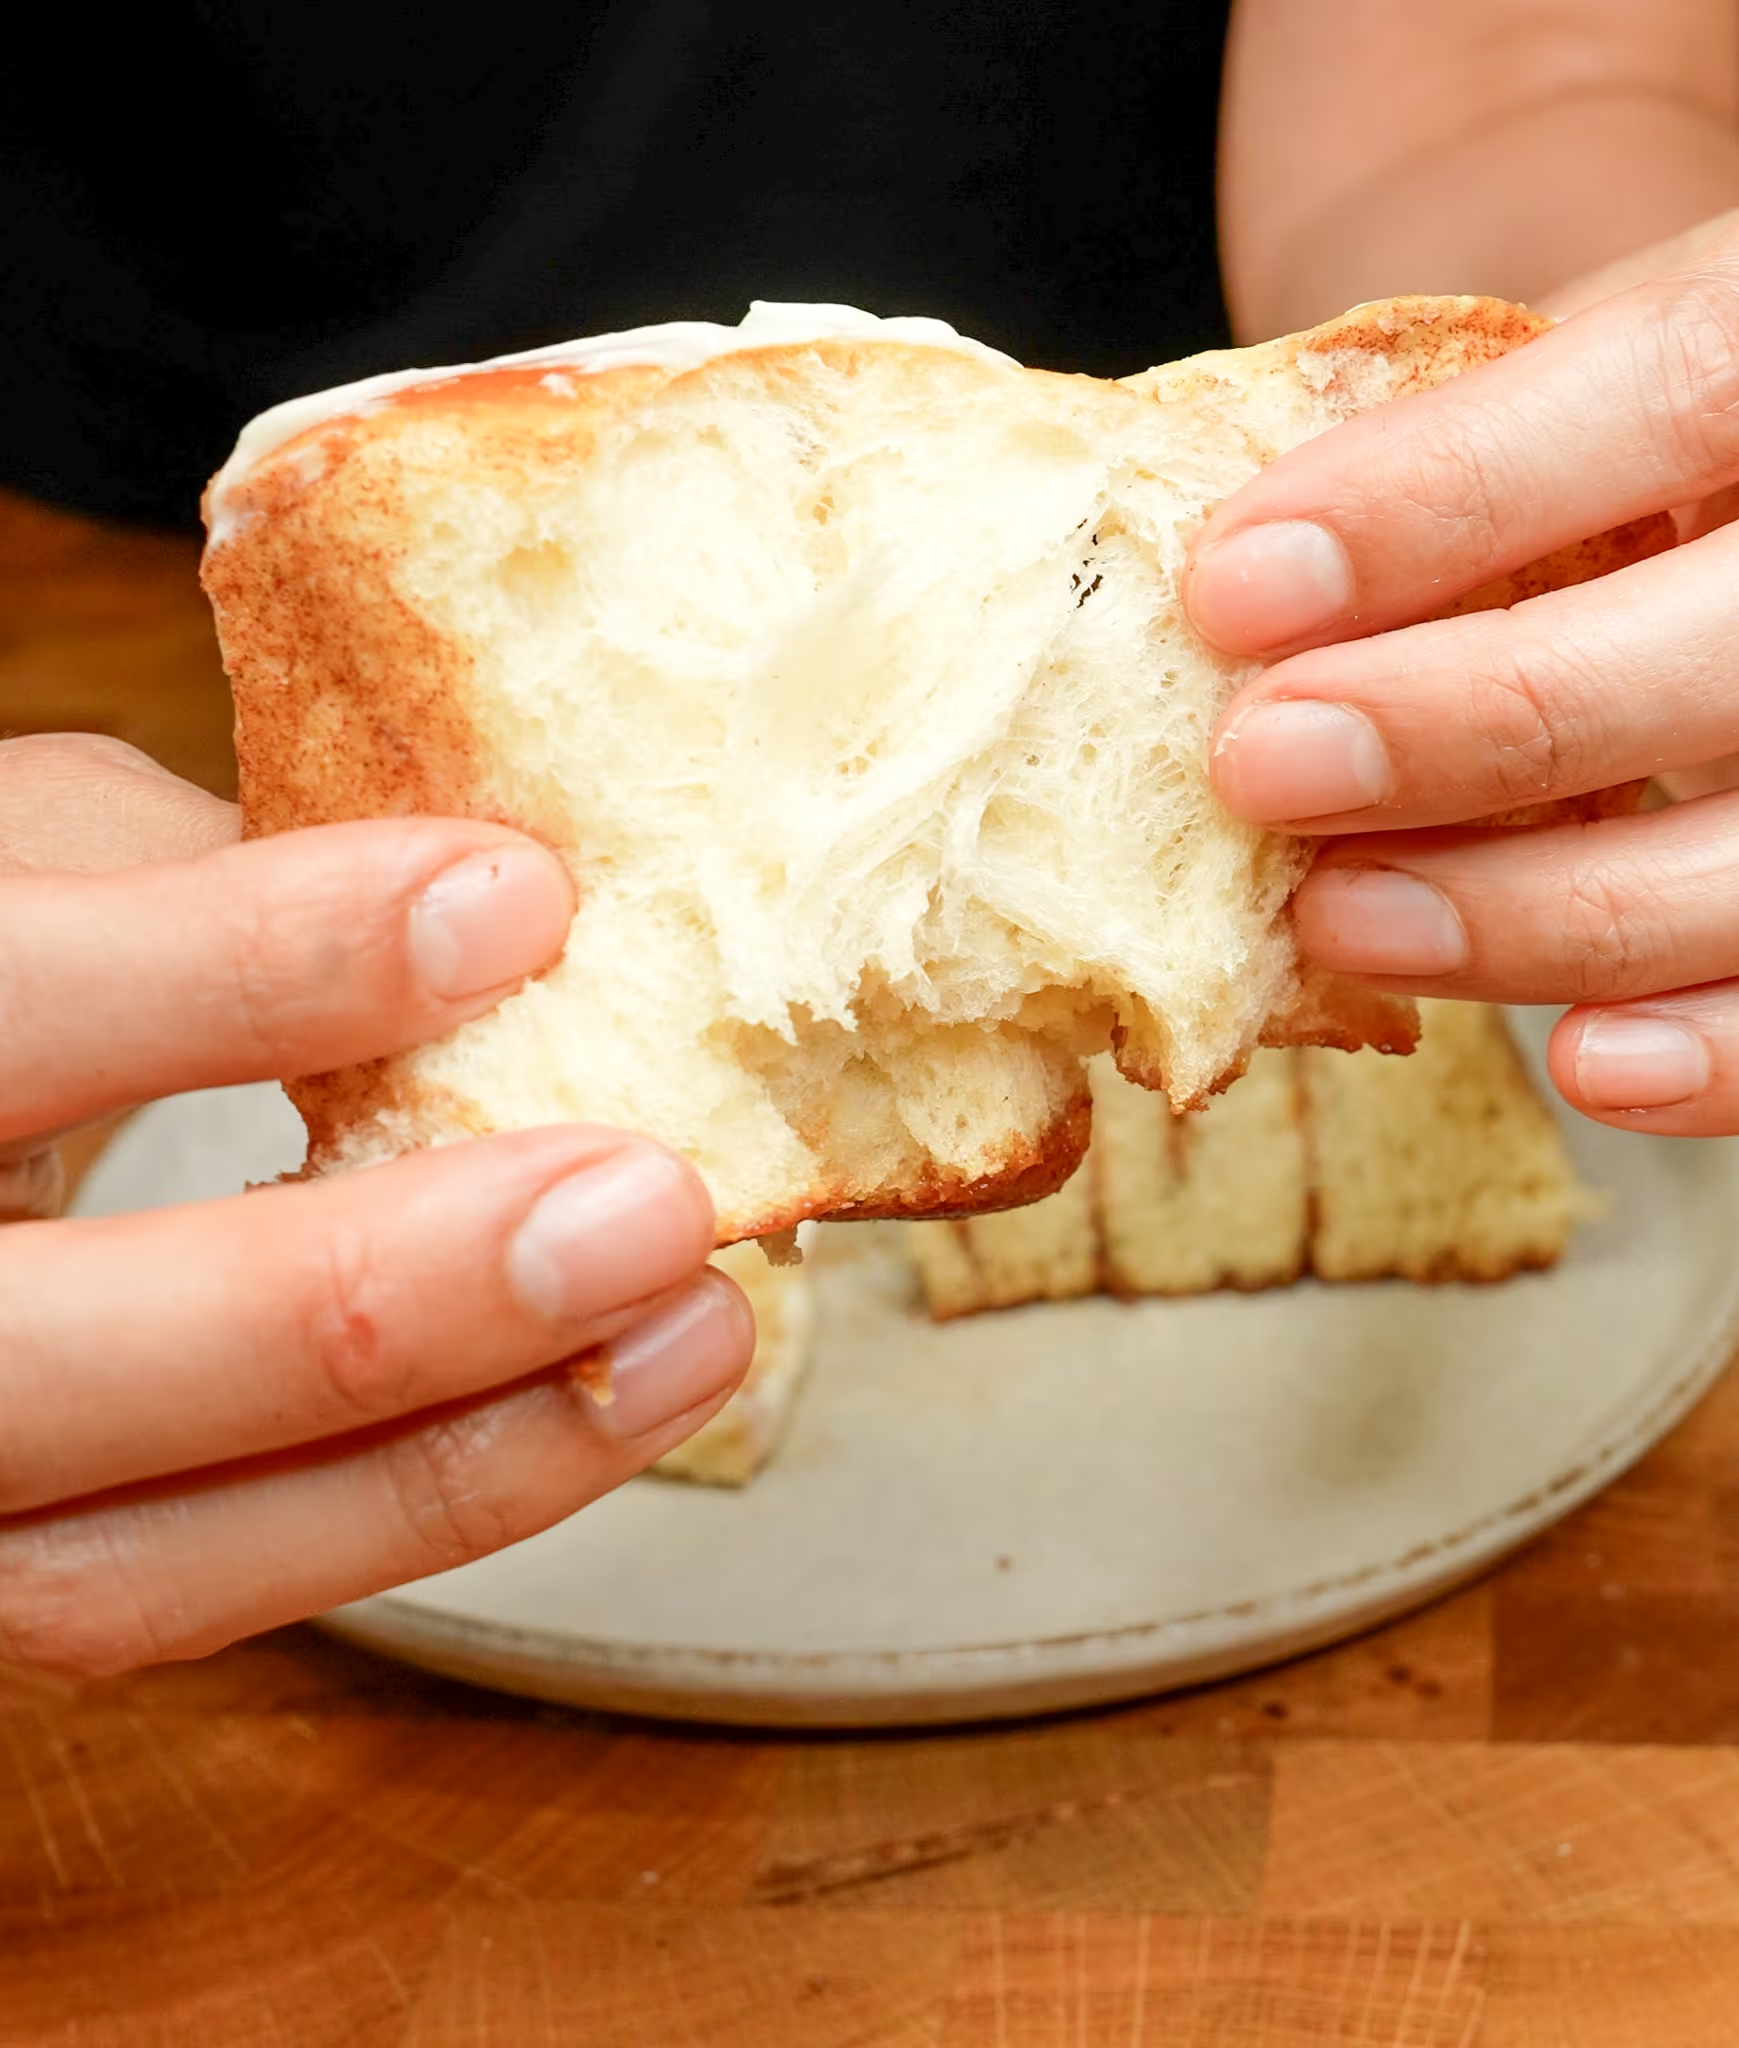
Texturally, my rolls are cotton-soft with a chewy texture from the bread flour. I prefer my cinnamon rolls to have a mochi-like texture and a bit of chew, but if you prefer a cake-like crumb, you can swap out bread flour for all-purpose flour. This reduces the amount of gluten-forming proteins in the dough and, therefore, the total amount of gluten, which will still be enough to give the bread texture but a much softer chew.
Flavor-wise, my milk bread cinnamon rolls are lightly fermented ("bready") with a slight buttery aroma. The bread itself is not overly sweet, which lets you customize the texture and sweetness of the final roll, since the filling and frosting largely determine those. As written, my milk bread cinnamon rolls contain a generous layer of cinnamon-brown sugar to season the bread. They also include a tangy-sweet frosting (my Cream Cheese American Buttercream), which pairs extraordinarily well in adding more sweetness and a bit of acidity to balance the fat and sugar.
What ingredients will you need to make my Milk Bread Cinnamon Rolls?
1 | GLUTINOUS RICE FLOUR
This flour is made from sticky (waxy) rice and is rich in amylopectin, a highly branched starch that gelatinizes and stales much more slowly. When mixed with hot water, it forms a sticky paste that enhances the shelf life of the final bread. This ingredient is also referred to as "sweet rice flour."
2 | WATER
Used to hydrate and cook the glutinous rice flour into a paste. The heat gelatinizes the starches, turning the mixture into a cohesive, elastic paste that contributes both structure and long-lasting softness to the dough.
3 | WHOLE MILK
Milk provides both water and milk proteins, contributing to flavor, a soft crumb, and gentle browning due to Maillard reactions. Using cold milk starts the dough at a lower temperature, as its temperature will rise due to friction during extended mixing, which is required to form gluten strands.
4 | INSTANT YEAST
Instant yeast is my favorite type of yeast to use for baking, as it’s more potent and efficient than active dry yeast. It starts working as soon as it comes into contact with moisture and produces carbon dioxide through fermentation, which causes the dough to rise and creates the bread’s airy structure. If you only have access to active dry, I’ve annotated the modification in the recipe card below.
5 | EGGS
Eggs contribute emulsifying proteins and fats that enrich the dough, improving elasticity and color. Cold eggs help control dough temperature during mixing, which can be especially beneficial for enriched doughs, preventing overheating.
6 | BROWN SUGAR
Sometimes you’ll see white sugar in milk bread, but I prefer brown sugar because it adds sweetness, color, and a mild molasses flavor. Brown sugar is also more hygroscopic (pulling moisture from the air), so the bread stays moister for longer.
7 | BREAD FLOUR, UNBLEACHED
High in protein (gluten-forming), this flour gives the dough its chewiness and strength, allowing it to rise tall. You can also use all-purpose flour, which I've annotated in the recipe card.
8 | KOSHER SALT
Salt enhances flavor, strengthens gluten structure, and regulates yeast activity by slowing fermentation slightly.
9 | UNSALTED BUTTER, SOFTENED AND CUBED
Butter contributes saturated fats that tenderize the dough, enrich the flavor, and soften the crumb. Softened butter incorporates more easily into enriched doughs, resulting in even distribution without tearing the gluten strands.
For cinnamon filling, you’ll need:
10 | BROWN SUGAR, LIGHT OR DARK
Brown sugar adds rich sweetness and a moist texture to the swirl. The molasses component in dark brown sugar creates a deeper flavor, while the light version offers a more subtle taste. Sugar also helps the filling caramelize during baking.
11 | GROUND CINNAMON
Cinnamon adds a warm spiciness - I mean, what's a cinnamon roll without cinnamon :(
For cream cheese frosting:
12 | CREAM CHEESE
Cream cheese adds tangy richness and creamy mouthfeel due to its high fat and protein content. Its acidity balances the rolls' sweetness, making it a smooth, spreadable topping.
13 | POWDERED SUGAR
Also called confectioners’ sugar, this finely ground sugar dissolves easily, creating a smooth glaze. It provides sweetness and structure, thickening the glaze without requiring heat.
14 | BUTTER
Butter provides a bit more fat to the frosting, so it doesn’t immediately turn into a drippy glaze. You can go that route too, just omit the butter and reduce the sugar by half in the recipe below.
Step by step:
STEP 1 | Prepare the rice flour paste.
WHY:
Milk breads often contain a small amount of pre-cooked flour (also called tangzhong or yudane, depending on the ratios, type of liquid, and recipe), which is mixed into the dough before baking. It’s common to think that this is responsible for the airy, soft and fluffier texture in milk breads. However, the team at Modernist Cuisine has demonstrated that the primary reason for lighter textures in these types of bread is from “sugar and fat that add volume and make the crumb soft and tender." (If you’re wondering about the experiment, they added pre-gelatinized paste to a lean French bread, and it was the same with or without the paste.)
Why, then, are we taking this additional step of making a flour paste? It’s going to make our rolls remain soft and tender for longer. Freshly baked, there will be no difference in rolls with or without this paste, but over time (a day or two) the ones containing this paste will have a softer texture.
HOW:
.avif)
In a medium microwave-safe bowl, stir the water and rice flour (1a). Wrap the bowl tightly in plastic wrap (1b). Microwave on high power for 30 seconds, then carefully remove the bowl and plastic. Stir with a small spatula to evenly distribute the thickened rice flour. It will be a little watery, so repeat this process 1 or 2 more times until the paste is thick and glossy when stirred (1c). Immediately cover with plastic wrap to reduce water loss.
You can also use a stovetop to prepare the paste, which is described in the recipe card below.
Cool the paste.
STEP 2 | Mix the milk bread dough.
WHY:
The order in which we add the ingredients and the duration of mixing will determine the amount of gluten formed and, therefore, the strength required to hold air in our dough. (Airyness = fluffy, cottony texture that we want.) In white flour, the gluten is not yet formed, but exists as two separate proteins (gliadin and glutenin) that are just hanging out. When water is introduced and agitation (or mixing with a stand mixer) occurs, these two proteins begin to bind together at multiple sites, forming a three-dimensional network.
HOW:
.avif)
To the bowl of a stand mixer, add the milk and instant yeast. Use a hand whisk (or a dough hook) to briefly distribute the yeast granules. Add the eggs, brown sugar, and cooled rice flour paste (2a, b). Mix again until everything is homogeneous (2c).
.avif)
Attach the dough hook (if you haven’t already) and add the flour and kosher salt (2d). Mix on medium-low speed until the dough forms a mass that looks slightly bumpy (not smooth) (2e). Butter impedes the formation of gluten, so we want to build a slight network of gluten before adding butter in the next steps.
.avif)
On medium-low speed (around setting 2-3), add the chunks of unsalted butter one at a time (2f). (Set the extra tablespoon of butter and wrapper aside for the pan in step 4.) Once all the butter has been mixed in, increase the speed to 4 and mix for about 5-10 minutes (2g). You want to mix until you reach high gluten development. Read down below to learn the visual cues.
➡️ To know when your dough is ready, stop the mixer. Using wet fingers, grab a grape-sized piece of dough. (By the way, this is called the “windowpane” test.) Gently and slowly flatten and pull the dough apart. Review the examples below to assess gluten formation:
.avif)
Low gluten development in this dough makes it very sticky, and it tears almost instantly upon stretching. It struggles to stay on the dough hook in the picture on the right. It’s got a lumpy, rough texture and appearance.
For this recipe, if you see low gluten development during this step, give the bowl a good scrape and keep mixing for a couple of minutes before checking again.
.avif)
Medium gluten development in this dough has more structure, as it’s starting to tear a little less than the low development dough. It should give some resistance to pulling, but will begin to tear in the thinner regions. It still will feel a bit tacky/sticky.
In the picture on the right, the dough is starting to smooth out but still has an overall irregular appearance. It will begin to attach itself to the dough hook, but it falls off into the bowl pretty easily.
I find that most cinnamon roll recipes stop here, but we are making milk bread, so I like to keep going to full gluten development. This ensures the proper structure and mochi-chewy-soft texture that I love. So, for this recipe, if you see medium gluten development, give the bowl a good scrape and keep mixing for a couple of minutes before checking again.
.avif)
High gluten development in this dough forms a translucent sheet of dough through which light can be seen. It’s hard for me to demonstrate that through my pictures, but do you see how you can see my finger through the dough? It’s almost like a thin film that has an elasticity to it as well. Not as strong as, say, rubber bands, but a gentle pull should give you some resistance and help it bounce back into shape. It doesn’t tear as easily as low- to medium-gluten development doughs. The dough should also feel less tacky.
Also, look at the picture on the right—the dough is very smooth and cohesive. It’s attached to the dough hook pretty firmly and will eventually fall off, but it’s strong enough to hold on for a while.
STEP 3 | Bulk ferment the milk bread dough.
WHY:
The primary reason for bulk fermentation is to develop the dough's internal structure. There are enzymes present in the dough that start to break down starches into edible sugars for the yeast. As the yeast consumes those sugars, it creates gas and acid as byproducts. The gas enlarges air pockets that were mixed in during the previous step. The acid strengthens the gluten network that we built. This causes the dough to expand.
HOW:
.avif)
Shape the dough into a large ball (3a). You can keep the dough in the stand mixer container or move it to another bowl. It's a fatty dough, so no need to grease or oil. Cover with plastic wrap and place in a warm spot around 75-80°F/24-29°C.
Either take a picture with your phone or mentally note the size of your dough ball. We want it to double in size, which should take around 1 hour (3b). Temperature is one of the factors that dictates the speed of this fermentation and, therefore, the expansion or rise of the dough. If your temperature is warmer, it may take less than an hour. If your air temperature is colder, it may take longer to warm up.
When the dough is done, it should look and feel very puffy. There’s no need to be extremely precise with measuring the bulk fermentation of this bread - just make sure it’s about doubled in size and you’re ready to go.
.avif)
While your dough is fermenting, prepare the cinnamon filling by mixing the brown sugar and cinnamon in a bowl (3c). Also, use that leftover tablespoon of softened butter to grease your 9x13 baking pan (3d). Set those aside for now.
STEP 4 | Shape the cinnamon rolls.
WHY:
The dough should be very aerated, so we need to perform a process called “degassing,” which removes air and allows us to roll it out. I know it's also called "punching down" the dough, but don't do actually do that! I see bakers do that on social media for theatrics but honestly, you’ve just spent all this time lovingly putting together this beautiful dough. We need to evenly remove the gas and punching will give you inconsistent air bubbles and crumb structure. What I like to lay it out on the surface and gently fold it in half, using your fingertips to gently flatten. (Sorry for my curmudgeon rant ... I just want you to have beautiful cinnamon rolls!)
HOW:
.avif)
Lightly sprinkle some flour onto a clean work surface. Using a bowl scraper or large spatula, gently pour the dough onto the surface (4a). Gently fold the dough in half, then press down with your fingertips along the surface to shape it into a thick slab (4b).
.avif)
Roll out the dough (4c).

We need a rectangle about 18 inches by 16 inches (46 cm by 41 cm) (4d). I use my ruler to measure and straighten up the sides.

Once you have your rectangle, use your hands to spread the cinnamon sugar all over the top of the dough, covering the entire surface except for the top 18 inches (46 cm) edge (4e), where you’ll leave a ½ inch (13 mm) border without filling.
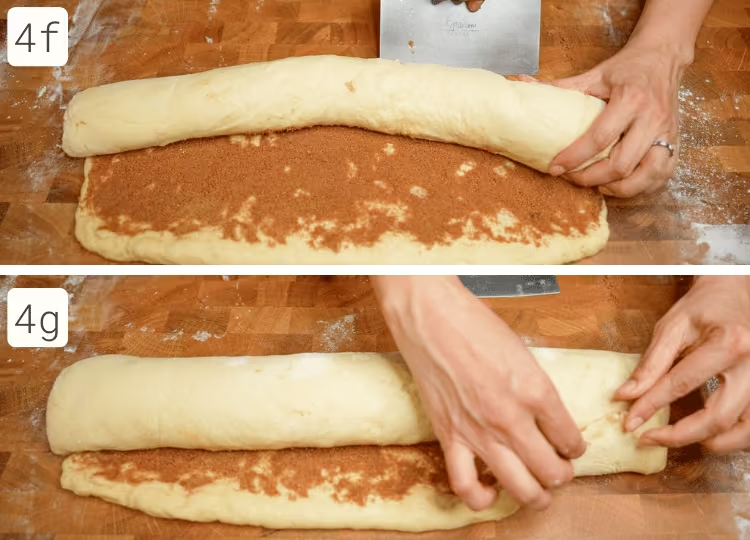
Starting from the bottom, roll the dough away from you (or towards the non-cinnamon-sugar edge). Your dough is probably soft, so I start by moving it from one side to the center and then to the other side. Then I reverse that motion until all the dough is formed into a roll (4f). Lightly pinch the end to seal the roll (4g).

Use a ruler to mark where we’re going to cut, every 1.5 inches (3.8 cm). Usually, I’ll take a blunt-edged object, such as a bench scraper or butter knife, and gently make an indentation for every cut (4h). You need 12 rolls, so ensure you have made 11 markings.
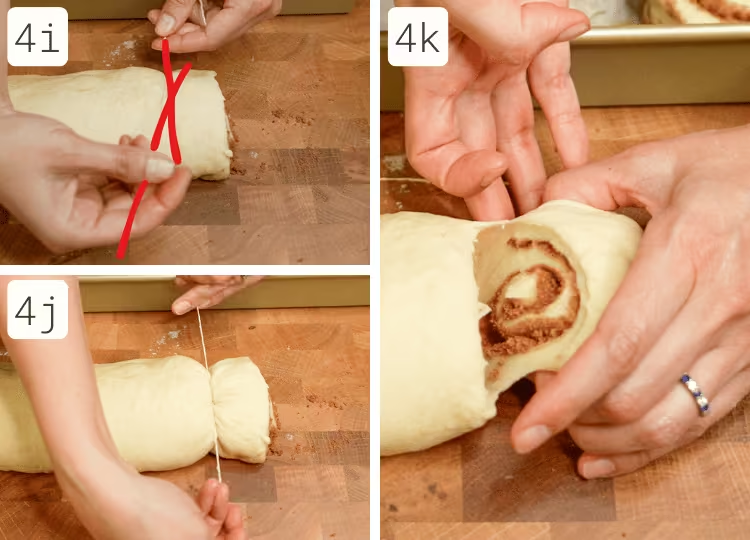
To cut, I find the string method gives me the cleanest cuts. Loop around the roll (4i—I’ve drawn over my white string in red so you can see I crossed them over) and pull outwards (4j). It will feel like you’re smashing the layers, but it creates the cleanest slices (4k).
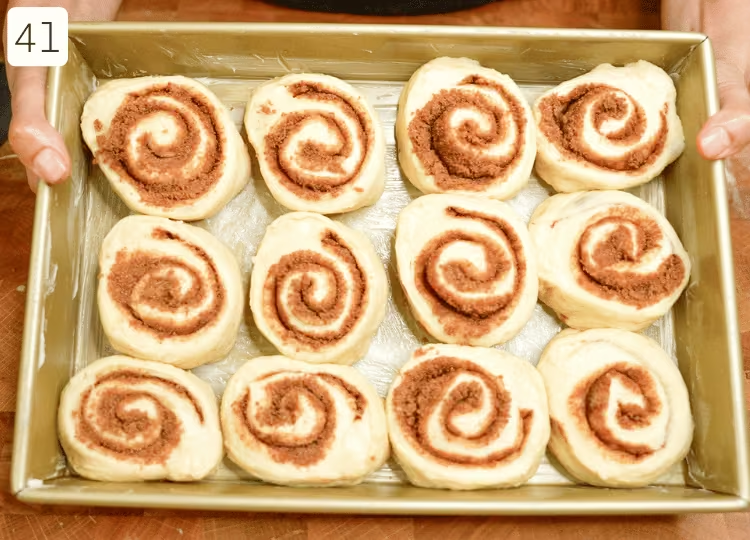
Arrange your rolls in a 9x13 pan, forming four rows of 3 rolls each. (Or 3 rows of 4 rolls each. Whatever floats your boat.) (4l)
STEP 5 | Proof the rolls in their pan.
WHY:
Proofing is the last fermentation step that allows the yeast to replenish the gas that was pressed out during shaping. This will further set the dough's structure, opening the crumb so the final rolls have a lofty, airy texture.
HOW:
Cover the pan with foil and leave it at room temperature (approximately 75-80°F/24-29°C) for about 1 hour.
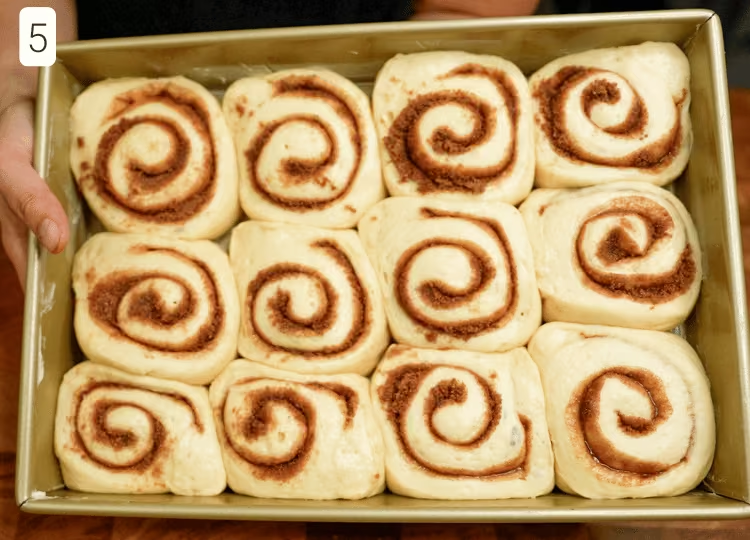
You’re looking for the rolls to be slightly puffy and possibly already touching the sides in some areas. If you can identify a fatter piece of dough you can poke gently, it should leave an indentation for a few seconds before slowly puffing back up. These rolls are a touch overproofed for my liking, but they'll still be fantastic. (I can just tell by how much their sides are touching - I usually like for there to be slightly bigger holes between the rolls.)
In the last half hour of the rise, move a rack to the center of your oven and preheat to 375°F (190 °C).
STEP 6 | Bake rolls and make the frosting.
HOW:
Bake your rolls for about 20-30 minutes. While that’s going on, I like to make the frosting:
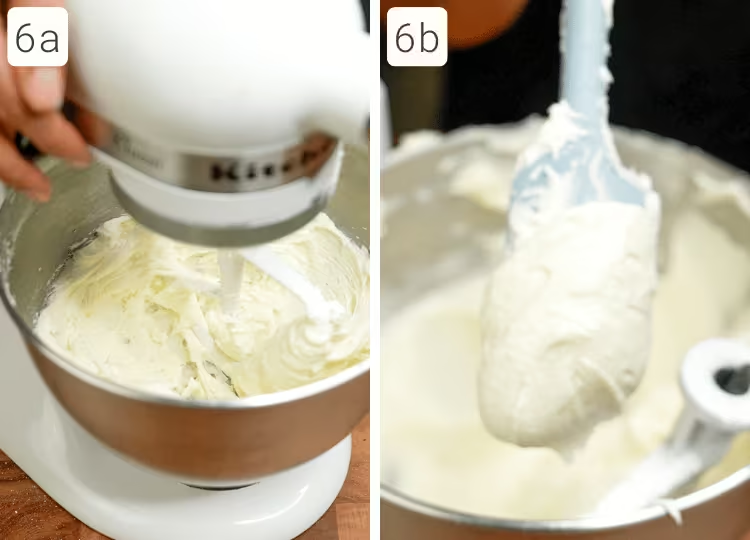
In a large mixing bowl, mix the butter and powdered sugar until smooth and creamy, and then add smoothed out cream cheese. There’s really no wrong way to mix the frosting for this recipe, since we actually want it a little runny. So everything I’ve taught you about cream cheese frosting kinda goes out the window. Just put everything in a bowl and mix it until oblivion :) BTW this is my Cream Cheese American Buttercream - if you want to learn more about this frosting, I've written a whole guide on it!
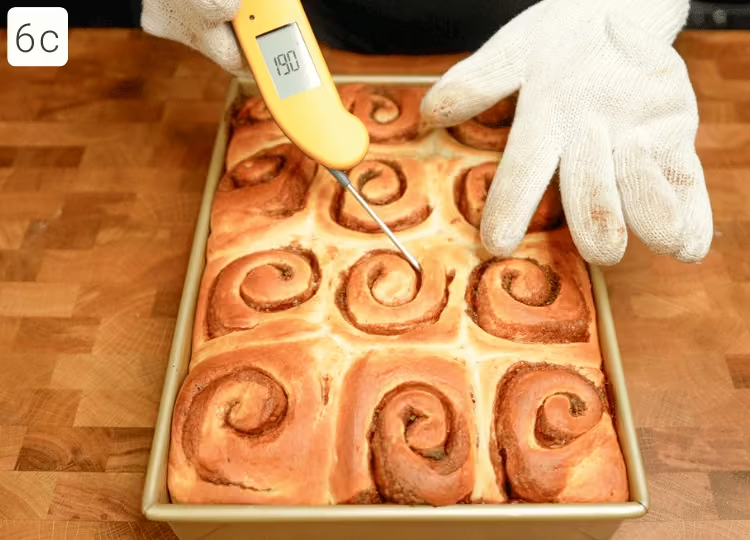
You’ll know your rolls are done when they have risen even more to fill the pan and have slightly browned edges. If you have an instant-read thermometer, you’re looking for an internal temperature of 190°F/88°C.
STEP 7 | Frost the rolls while still warm.
.avif)
Spread the frosting over the rolls while they are warm, letting it ooze down the sides, or spread it individually just before serving.
Video
This video goes into the science of how to customize your rolls:
Honors Members Section
This extra material is accessible to Sugarologie Honors members.
Become a member to view extended research notes, technique analysis, and supplemental materials! Learn more about Sugarologie Honors here.
Already a member?
Before starting the recipe, please read this!
Measure by weight, if possible.
Measuring by weight is the best way for you to replicate my recipes. I develop recipes using ingredients (even liquids) measured in grams, which is why you see them listed first in the recipe cards. For measurements under 5 grams, I will typically only list the volumetric measurements (teaspoons, etc.), as most home scales are not precise for such small weights.
In most cases, I have converted grams to volumetric measurements (aka US customary units) for bakers who prefer this method. However, the measurements are not as precise and may have awkward proportions. The recipes should still work, but for the ultimate precision, try to use weight.
This is the OXO scale I use daily. I also purchased this budget version of a good scale, which I keep at my Mom’s house for baking. If you’re interested in other tools I use for my baking, I’ve compiled a list here.
Use room temperature ingredients.
All my ingredients should be used at room temperature, or 65-75 °F/18-24 °C. I will always indicate if you need something outside this range. If no details are given, room temperature is the default.
Pay attention to the ingredient descriptions.
I try not to be brand-specific, but I will always note an interesting result from a type of ingredient, be it negative or positive.
A specific note regarding salt: I use Diamond Crystal Kosher salt for everything on this site except for frostings. In frostings, you want the salt to dissolve more easily, and kosher salt tends to leave granules behind. If you substitute table salt (more finely granulated) for recipes that list kosher salt, you must use half the volume indicated in my recipes.
Substitutions are hard.
That said, substitutions aren’t impossible but can be the toughest part of recipe development. Small swaps, like reduced-fat milk (2% fat) for whole milk (3.5% fat), usually work fine. However, bigger changes—such as replacing oil with applesauce or sour cream with Greek yogurt—can significantly impact texture and density.
Be wary of general, all-purpose substitutions in baking; I find that usually there is never a one size-fits-all solution. I carefully select ingredients for my recipes, so for the best results, start with the original recipe and modify with caution.
Read all the recipe instructions before beginning.
I’m in the “Pre-read the Chapter before Class Lecture” club... and I invite you to join! Baking new recipes can be intimidating, so let’s set you up for success. I want you to think about timeframes. Most fillings and frostings can be made ahead of time, and give you an extra day for mental space. Also, as you become a more proficient baker, you can anticipate and recognize steps. (“Oh, this has a meringue step, so I’ll need an extra clean bowl…” etc.) Ensure you go down the ingredient list and have everything at the right temperature.
.avif)

.avif)

.avif)
Milk Bread Cinnamon Rolls with Cream Cheese Frosting
For rice flour paste:
- 158 g (2/3 cup) water
- 30 g (3 tablespoons) glutinous rice flour*
For milk bread dough:
- 183 g (¾ cup) whole milk, cold from fridge
- 11 g (3 ¼ teaspoons) instant yeast**
- 100 g (2 large) eggs, cold from fridge
- 103 g (½ cup) brown sugar, light
- All the rice flour paste from above, about 180 grams
- 630 g (5 ¼ cups) bread flour***, unbleached
- 9 g (3 teaspoons) kosher salt
- 98 g (7 tablespoons) unsalted butter, softened and cut into cubes (one stick of butter is eight tablespoons, so save the extra tablespoon of butter and wrapper to grease your pan)
For cinnamon filling:
- 207 g (1 cup) brown sugar, light or dark
- 11 g (2 tablespoons****) ground cinnamon
OR you can make my leak-free brown sugar-cinnamon filling recipe HERE - just make sure you use a half sheet pan (13x18 inch or 45 x 33 cm) instead of a 9x13 pan.
For cream cheese icing:
- 226 g (1 cup) full-fat cream cheese
- 196 g (14 tablespoons) unsalted butter, cold from the fridge
- 280 g (2 ⅓ cups) powdered sugar, unsifted
- 1 teaspoon vanilla extract
- pinch of salt
- Prepare the rice flour paste.
Microwave method:
In a medium microwave-safe bowl, stir the water and rice flour until no clumps remain. Wrap the bowl tightly in plastic wrap. Microwave on high power (1200 Watts) for 30 seconds, then carefully remove the bowl and plastic. Stir with a small spatula to evenly distribute the thickened rice flour. It will still be a little watery, so repeat this process 1 or 2 more times until the paste is thick and glossy when stirred. Immediately cover with plastic wrap to reduce water loss.
Stovetop method:
In a small pan, add the water and rice flour, and stir until no clumps remain. Cook on medium-low heat until the paste thickens into a pudding-like consistency. Pour the mixture into a small bowl and cover it to minimize moisture loss.
➡️ For both methods, ensure that the paste is at most room temperature before adding the dough in the next step. It doesn’t have to be cold, but it shouldn’t be piping hot. If I’m working through this recipe straight through, I’ll often just place the bowl of paste in some ice water to help it cool down faster.
- Mix the milk bread dough.
To the bowl of a stand mixer, add the milk and instant yeast. Whisk (I just use the bread hook) to distribute the yeast granules. Add the eggs, brown sugar, and cooled rice flour paste. (Please ensure you have pretty close to 180 grams of paste; you can always add water back if too much water has evaporated from the paste.) Using the mixer with the bread hook, mix until everything is homogeneous. Add the flour and kosher salt, then, using the hook attachment, mix for 2-3 minutes on medium-low speed to work a little bit of gluten in and until the dough comes together into a shaggy mass.
On medium-low speed (around setting 2-3), add the chunks of unsalted butter one at a time. (Set the extra tablespoon of butter and wrapper aside for the pan in step 4.) Once all the butter has been mixed in, increase the speed to 4 (depending on your mixer's capabilities) and mix for about 10-12 minutes. Keep an eye on the dough and mixer to ensure everything is going ok. We need to build gluten, which takes some time since this dough contains fat and sugar.
➡️ To know when your dough is ready, stop the mixer, wet your fingers, and grab a grape-sized piece of dough. Gently and slowly flatten and pull the dough apart. The dough should have enough gluten so that it forms a translucent sheet of dough through which light can be seen. You may even be able to see the strands of gluten-forming dough. If the dough tears easily during this process, we need to strengthen it further and develop more gluten. Mix for another couple of minutes and retest.
Your dough should be slightly warm, smooth, and somewhat tacky.
- Bulk ferment the milk bread dough.
Shape the dough into a rough, large ball. You can keep the dough in the stand mixer container or move it to another bowl. Cover with plastic wrap and place in a warm spot at 75-80 °F/24-29 °C. A great spot is inside your oven (not turned on) or on top of your refrigerator.
Either take a picture with your phone or mentally note the size of your dough ball. We want it to double in size, which should take around 1 hour. Temperature is one of the factors that dictates the speed of fermentation and, therefore, the expansion or rise of the dough. If your temperature is warmer, it may take less than an hour. If your air temperature is colder, it may take longer to warm up/rise.
While your dough is fermenting, prepare the filling by mixing the brown sugar and cinnamon in a bowl. Set that aside for now.
- Shape the cinnamon rolls.
(Note: if this is your first time making these rolls, it may be easier to watch me do this step; I have photographs in the section above the recipe card.)
a. Prepare the work surface + pan + dough.Take that tablespoon of butter and smear it all over the inside of the pan. It will seem thick, but it will also absorb into the dough while it bakes. Set the pan aside for now.
Lightly sprinkle some flour onto a clean work surface. Using a bowl scraper or large spatula, gently pour the dough onto the surface. Gently fold the dough in half, then press down with your fingertips along the surface to shape it into a thick slab.
b. Shape into a large flat rectangle.
We need a rectangle about 18 inches by 16 inches (46 cm by 41 cm).
This will require us to stretch and flatten the dough even further. Use a rolling pin and stretch the dough, trying to evenly distribute it to about ¼ inch (6.5 mm) thickness. If the dough tears, just squeeze it back together. The dough contains a lot of butter, which means it is typically easy to work with and won’t stick too much to the work surface. However, if you’re experiencing a bit of stickiness, sprinkle a tiny bit more flour.
c. Add filling + roll dough.
Once you have your rectangle, use your hands to spread the cinnamon sugar all over the top of the dough, covering the entire surface except for the top 18 inches (46 cm) edge, where you’ll leave a ½ inch (13 mm) border without filling. This is the edge where we’ll create a seam to seal the roll, and it’s easier to do without cinnamon sugar getting in the way.
Starting from the bottom, roll the dough away from you (or towards the non-cinnamon-sugar edge). Your dough is probably soft, so I start by moving it from one side to the center and then to the other side. Then I reverse that motion until all the dough is rolled into a single roll. Don’t go too tight; otherwise, your dough will rise in the centers while it bakes. I would actually err on the side of looser than tight. Remember, there are living, breathing organisms still in your dough, and as they prove in the next step, they’re going to expand your dough as they “breathe,” so give them room to grow!
d. Cut dough into 12 equal pieces.
Use a ruler to mark where to cut every 1.5 inches (3.8 cm). I take a blunt-edged object, such as a bench scraper or butter knife, and gently gently indent to mark every cut. To cut, you can either use a very sharp knife, unflavored dental floss, or kitchen twine. I find the string method gives me the cleanest cuts. Loop around the roll and pull down. See my photos above. It will feel like you’re smashing the layer, but it creates the cleanest slices.
Arrange your rolls in a 9x13 pan, forming four rows of 3 rolls each.
- Proof the rolls in their pan.
Cover the pan with foil and leave it at room temperature ((about 75-80°F/24-29°C) for 45 mins to 1 hour and 30 minutes.
In the last half hour of the rise, move a rack to the center of your oven and preheat to 375°F (190 °C).
➡️ How do you know when your rolls are done proofing? I’ve given a large time span for this step because, again, it will vary based on many environmental factors. You’re looking for the rolls to be slightly puffy and possibly already touching the sides of each other, with the corner spots still open.
If you can identify a fatter piece of dough you can poke gently, it should leave an indentation for a few seconds before slowly puffing back up. During the baking, the rolls will puff up and rise even more! Keep this in mind while you watch them prove. I like my rolls to be mmoderately puffy at this stage - about halfway to 60% of where I’d like them to be for the final roll.
- Bake and make the cream cheese frosting.
Recover the rolls with foil. Bake your rolls for about 15 minutes, then remove the foil and continue baking for 8-10 minutes or until you like the browning. If you have an instant-read thermometer, you’re looking for an internal temperature of 190°F.
While your rolls are baking, you can make the cream cheese frosting:- Smooth out the cream cheese.
In a large mixing bowl (if using a stand mixer, use your paddle attachment), mix the cold cream cheese on low speed until creamy and until no lumps remain. - Smooth out the butter.
Cut the cold butter into chunks so it’s easier to work with, then add it to the same bowl (no need to clean the bowl or attachments). Cream until smooth, with no visible lumps. - Add the powdered sugar in increments.
Add about a third of the powdered sugar (no need to be exact) and mix on low. Once combined, add the next third and repeat. With the final addition, mix in the vanilla and a pinch of salt—cream cheese is already salted, so adjust to taste at the end. If using a hand mixer, this part takes the longest; I use a scraping motion to help it come together faster. - Add cream cheese and smooth out the buttercream.
Add the smooth, cold cream cheese to the butter-sugar mixture and mix on low just until the lumps disappear. Use a spatula to finish blending—it’ll thin out slightly as the cream cheese incorporates.
- Smooth out the cream cheese.
- Glaze the rolls while slightly warm.
Spread the frosting over the rolls while they are warm, letting it ooze down the sides, or spread it individually just before serving.
If you have leftover buns, store them in an airtight container for up to 3 days (in the fridge if frosted). Oh man, what until you pop those babies in the microwave (for about 30 seconds) the next day for breakfast. So, so good.

Recipe Card - Adriana's Notes
*You can use either potato starch or rice flour, but my favorite is to use Mochiko Sweet Rice Flour. You can use any type of flour that is labeled “glutinous rice flour.” Keep in mind that this is not the same as just “rice flour” because glutinous rice (or “sweet” rice) is a shorter type of grain that contains a high ratio of amylopectin, which is the key starch component that is better at preventing starch retrogradation, or staling, and helps the crumb stay softer for much longer.
**I use Instant yeast in this recipe (specifically SAF-Instant Baker’s Dry Yeast). This type of yeast works more efficiently than active dry yeast. However, if you only have access to Active dry yeast, we can still get this recipe to work beautifully! You’ll need to use 16 g (4 ¾ teaspoons) of active dry yeast instead of the 11 g (3 ¼ teaspoons) listed in the recipe card. Additionally, you’ll want to make the following method modifications: first, use warm milk (around 90°F/32°C) and add the active dry yeast to wake it up. Active dry yeast contains a small amount of dead yeast due to its processing method. This is why you need to use more yeast and use warm milk to activate it, making it warm and comfortable so it can work effectively in your bread dough. Second, keep an eye on the bulk ferment and proofing times. You may need a bit more time to achieve proper dough formation, so use my picture and descriptions to determine when to proceed to the next step.
***You can use either bread flour or all-purpose flour for these rolls. Bread flour yields rolls with a more shredded-cottony crumb texture that’s a tad chewier (my favorite!). All-purpose flour will still create a cottony texture, though less so due to the lower gluten-forming protein content. The crumb will be slightly softer. You can also mix half and half for a shreddy-soft texture.
****I like two tablespoons of Saigon cinnamon (from Costco), which is an amount that is moderately high in warm spice flavor for my palate. If you have a particularly “spicy-hot” version of cinnamon, you can reduce the amount by a couple of teaspoons.
Recommended Sugar Lab Recipes + Experiments
%20(1).png)
.avif)

Got room for more dessert?
Subscribe to my Crumby Data newsletter! I share behind-the-scenes looks at recipe development, flavor testing for the Cakeculator, and life as a content creator. It’s free, lands in your inbox every few weeks, and you can unsubscribe anytime...no strings attached :)
Feel free to take a look at previous newsletters here!
.ico)