.avif)
Stuffed Chocolate Chip Cookies


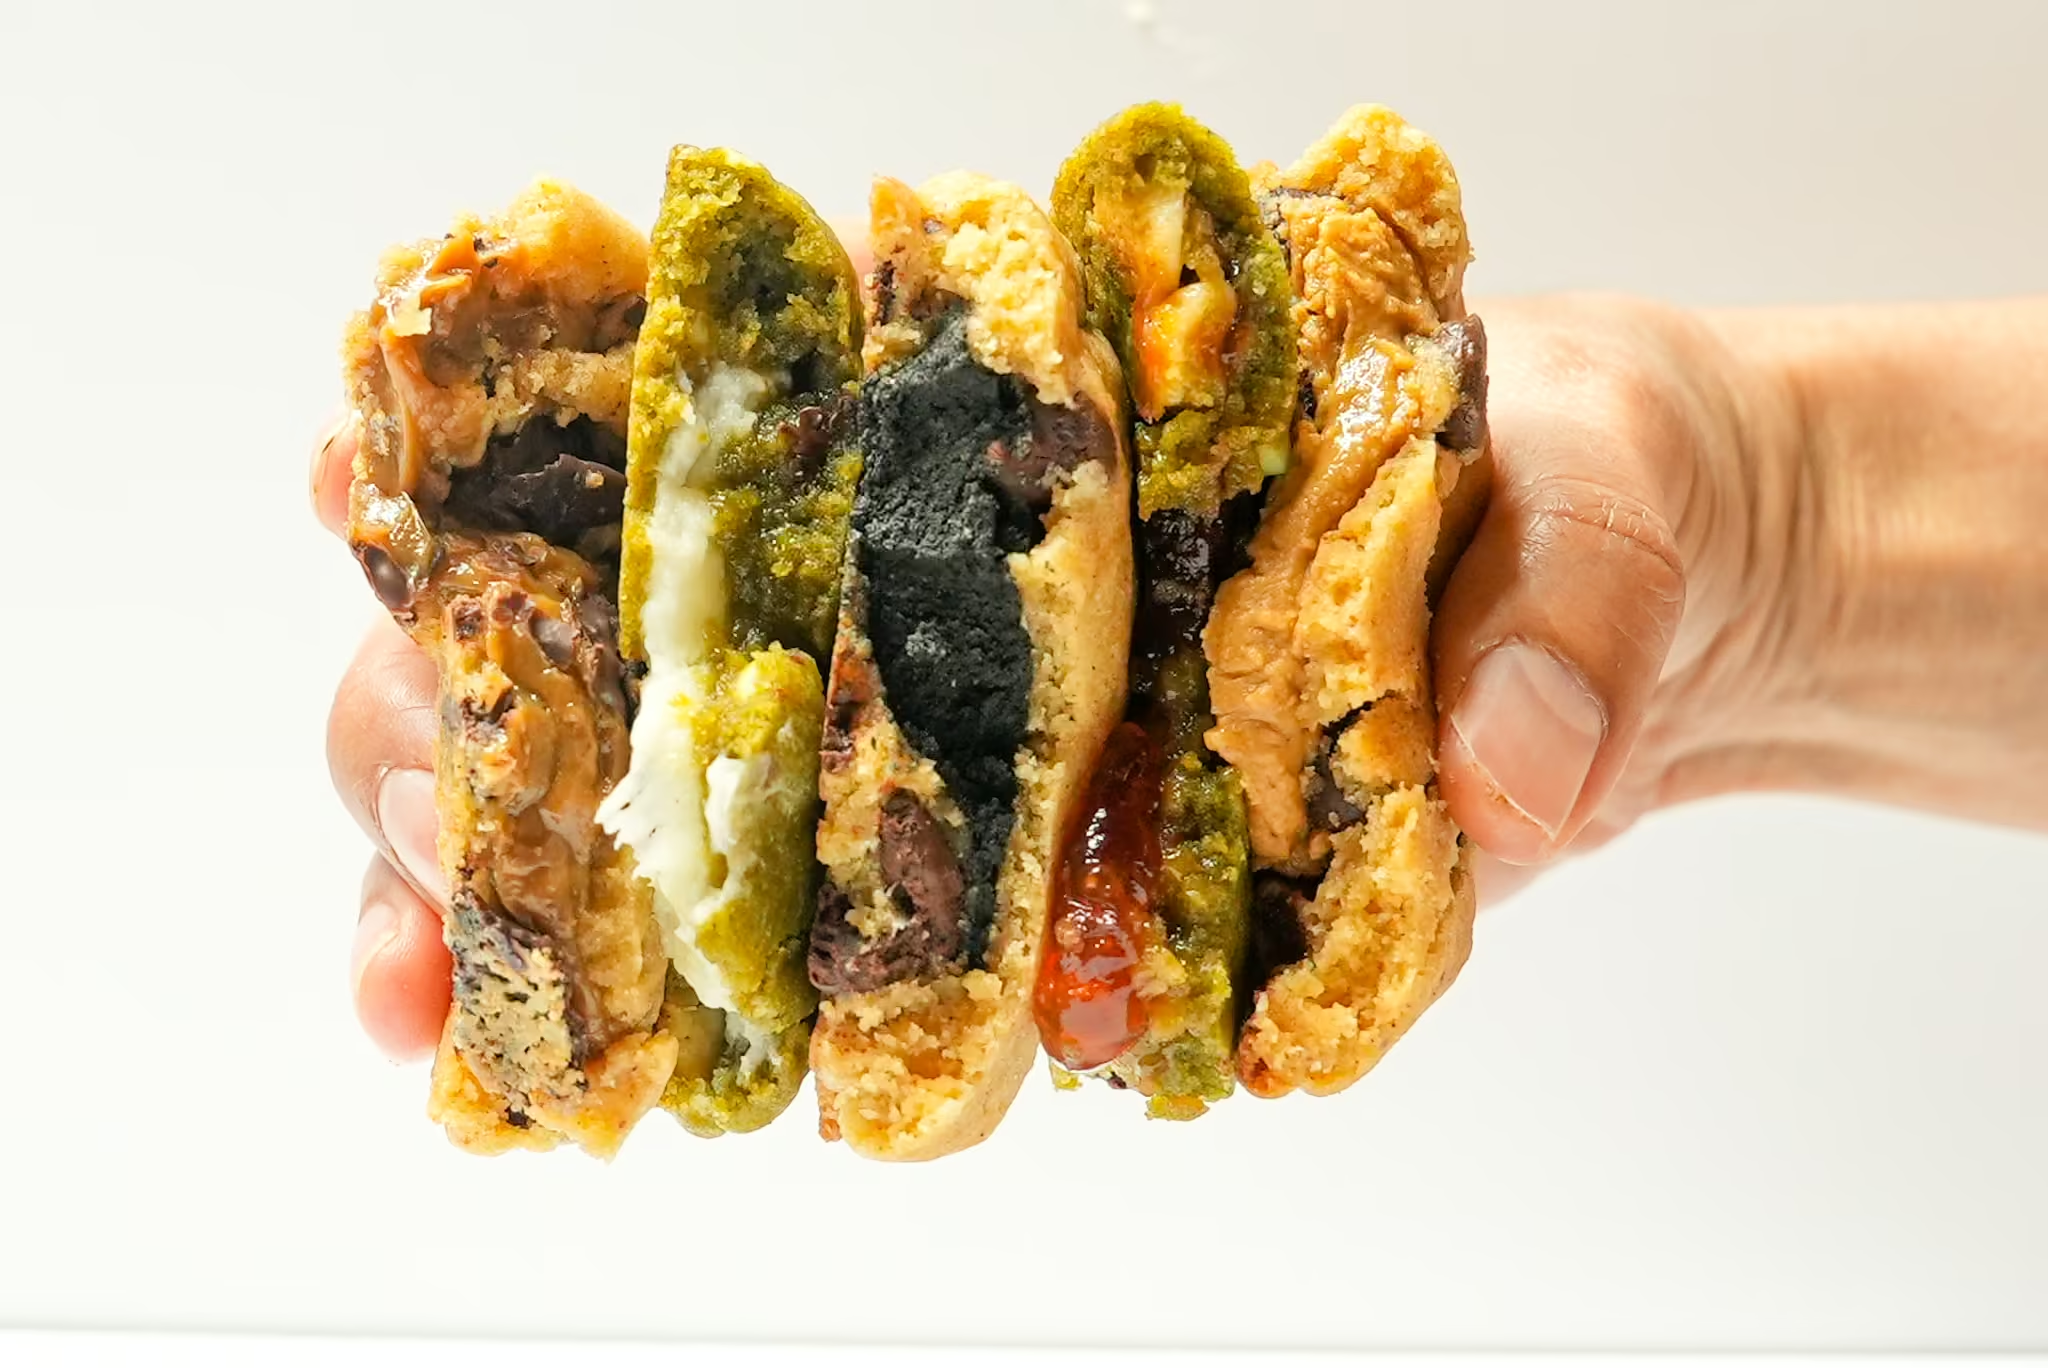
These are my Chocolate Chip Stuffies - a super stable chocolate chip cookie dough that bakes up chewy, thick, and slightly cakey. It has the most amazing depth of flavor from the brown butter and is perfect for holding all sorts of gooey fillings, such as Nutella and peanut butter.
.avif)
The flavor and taste of my chocolate chip cookie base are wonderfully chock-full of toasted milk powder. It also has the perfect ratio of chocolate chips to dough, which allows the filling flavors to come forward. I also specifically tailored the base for not-too-sweet cookie lovers. This way, we can adjust the overall sweetness of the cookie with the fillings, of which there are so many to choose from!
What kind of fillings can be used for stuffed cookies?
There are two things to consider (other than taste and flavor) when deciding what to stuff your cookies with.
- The texture at room temperature, and
- How solid it freezes.
For the texture at room temperature, we typically want some contrast with the more solid cookie, so ooey-gooey-chewy-drippy are all good things to consider. If the filling freezes well, we can more easily wrap it in dough to prevent leakage. If it's too soft, it will be incredibly difficult to center the filling, and you’ll likely end up with leaky, exploding cookie masses.
I tested a bunch of fillings in my video, and I suggest watching it below for some ideas. Some great ones to start with are: peanut butter, Nutella, and black sesame paste. All are premade, freeze exceptionally well, and have a nice contrasting texture when baked inside a cookie.
Some fillings to avoid (at least, right now and until I get some workarounds) are: caramel sauces and fruit jams. Neither of these fillings can freeze solid in home freezers because of the sugar's lower freezing point.
What ingredients do you need for Chocolate Chip Stuffies?
.avif)
1 | FILLING
The best types of fillings for this cookie are those that freeze solid and are semi-soft or gooey at room temperature. You can get pretty creative here, but some that worked successfully for me are: peanut butter, Nutella, black sesame paste, fruit curds, store-bought dulce de leche, and cream cheese.
2 | DRIED NONFAT MILK POWDER, NONFAT
Dried milk powder contributes extra protein and lactose for the Maillard reaction during the butter browning step. It’s my flavor cheat code for an incredibly complex and deeply flavored chocolate chip cookie.
3 | UNSALTED BUTTER
Butter provides the main source of fat and helps give my cookies a chewy-creamy texture. I always use unsalted butter because salt levels vary across butter brands.
4 | EGG/EGG YOLK
This whole egg supplies structure and moisture. The egg yolk adds extra fat and emulsifiers, such as lecithin, which make the cookie richer and more cohesive.
5 | VANILLA EXTRACT & SALT
Vanilla extract enhances the cookie's sweetness and acts as a flavor amplifier. Salt balances the sweetness.
6 | BAKING POWDER
I don’t typically use baking powder in chocolate chip cookies, but I felt this recipe needed a bit more puffiness. Baking powder produces carbon dioxide gas during baking, which helps the cookie rise and become lighter.
7 | BAKING SODA
Baking soda raises the pH of the dough, which speeds up the Maillard reaction and leads to better browning.
8 | LIGHT BROWN SUGAR
Brown sugar adds sweetness, moisture, and a subtle molasses flavor, which makes cookies chewier and richer. Combined with the butter, it gives the cookie butterscotch flavors as well.
9 | WHITE GRANULATED SUGAR
Granulated sugar creates a crisp edge and helps prevent the cookie from spreading too much.
10 | UNBLEACHED ALL-PURPOSE FLOUR
Flour provides the structure for the cookie. Unbleached flour has a slightly higher protein content than bleached flour, which I like for its chewy baked texture.
11 | CHOCOLATE CHIPS
I prefer semi-sweet chocolate chips for this cookie, but you can tailor this to complement whatever filling you’re using. For example, you can use a darker chocolate chip if you have a very sweet filling (like Nutella). Whichever flavor you choose, just ensure you get chips on the smaller side, as that makes the dough balls easier to shape.
Step by step:
STEP 1 | Freeze your filling.
WHY:
Keeping the filling frozen helps the cookie maintain a nice mounded shape while baking. This ensures it doesn’t melt prematurely and leak into the dough, which can cause uneven spreading or hollow centers. It also makes the cookies much easier to assemble.
HOW:
.avif)
Scoop your filling into 2-3 teaspoon-sized balls and place them on a plastic-lined tray. Keep them in the freezer until the cookie dough is ready - at least 1 hour. Here I am freezing six balls of Nutella and six balls of canned dulce de leche. I’m using a #40 scoop, which equals one tablespoon when filled, but I’m scooping just a tad less than a full scoop.
STEP 2 | Brown the butter and mix with milk powder.
WHY:
Browning the butter develops complex nutty flavors through the Maillard reaction as the milk solids cook. Adding milk powder enhances this browning and deepens the flavor, while immediately removing the butter from the heat prevents burning. Letting the butter cool helps the sugar dissolve more slowly, resulting in a thicker cookie that spreads less.
HOW:
.avif)
Have a large heatproof mixing bowl ready for the melted butter, and set that aside. Add the nonfat milk powder to a small bowl. Add the butter to a light-colored pan and melt on medium-low heat. You can check out my setup here (2a).
.avif)
We brown the milk solids present in the butter first, then add the milk powder. Doing this in steps ensures even browning, and I find it’s easier to manage. Stir continuously, scraping the pan to prevent milk solids from sticking and burning. Turn off the heat once the solids are a light brown (2b), then immediately pour in the milk powder (2c).
.avif)
Turn on your heat to low and cook until all the solids are toasty-brown (2d). Immediately pour the melted butter into the large mixing bowl, being sure to scrape those toasted milk solids (2e).
.avif)
Allow the butter to cool to room temperature (between between 65-75°F / 18-24°C) before proceeding with the recipe. It may still be liquid or be starting to look hard around the edges (2f). If you don’t have a thermometer, just think about when recipes ask you for “softened butter” before creaming sugar and butter together. You’re not going to get as cohesive a block of butter, but it should be semi-firm. By the way, you can speed up the process by placing the mixing bowl in a larger bowl of ice water, or even in the fridge.
.avif)
While the butter is cooling, whisk together the flour, salt, baking powder, and baking soda (2g,h).
STEP 3 | Add the eggs and vanilla.
WHY:
Emulsifying the eggs with the butter creates a stable, smooth base for building dough structure and even distribution of leavening agents. Proper mixing here helps achieve a consistent texture and spread.
HOW:
.avif)
Ensure the browned butter is at room temperature, then add the cold egg, cold egg yolk, and vanilla (3a). Using the paddle attachment, mix on medium-high speed until thick and emulsified, about 2–3 minutes. It should be lighter in color with no separation of fat or water. Scrape down the bowl (3b).
STEP 4 | Add the sugars.
WHY:
Keeping the sugar granules undissolved maintains cookie structure and chewiness. Dissolved sugar can lead to excess spreading and thin cookies.
HOW:
.avif)
Add both sugars and mix on low speed until just combined (4a,b). We’re not looking to dissolve the sugar, which would cause the cookie to flatten, but rather to leave it in its crystalline-solid state. You can even do this with a spatula, stirring the sugar until it’s coated in the egg-butter mixture.
STEP 5 | Stir in the flour and chocolate.
WHY:
Mix the flour on low speed to prevent overmixing, which can lead to tough cookies due to excessive gluten development.
HOW:
.avif)
Add the flour and mix on low speed (5a). Stir in your chocolate chips (5b).
STEP 6 | Chill the dough.
WHY:
Chilling slightly hardens the fat in the dough, creating a more mounded, thicker cookie. It also makes the dough much easier to work with, as we will be handling it quite a bit to wrap our filling.
HOW:
.avif)
Spread the dough onto a sheet of plastic wrap (or onto a tray), flatten it, and wrap it completely (6a,b). The flatter you get it, the faster it will chill. Place in the fridge for at least 30 minutes, and as long as overnight.
STEP 7 | Preheat the oven and portion the dough.
WHY:
Ensuring both the dough and filling are firm before shaping helps maintain the cookie’s structure and make them much easier to assemble.
HOW:
Ensure your dough is firm enough to shape (it should feel like hard Play-Doh) and your fillings are nice and firm. Then, arrange a rack in the middle of your oven and preheat to 375°F / 190°C.
I like to portion out all my dough first into about 3½ tablespoons of cookie dough.
.avif)
Then I remove the filling balls from the freezer. Flatten a dough piece (7a), then place it in the palm of your hand to create a cup shape (7b).
.avif)
Place a ball of filling in the cup (7c), then shape the cookie dough around it (7d).
.avif)
Make sure there are no holes, and then roll the entire cookie ball in your hands to get a sphere (7e,f). Place each cookie ball in the fridge while you prep the remaining dough balls.
STEP 8 | Bake the stuffed cookies for 13–15 minutes.
WHY:
Baking at 375°F/190°C in the center of the oven yields an ideal shape for these cookies. This temperature will create thicker cookies from the dough amounts I specified in the previous step. You should get a nicely mounded shape with the filling located in the center of the dough.
HOW:
.avif)
Once you’re ready to bake, place the spheres onto the parchment-lined trays. My trays comfortably hold about six cookies, about 2-3 inches apart (8a). Keep the raw cookie dough balls in the fridge while the others are baking.
.avif)
Bake for about 13-15 minutes. The cookies are done when they transform from a sphere into a domed shape with slightly brown edges (8b). If you use a thermometer, the outer cookie shell should be at least 160°F/71°C. The fillings are pre-cooked, so you don’t need to temp them.
And if you’re wondering about the one that exploded on the right and upper left - I used homemade dulce de leche there. My sauce was too runny to begin with, but I tried stuffing the cookie balls anyway. Don’t worry, you can still use dulce de leche - just either use homemade versions that are very thick or store-bought versions that have agar in the ingredients.
Allow the cookies to cool on the tray for about 30 seconds before moving to a cooling rack.
Flavor Modifications:
I have a matcha cheesecake-stuffed cookie recipe available to try too!
Video
I made a video on the science of these cookies! If you want to learn about all the fillings I tested, skip to 8:47 in the video.
Honors Members Section
This extra material is accessible to Sugarologie Honors members.
Become a member to view extended research notes, technique analysis, and supplemental materials! Learn more about Sugarologie Honors here.
Already a member?
Before starting the recipe, please read this!
Measure by weight, if possible.
Measuring by weight is the best way for you to replicate my recipes. I develop recipes using ingredients (even liquids) measured in grams, which is why you see them listed first in the recipe cards. For measurements under 5 grams, I will typically only list the volumetric measurements (teaspoons, etc.), as most home scales are not precise for such small weights.
In most cases, I have converted grams to volumetric measurements (aka US customary units) for bakers who prefer this method. However, the measurements are not as precise and may have awkward proportions. The recipes should still work, but for the ultimate precision, try to use weight.
This is the OXO scale I use daily. I also purchased this budget version of a good scale, which I keep at my Mom’s house for baking. If you’re interested in other tools I use for my baking, I’ve compiled a list here.
Use room temperature ingredients.
All my ingredients should be used at room temperature, or 65-75 °F/18-24 °C. I will always indicate if you need something outside this range. If no details are given, room temperature is the default.
Pay attention to the ingredient descriptions.
I try not to be brand-specific, but I will always note an interesting result from a type of ingredient, be it negative or positive.
A specific note regarding salt: I use Diamond Crystal Kosher salt for everything on this site except for frostings. In frostings, you want the salt to dissolve more easily, and kosher salt tends to leave granules behind. If you substitute table salt (more finely granulated) for recipes that list kosher salt, you must use half the volume indicated in my recipes.
Substitutions are hard.
That said, substitutions aren’t impossible but can be the toughest part of recipe development. Small swaps, like reduced-fat milk (2% fat) for whole milk (3.5% fat), usually work fine. However, bigger changes—such as replacing oil with applesauce or sour cream with Greek yogurt—can significantly impact texture and density.
Be wary of general, all-purpose substitutions in baking; I find that usually there is never a one size-fits-all solution. I carefully select ingredients for my recipes, so for the best results, start with the original recipe and modify with caution.
Read all the recipe instructions before beginning.
I’m in the “Pre-read the Chapter before Class Lecture” club... and I invite you to join! Baking new recipes can be intimidating, so let’s set you up for success. I want you to think about timeframes. Most fillings and frostings can be made ahead of time, and give you an extra day for mental space. Also, as you become a more proficient baker, you can anticipate and recognize steps. (“Oh, this has a meringue step, so I’ll need an extra clean bowl…” etc.) Ensure you go down the ingredient list and have everything at the right temperature.
.avif)

.avif)


Chocolate Chip Stuffies
- 12 tablespoons (approximately ¾ cup) of filling*
- 6 g (2 teaspoons) dried milk powder, nonfat
- 176 g (12 ½ tablespoons) unsalted butter
- 255 g (2 ⅛ cups) all-purpose flour, unbleached
- 4 g (1 ¼ teaspoons) kosher salt
- ¼ teaspoon baking powder
- ⅛ teaspoon baking soda
- 50 g (1 large) egg, cold from fridge
- 20 g (1 large) egg yolk, cold from fridge
- 15 g (1 tablespoon) vanilla extract
- 138 g (⅔ cups) light brown sugar
- 66 g (⅓ cup) white granulated sugar
- 200 g ( 7 ½ ounces) of assorted chocolate chips** (I like half semi-sweet, half bittersweet)
Do Ahead Steps:
- Freeze your filling.
Scoop your filling into 2-3 teaspoon-sized balls and place them on a plastic-lined tray. Keep them in the freezer until the cookie dough is ready—about 1 hour, depending on the type you choose*.
If your scoops are wonky-shaped, check after about 30 minutes. If the filling is semi-firm but still malleable, you can roll it into spheres and freeze it solid. (If you’re going for perfectly mounded cookies.) - Brown the butter and cool. Prepare the flour mixture.
Have a large heatproof mixing bowl ready for the melted butter, and set that aside. Add the nonfat milk powder to a small bowl.
Add the butter to a light-colored pan and melt on medium-low heat. Stir continuously, scraping the pan to prevent milk solids from sticking and burning. Turn off the heat once the solids are a light brown, then immediately pour in the milk powder. Turn the heat back onto low and continue stirring until all the solids turn toasty brown.
Immediately pour the melted butter into the large mixing bowl, being sure to scrape those toasted milk solids.
Allow the butter to cool to room temperature (between 65-75°F/18-24°C) before proceeding with the recipe. It may still be liquid in the centers and starting to firm up around the edges. You can speed up the process by placing the mixing bowl in a larger bowl of ice water, or even the fridge.
Meanwhile, whisk the flour, salt, baking powder, and baking soda in a small bowl, then set it aside.
Make the dough:
- Add the eggs and flavorings.
Ensure the browned butter is at room temperature, then add the cold egg, cold egg yolk, and vanilla. Using the paddle attachment (or hand mixer), mix on high speed until thick and emulsified, about 2-3 minutes. It should be lighter in color with no separation of fat or water. Scrape down the bowl. - Add the sugars.
Add both sugars and mix on low speed until just combined. We’re not looking to dissolve the sugar, which would cause the cookie to flatten, but rather to leave it in its crystalline-solid state. You can even do this with a spatula, stirring the sugar until it’s coated in the egg-butter mixture. - Stir in the flour and chocolate.
Add the flour mixture to the dough, then either stir by hand or mix on low speed just until a cohesive dough ball forms. Stir in the chocolate chips. - Chill the dough.
Spread the dough onto a sheet of plastic wrap (or onto a tray), flatten it, and wrap it completely. The flatter you get it, the faster it will chill. Place in the fridge for at least 30 minutes, and as long as overnight. - Preheat the oven and make the dough balls.
Ensure your dough is firm enough to shape (it should feel like hard Play-Doh) and your fillings are nice and firm. Then, arrange a rack in the middle of your oven and preheat to 375°F/190°C.
I like to portion out all my dough first into about 3 ½-4 tablespoons (a scant ¼ cup or approximately 75 g) of cookie dough.
Then I remove the filling balls from the freezer. Flatten a dough piece, then place it in the palm of your hand to create a cup shape. Place a ball of filling, then shape the cookie dough around it. Make sure there are no holes, and then roll the entire cookie ball in your hands to get a sphere.
Place the cookie balls in the fridge until the oven is done preheating. - Bake for 13-15 minutes.
Once you’re ready to bake, place the spheres onto the parchment-lined trays. My trays comfortably hold about six cookies, about 2-3 inches apart. Keep the raw cookie dough balls in the fridge while the others are baking.
Bake for about 13-15 minutes. The cookies are done when they transform from a sphere into a domed shape with slightly brown edges. If you use a thermometer, the outer cookie shell should be at least 160°F/71°C. The fillings are pre-cooked, so you don’t need to temp them.
Allow them to cool on the tray for about 30 seconds before moving to a cooling rack.

Recipe Card - Adriana's Notes
*These fillings freeze in about an hour: nut and seed butters, such as peanut butter, Nutella, and sesame pastes; chocolate ganaches; cream cheese fillings; and mochi fillings. Dulce de leche, fruit curds, jellies, and jams have a lower freezing point due to their high sugar content and require at least 2-6 hours of freezing. Just ensure they are somewhat firm (but still may be slightly squishy) before using - it’s just going to make your life much easier and make less of a mess. Caramel sauce is not recommended, as I couldn’t get those to freeze well enough for shaping.
**You can use either chopped chocolate chunks from a bar or chocolate chips. Try to use small chocolate chips. For example, I love Ghirardhello chocolate chips, but they are on the larger side, which makes shaping dough balls more difficult. Aim for normal-sized chips.
Recommended Sugar Lab Recipes + Experiments
.avif)
.avif)

Got room for more dessert?
Subscribe to my Crumby Data newsletter! I share behind-the-scenes looks at recipe development, flavor testing for the Cakeculator, and life as a content creator. It’s free, lands in your inbox every few weeks, and you can unsubscribe anytime...no strings attached :)
Feel free to take a look at previous newsletters here!
.ico)