.avif)
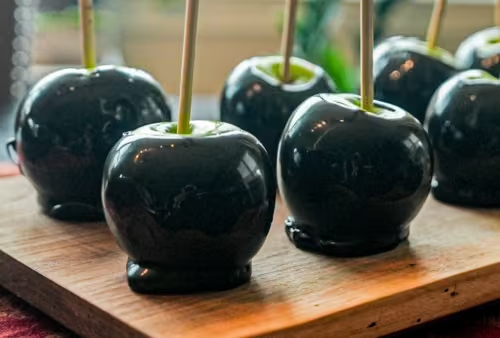
No Dye Black Caramel Apples


My black caramel apples have a super-glossy, jet-black finish thanks to black cocoa powder. This super-alkalized cocoa powder gives the caramel a deep, smoky, sweet flavor, like caramelized liquid Oreos.
.avif)
I can’t even begin to describe how beautiful these apples turned out; the pictures don’t do them justice. They are truly stunning to see in person. As for the flavor, it’s sweet-salty, with depth from both caramelization of sugars and the Maillard reaction from heavy cream and butter.

In this tutorial, I’ll teach you how to make foolproof caramel sauce, which serves as the base for the coating, and we’ll also go over how to tailor the texture. Do you prefer a chewier texture? Or a soft-chew? You can have either! Let’s get started.
Ingredients
.avif)
1 | WHITE GRANULATED SUGAR
This is the base of the caramel. When heated, the sucrose molecules break down and recombine into hundreds of delicious aromatic compounds through caramelization. It also produces amber-colored compounds, which give it its beautiful color.
2 | LEMON JUICE/VINEGAR
A small amount of acid helps prevent sugar crystals from forming by breaking some sucrose into glucose and fructose, which are smaller and thus less prone to crystallization.
3 | HEAVY CREAM
If we didn’t add any liquid to a caramel, it would solidify into a hard mass. For a caramel sauce, heavy cream is excellent; its water content helps cool the sugar, and its milk proteins and sugars contribute to browning via the Maillard reaction, adding flavor complexity.
4 | UNSALTED BUTTER
Butter acts similarly to heavy cream, just with more fat and less water. It also adds emulsifiers, which help the sauce maintain a smooth, homogeneous texture.
5 | BLACK COCOA
This is the queen of this dessert and one of my favorite ingredients to work with. It is a highly alkalized cocoa powder that’s nearly black. It provides a rich, earthy flavor and dramatically dark color, intensifying both the taste and appearance of the caramel coating.
6 | SALT
Because caramel sauces are very sweet, we need salt to balance them. Taste the caramel sauce without any salt—you may notice it’s very flat and perhaps one-note (sweet). Add a bit of salt, and you should start to see how it enhances the Oreo flavor and tones down the sweetness.
7 | SMALL GRANNY SMITH APPLES
You can use any type, although Granny Smith is most traditional. Again, caramel is very sweet, so Granny Smith apples add complexity with their tartness, making for a more well-rounded bite.
Most commercially available apples are coated in a food-safe wax. I didn’t find any difference between the apples I boiled (thus removing their waxy coating) and those I thoroughly washed in warm water and wiped clean.
Also, I like smaller apples because you get a higher ratio of caramel to apple, and they’re easier to manage and dip. If you have larger apples, just make sure you use a pot deep enough to submerge them. I tilt my pot anyway to accommodate larger apples —and I’ll show you below.
Step by step:
STEP 1 | SET UP INGREDIENTS/WORKSTATION.
WHY:
The caramel process requires you to pay close attention throughout the cooking step, so it’s best to get everything set up ahead of time.
HOW:
Lay out your ingredients, line a tray with parchment or wax paper, and get your apples, tools, and pot/bowl ready before starting.
.avif)
Cut butter into small chunks and sift black cocoa powder into a small bowl (1a). Set aside.
Remove apple stems by twisting them off. Insert chopsticks or thick skewers into the tops and place the apples on a parchment- or wax-lined tray (1b).
STEP 2 | MELT THE SUGAR.
WHY:
The difference between the 1-cup caramel sauce (for 4 apples) and the 2-cup version (for 8 apples) is that you must heat the 2-cup version incrementally to prevent clumping and ensure even heating. The 1-cup you can typically do all at once.
Lemon juice or vinegar (called doctoring agent) prevents crystallization; that’s when the sugar seizes up into what looks like an uneven layer of ice. The acid breaks up some of the sucrose molecules into glucose and fructose, which interferes with crystal formation. Do not skip this—it’s insurance to keep your caramel beautiful and liquified!
HOW:
I’m going to demo the larger (2-cup) version here. In a small bowl, combine sugar and lemon juice. Rub the mixture together with your fingertips to distribute.
.avif)
Add a 1/4-inch layer of this sugar to a thick-bottomed saucepan over medium heat (2a). Stir constantly as the sugar melts—first turning perhaps clumpy + clear (2b), then amber + liquified (2c).
.avif)
.avif)
Add more sugar gradually, letting each addition melt before the next (2d-f). Repeat until all the sugar is melted and reaches a light amber to honey color (2g), then remove from the heat.
STEP 3 | ADD HEAVY CREAM TO THE CARAMEL.
WHY:
Heavy cream adds fat and flavor to the caramel, transforming it from a hard candy into a sauce. The milk proteins and sugars undergo the Maillard reaction, while simultaneously releasing steam as they hit the very hot caramel. Adding the heavy cream gradually will ensure you reduce clumping.
HOW:
.avif)
Carefully pour in a small splash of heavy cream while stirring constantly (3a). It will bubble and steam. Add the rest in small amounts, stirring each time (3b). If the mixture seizes into a hard lump, return it to medium heat and stir until smooth.
STEP 4 | ADD BLACK COCOA POWDER + BUTTER.
WHY:
Black cocoa provides deep flavor and a dramatic dark color, while butter adds fat and flavor, and helps emulsify. Mixing these in now ensures even incorporation before the final heating stage.
HOW:
.avif)
Whisk or stir in the sifted black cocoa powder until evenly distributed (4a,b).
.avif)
STEP 5 | REHEAT THE MIXTURE TO 235–240°F/113–116°C.
WHY:
We must reheat the caramel after adding the heavy cream and butter to evaporate some of the water and adjust the final caramel texture. If we try to dip the apples now, the caramel will slide off because of the excess water. Heating to 235°F gives a soft chew, while 240°F creates a firmer bite by evaporating more water. The higher the temperature, the less moisture remains.
HOW:
.avif)
Return the pot to medium-high heat. Stir continuously as the mixture begins to bubble and steam (5a). Cook until it reaches 235–240°F (113–116°C) and becomes thick and glossy (5b). Choose 235°F for softer caramel, or 240°F for a firmer chew.
STEP 6 | DIP YOUR APPLES.
WHY:
Letting the caramel cool slightly before dipping allows it to thicken for better coating. It’s best to salt the caramel at the very end because we’ve adjusted the ingredient ratio —if we salted earlier, we might end up with an overly salty caramel.
HOW:
Stir in the salt, then let the caramel cool to around 200°F for a nice, thick coat.
.avif)
Tilt the pot away from you (6a) and dip each apple by its skewer, rotating it to coat fully (6b,c).
.avif)
.avif)
Let the extra drip off (6d), then place it on the lined tray (6e).
.avif)
If the caramel thickens too much to dip, gently reheat (6f). I actually like the look of the apples near the end - they’re irregular and drippy and a little creepy looking, if that’s the vibe you’re after.
.avif)
After the caramel sets (about 30 minutes to an hour), you may get a puddle underneath—just smear around underneath to tidy up (6g). You can also cut it off. Store apples in the fridge if not eaten the same day.
.avif)
.avif)
Video
Honors Members Section
This extra material is accessible to Sugarologie Honors members.
Become a member to view extended research notes, technique analysis, and supplemental materials! Learn more about Sugarologie Honors here.
Already a member?
Before starting the recipe, please read this!
Measure by weight, if possible.
Measuring by weight is the best way for you to replicate my recipes. I develop recipes using ingredients (even liquids) measured in grams, which is why you see them listed first in the recipe cards. For measurements under 5 grams, I will typically only list the volumetric measurements (teaspoons, etc.), as most home scales are not precise for such small weights.
In most cases, I have converted grams to volumetric measurements (aka US customary units) for bakers who prefer this method. However, the measurements are not as precise and may have awkward proportions. The recipes should still work, but for the ultimate precision, try to use weight.
This is the OXO scale I use daily. I also purchased this budget version of a good scale, which I keep at my Mom’s house for baking. If you’re interested in other tools I use for my baking, I’ve compiled a list here.
Use room temperature ingredients.
All my ingredients should be used at room temperature, or 65-75 °F/18-24 °C. I will always indicate if you need something outside this range. If no details are given, room temperature is the default.
Pay attention to the ingredient descriptions.
I try not to be brand-specific, but I will always note an interesting result from a type of ingredient, be it negative or positive.
A specific note regarding salt: I use Diamond Crystal Kosher salt for everything on this site except for frostings. In frostings, you want the salt to dissolve more easily, and kosher salt tends to leave granules behind. If you substitute table salt (more finely granulated) for recipes that list kosher salt, you must use half the volume indicated in my recipes.
Substitutions are hard.
That said, substitutions aren’t impossible but can be the toughest part of recipe development. Small swaps, like reduced-fat milk (2% fat) for whole milk (3.5% fat), usually work fine. However, bigger changes—such as replacing oil with applesauce or sour cream with Greek yogurt—can significantly impact texture and density.
Be wary of general, all-purpose substitutions in baking; I find that usually there is never a one size-fits-all solution. I carefully select ingredients for my recipes, so for the best results, start with the original recipe and modify with caution.
Read all the recipe instructions before beginning.
I’m in the “Pre-read the Chapter before Class Lecture” club... and I invite you to join! Baking new recipes can be intimidating, so let’s set you up for success. I want you to think about timeframes. Most fillings and frostings can be made ahead of time, and give you an extra day for mental space. Also, as you become a more proficient baker, you can anticipate and recognize steps. (“Oh, this has a meringue step, so I’ll need an extra clean bowl…” etc.) Ensure you go down the ingredient list and have everything at the right temperature.
.avif)
.avif)

.avif)
.avif)
Black Cocoa Caramel Apples
- 150 g (¾ cup) white granulated sugar
- ¼ teaspoon lemon juice (strained) or vinegar
- 120 g (½ cup) heavy cream (warmed slightly)
- 9 g (1 tablespoon) black cocoa*, sifted to remove clumps
- 28 g (4 tablespoons) unsalted butter, sliced into 1 TB chunks (any temp is fine)
- ¼ teaspoon fine salt
- 4 small Granny Smith apples**, washed very well and dried with a towel
- 300 g (1 ½ cups) white granulated sugar
- ½ teaspoon lemon juice (strained) or vinegar
- 240 g (1 cup) heavy cream (cold from fridge is fine)
- 56 g (8 tablespoons) unsalted butter, sliced into 1 TB chunks (any temp is fine)
- 18 g (2 tablespoons) black cocoa*, sifted to remove clumps
- ½ teaspoon fine or kosher salt
- 8 small Granny Smith apples*, washed + dried
- Set up your ingredients/workstation.
1 cup recipe: In a small pot, combine sugar and lemon juice/vinegar. Rub together with your fingertips.
2 cup recipe: In a small bowl, combine sugar and lemon juice; rub together.
Cut butter into chunks and sift black cocoa into a small bowl.
Skewer apples by removing their stems (just twist them off), insert chopsticks or thick skewers, and place on a parchment- or wax-lined tray. - Melt the sugar.
For the 1 cup recipe:
Place the pot of sugar on medium-high heat. At first, it will seem like you’re just stirring around dry sugar crystals, but you are distributing the heat throughout. Then, the sugar will first look a little wet directly where it touches the pan, then turn clear, and then start to turn light brown. As you stir, you may see chunks; just keep stirring, and the chunks will dissolve. Once the caramel is a light amber/honey color, remove the pan from the heat.
For the 2 cup recipe:
Add enough sugar to create a thin layer (about 1/4 inch or 6mm) of sugar on a thick-bottomed saucepan. Cook on medium heat, stirring constantly. The sugar will first look a little wet directly where it touches the pan, then turn clear, then amber. Now sprinkle on some more sugar. It doesn’t have to be precise, but enough so that when you stir, the sugar easily combines, and everything gets a little wet. Once all the sugar is liquified, add more sugar. Repeat this until all the sugar is added. Once the caramel is a light amber/honey color, remove the pan from the heat. - Add heavy cream to the caramel.
Carefully pour a small splash of heavy cream while stirring constantly with the spatula. It will produce bubbles and steam, so be careful. Pour in a bit more, stirring and repeating this until all the cream has been added. It may be thick or lumpy when you do this, but don’t worry; just keep stirring, and it will eventually mix. If you find that it forms a big sugary mass return to medium heat until liquified. - Add black cocoa powder + butter.
Pour in the sifted black cocoa powder and use a whisk or spatula to distribute. Add the unsalted butter and stir until melted and combined. - Reheat the mixture to 235-240°F/113-116°C.
Place the pot back on medium-high heat. It will start to bubble, and steam will begin to rise. This may take 5-10 minutes, but keep stirring until you reach 235-240°F/113-116°C and the caramel is thick and glossy.
If you stop at 235, you will have a soft chew. If you go to 240, your caramel will be chewier because you have evaporated more water from the mixture. I prefer 235, my husband likes 240; both are great! - Dip your apples.
Stir in the salt.
Rest the caramel for a few minutes to thicken up. I like my caramel sauce to be around 200 for a nice, thick coat of caramel.
Grab an apple by its skewer, tilt the pot away from you, and push the apple in. You can do a sweeping motion up the sides, bringing a bit of caramel with the apple to ensure it reaches the tippy top. Let the residual caramel drip off before placing it on your lined tray. Repeat with all the apples.
If at any time during this process, your caramel starts to thicken so much that you can’t dip, place it back on the stove for a few seconds to get some heat on the pan and stir.
You may get a puddle of set caramel under each apple. After the caramel sets and it’s easy to handle, I just smear the caramel underneath to create an even surface for it to sit on.
Store your apples in the fridge if you don't eat them the same day.

Recipe Card - Adriana's Notes
*Black cocoa powder is an alkalized version of natural cocoa powder, which in addition to raising the pH, turns the cocoa black. It has a smoky, mellow, and sometimes alkaline flavor reminiscent of Oreo cookies. It’s hard to source in stores, so I buy mine online. (I get it on Amazon, here.)
**You can use any type of apple here. Apples sold in the US typically have a safe, edible wax applied to their surfaces to ensure the fruit stays fresher for longer. You can remove the wax, if that's your preference. I didn't find any difference in apples that had the wax still on them in terms of the caramel adhering, but I do boil my apples very briefly from a cleanliness perspective to ensure they're safe for longer storage while covered in caramel, just in case.
Recommended Sugar Lab Recipes + Experiments


Got room for more dessert?
Subscribe to my Crumby Data newsletter! I share behind-the-scenes looks at recipe development, flavor testing for the Cakeculator, and life as a content creator. It’s free, lands in your inbox every few weeks, and you can unsubscribe anytime...no strings attached :)
Feel free to take a look at previous newsletters here!
.ico)