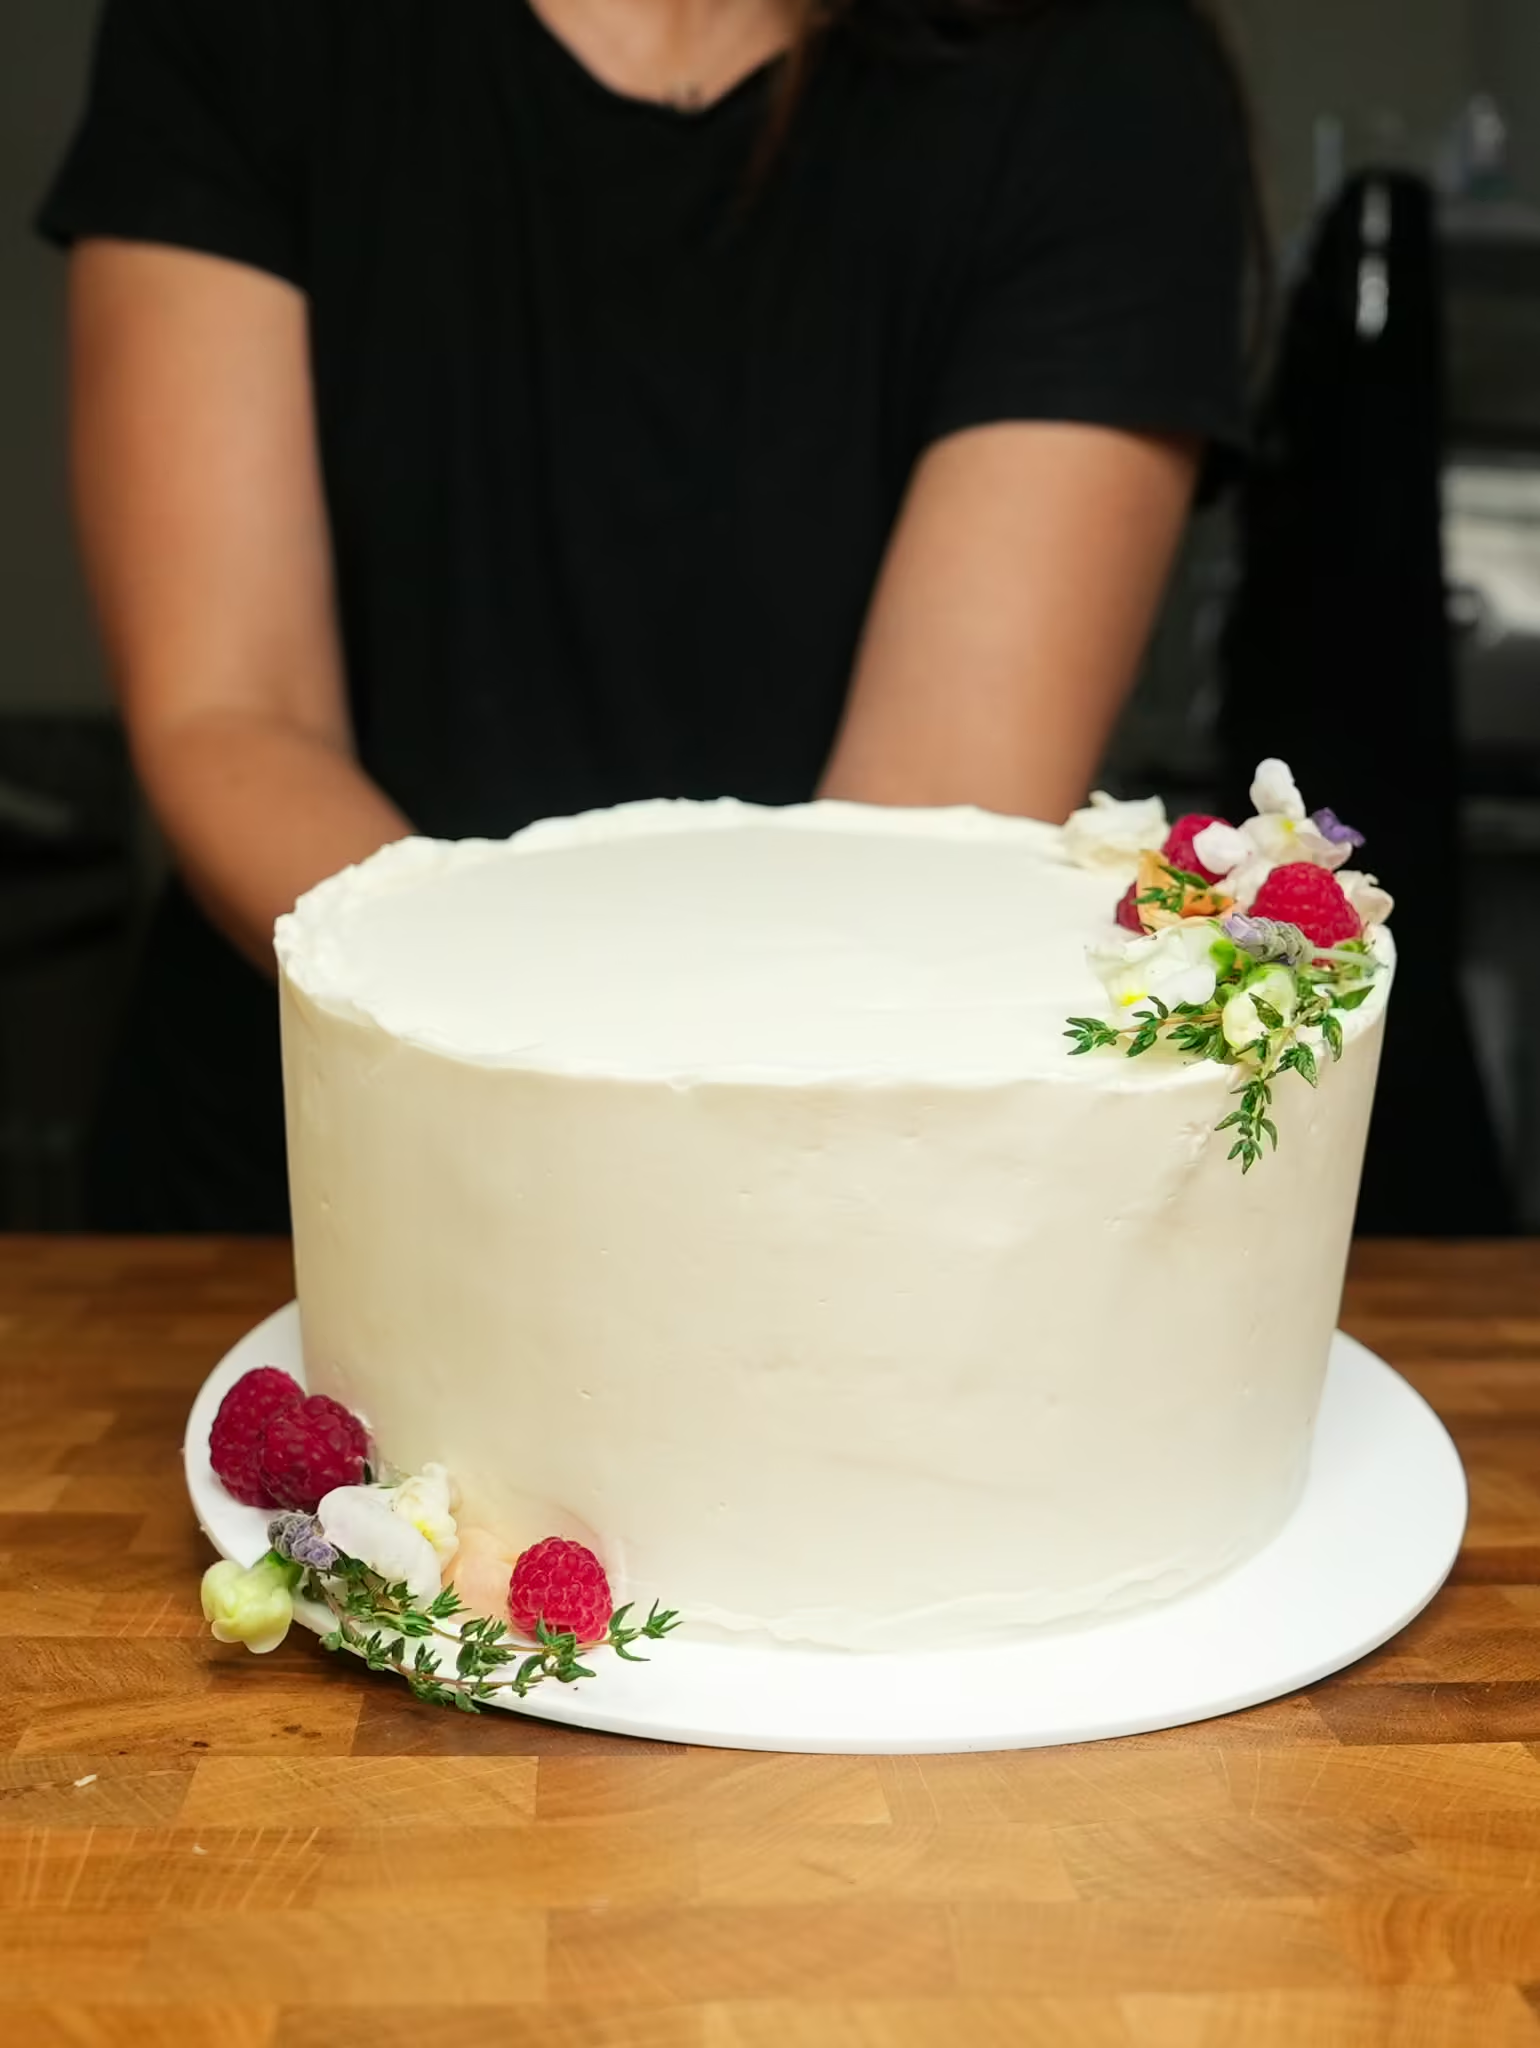
The Lychee Raspberry Chiffon Cake I Made for my Sister's Wedding

Yield
One 8-inch cake, 10-15 servings
Prep time
2 hours
Cook time
1 hour
Total time
About 3 hours plus cooling

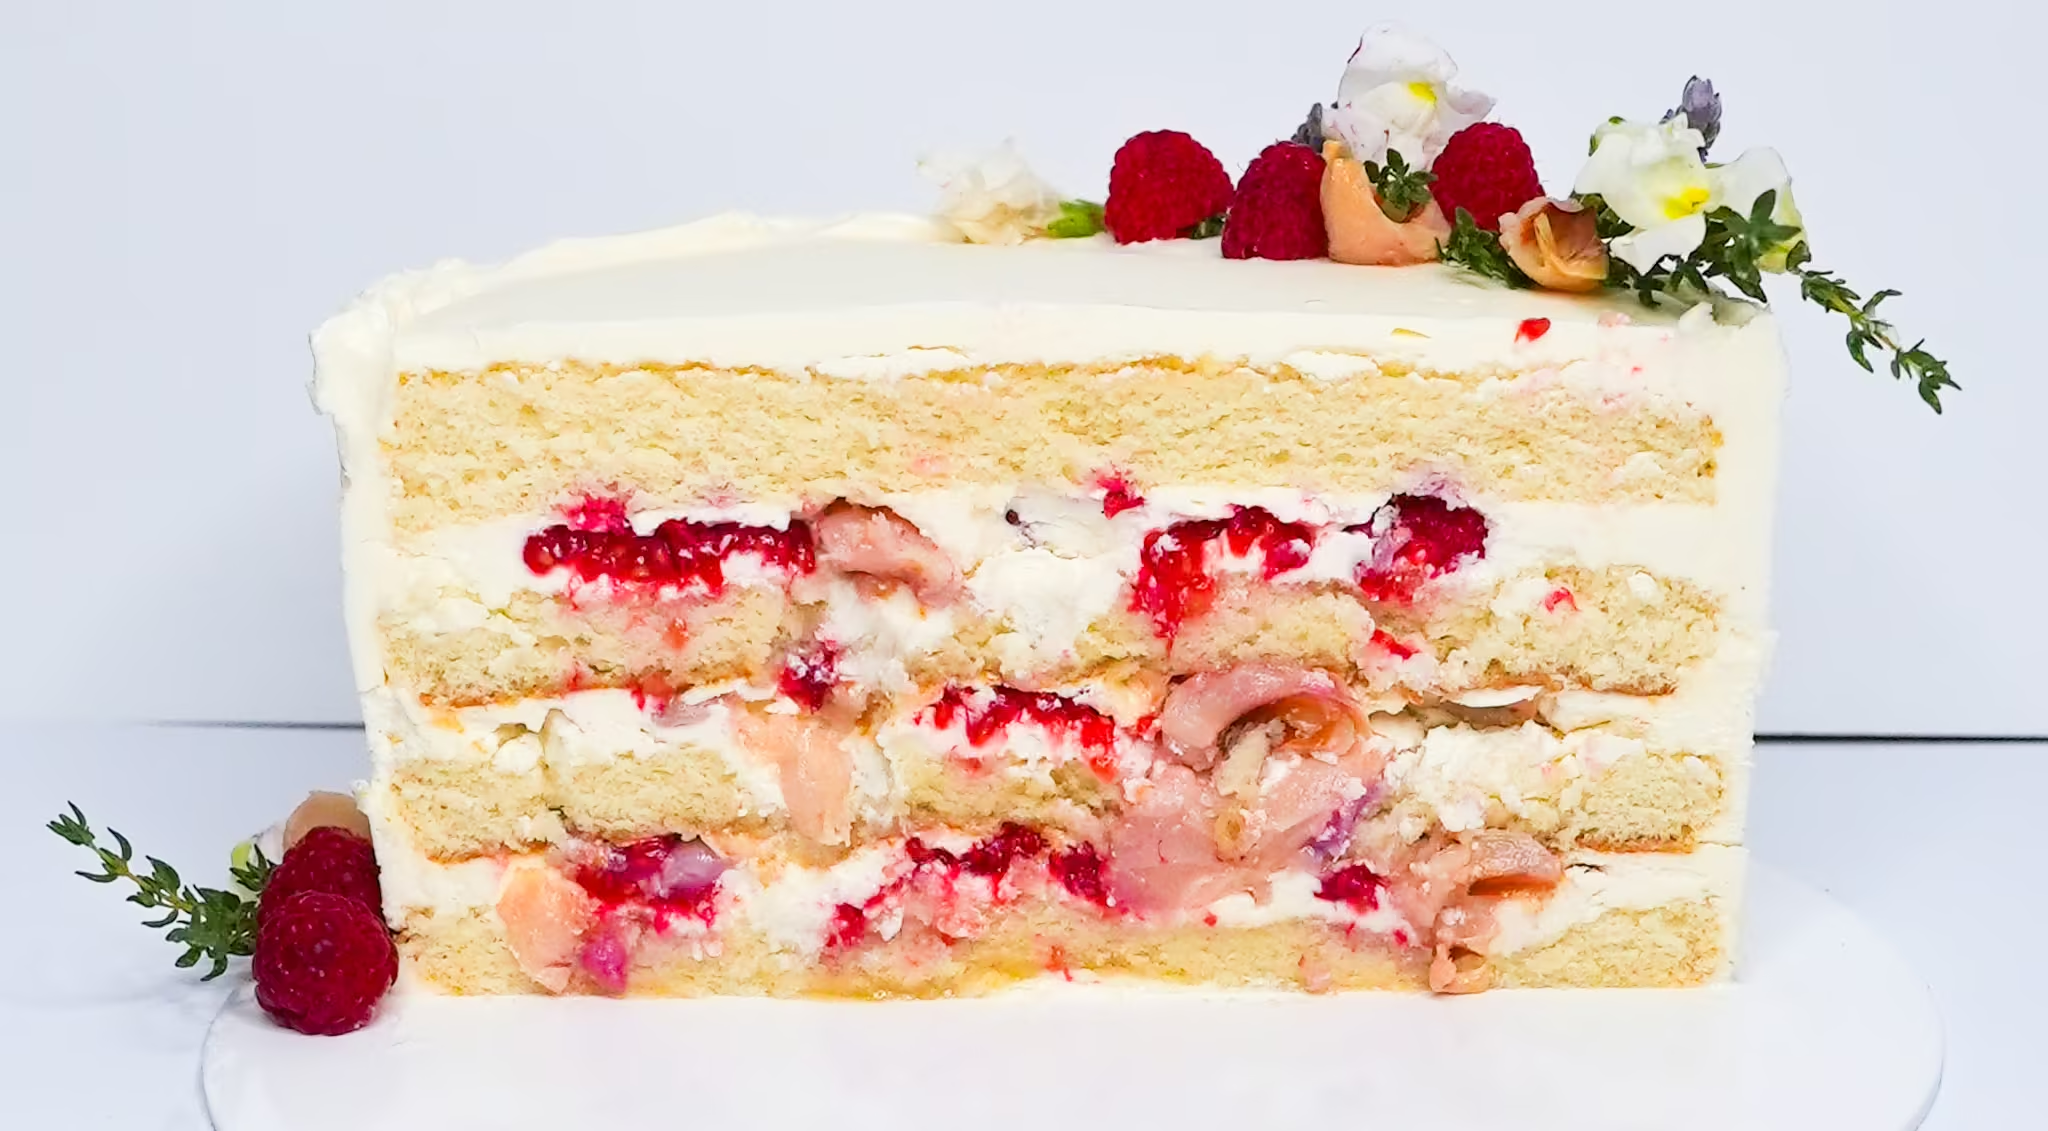
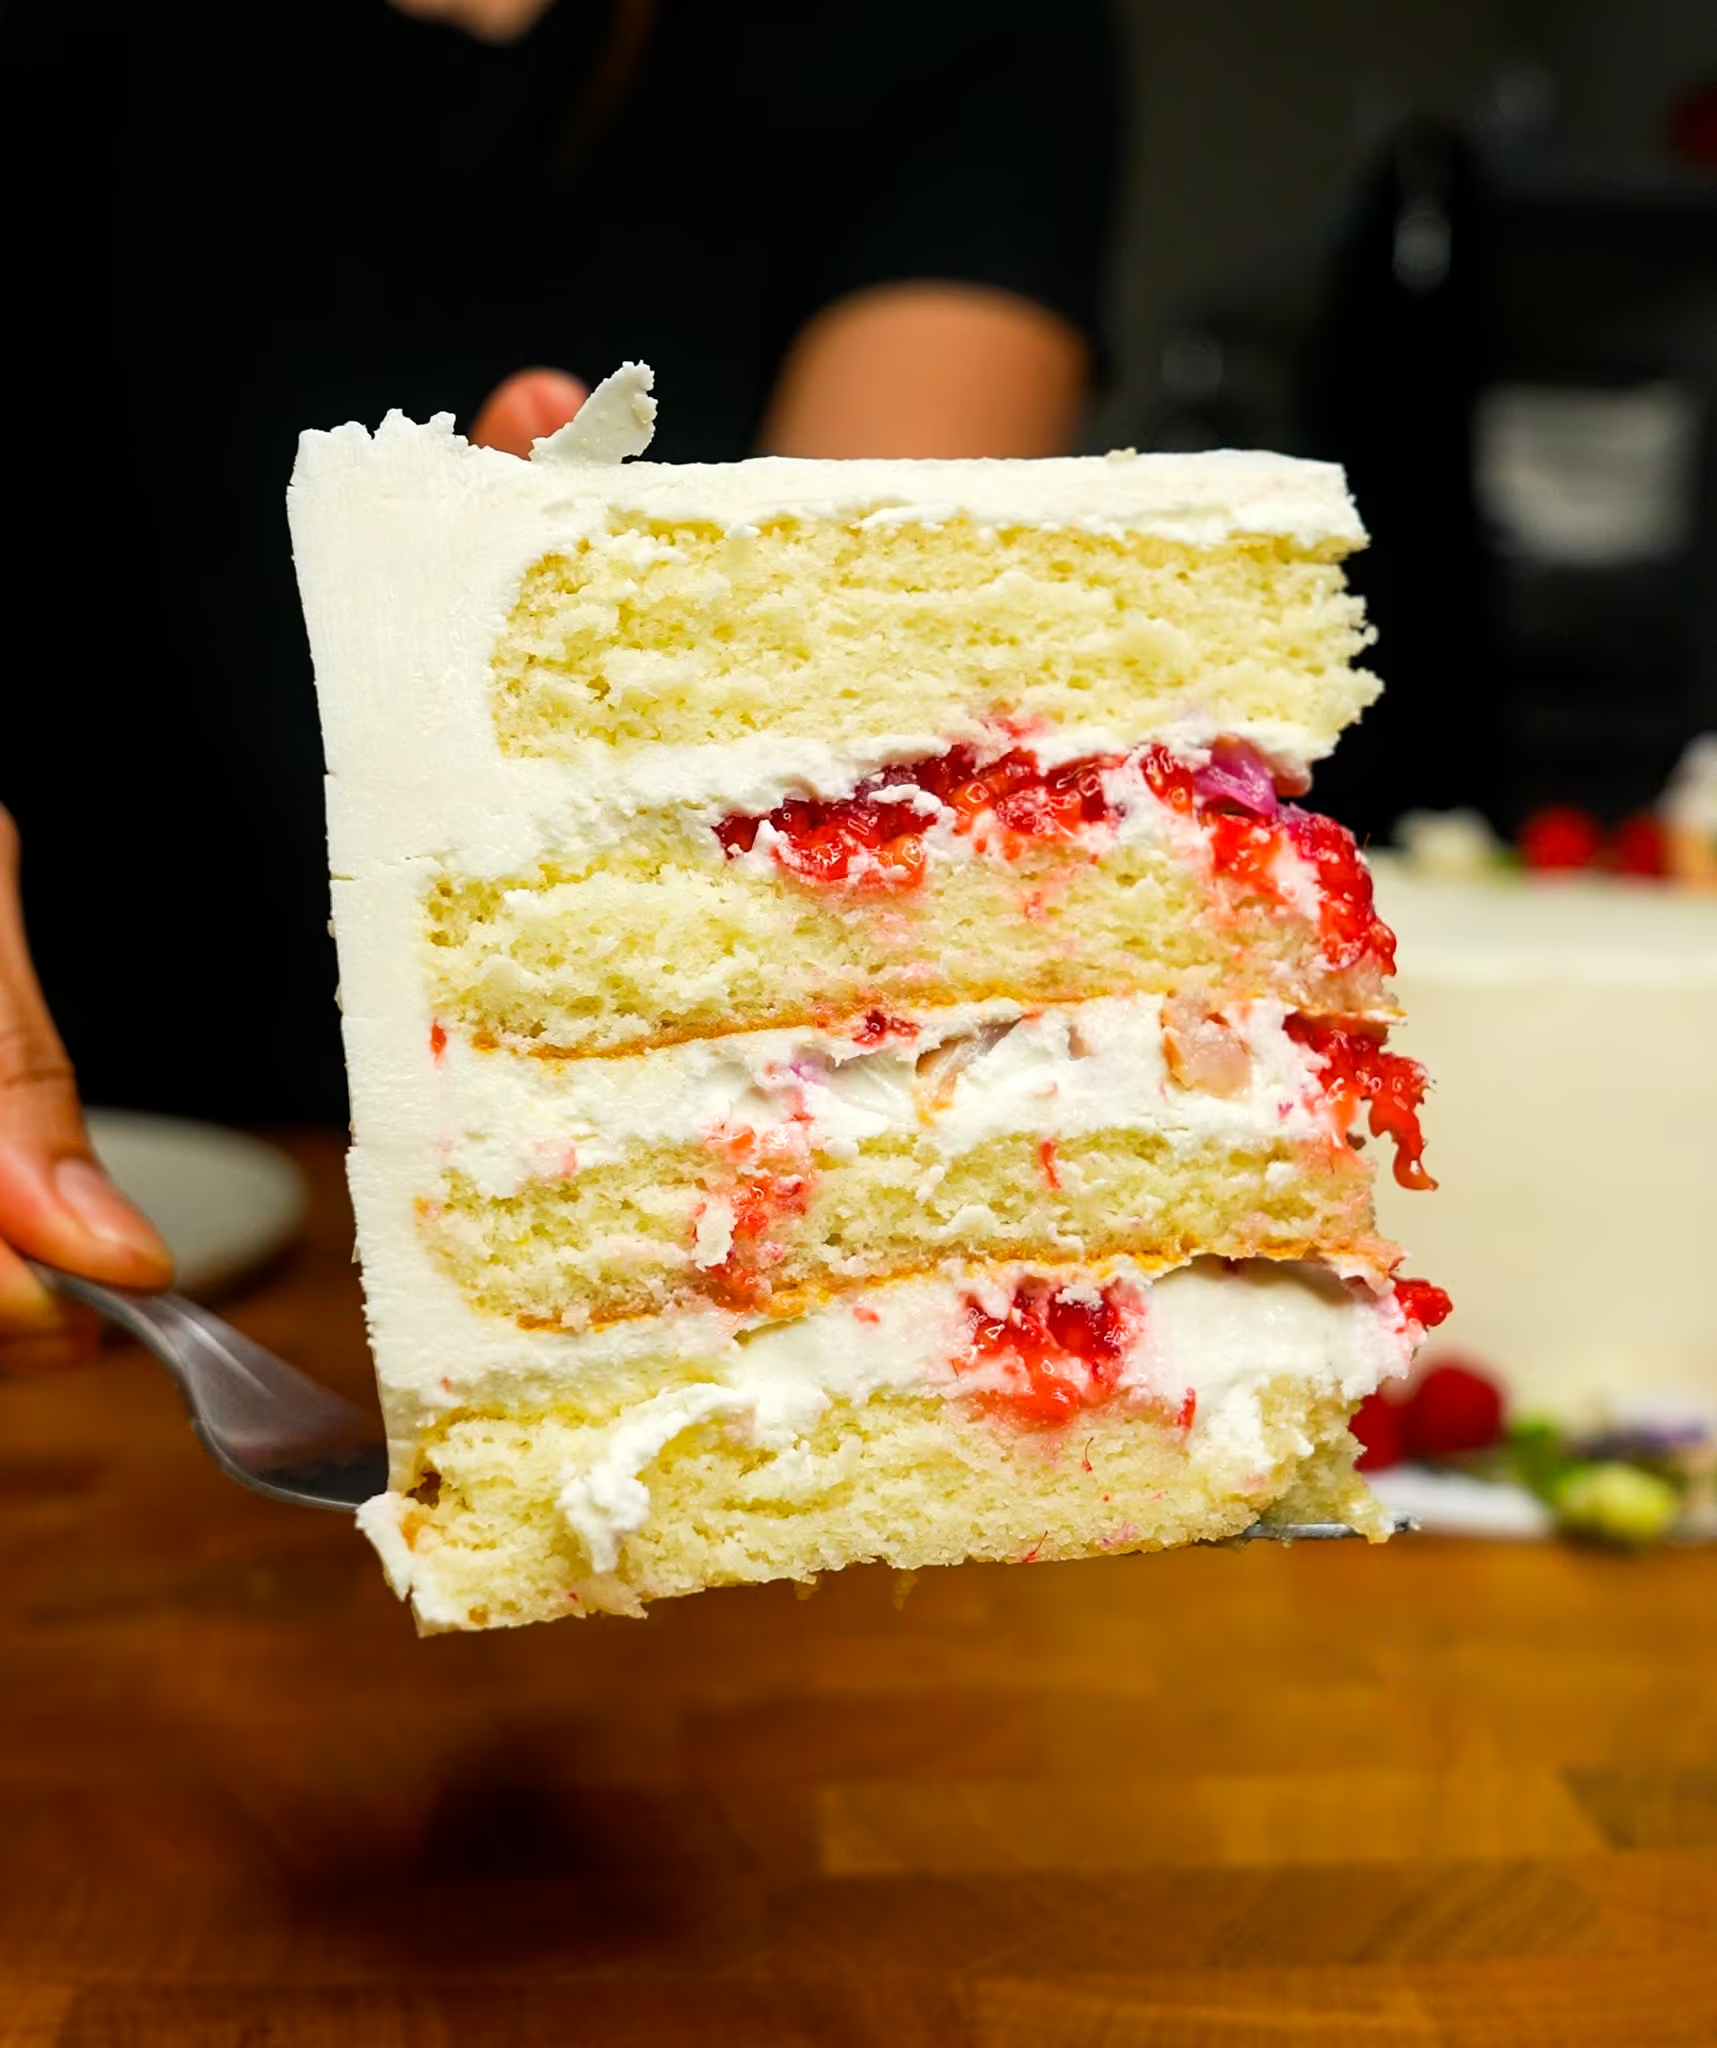
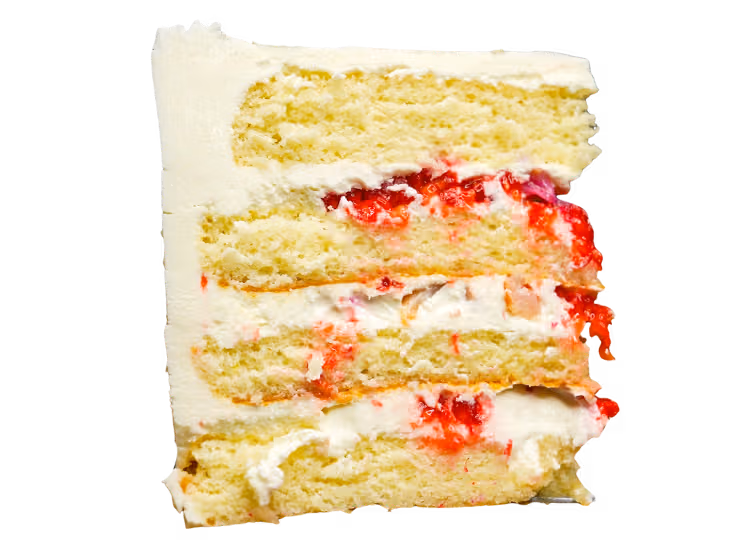
This lychee and raspberry chiffon cake was one of the centerpiece desserts at my sister’s wedding. It features layers of light Vanilla Almond Chiffon filled with fresh raspberries and lychee. For the filling, I opted for a buttercream that simulates the texture of whipped cream quite well, using a lychee-flavored Ermine Buttercream. For the actual wedding cakes, I finished them all with a final layer of Vanilla American Dreamy Buttercream to ensure a consistent and polished appearance across the display. However, for the recipe I’ll share with you below, we’ll use lychee buttercream for the entire cake.

What is the flavor/taste/texture of my Lychee Raspberry Chiffon Cake?

The overall flavor profile of this cake is lychee-forward, followed by bursts of acidity from the raspberries. The vanilla chiffon cake and Ermine Buttercream are lighter-style recipes of mine, and I often use them to make cakes that contain fruit. If you opt to include almond extract in the cake (which I highly recommend), it adds a subtle aromatic note that ties everything together—each bite feels fresh and light.

How much time does it take to make this cake?

Here is an approximation of the workflow required to make this cake. 

You can definitely pre-make components, such as the cake and frosting. 

Frostings: Butter-based frostings can be prepared up to a week in advance. You can store them right after making them by wrapping them in plastic wrap and placing them in either the fridge or freezer. Please refer to this guide for instructions on how to do that.

Cake layers: My chiffon cakes are excellent candidates for freezing. Once the cakes are baked and cooled slightly (I still have to wear gloves to handle the pan, but it’s cool enough for my hand to hold the cake), I flip the cakes out onto a piece of plastic wrap. I then gently wrap the cake. I know that we want it to be airtight, but you still have to be careful because if you wrap the cake too tightly, the cake will freeze with dents in it. This can be stored in the freezer for a few weeks. I'll have a cake storage guide up soon, but generally, the fridge accelerates staling, whereas the freezer slows it down. Plus, frozen-ish cake layers are much easier to handle. I want them until mine are just thawed enough to cut, but most of the time, they're still pretty chilled when stacking.

Step by step:

(I apologize for the quality of these photos - budding photographer, I certainly am not! But I am learning, so thank you for being patient with me!)

This photo tutorial will explain how to assemble the cake once you have all the components ready: cakes that are baked and cooled, and frostings that are prepared. 

For more guidance on the frosting, refer to my Complete Guide to Ermine Buttercream.

STEP 1 | Chop the lychee and wash the berries.

WHY:
Smaller, evenly sized lychee pieces prevent air gaps from forming and give a consistent filling filled with fruit.

HOW:

Cut the lychee into ¼ inch pieces. Wash the raspberries gently under cool water. Set a few of the best-looking berries and lychee pieces aside on a paper towel—these will be used for decorating the top of the cake later.

STEP 2 | Cut the cake layers.

WHY:
Some bakers prefer fat cake layers, but I’ve been leaning more towards thinner layers. I like a more even distribution of filling. 

HOW:

Here are the cake layers I baked the day before. They were wrapped in plastic and left on the countertop at room temperature (2a). Cut each cake into two thinner layers using a cake leveler or a long serrated knife (2b).

STEP 3 | Set up the cake base.

WHY:
The first smear of frosting helps the cake adhere to the board, preventing it from sliding around as you work.

HOW:

Place a cake board on a turntable or cake stand (a flat plate works too, but smoothing the frosting will be trickier). Add a small dab of frosting to the center of the board to act as glue (3a), then place the flattest cake slice on top (3b).

👉🏻 TIP: Use the flattest cake layers for the bottom and top. This makes the cake sturdier and helps with even frosting later.

STEP 4 | Add buttercream and fruit filling.

WHY:
The best way to ensure a cake with a filling of fresh fruit doesn’t weep or bulge is by embedding the frosting and compacting it very well with the fruit. As the water from the fruit migrates outward, the fruit can collapse, which in turn can cause the cake to bulge. Additionally, leaving space around the edge prevents the filling from bulging out when more layers are added.

HOW:

Add about ¾ cup of frosting (or four scoops with a 3-tbsp ice cream scoop) onto the cake layer. Spread it evenly (4a). Add the chopped lychee and raspberries, leaving a 1-inch edge around the perimeter free. Add an extra thin layer (about 3 tbsp) of frosting on top of the fruit to fill gaps and flatten the surface (4b,c).

STEP 5 | Continue layering cake and filling.

WHY:
Even stacking prevents a tilted or unstable cake. Gentle pressure helps remove air pockets, resulting in a clean finish.

HOW:

Add the next cake layer, ensuring the edges align. Press gently with your hand to secure it in place. Repeat Step 4 for the next two layers. Use the flattest layer on top to create a level surface for frosting.

STEP 6 | Apply a crumb coat.

WHY:
A crumb coat locks in loose crumbs, so the final layer of frosting looks clean and smooth. It also provides a base layer of fat that prevents crumbs from showing through the outer coat.

HOW:

Spread a very thin layer of frosting over the top and sides of the cake. Use extra frosting to fill any gaps on the sides until the surface is smooth and even. Don’t worry if it looks rough—this layer is meant to trap crumbs (6a,b). 

Chill the cake for at least 30 minutes until the frosting is firm to the touch.

STEP 7 | Apply a top coat of frosting.

WHY:

This is the final, visible layer of frosting, so it should be smooth and clean. Chilling beforehand helps it glide on without picking up crumbs.

HOW:

Add a few large scoops of frosting to the top of the cake and smooth it flat with a spatula (7a). Frost the sides (7b) and use a bench scraper to make the surface even (7c).

STEP 8 | Decorate with fresh fruit and flowers.

WHY:

My favorite way to decorate is to use fresh flowers and the fruit that’s used inside the cake.

HOW:

Arrange the reserved lychee and raspberries on top of the cake, along with edible flowers or piped frosting details. Good ideas for decoration include either a wreath that goes along the top perimeter of the cake or opposing sides of little decoration, like I’m showing above.

Video

Read this before you begin

Measure by weight, if possible.

Measuring by weight is the best way for you to replicate my recipes. I develop recipes using ingredients (even liquids) measured in grams, which is why you see them listed first in the recipe cards. For measurements under 5 grams, I will typically only list the volumetric measurements (teaspoons, etc.), as most home scales are not precise for such small weights.

In most cases, I have converted grams to volumetric measurements (aka US customary units) for bakers who prefer this method. However, the measurements are not as precise and may have awkward proportions. The recipes should still work, but for the ultimate precision, try to use weight.

This is the OXO scale I use daily. I also purchased this budget version of a good scale, which I keep at my Mom’s house for baking. If you’re interested in other tools I use for my baking, I’ve compiled a list here.

Use room temperature ingredients.

All my ingredients should be used at room temperature, or 65-75 °F/18-24 °C. I will always indicate if you need something outside this range. If no details are given, room temperature is the default. 

Pay attention to the ingredient descriptions.

I try not to be brand-specific, but I will always note an interesting result from a type of ingredient, be it negative or positive. 

A specific note regarding salt: I use Diamond Crystal Kosher salt for everything on this site except for frostings. In frostings, you want the salt to dissolve more easily, and kosher salt tends to leave granules behind. If you substitute table salt (more finely granulated) for recipes that list kosher salt, you must use half the volume indicated in my recipes.

Substitutions are hard.

That said, substitutions aren’t impossible but can be the toughest part of recipe development. Small swaps, like reduced-fat milk (2% fat) for whole milk (3.5% fat), usually work fine. However, bigger changes—such as replacing oil with applesauce or sour cream with Greek yogurt—can significantly impact texture and density.

Be wary of general, all-purpose substitutions in baking; I find that usually there is never a one size-fits-all solution. I carefully select ingredients for my recipes, so for the best results, start with the original recipe and modify with caution.

Read all the recipe instructions before beginning.

I’m in the “Pre-read the Chapter before Class Lecture” club... and I invite you to join! Baking new recipes can be intimidating, so let’s set you up for success. I want you to think about timeframes. Most fillings and frostings can be made ahead of time, and give you an extra day for mental space. Also, as you become a more proficient baker, you can anticipate and recognize steps. (“Oh, this has a meringue step, so I’ll need an extra clean bowl…” etc.) Ensure you go down the ingredient list and have everything at the right temperature.

Lychee Raspberry Chiffon Cake

Yield
One 8-inch cake, 10-15 servings
Prep time
2 hours
Cook time
1 hour
Total time
About 3 hours plus cooling

Ingredients

For the vanilla almond chiffon cake layers:

Yield: Two 8-inch round cakes, approx 1.5-1.75” tall
Prep Time:
30 minutes
Bake Time:
35 minutes
Total time:
1 hour plus cooling

  • 148 g (10 tablespoons) water, room temperature
  • 110 g (8 tablespoons) oil, canola or another veg-based
  • 84 g (4 tablespoons) sugar syrup*
  • 80 g (4 large) egg yolks
  • 10 g (2 teaspoons) vanilla extract
  • 5 g (1 teaspoon) almond extract (optional, but yummy!)
  • 180 g (1 ½ cups) cake flour, bleached or unbleached
  • 56 g (8 tablespoons) potato starch
  • 200 g (1 cup) white granulated sugar (for flour 🌾)
  • 2 teaspoons baking powder
  • 1 teaspoon salt
  • 38 g (3 tablespoons) white granulated sugar (for meringue 🥚)
  • 120 g (4 large) egg whites
  • 1/4 teaspoon cream of tartar

For the Vanilla Lychee Ermine Buttercream:

Yield: about 6  cups
Prep Time:
20 minutes
Cook Time:
10-15 minutes
Total time:
30 minutes plus cooling

  • 83 g  (11 tablespoons) sweet rice flour, such as Mochiko
  • 400 g  (2 cups) white granulated sugar
  • 342 g  (1 ⅓ cups) lychee syrup from can
  • 74 g  (5 tablespoons) water
  • 236 g  (1 cup) heavy cream
  • 509 g  (2 ¼ cups) unsalted butter, softened slightly
  • 10 g  (2 teaspoons) vanilla extract
  • Pinch of fine sea salt

For the Topping + Filling:

  • One 20-oz can of lychee
  • 6 to 8 oz of raspberries

Instructions

Vanilla-Almond Cake Layers:

  1. Preheat the oven.
    Move your rack to the middle position. Preheat the oven to 350°F (176°C).
  2. Prepare the pans.
    Line the bottoms of two 8" cake pans (not non-stick) with a circle of parchment paper. Don't add anything (oil, flour, or paper) to the sides of the pans.
  3. Prepare wet/dry ingredients.
    In a measuring cup, combine room-temperature water, oil, sugar syrup, egg yolks, and vanilla (and almond, if using) with a fork until well emulsified. Set aside.

    In a large bowl, sift together cake flour, potato starch, granulated sugar (labeled "for flour 🌾"), and baking powder. Add kosher salt and whisk for 30 seconds.
  4. Mix wet and dry ingredients.
    Make a well in the flour mixture and slowly whisk in the water mixture, pulling in flour gradually to avoid lumps. Mix until just combined. Set aside.
  5. Whip egg whites.
    Add your small amount of granulated sugar (labeled “for meringue  🥚”) into a small bowl so it’s easy to add to the meringue while it whips. In a clean bowl, beat the egg whites and cream of tartar with a mixer on medium speed until they are thick and foamy. Gradually add the sugar (labeled "for meringue"), waiting 5–10 seconds between additions. Beat until stiff, glossy peaks form. ‍
  6. Fold egg whites into the batter.
    Add about ⅓ of the meringue to the cake batter. Gently fold the mixture until it is well combined, and repeat with the remaining meringue. The final chiffon batter should be smooth, tan, and airy.
  7. Fill the pans.
    Evenly distribute the batter into the prepared pans.
  8. Bake for about 30-35 minutes.
    Start watching during the last 5 minutes. My chiffons will dome as they bake, then flatten slightly toward the end. They’re done when the sides of the cake are just starting to pull from the pan. You can test with a skewer that comes out clean or the internal temperature is 195-200°F/90.5-93°C.
  9. Cool the cakes:
    Transfer the pans to a wire rack and let them cool to room temperature. Some cakes will deflate slightly (particularly the chiffons), but all my cakes are designed to be cooled while resting upright in the pans.
  10. Remove cake from pan:
    I remove cakes from their pan while they are still slightly warm to preserve moisture. Once the cake pan has cooled enough to handle, slide a knife around the perimeter of the cake to loosen it, and then carefully invert the pan over a wire rack or plate. The cake should fall right out, and you can peel the parchment off the bottom. You can leave the cakes out if your frosting is done, and you're immediately moving to assembly. Usually, if it takes more than 30 minutes, I wrap the cake in plastic to reduce moisture loss. The cakes must be completely cooled before moving on to the assembly.

Lychee-Rice Flour Ermine Buttercream:

  1. Cook sweetened flour paste.
    If you plan to sieve your flour paste, place your sieve atop a shallow tray or plate for easy access.

    Otherwise, simply have your tray ready.

    Set a timer for 3 minutes (don’t start it yet) and set that aside for now.

    In a pan, whisk together the flour and sugar until a smooth mixture forms. Pour in lychee syrup (reserving the fruit for filling), water, and heavy cream. Whisk until no lumps of flour remain.

    Place the pan on medium-low heat. Cook the flour mixture, whisking continuously and scraping the sides as needed. It will gradually start to thicken into a loose pudding.

    Once you see large bubbles forming in the center, start your timer (3 minutes!) and continue whisking vigorously. Feel free to decrease the heat slightly if the starch begins sticking to the bottom of the pan, but aim for a steady bubbling mixture throughout this process.
  2. Sieve (optional) and cool sweetened flour paste.
    When the timer is up, use a spatula to scrape the hot paste onto your tray.

    If you have clumps or want to ensure you get a super smooth frosting, push the hot paste through a sieve onto the tray.

    Spray a piece of plastic wrap with oil and press it directly onto the surface of the paste. I like to flatten it out, too, so it cools faster.

    Let this sit at room temperature to cool. I will sometimes place the tray in the freezer for about 10-15 minutes to speed up the process. It should feel completely cool to the touch before use.
  3. Aerate butter.
    Add the softened butter to the bowl of your stand mixer. Using the whisk attachment, beat the butter on high speed until it's paler in color and slightly more voluminous. Add the vanilla extract and pinch of salt, and mix on high speed for 2 minutes.
  4. Add cooled flour paste.
    Ensure your paste is cool to the touch. Mix the paste in 4 to 5 additions. Add the first amount, then whisk on high speed for a few seconds before adding the next.
  5. Adjust buttercream for texture.
    ‍The whisk introduces many air pockets, so switch to the paddle attachment for a smoother finish. Run the mixer on low speed for a few minutes until most of the air pockets are smoothed out.

    Compared to most other buttercreams, this frosting may feel looser. Don't let that deter you; it will still pipe and frost a cake just fine. It has a lower butter content than my other buttercreams so it will feel less dense. Running a spatula over the top of the buttercream several times while smoothing it onto cakes or through a piping tip will give you the smoothest result with this frosting style.

ASSEMBLY

  1. Chop the lychee and wash the berries.
    Cut the lychee pieces into ¼ inch pieces. Wash the berries. Save a few of your best-looking berries and lychee pieces for the top of the cake.
    Set both those aside on a paper towel to dry slightly.
  2. Cut the cake layers.
    We will need four layers of cake, approximately ¾ inches in height. There are two cakes, which should rise around 1.5-1.75 inches. This means that each cake should be cut in half.

    Use a cake leveler or a large serrated knife to slice straight through the layers. My cake leveler has markings on it, so I know how to cut ¾-inch slices. However, if you're using a knife, you may need a ruler for accuracy. 
  3. Set up the cake board and the first slice of cake.
    Place a cake board onto your cake turner or a cake stand. You can also do this on a large, flat plate or platter, but the outside will be difficult to smooth out, so you may opt for a more rustic look for the outer frosting. We’ll get to that in a bit.

    Add a schmear of frosting to the cake board to anchor the cake. Add the first layer of cake.

    👉🏻 TIP: Try to use the flattest pieces of cake for the bottom and top - it will help level the cake overall with a sturdy bottom. It’s much easier to deal with uneven cake slices in the middle with more buttercream.
  4. Add the buttercream frosting and fruit.
    I use a metal scoop to ensure the same amount of frosting is evenly distributed between the cake layers. My ice cream scoop holds three tablespoons per scoop, and I use four scoops, which equals 12 tablespoons, or ¾ cups of frosting for each filling application. You can also use a measuring scoop to do this.

    Add nine tablespoons, or a little more than 1/2 cup, of frosting to the cake layer. Spread it around.

    Add the raspberries and lychee, leaving a 1-inch border along the outside edge free (so the berries don’t pop out into the final coat of frosting). Open the berries and lychee so they lie as flat as possible, and gently push them into the frosting. We only have three fillings to make, so be generous with the fruit. Just remember not to use the ones you set aside for the top :)

    Add another three tablespoons (or a scant ¼ cup) of frosting on top of the fruit. Use your spatula to fill in all the gaps with the berries, applying gentle pressure to achieve a flat, even surface.
  5. Continue adding cake and fruit.
    Add another layer of cake. Get to eye level and ensure that the sides are lining up as even as possible. Use the palm of your hand to apply gentle pressure. This will ensure there are no air gaps in the frosting. Repeat step 3. Continue until all the cake layers have been used up, saving the flattest layer for the very top.
    Give your cake a final eye-level look. Adjust the cake if necessary to get straight sides.
  6. Apply a crumb coat.
    Now, apply a super-thin layer of frosting to the top and outside of the cake.

    There will likely be gaps of frosting, so I like to go in with more buttercream on the sides to fill all the gaps until it’s level with the side of the cake.

    During this process, my cake takes on a semi-cylindrical shape, but it's quite unappealing in terms of appearance. But it’s ok! The goal here is just to apply a layer of fat in which excess crumbs will get trapped, so that when we do a final coat, it’s free from any chocolate crumbs.

    Chill the cake for at least 30 minutes to set the crumb coat. To test, touch the buttercream; it should be firm and not leave any indentations.
  7. Apply a top coat of frosting.
    Apply a couple of big dollops of frosting to the top of the cake. Use a flat spatula to spread the mixture evenly over the top, then smooth it out to create a flat surface.

    Apply frosting around the sides and use a bench scraper to create flat and smooth sides. 
  8. Decorate with fresh flowers, leftover fruit, and/or piping.
    I like a half-moon shape for decorating. Place fruit and flowers all along the top.

Adriana's Notes

*My favorite version of this cake uses equal parts agave and corn syrup as it strikes a nice balance between sweetness and both initial and long-term moisture. To achieve this, split the total syrup weight in half, using half agave (light or dark) and half corn syrup. You can also use 100% corn syrup, agave, or invert syrup. Honey works too, but it tends to reduce rise and create a more domed top. 

For the vanilla almond chiffon cake layers:

Yield: Two 8-inch round cakes, approx 1.5-1.75” tall
Prep Time:
30 minutes
Bake Time:
35 minutes
Total time:
1 hour plus cooling

  • 148 g (10 tablespoons) water, room temperature
  • 110 g (8 tablespoons) oil, canola or another veg-based
  • 84 g (4 tablespoons) sugar syrup*
  • 80 g (4 large) egg yolks
  • 10 g (2 teaspoons) vanilla extract
  • 5 g (1 teaspoon) almond extract (optional, but yummy!)
  • 180 g (1 ½ cups) cake flour, bleached or unbleached
  • 56 g (8 tablespoons) potato starch
  • 200 g (1 cup) white granulated sugar (for flour 🌾)
  • 2 teaspoons baking powder
  • 1 teaspoon salt
  • 38 g (3 tablespoons) white granulated sugar (for meringue 🥚)
  • 120 g (4 large) egg whites
  • 1/4 teaspoon cream of tartar

For the Vanilla Lychee Ermine Buttercream:

Yield: about 6  cups
Prep Time:
20 minutes
Cook Time:
10-15 minutes
Total time:
30 minutes plus cooling

  • 83 g  (11 tablespoons) sweet rice flour, such as Mochiko
  • 400 g  (2 cups) white granulated sugar
  • 342 g  (1 ⅓ cups) lychee syrup from can
  • 74 g  (5 tablespoons) water
  • 236 g  (1 cup) heavy cream
  • 509 g  (2 ¼ cups) unsalted butter, softened slightly
  • 10 g  (2 teaspoons) vanilla extract
  • Pinch of fine sea salt

For the Topping + Filling:

  • One 20-oz can of lychee
  • 6 to 8 oz of raspberries

Vanilla-Almond Cake Layers:

  1. Preheat the oven.
    Move your rack to the middle position. Preheat the oven to 350°F (176°C).
  2. Prepare the pans.
    Line the bottoms of two 8" cake pans (not non-stick) with a circle of parchment paper. Don't add anything (oil, flour, or paper) to the sides of the pans.
  3. Prepare wet/dry ingredients.
    In a measuring cup, combine room-temperature water, oil, sugar syrup, egg yolks, and vanilla (and almond, if using) with a fork until well emulsified. Set aside.

    In a large bowl, sift together cake flour, potato starch, granulated sugar (labeled "for flour 🌾"), and baking powder. Add kosher salt and whisk for 30 seconds.
  4. Mix wet and dry ingredients.
    Make a well in the flour mixture and slowly whisk in the water mixture, pulling in flour gradually to avoid lumps. Mix until just combined. Set aside.
  5. Whip egg whites.
    Add your small amount of granulated sugar (labeled “for meringue  🥚”) into a small bowl so it’s easy to add to the meringue while it whips. In a clean bowl, beat the egg whites and cream of tartar with a mixer on medium speed until they are thick and foamy. Gradually add the sugar (labeled "for meringue"), waiting 5–10 seconds between additions. Beat until stiff, glossy peaks form. ‍
  6. Fold egg whites into the batter.
    Add about ⅓ of the meringue to the cake batter. Gently fold the mixture until it is well combined, and repeat with the remaining meringue. The final chiffon batter should be smooth, tan, and airy.
  7. Fill the pans.
    Evenly distribute the batter into the prepared pans.
  8. Bake for about 30-35 minutes.
    Start watching during the last 5 minutes. My chiffons will dome as they bake, then flatten slightly toward the end. They’re done when the sides of the cake are just starting to pull from the pan. You can test with a skewer that comes out clean or the internal temperature is 195-200°F/90.5-93°C.
  9. Cool the cakes:
    Transfer the pans to a wire rack and let them cool to room temperature. Some cakes will deflate slightly (particularly the chiffons), but all my cakes are designed to be cooled while resting upright in the pans.
  10. Remove cake from pan:
    I remove cakes from their pan while they are still slightly warm to preserve moisture. Once the cake pan has cooled enough to handle, slide a knife around the perimeter of the cake to loosen it, and then carefully invert the pan over a wire rack or plate. The cake should fall right out, and you can peel the parchment off the bottom. You can leave the cakes out if your frosting is done, and you're immediately moving to assembly. Usually, if it takes more than 30 minutes, I wrap the cake in plastic to reduce moisture loss. The cakes must be completely cooled before moving on to the assembly.

Lychee-Rice Flour Ermine Buttercream:

  1. Cook sweetened flour paste.
    If you plan to sieve your flour paste, place your sieve atop a shallow tray or plate for easy access.

    Otherwise, simply have your tray ready.

    Set a timer for 3 minutes (don’t start it yet) and set that aside for now.

    In a pan, whisk together the flour and sugar until a smooth mixture forms. Pour in lychee syrup (reserving the fruit for filling), water, and heavy cream. Whisk until no lumps of flour remain.

    Place the pan on medium-low heat. Cook the flour mixture, whisking continuously and scraping the sides as needed. It will gradually start to thicken into a loose pudding.

    Once you see large bubbles forming in the center, start your timer (3 minutes!) and continue whisking vigorously. Feel free to decrease the heat slightly if the starch begins sticking to the bottom of the pan, but aim for a steady bubbling mixture throughout this process.
  2. Sieve (optional) and cool sweetened flour paste.
    When the timer is up, use a spatula to scrape the hot paste onto your tray.

    If you have clumps or want to ensure you get a super smooth frosting, push the hot paste through a sieve onto the tray.

    Spray a piece of plastic wrap with oil and press it directly onto the surface of the paste. I like to flatten it out, too, so it cools faster.

    Let this sit at room temperature to cool. I will sometimes place the tray in the freezer for about 10-15 minutes to speed up the process. It should feel completely cool to the touch before use.
  3. Aerate butter.
    Add the softened butter to the bowl of your stand mixer. Using the whisk attachment, beat the butter on high speed until it's paler in color and slightly more voluminous. Add the vanilla extract and pinch of salt, and mix on high speed for 2 minutes.
  4. Add cooled flour paste.
    Ensure your paste is cool to the touch. Mix the paste in 4 to 5 additions. Add the first amount, then whisk on high speed for a few seconds before adding the next.
  5. Adjust buttercream for texture.
    ‍The whisk introduces many air pockets, so switch to the paddle attachment for a smoother finish. Run the mixer on low speed for a few minutes until most of the air pockets are smoothed out.

    Compared to most other buttercreams, this frosting may feel looser. Don't let that deter you; it will still pipe and frost a cake just fine. It has a lower butter content than my other buttercreams so it will feel less dense. Running a spatula over the top of the buttercream several times while smoothing it onto cakes or through a piping tip will give you the smoothest result with this frosting style.

ASSEMBLY

  1. Chop the lychee and wash the berries.
    Cut the lychee pieces into ¼ inch pieces. Wash the berries. Save a few of your best-looking berries and lychee pieces for the top of the cake.
    Set both those aside on a paper towel to dry slightly.
  2. Cut the cake layers.
    We will need four layers of cake, approximately ¾ inches in height. There are two cakes, which should rise around 1.5-1.75 inches. This means that each cake should be cut in half.

    Use a cake leveler or a large serrated knife to slice straight through the layers. My cake leveler has markings on it, so I know how to cut ¾-inch slices. However, if you're using a knife, you may need a ruler for accuracy. 
  3. Set up the cake board and the first slice of cake.
    Place a cake board onto your cake turner or a cake stand. You can also do this on a large, flat plate or platter, but the outside will be difficult to smooth out, so you may opt for a more rustic look for the outer frosting. We’ll get to that in a bit.

    Add a schmear of frosting to the cake board to anchor the cake. Add the first layer of cake.

    👉🏻 TIP: Try to use the flattest pieces of cake for the bottom and top - it will help level the cake overall with a sturdy bottom. It’s much easier to deal with uneven cake slices in the middle with more buttercream.
  4. Add the buttercream frosting and fruit.
    I use a metal scoop to ensure the same amount of frosting is evenly distributed between the cake layers. My ice cream scoop holds three tablespoons per scoop, and I use four scoops, which equals 12 tablespoons, or ¾ cups of frosting for each filling application. You can also use a measuring scoop to do this.

    Add nine tablespoons, or a little more than 1/2 cup, of frosting to the cake layer. Spread it around.

    Add the raspberries and lychee, leaving a 1-inch border along the outside edge free (so the berries don’t pop out into the final coat of frosting). Open the berries and lychee so they lie as flat as possible, and gently push them into the frosting. We only have three fillings to make, so be generous with the fruit. Just remember not to use the ones you set aside for the top :)

    Add another three tablespoons (or a scant ¼ cup) of frosting on top of the fruit. Use your spatula to fill in all the gaps with the berries, applying gentle pressure to achieve a flat, even surface.
  5. Continue adding cake and fruit.
    Add another layer of cake. Get to eye level and ensure that the sides are lining up as even as possible. Use the palm of your hand to apply gentle pressure. This will ensure there are no air gaps in the frosting. Repeat step 3. Continue until all the cake layers have been used up, saving the flattest layer for the very top.
    Give your cake a final eye-level look. Adjust the cake if necessary to get straight sides.
  6. Apply a crumb coat.
    Now, apply a super-thin layer of frosting to the top and outside of the cake.

    There will likely be gaps of frosting, so I like to go in with more buttercream on the sides to fill all the gaps until it’s level with the side of the cake.

    During this process, my cake takes on a semi-cylindrical shape, but it's quite unappealing in terms of appearance. But it’s ok! The goal here is just to apply a layer of fat in which excess crumbs will get trapped, so that when we do a final coat, it’s free from any chocolate crumbs.

    Chill the cake for at least 30 minutes to set the crumb coat. To test, touch the buttercream; it should be firm and not leave any indentations.
  7. Apply a top coat of frosting.
    Apply a couple of big dollops of frosting to the top of the cake. Use a flat spatula to spread the mixture evenly over the top, then smooth it out to create a flat surface.

    Apply frosting around the sides and use a bench scraper to create flat and smooth sides. 
  8. Decorate with fresh flowers, leftover fruit, and/or piping.
    I like a half-moon shape for decorating. Place fruit and flowers all along the top.

Recipe Card - Adriana's Notes

*My favorite version of this cake uses equal parts agave and corn syrup as it strikes a nice balance between sweetness and both initial and long-term moisture. To achieve this, split the total syrup weight in half, using half agave (light or dark) and half corn syrup. You can also use 100% corn syrup, agave, or invert syrup. Honey works too, but it tends to reduce rise and create a more domed top. 

There’s more where this came from!

Craving the latest scoop on new Cakeculator flavors, baking science tutorials, and other delectable updates? I'm whipping up a freshly baked newsletter soon! Sign up here to be the first to get it.

Thank you! Your submission has been received!
Oops! Something went wrong while submitting the form.

Lychee Raspberry Chiffon Cake

Yield
One 8-inch cake, 10-15 servings
Prep time
2 hours
Cook time
1 hour
Total time
About 3 hours plus cooling

Ingredients

For the vanilla almond chiffon cake layers:

Yield: Two 8-inch round cakes, approx 1.5-1.75” tall
Prep Time:
30 minutes
Bake Time:
35 minutes
Total time:
1 hour plus cooling

  • 148 g (10 tablespoons) water, room temperature
  • 110 g (8 tablespoons) oil, canola or another veg-based
  • 84 g (4 tablespoons) sugar syrup*
  • 80 g (4 large) egg yolks
  • 10 g (2 teaspoons) vanilla extract
  • 5 g (1 teaspoon) almond extract (optional, but yummy!)
  • 180 g (1 ½ cups) cake flour, bleached or unbleached
  • 56 g (8 tablespoons) potato starch
  • 200 g (1 cup) white granulated sugar (for flour 🌾)
  • 2 teaspoons baking powder
  • 1 teaspoon salt
  • 38 g (3 tablespoons) white granulated sugar (for meringue 🥚)
  • 120 g (4 large) egg whites
  • 1/4 teaspoon cream of tartar

For the Vanilla Lychee Ermine Buttercream:

Yield: about 6  cups
Prep Time:
20 minutes
Cook Time:
10-15 minutes
Total time:
30 minutes plus cooling

  • 83 g  (11 tablespoons) sweet rice flour, such as Mochiko
  • 400 g  (2 cups) white granulated sugar
  • 342 g  (1 ⅓ cups) lychee syrup from can
  • 74 g  (5 tablespoons) water
  • 236 g  (1 cup) heavy cream
  • 509 g  (2 ¼ cups) unsalted butter, softened slightly
  • 10 g  (2 teaspoons) vanilla extract
  • Pinch of fine sea salt

For the Topping + Filling:

  • One 20-oz can of lychee
  • 6 to 8 oz of raspberries

Instructions

Vanilla-Almond Cake Layers:

  1. Preheat the oven.
    Move your rack to the middle position. Preheat the oven to 350°F (176°C).
  2. Prepare the pans.
    Line the bottoms of two 8" cake pans (not non-stick) with a circle of parchment paper. Don't add anything (oil, flour, or paper) to the sides of the pans.
  3. Prepare wet/dry ingredients.
    In a measuring cup, combine room-temperature water, oil, sugar syrup, egg yolks, and vanilla (and almond, if using) with a fork until well emulsified. Set aside.

    In a large bowl, sift together cake flour, potato starch, granulated sugar (labeled "for flour 🌾"), and baking powder. Add kosher salt and whisk for 30 seconds.
  4. Mix wet and dry ingredients.
    Make a well in the flour mixture and slowly whisk in the water mixture, pulling in flour gradually to avoid lumps. Mix until just combined. Set aside.
  5. Whip egg whites.
    Add your small amount of granulated sugar (labeled “for meringue  🥚”) into a small bowl so it’s easy to add to the meringue while it whips. In a clean bowl, beat the egg whites and cream of tartar with a mixer on medium speed until they are thick and foamy. Gradually add the sugar (labeled "for meringue"), waiting 5–10 seconds between additions. Beat until stiff, glossy peaks form. ‍
  6. Fold egg whites into the batter.
    Add about ⅓ of the meringue to the cake batter. Gently fold the mixture until it is well combined, and repeat with the remaining meringue. The final chiffon batter should be smooth, tan, and airy.
  7. Fill the pans.
    Evenly distribute the batter into the prepared pans.
  8. Bake for about 30-35 minutes.
    Start watching during the last 5 minutes. My chiffons will dome as they bake, then flatten slightly toward the end. They’re done when the sides of the cake are just starting to pull from the pan. You can test with a skewer that comes out clean or the internal temperature is 195-200°F/90.5-93°C.
  9. Cool the cakes:
    Transfer the pans to a wire rack and let them cool to room temperature. Some cakes will deflate slightly (particularly the chiffons), but all my cakes are designed to be cooled while resting upright in the pans.
  10. Remove cake from pan:
    I remove cakes from their pan while they are still slightly warm to preserve moisture. Once the cake pan has cooled enough to handle, slide a knife around the perimeter of the cake to loosen it, and then carefully invert the pan over a wire rack or plate. The cake should fall right out, and you can peel the parchment off the bottom. You can leave the cakes out if your frosting is done, and you're immediately moving to assembly. Usually, if it takes more than 30 minutes, I wrap the cake in plastic to reduce moisture loss. The cakes must be completely cooled before moving on to the assembly.

Lychee-Rice Flour Ermine Buttercream:

  1. Cook sweetened flour paste.
    If you plan to sieve your flour paste, place your sieve atop a shallow tray or plate for easy access.

    Otherwise, simply have your tray ready.

    Set a timer for 3 minutes (don’t start it yet) and set that aside for now.

    In a pan, whisk together the flour and sugar until a smooth mixture forms. Pour in lychee syrup (reserving the fruit for filling), water, and heavy cream. Whisk until no lumps of flour remain.

    Place the pan on medium-low heat. Cook the flour mixture, whisking continuously and scraping the sides as needed. It will gradually start to thicken into a loose pudding.

    Once you see large bubbles forming in the center, start your timer (3 minutes!) and continue whisking vigorously. Feel free to decrease the heat slightly if the starch begins sticking to the bottom of the pan, but aim for a steady bubbling mixture throughout this process.
  2. Sieve (optional) and cool sweetened flour paste.
    When the timer is up, use a spatula to scrape the hot paste onto your tray.

    If you have clumps or want to ensure you get a super smooth frosting, push the hot paste through a sieve onto the tray.

    Spray a piece of plastic wrap with oil and press it directly onto the surface of the paste. I like to flatten it out, too, so it cools faster.

    Let this sit at room temperature to cool. I will sometimes place the tray in the freezer for about 10-15 minutes to speed up the process. It should feel completely cool to the touch before use.
  3. Aerate butter.
    Add the softened butter to the bowl of your stand mixer. Using the whisk attachment, beat the butter on high speed until it's paler in color and slightly more voluminous. Add the vanilla extract and pinch of salt, and mix on high speed for 2 minutes.
  4. Add cooled flour paste.
    Ensure your paste is cool to the touch. Mix the paste in 4 to 5 additions. Add the first amount, then whisk on high speed for a few seconds before adding the next.
  5. Adjust buttercream for texture.
    ‍The whisk introduces many air pockets, so switch to the paddle attachment for a smoother finish. Run the mixer on low speed for a few minutes until most of the air pockets are smoothed out.

    Compared to most other buttercreams, this frosting may feel looser. Don't let that deter you; it will still pipe and frost a cake just fine. It has a lower butter content than my other buttercreams so it will feel less dense. Running a spatula over the top of the buttercream several times while smoothing it onto cakes or through a piping tip will give you the smoothest result with this frosting style.

ASSEMBLY

  1. Chop the lychee and wash the berries.
    Cut the lychee pieces into ¼ inch pieces. Wash the berries. Save a few of your best-looking berries and lychee pieces for the top of the cake.
    Set both those aside on a paper towel to dry slightly.
  2. Cut the cake layers.
    We will need four layers of cake, approximately ¾ inches in height. There are two cakes, which should rise around 1.5-1.75 inches. This means that each cake should be cut in half.

    Use a cake leveler or a large serrated knife to slice straight through the layers. My cake leveler has markings on it, so I know how to cut ¾-inch slices. However, if you're using a knife, you may need a ruler for accuracy. 
  3. Set up the cake board and the first slice of cake.
    Place a cake board onto your cake turner or a cake stand. You can also do this on a large, flat plate or platter, but the outside will be difficult to smooth out, so you may opt for a more rustic look for the outer frosting. We’ll get to that in a bit.

    Add a schmear of frosting to the cake board to anchor the cake. Add the first layer of cake.

    👉🏻 TIP: Try to use the flattest pieces of cake for the bottom and top - it will help level the cake overall with a sturdy bottom. It’s much easier to deal with uneven cake slices in the middle with more buttercream.
  4. Add the buttercream frosting and fruit.
    I use a metal scoop to ensure the same amount of frosting is evenly distributed between the cake layers. My ice cream scoop holds three tablespoons per scoop, and I use four scoops, which equals 12 tablespoons, or ¾ cups of frosting for each filling application. You can also use a measuring scoop to do this.

    Add nine tablespoons, or a little more than 1/2 cup, of frosting to the cake layer. Spread it around.

    Add the raspberries and lychee, leaving a 1-inch border along the outside edge free (so the berries don’t pop out into the final coat of frosting). Open the berries and lychee so they lie as flat as possible, and gently push them into the frosting. We only have three fillings to make, so be generous with the fruit. Just remember not to use the ones you set aside for the top :)

    Add another three tablespoons (or a scant ¼ cup) of frosting on top of the fruit. Use your spatula to fill in all the gaps with the berries, applying gentle pressure to achieve a flat, even surface.
  5. Continue adding cake and fruit.
    Add another layer of cake. Get to eye level and ensure that the sides are lining up as even as possible. Use the palm of your hand to apply gentle pressure. This will ensure there are no air gaps in the frosting. Repeat step 3. Continue until all the cake layers have been used up, saving the flattest layer for the very top.
    Give your cake a final eye-level look. Adjust the cake if necessary to get straight sides.
  6. Apply a crumb coat.
    Now, apply a super-thin layer of frosting to the top and outside of the cake.

    There will likely be gaps of frosting, so I like to go in with more buttercream on the sides to fill all the gaps until it’s level with the side of the cake.

    During this process, my cake takes on a semi-cylindrical shape, but it's quite unappealing in terms of appearance. But it’s ok! The goal here is just to apply a layer of fat in which excess crumbs will get trapped, so that when we do a final coat, it’s free from any chocolate crumbs.

    Chill the cake for at least 30 minutes to set the crumb coat. To test, touch the buttercream; it should be firm and not leave any indentations.
  7. Apply a top coat of frosting.
    Apply a couple of big dollops of frosting to the top of the cake. Use a flat spatula to spread the mixture evenly over the top, then smooth it out to create a flat surface.

    Apply frosting around the sides and use a bench scraper to create flat and smooth sides. 
  8. Decorate with fresh flowers, leftover fruit, and/or piping.
    I like a half-moon shape for decorating. Place fruit and flowers all along the top.