.avif)
The Chocolate Miso Caramel Cake I made for my Sister’s Wedding


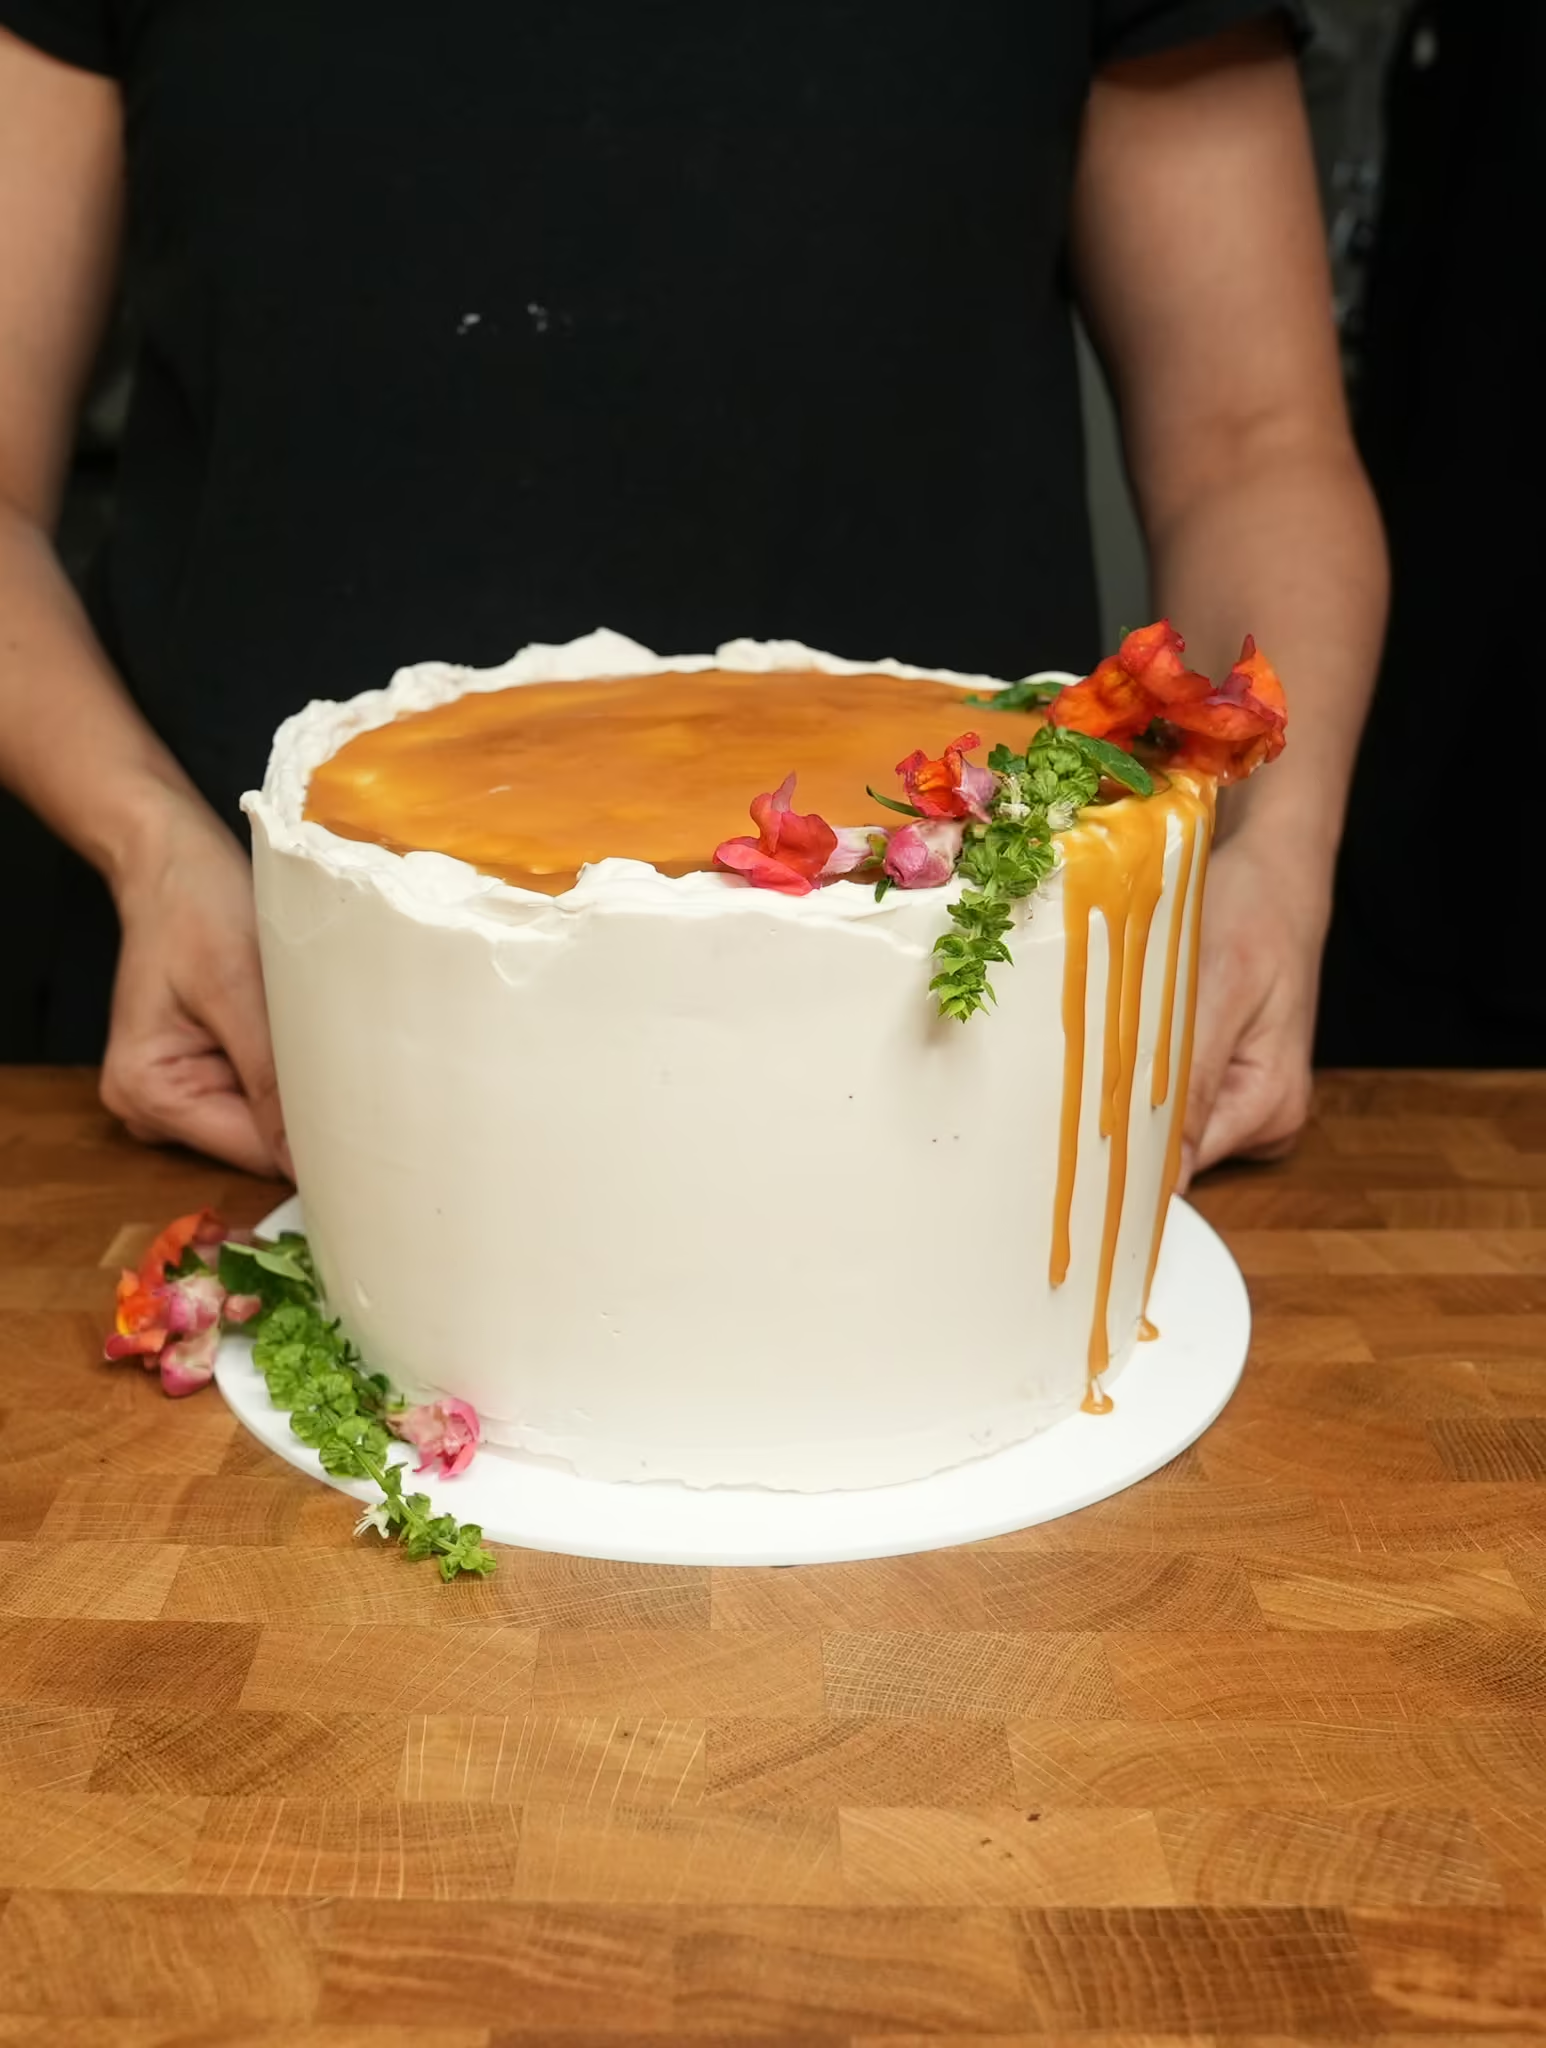
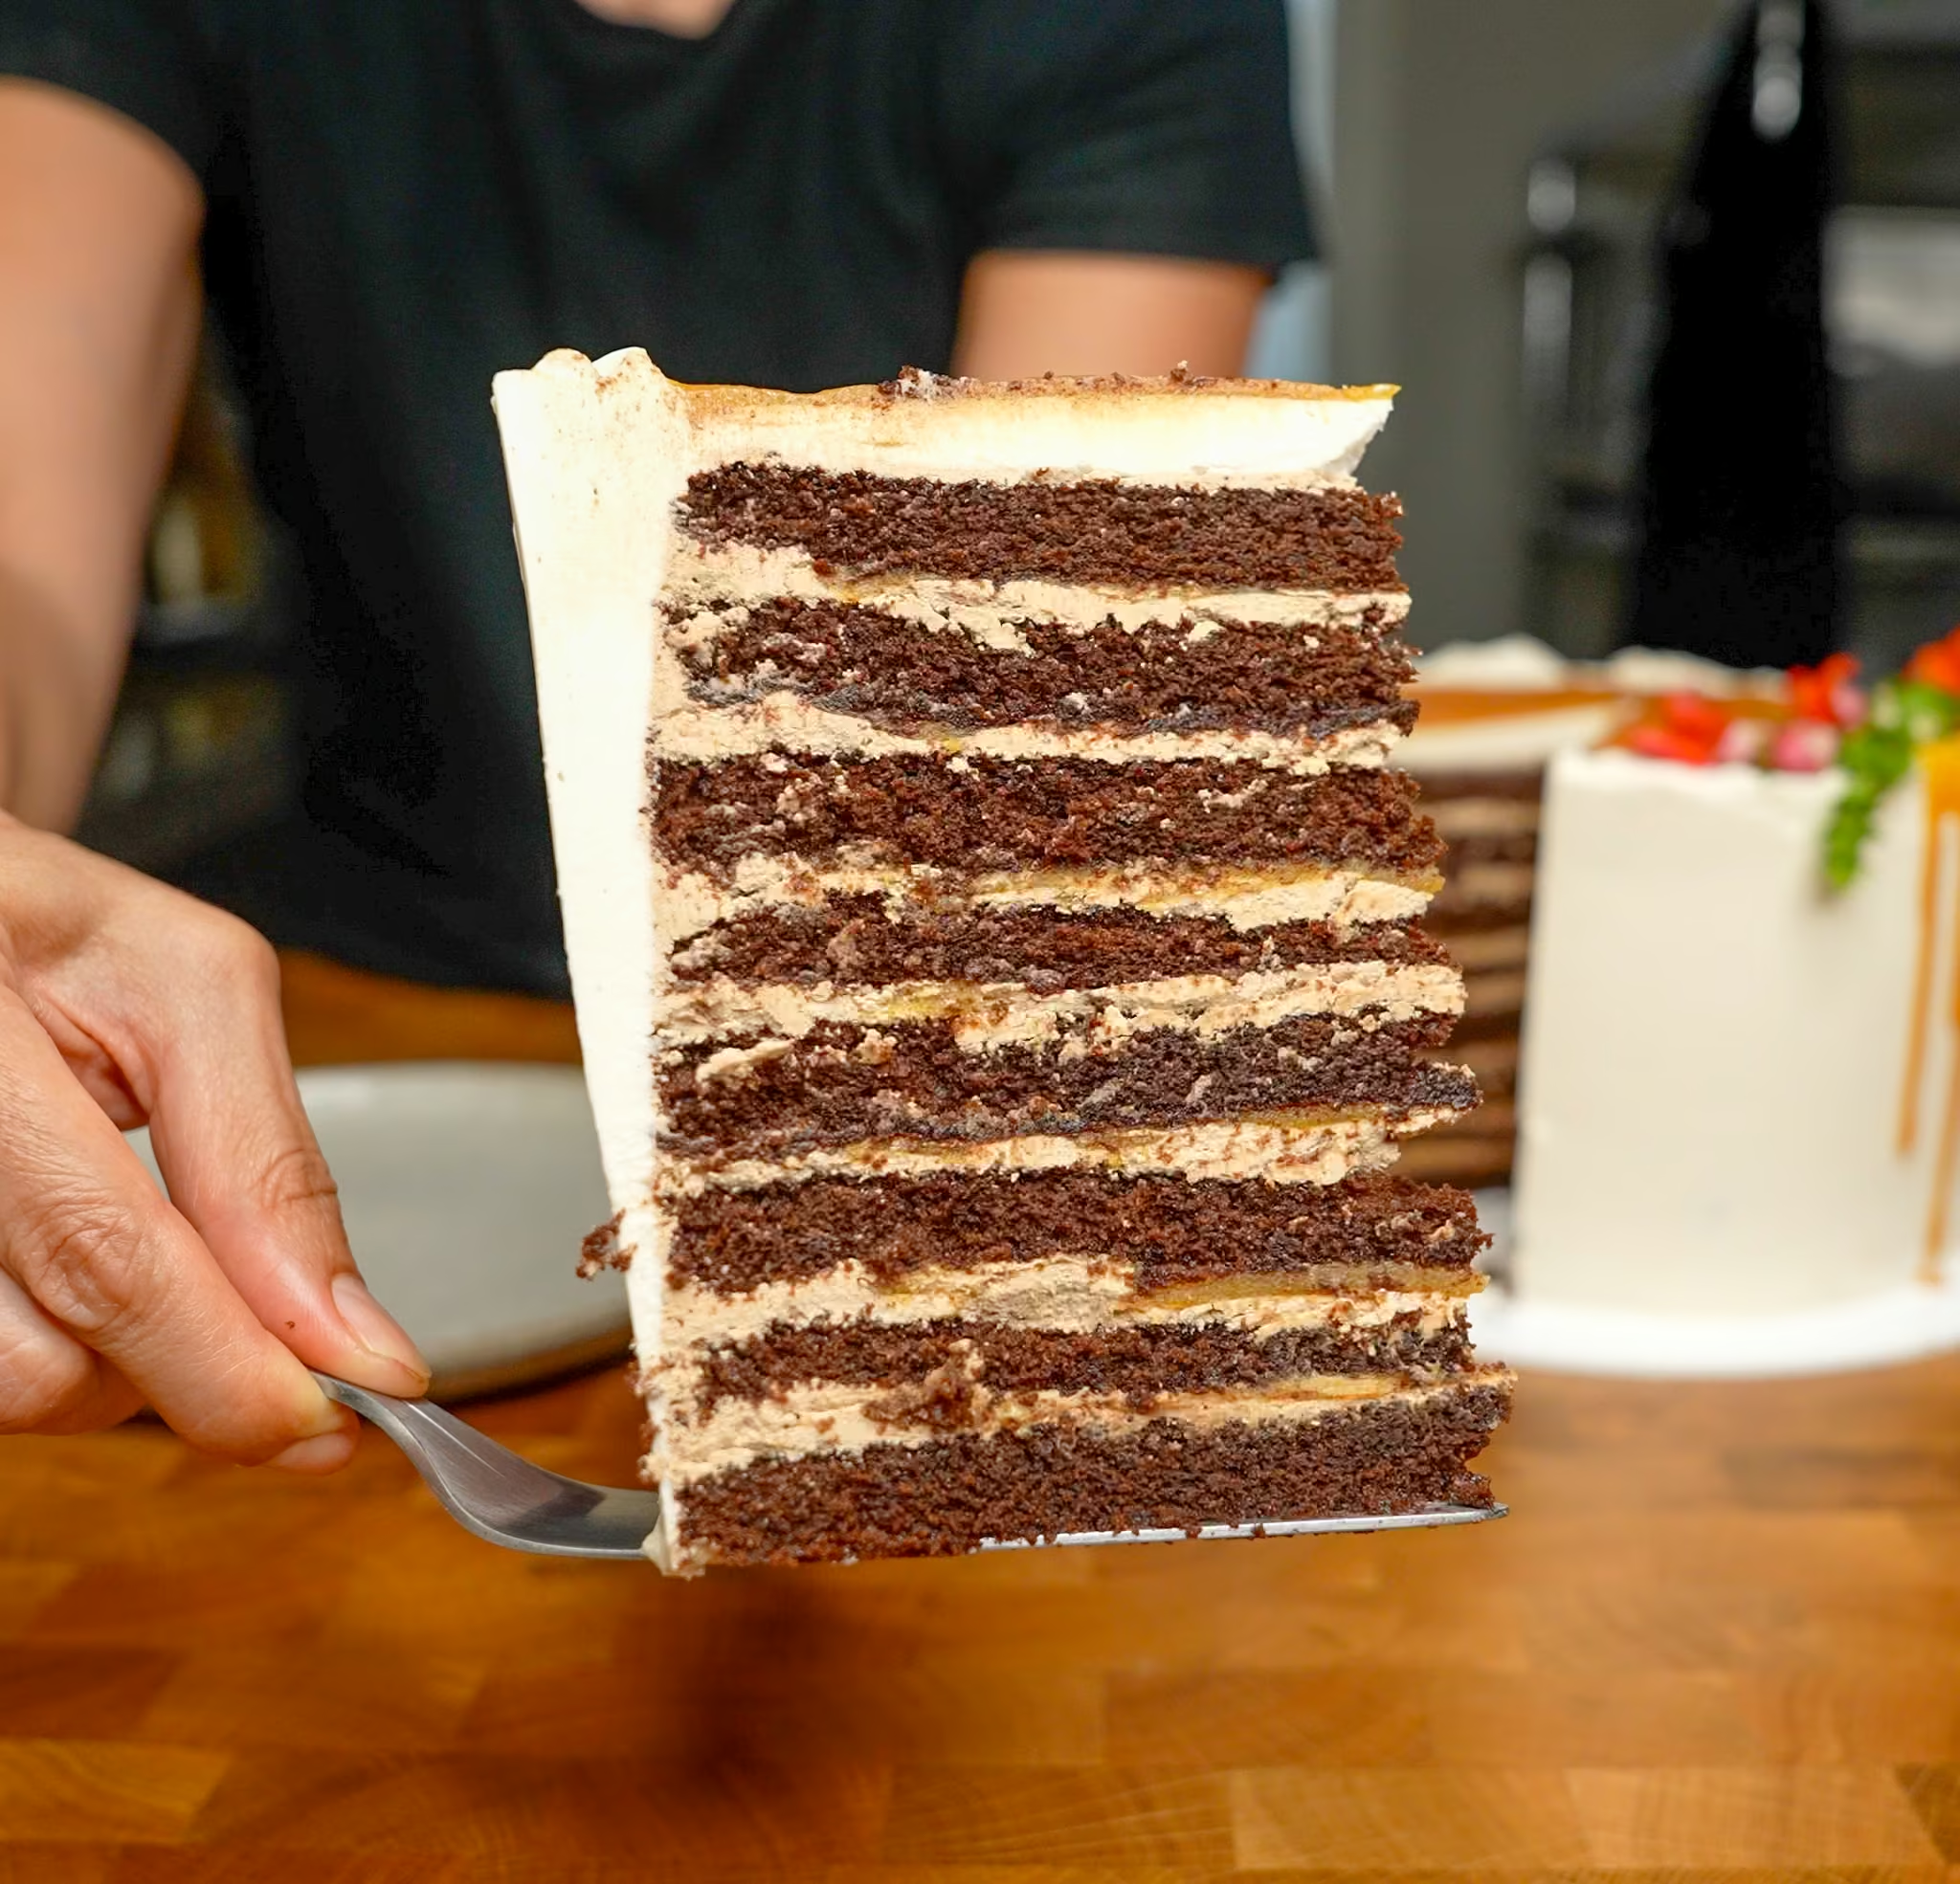
The best cakes have depth of flavor, not just sweetness. For my sister’s wedding, I baked one of my favorite chocolate creations yet: rich chocolate layers filled with miso caramel and mousse-soft chocolate Russian Buttercream. To give it a wedding vibe and dependable stability for a warm day, I frosted the outside of the cake with my Vanilla American Dreamy Buttercream for a unified, elegant finish.
What is the flavor of this chocolate cake?
The flavor of this cake is intensely chocolate, tempered by the umami-rich caramel and subtle sweetness of the buttercreams.
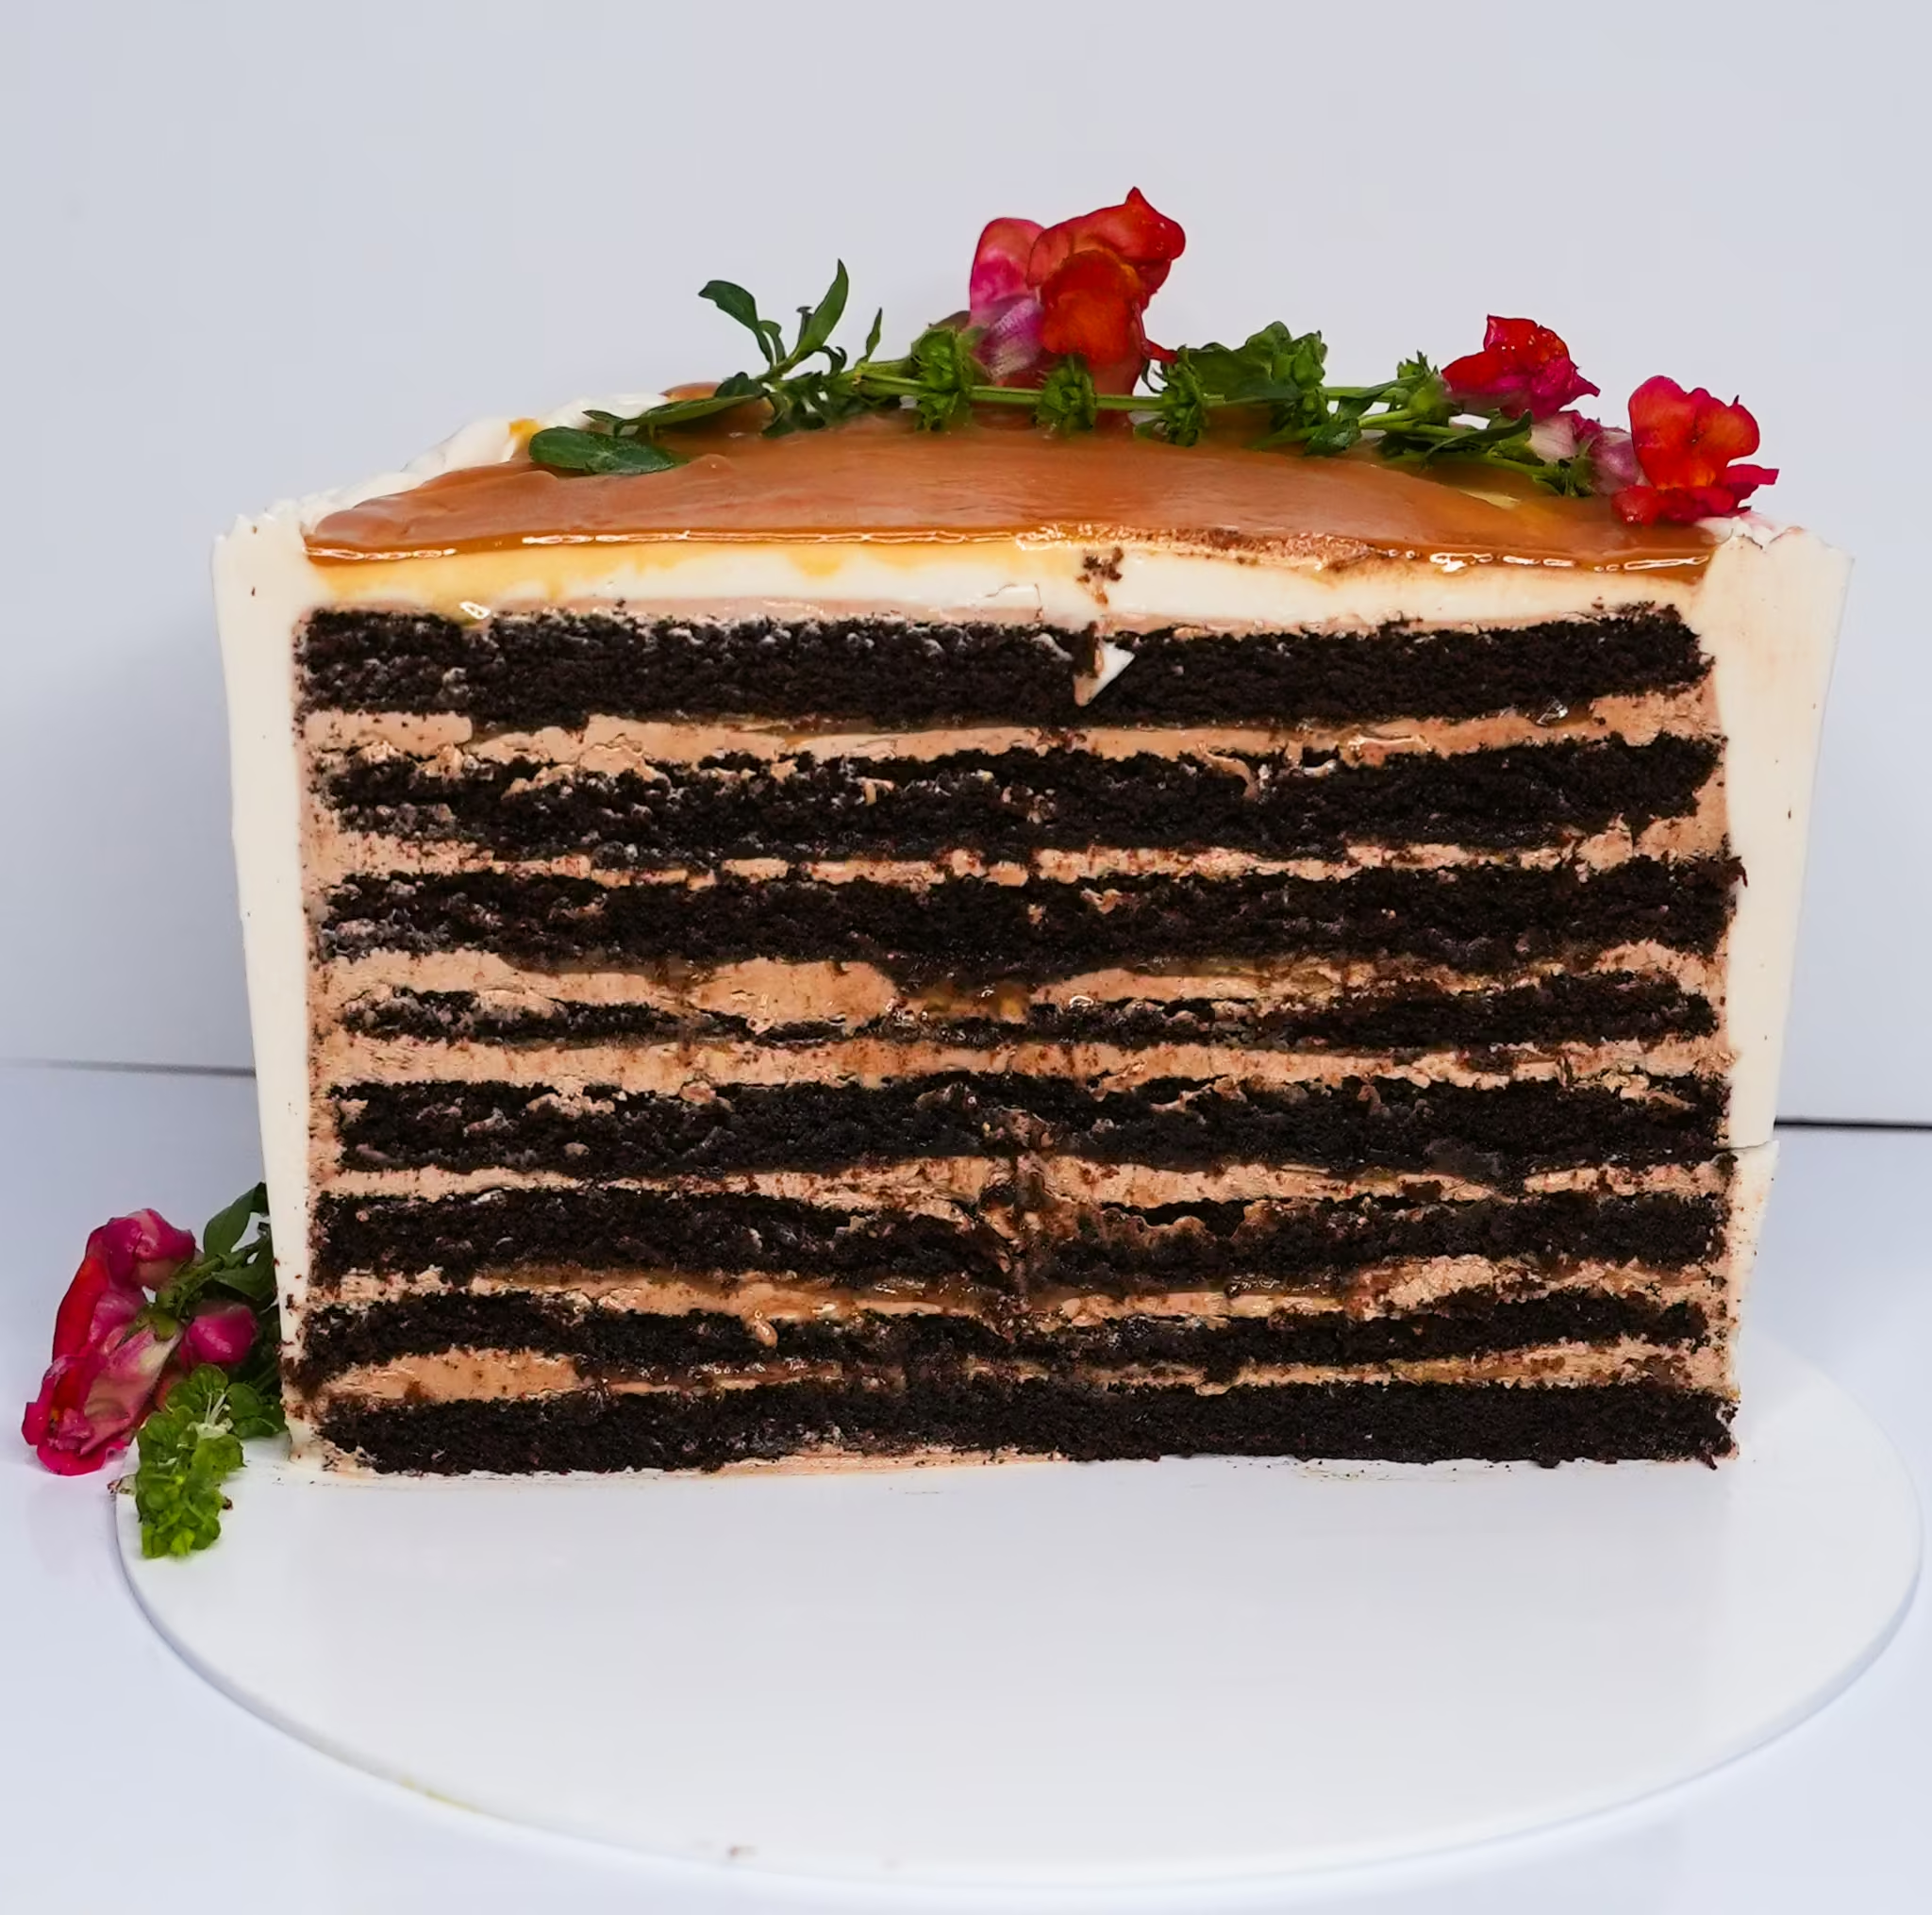
This version of my chocolate indulgence cake is specifically reformulated for wedding cakes - it bakes up tall and flat, ensuring even layering and minimizing cake trimming and waste. It also has the perfect texture - it’s a hybrid of a fudgy chocolate cake and chocolate chiffon.
The salted caramel is lightly flavored with white miso - a recipe I adapted from Okonomi Kitchen (Whisking the miso into the cream before adding it to the sugar? Brilliant!). This creates a caramel sauce with a hint of umami, adding a slightly savory element that balances the sweetness of the cake.
For the filling, I also reformulated my Chocolate Russian Buttercream for more stability. These types of frosting use condensed milk, which gives the final buttercream a wonderful creamy flavor. Paired with Dutch-processed cocoa, it creates a buttercream that tastes and feels like a milk chocolate mousse, except more stable. It was able to hold up the cake beautifully, and since it didn’t depend on raw egg whites or a whipped cream foam (like a traditinal mousse), I felt good leaving it out for hours for my sister’s wedding.
For the outside, I used Vanilla American Dreamy Buttercream. You may be wondering - why make another frosting?! I wanted a cohesive look for all the cakes that I made that day (5 in total) - and since each cake was different inside, I tied them all together by covering them all with Vanilla American Dreamy Buttercream. It smooths and frosts beautifully - plus I trusted the stability of this frosting. I knew it would hold up on the humid day of the wedding. You can, of course, use just one type of frosting for this cake, and I will let you know what changes to make down below.
How big is this Chocolate Cake? What size pans do I need?
This is a big cake. It clocked in at 3.5 kg (almost 8 lbs 😳) when all said and done. Wilton’s cake guide states that a cake of this size yields around 20-24 servings of cake, which is on the high end for the cake slices I usually serve. My estimation is around 16-20.
To make this cake, you’ll need two 8-inch round pans that are 2 inches high. I use NordicWare pans. Actually, I love these pans so much that I brought them in my suitcase to bake my sister’s cake.
You’ll also need the standard set of cake decorating supplies, and I have a list for that here.
How much time does it take to make this cake?
This is a large project that is best completed over a couple days. Here is a workflow to give you an idea of the timing for this cake. This, of course, doesn’t include cooling or cleaning time, so ideally, you’d split this up. If you want to make this cake in one day, scroll down to the “potential shortcuts” header.
.avif)
For making the components ahead of time, I follow these general guidelines:
Frostings: Butter-based frostings can be prepared weeks in advance. You can store right after making them by wrapping them in plastic wrap and placing them in either the fridge or freezer. Please refer to this guide for instructions on how to do that.
Fillings: Most fillings can be prepared ahead of time, but their shelf life will vary. The miso caramel for this cake lasts a relatively long time (as compared to, say, pastry creams) because of the high sugar content. This typically prevents spoilage, although I still keep it in the fridge and use clean utensils every time I dip into the jar. Caramel can be stored in the refrigerator for several weeks. To use, bring the jar out to room temperature. If I’m in a rush, I’ll microwave the jar for about 20 seconds and stir it. Just ensure it’s not too hot when it goes onto the cake, which can melt the buttercream.
Cake layers: Chocolate cake is a fantastic option to make ahead of time, particularly this version, as it’s extra moist. Once the cakes are baked and cooled slightly (I still have to wear gloves to handle the pan, but it’s cool enough for my hand to hold the cake), I flip the cakes out onto a piece of plastic wrap. I then gently wrap the cake. I know that we want it to be airtight, but you still have to be careful because if you wrap the cake too tightly, the cake will freeze with dents in it. This can go into the freezer for a few weeks. I'll have a cake storage guide up soon, but generally, the fridge increases staling whereas the freezer almost stalls it. Plus - frozen-ish cake layers are much easier to handle. I want until mine are just thawed enough to cut but most of the time they're still pretty chilled when stacking.
Potential Shortcuts:
- Buy pre-made caramel.
Any kind will do! Salted or regular, just make sure you have around 1 ½ cups for the inside of the cake, with about ½ cup more if you want to decorate the outside with caramel, like I did for my cake in the pictures. - Use only one type of frosting.
I used Chocolate Russian Buttercream to simulate a milk chocolate mousse effect for the filling. I then used white Vanilla American Dreamy buttercream on the outside of this cake to match all the other cakes in my wedding cake lineup. Whatever you choose, you’ll need around 7 to 8 cups of frosting total, depending on the thickness of the outer coat and the amount of decorating. Approximately 4 cups are dedicated to the filling, 1 cup to a light crumb coat, and the remaining amount is used for the exterior.
Step by step:
This photo tutorial will explain how to assemble the cake once you have all the components ready: cakes baked and cooled, frostings prepared, and miso caramel at room temperature.
If you need help with any of those components, I will have some detailed blog posts available. Currently, I have the complete guide to my American Dreamy Buttercream. For the Chocolate Russian Buttercream, you can refer to the Complete Guide to Russian Buttercream or view more information, specifically the chocolate variation, in the Cakeculator.
STEP 1 | Cut the cake layers.
WHY:
This cake is equal parts cake and “mousse” filling (Chocolate Russian Buttercream). We need to cut the tall 2” cakes into thinner layers for even filling distribution.
HOW:
.avif)
Use a serrated knife or cake leveler to slice each cake horizontally into four even layers, each about ½ inch thick (1a,b). If your cakes are around 1.75–2 inches tall, you'll make three cuts per cake. A ruler or cake leveler with markings can help keep each layer even.
STEP 2 | Set up the cake board and first cake layer.
WHY:
The frosting "schmear" acts like glue, anchoring the cake to prevent slipping during stacking and smoothing. Starting on a turntable or cake stand allows for even frosting application.
HOW:
.avif)
Place a cake board on your turntable or cake stand. Add a small amount of frosting in the center of the board (2a) and press the flattest cake layer on top (2b). Use the flattest layers for the base and top to maintain a level and sturdy cake.
STEP 3 | Add the chocolate buttercream frosting and miso caramel filling.
WHY:
Frosting layers provide fat for richness and structure, while miso caramel adds a savory umami contrast to balance sweetness. Creating a “dam” keeps the caramel from leaking, preserving the cake’s outer layer of frosting.
HOW:
.avif)
Scoop about ½ cup of buttercream onto the cake layer (3a). Spread it evenly, then use the spatula to create a shallow indentation in the center, leaving a 1-inch border around the edge. Add about three tablespoons of miso caramel and spread it into a thin, even layer within the indentation (3b).
STEP 4 | Continue adding cake, frosting, and filling.
WHY:
Layering builds height and flavor. Pressing each layer gently removes air pockets, ensuring stability and a uniform slice.
HOW:
.avif)
Place the next cake layer on top, aligning the edges to ensure a smooth finish. Gently press your hand against it to secure it in place. Repeat the frosting and filling process from Step 3 (4a). Continue stacking until all layers are used, reserving the flattest piece for the top (4b).
STEP 5 | Apply a crumb coat.
WHY:
A crumb coat traps loose cake crumbs, allowing the final frosting layer to be smooth and crumb-free. Chilling firms the fat, locking the crumbs in place.
HOW:
.avif)
Step back and view the cake at eye level. Adjust the layers as needed to achieve straight sides. Fill any gaps between layers with additional buttercream and smooth it out to create a smooth, even surface (5a). Spread a very thin layer of chocolate buttercream over the top and sides of the cake (5b).
.avif)
Don’t worry about perfection—this is just a base layer (5c). Chill the cake in the fridge for at least 30 minutes. The frosting should feel firm to the touch.
STEP 6 | Apply the top coat of frosting.
WHY:
This layer provides the final appearance and flavor finish. Using chilled, crumb-free surfaces ensures a clean application. A ledge around the top edge helps contain caramel topping.
HOW:
.avif)
Add large dollops of Vanilla American Buttercream to the top of the cake (6a). Smooth it across the top and flatten (6b).
.avif)
Apply frosting around the sides (6c), smoothing with a bench scraper until you’re happy with the finish (6d). Chill the cake again before decorating.
STEP 7 | Decorate with fresh flowers, caramel, and/or piping.
WHY:
Caramel adds visual appeal and flavor. A warm (not hot) consistency ensures smooth drips without melting the frosting. Flowers add elegance—just make sure they're food-safe or have non-toxic stems wrapped.
HOW:
.avif)
Microwave the caramel for 10–20 seconds, or until it is pourable but not hot. Add a few tablespoons to a piping bag, snip a small hole, and let the mixture drip down the sides. Pour the remaining caramel into the center of the top, spreading it inside the buttercream ledge (7a). Decorate with fresh flowers or additional piping as desired (7b).
Video
Honors Members Section
This extra material is accessible to Sugarologie Honors members.
Become a member to view extended research notes, technique analysis, and supplemental materials! Learn more about Sugarologie Honors here.
Already a member?
Before starting the recipe, please read this!
Measure by weight, if possible.
Measuring by weight is the best way for you to replicate my recipes. I develop recipes using ingredients (even liquids) measured in grams, which is why you see them listed first in the recipe cards. For measurements under 5 grams, I will typically only list the volumetric measurements (teaspoons, etc.), as most home scales are not precise for such small weights.
In most cases, I have converted grams to volumetric measurements (aka US customary units) for bakers who prefer this method. However, the measurements are not as precise and may have awkward proportions. The recipes should still work, but for the ultimate precision, try to use weight.
This is the OXO scale I use daily. I also purchased this budget version of a good scale, which I keep at my Mom’s house for baking. If you’re interested in other tools I use for my baking, I’ve compiled a list here.
Use room temperature ingredients.
All my ingredients should be used at room temperature, or 65-75 °F/18-24 °C. I will always indicate if you need something outside this range. If no details are given, room temperature is the default.
Pay attention to the ingredient descriptions.
I try not to be brand-specific, but I will always note an interesting result from a type of ingredient, be it negative or positive.
A specific note regarding salt: I use Diamond Crystal Kosher salt for everything on this site except for frostings. In frostings, you want the salt to dissolve more easily, and kosher salt tends to leave granules behind. If you substitute table salt (more finely granulated) for recipes that list kosher salt, you must use half the volume indicated in my recipes.
Substitutions are hard.
That said, substitutions aren’t impossible but can be the toughest part of recipe development. Small swaps, like reduced-fat milk (2% fat) for whole milk (3.5% fat), usually work fine. However, bigger changes—such as replacing oil with applesauce or sour cream with Greek yogurt—can significantly impact texture and density.
Be wary of general, all-purpose substitutions in baking; I find that usually there is never a one size-fits-all solution. I carefully select ingredients for my recipes, so for the best results, start with the original recipe and modify with caution.
Read all the recipe instructions before beginning.
I’m in the “Pre-read the Chapter before Class Lecture” club... and I invite you to join! Baking new recipes can be intimidating, so let’s set you up for success. I want you to think about timeframes. Most fillings and frostings can be made ahead of time, and give you an extra day for mental space. Also, as you become a more proficient baker, you can anticipate and recognize steps. (“Oh, this has a meringue step, so I’ll need an extra clean bowl…” etc.) Ensure you go down the ingredient list and have everything at the right temperature.
.avif)

.avif)

.avif)
Chocolate Indulgence Cake with Miso Caramel
For the chocolate indulgence cake layers:
Yield: Two 8-inch round cakes, approx 1.75-2" tall
Prep Time: 1 hour
Bake Time: 45-50 minutes
Total time: 1 hour and 45 minutes
- 129 g (1 ⅓ cups) unsweetened cocoa powder, Dutch-processed*
- 360 g (1 ½ cups) boiling water
- 200 g (1 cup) vegetable oil
- 160 g (8 large) egg yolks, cold from the fridge
- 20 g (4 tablespoons) vanilla
- 240 g (2 cups) all-purpose flour, unbleached
- 13 g (3 teaspoons) baking powder
- 480 g (2 ¼ cups) light brown sugar
- 9 g (2 ½ teaspoons) salt
- 50 g (4 tablespoons) white sugar
- 120 g (4 large) egg whites, cold from the fridge
For the miso salted caramel:
Yield: 2 cups
Prep Time: 5 minutes
Cook Time: 15-20 minutes
Total time: 30 minutes + cooling time
- (27 g) 1 ½ tablespoons of white miso
- 236 g (1 cup) heavy cream (room temp)
- 300 g (1 ½ cups) white granulated sugar
- ¼ teaspoons lemon or lime juice (strained) or apple cider vinegar
- 142 g (10 tablespoons) unsalted butter, cut into large chunks (any temp is fine)
For the Chocolate Russian buttercream:
Yield: 4 ½ cups
Prep Time: 20-25 minutes
Total time: 30 minutes + cooling time
- 29 g (5 ¼ tablespoons) cocoa powder, Dutch-processed*
- 53 g (3 ¾ tablespoons) boiling water
- 594 g (2 ⅔ cups) unsalted butter
- 45 g (6 tablespoons) powdered sugar**, unsifted is fine
- 8 g (1 ½ teaspoons) vanilla extract
- ¼ teaspoon fine sea salt
- 230 g (¾ cup) sweetened condensed milk
For the Vanilla American dreamy buttercream:
Yield: about 4 cups
Prep Time: 15-20 minutes
Total time: about 20 minutes
- 452 g (2 cups) unsalted butter
- 120 g (1 cup) powdered sugar (1), unsifted ok**
- 7 g (1 ½ teaspoon) vanilla extract
- ¼ teaspoon fine sea salt (to taste, start with a pinch)
- 100 g (¼ cup + 1 tablespoon) light agave nectar***
- 177 g (½ cup) light corn syrup
- 60 g (1 cup) powdered sugar (2), unsifted ok
- 60 g (¼ cup) heavy cream, cold from fridge (optional)****
For decoration (all optional):
- Fresh edible/organic flowers
- Leftover miso caramel sauce
Chocolate Indulgence Cake Layers:
- Preheat the oven .
Move your rack to the middle position. Preheat the oven to 350°F (176°C).
- Prepare the cocoa powder syrup.
In a large heat-proof measuring cup or medium bowl, whisk the cocoa powder, boiling water, and oil until smooth and lump-free. Let it sit for 5–10 minutes to allow the chocolate flavor to bloom.
While the cocoa powder syrup sits, I like to prep other components of the recipe:- The pans:
Line the bottom of two 8-inch (and 2 inches tall) round cake pans with a circle of parchment paper. Do not spray or add any fat to the interior of the pan. You’ll get the best height by leaving them bare. - The eggs:
This recipe uses eight yolks but only four whites, so I separate them now and reserve the extra four whites for another purpose. The reason I recommend that your eggs be cold from the fridge is that they will be easier to separate, as the fat in the yolk is slightly firmer and easier to detach from the whites.
Additionally, eggs vary in total size and even within the distribution of yolk and white. (I don’t know what’s been going on, but I’ve been getting more “twin yolks” than I ever have in my entire baking life.) Try to go by weight to ensure you get 160 grams of yolks and 120 grams of white. - Sift the dry ingredients.
In a large bowl, sift the flour and baking powder. Whisk in the salt and brown sugar. Little soft lumps of brown sugar are ok, but feel with your fingers to ensure there aren’t any of those really hard lumps that sometimes come with brown sugar. Set this bowl aside for now.
- The pans:
By now, your cocoa syrup is ready. Add the eight egg yolks and vanilla extract to the syrup and whisk until fully combined.
- Mix the wet and dry mixtures.
Make a well in the middle of the flour mixture, and slowly pour in the cocoa powder syrup, whisking the entire time to avoid lumps. Set that aside for now while you make the meringue. - Make the meringue.
Add the white sugar to a small bowl so it’s easy to add to the meringue while it whips. In a clean bowl, add the egg whites and beat on medium-high speed until thick and foamy. Gradually add the sugar, waiting 5–10 seconds between additions. Beat until stiff, glossy peaks form. - Fold egg whites into the batter.
Add about ⅓ of the meringue to the chocolate cake batter. Gently fold the mixture until it is well combined, and repeat with the remaining meringue. The final batter should be smooth and airy. - Add the batter to the pans.
Evenly distribute and pour the batter between the two pans. If you want to use a scale, the amount is approximately 870 grams of batter per pan. - Bake for 45-50 minutes.
These are big and moist cakes. You’ll need to bake both cakes for around 45-50 minutes.
The cakes may rise above the rim of the baking pan. You’re going to think I’m crazy, but it will be fine. The cakes dome up during the last third of the baking time, then, during the last 10 minutes or so, the dome will slightly flatten. You’ll know it’s done when the center no longer jiggles and a toothpick comes out clean. When pressed, you should feel some resistance and possibly a slight crackling. Also, you will see some hairline cracks along the surface of the cake. This is normal.
The best way to know when it’s done is to insert an instant-read thermometer in the direct center of the cake, which should read 190°F (88°C). - Allow to cool upright in the pan for a short time.
As the cake cools, it will shrink down to the level of the pan. It will also pull away from the sides, and it may even dip slightly. This is also normal. While the pan is still warm - about 5-10 minutes later, I slide a knife around the perimeter to loosen the cake from the pan and carefully invert it onto a rack or plastic wrap.
If you plan on using it immediately, you can let it cool before frosting. For use the next day, wrap in plastic and leave on the countertop.
In cases where I won’t work with the cake for more than 24 hours, I will wrap the cake and place it in the freezer. Just make sure you lay it on a flat surface to freeze so the cake isn’t malformed/dented.
Miso Caramel Sauce:
- Make the miso-cream.
Add the miso paste to a small bowl. Warm the heavy cream in a large heatproof measuring cup using the microwave (or a small saucepan) until it is just warm. Splash a bit of the warm cream on the miso paste. Use a small whisk or spatula to whisk the mixture until it is smooth and free of lumps. Then, pour the mixture back into the larger heatproof measuring cup and mix until everything is well combined.
Place the cup aside so you have easy access to it while cooking in the next step. - Melt the sugar.
Add half the sugar to a heavy-bottomed saucepan, along with the lemon juice (or vinegar). Rub into the sugar until it’s no longer clumpy.
Cook over medium heat, stirring constantly with either a wooden spoon or a heat-proof silicone spatula. The sugar will first appear clear and wet, and then start to turn amber in certain areas. Once you get a point where about 90% of the sugar is melted, pour a couple tablespoons of the remaining sugar over the surface. The sugar granules should melt into the amber liquid as you stir. Continue this process until all the sugar is added and has melted into a deep amber color. (The darker you get, the more bitter the caramel, so I aim for a dark amber/honey color.)
Immediately remove the saucepan from your heat source.
- Carefully add the miso-cream to the melted sugar.
The caramel is very hot, and your heavy cream will immediately release steam upon contact, so be very careful. Add about ¼ cup of the miso cream, stirring constantly until all the cream has mixed into the sugar. Repeat this until all the cream has been added.
If you notice that the caramel starts to ball up uncontrollably, don’t worry, that just means the sugar is beginning to harden, but it’s easily fixable. Just place the saucepan back on the heat source until the sauce is all melted, then remove it from the heat and continue adding the cream. - Add the butter.
Add the sliced butter and continually stir until it’s completely mixed in.
CAREFULLY give the caramel a taste. It should be sweet at first, with a slight hit of the salty, umami-rich miso near the end. I’ve found that the saltiness increases as the caramel cools, so don’t worry if it feels a tad undersalted. However, if you think it’s really undersalted, add a pinch of fine sea salt here to taste. - Store in a glass container.
Carefully pour the hot caramel into a glass container for storage. When handling the glass, wear gloves or use a kitchen towel as the caramel is still very hot. Allow to cool completely before using. I store my jars of caramel in the fridge. They last at least a few weeks, but honestly, they’ve not been around long enough for me to know their total storage limit :)
For the Chocolate Russian Buttercream:
- Mix the cocoa paste.
In a small bowl, add the cocoa powder. Pour in the boiling water and stir until all the lumps have disappeared, forming a thick paste. Set aside. - Prepare the Frosting Butter.
Add the slightly softened butter to the mixing bowl and whisk on high speed for about 2 minutes, scraping down the sides at least once. After mixing, the butter will be lighter in color, smooth, soft, and ball inside the whisk.
Add the powdered sugar, vanilla extract, and a small pinch of salt to the butter, and whisk again on medium-high speed for another 1-2 minutes. - Add the sweetened condensed milk.
Continue with the whisk attachment and add the condensed milk in three parts, mixing for one minute on high speed before adding the next portion. Scrape the bowl down a few times during this process.
Once all the milk has been added, mix on high speed for one minute. Just looking at the mixture to see if it’s properly mixed is difficult because the butter and milk are similar colors, so this ensures proper emulsification and prevents a runny frosting. At the end of this step, the buttercream should have a thick and creamy texture.
If your buttercream looks runny, greasy, curdled, or broken at any point during this process, it has not yet been emulsified. Turn up the speed or mix for longer until the elements come together. - Add the cocoa paste.
Scrape in all of your cooled cocoa powder paste and continue mixing with the whisk attachment on medium-high speed until the mixture is completely combined, about 2-3 minutes. - Flavor and smooth the frosting.
The whisk attachment introduced lots of air pockets, so switch over to the paddle attachment and mix on low speed for at least a few minutes to smooth out the frosting. Give the frosting a taste.
Add another splash of vanilla if you like. Don’t be shy with the salt; it pairs extremely well with chocolate, so add another pinch if the frosting tastes flat. Properly seasoned, this frosting should taste like a good-quality chocolate ice cream.
If the frosting sits out in the bowl, it may look airy or full of bubbles. This is likely due to the alkalizing agent used in Dutch-processed cocoa interacting with the acidity in the final buttercream. Don't worry; this is a normal occurrence. Simply mix on low speed to remove air bubbles before use.
Vanilla American Dreamy Buttercream:
- Prepare the Frosting Butter.
Add the slightly softened butter to the bowl of the stand mixer. With the whisk attachment, mix on high speed for about 2 minutes, scraping down the sides at least once. After mixing, the butter will be lighter in color, smooth, soft, and will form a ball inside the whisk.
Add the powdered sugar (1), vanilla extract, and a small pinch of salt to the butter and whisk again at medium-high speed for another 1-2 minutes. - Add the sugar syrup incrementally.
Add the syrup in 3 to 4 additions. Stop the mixer, then add a small amount and mix at medium speed using the whisk attachment. Repeat until all the syrup is incorporated, scraping down the bowl a couple of times for even mixing.
Mix at high speed for one minute after adding all the syrup. Since most syrups are clear, it can be challenging to determine when they're fully emulsified. To ensure accuracy, set a timer and mix for the full minute. - Adjust frosting for sweetness and density.
Taste the frosting to determine how much powdered sugar to add. It should be smooth, creamy, buttery, and slightly sweet. Add powdered sugar in a few increments, mixing at low speed to minimize mess. Once all the sugar is added, mix on high speed for 30 seconds and taste again. I prefer a slightly sweeter buttercream (see my footnotes).
You can stop here or add more powdered sugar as desired. Please note that exceeding twice the amount of powdered sugar (2) may result in a grainy texture due to the presence of sugar granules. - Adjust frosting for texture and flavor.
Switch to the paddle attachment and smooth the frosting at low speed for a few minutes to remove large air pockets. Taste the frosting; if it's too buttery, add heavy cream one tablespoon at a time until the desired consistency is reached. Adjust the salt and vanilla as needed if you’re satisfied with the texture and flavor. Then, whip on low speed for at least one minute.
ASSEMBLY
- Cut the cake layers.
We will need eight thin layers of cake, approximately ½ inch in height. Each cake should rise around 1.75-2 inches in your cake pans. This means that each cake layer should be cut 3 times to yield 4 ½-inch layers of cake.
Use a cake leveler or a large serrated knife to slice straight through the layers. My cake leveler has markings on it, so I know how to cut ½ inch slices, but you may need a ruler if you’re using a knife. - Set up the cake board and the first slice of cake.
Place a cake board onto your cake turner or a cake stand. You can also do this on a large, flat plate or platter, but the outside will be difficult to smooth out, so you may opt for a more rustic look for the outer frosting. We’ll get to that in a bit.
Add a schmear of frosting to the cake board to anchor the cake. Add the first layer of cake.
👉🏻 TIP: Try to use the flattest pieces of cake for the bottom and top - it will help level the cake overall with a sturdy bottom. It’s much easier to deal with uneven cake slices in the middle with more buttercream. - Add the chocolate buttercream frosting and miso caramel filling.
🧁 NOTE: For my cake pictured above, I used chocolate Russian Buttercream to fill and crumb coat the cake, and Vanilla American Dreamy Buttercream for the top coat. You can use either buttercream to do both; simply disregard my labels for the frosting flavors and proceed through these instructions with one type of frosting. However, you can only do this if you’ve prepared enough frosting of one kind, about 7-8 cups.
I use a metal scoop to ensure the same amount of chocolate frosting is evenly distributed between the cake layers. My ice cream scoop holds 3 tablespoons per scoop, and I use three scoops, which equals 9 tablespoons, or ½ cup plus 1 tablespoon, of frosting for each filling application. You can also use a ½ cup measuring scoop and add a slightly heaping scoop of frosting in between each layer.
Use a flat cake spatula to spread frosting evenly to the edges of the cake layer. Create a shallow indentation to hold the miso caramel, leaving a 1-inch border along the perimeter of the cake to create a dam, so the miso caramel doesn’t leak out.
Add approximately 3 tablespoons of miso caramel to the indentation and use a cake spatula to spread it into an even, thin layer. - Continue adding cake, chocolate frosting, and filling.
Add another layer of cake. Get to eye level and ensure that the sides are lining up as even as possible. Use the palm of your hand to apply gentle pressure. This will ensure there are no air gaps in the frosting. Repeat step 3. Continue until all the cake layers have been used up, saving the flattest layer for the very top.
Give your cake a final eye-level look. Adjust the cake if necessary to get straight sides. - Spackle in the sides with more chocolate buttercream.
Apply a crumb coat.
Now, apply a super-thin layer of frosting (using the chocolate buttercream) to the top and outside of the cake.
There will likely be gaps of frosting, so I like to go in with more chocolate buttercream on the sides to fill all the gaps until it’s level with the side of the cake.
During this process, my cake takes on a semi-cylindrical shape, but it's quite unappealing in terms of appearance. But it’s ok! The goal here is just to apply a layer of fat in which excess crumbs will get trapped, so that when we do a final coat, it’s free from any chocolate crumbs.
Chill the cake for at least 30 minutes to set the crumb coat. To test, touch the buttercream; it should be firm and not leave any indentations. - Apply a top coat of frosting with Vanilla American Buttercream.
Apply a couple of big dollops of frosting to the top of the cake. Use a flat spatula to spread the mixture evenly over the top, then smooth it out to create a flat surface. I like to leave a slight “ledge” on the top of the cake to keep the caramel on the top.
Apply frosting around the sides and use a bench scraper to create flat and smooth sides.
Once you like the look of the cake, place it in the fridge while you prepare the decorations. - Decorate with fresh flowers, caramel, and/or piping.
Ensure your caramel is at pouring consistency. You can place the jar in the microwave for about 10-20 seconds to liquefy it further. You don’t want it hot, but just warm enough to run down the side of the cake and smooth along the top.
If you want to do the drip effect like on my cake, pour a few tablespoons of runny caramel into a piping bag and snip off a tiny piece of the bag at the pointed end. Start at the edge of the cake and allow the caramel to run down the sides. Continue moving along the perimeter until you achieve the desired look.
Pour the remaining caramel on top of the cake, inside the ledge you created earlier.
Decorate with fresh flowers.

Recipe Card - Adriana's Notes
*Dutch-processed cocoa (also called European cocoa) works best here because it’s been alkalized. This process alters several characteristics of the powder: the color becomes darker and redder, the flavor mellows (becoming less sharp or astringent), and the pH shifts to a more basic level. Additionally, a pH shift alters the solubility of the cocoa powder, allowing it to dissolve more easily.
For the cake, this type of cocoa powder will give the best rise and flavor.
For the frosting, you may notice a separation or curdled appearance if you use natural cocoa powder.
**Try to use the highest quality powdered sugar. In my experiments, I found that generic brands tend to use either a higher ratio or lower quality of starch (typically corn or tapioca) to cut the powdered sugar, which can result in a slightly gritty or granular texture in the final frosting. The brands I use in my kitchen are C&H or Domino powdered sugar.
***There are several types of sugar syrups you can use in this buttercream. In my photographs and video tutorial, I’ve used light corn syrup; please refer to the ingredient description above for additional syrup suggestions and usage instructions.
****If at the end of mixing you find that your buttercream is too thick/heavy/overly buttery, you can add heavy cream. Start with one tablespoon, whisk on high speed, and taste it. You can continue doing this until you achieve the desired texture and taste. The butter can handle a little more liquid (probably up to double the amount listed in this recipe), but once it reaches the texture of a firm Greek yogurt, you'll likely need to stop adding heavy cream. If you get the breakpoint where the buttercream is too loose or splits, simply add a tablespoon of softened butter to re-emulsify the mixture.
.avif)
.avif)

Got room for more dessert?
Subscribe to my Crumby Data newsletter! I share behind-the-scenes looks at recipe development, flavor testing for the Cakeculator, and life as a content creator. It’s free, lands in your inbox every few weeks, and you can unsubscribe anytime...no strings attached :)
Feel free to take a look at previous newsletters here!
.ico)
.avif)