.png)
.png)
Russian Buttercream (aka Condensed Milk Frosting): Your Complete Guide


Russian Buttercream, or Condensed Milk Frosting, is made primarily of butter and sweetened condensed milk. Its simplicity makes it an excellent beginner recipe, yet it still creates a wonderfully stable frosting with an amazingly complex flavor. And I’ve seen all the comments about how this frosting can often feel and taste overwhelmingly buttery, so I’ve updated my recipe’s method to create a new lighter version of Russian Buttercream that melts in your mouth with a silky texture.
.avif)
Welcome to my ultimate Russian Buttercream guide! We'll explore texture, aeration, and ingredient chemistry, explaining how this frosting differs from others. Learn if it's right for your dessert and get the exact process to understand and customize your perfect Russian Buttercream.
What is Russian Buttercream?
My Russian Buttercreams are a type of True Buttercream (in purple, below), which means they are emulsion-based.

True Buttercreams are a family of stable emulsion frostings in which fat- and water-based ingredients are mixed to create a thick, creamy texture. I’ll often refer to these as “emulsion-based buttercreams.”
Generally, True Buttercreams have:
- moderate sweetness,
- low aeration,
- a creamy and buttery texture,
- the ability to create intricate piped designs and smooth cake sides,
- excellent stability at room temperature and under pressure, and
- easy modifications for adding dyes and flavors.
So, what sets Russian Buttercream apart from other True Buttercreams?
Let’s get into the specifics of Russian buttercream:
My Vanilla Russian Buttercream is one of the easiest of all my True Buttercreams, making it excellent for beginner and advanced bakers alike. The emulsion mixing steps are straightforward, and there are no cooking steps before making the buttercream emulsion, so it’s a great introduction before moving on to the more advanced types.

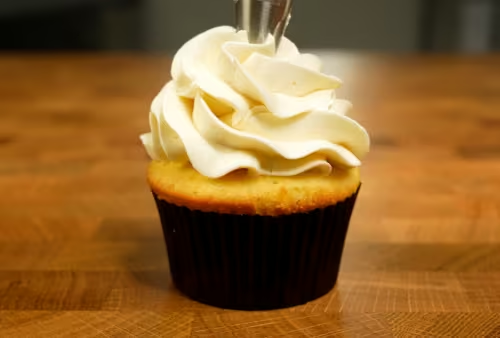
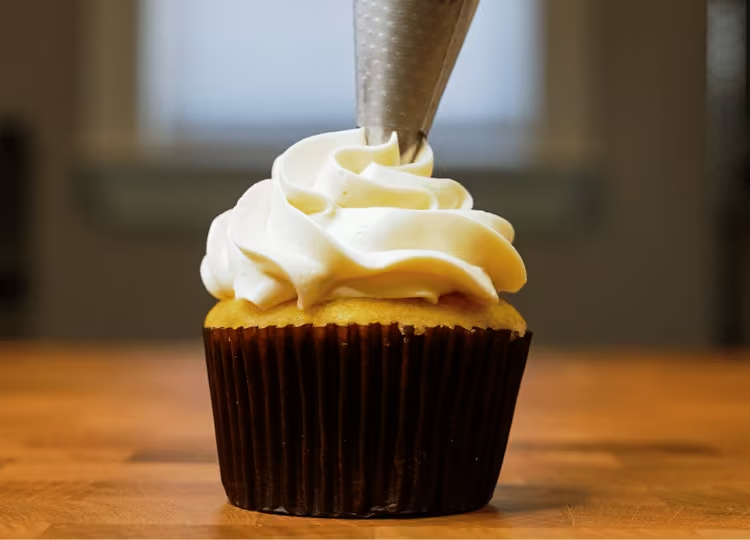
What is the texture of Russian Buttercream?
My Russian Buttercream has been reformulated and offers a unique, silky-smooth, creamy, melt-in-your-mouth texture. This is because it uses my Frosting Butter, which has been pre-conditioned to emulsify perfectly with the condensed milk.
Typically, Russian Buttercreams are denser than other True Buttercreams, and this is likely due to a couple of things. First, there is sweetened condensed milk, a concentrated syrup of milk proteins and sugars. I’ll get into this more in the ingredient section below.
The second factor contributing to density is low aeration. I measure the aeration of my frostings, which is the volume taken up by air and given as a percentage. Vanilla Russian Buttercream is on the very low end of my frosting aeration, at 12%. This indicates that for any given volume of frosting, 12% is occupied by air, and the rest is made up of ingredients (butter, sugar, milk proteins, etc.). To compare, a high-aeration frosting could be whipped cream, with up to 50% air.
Aeration is an interesting characteristic because it helps us understand texture. It affects the mouthfeel, greasiness, and smoothness of a particular type of frosting. Though most of my emulsion-based frostings are minimally aerated, don’t let the low percentages deter you. Air is not the only contributor to texture.
In my emulsion-based frostings, a high ratio of silky or creamy syrups is usually intermixed with the butterfat, creating a melt-in-your-mouth creaminess in the final buttercream. In addition, my pre-conditioning step to make Frosting Butter helps break down the butterfat, creating a more even emulsion and further contributing to this silky texture. However, I would note that this is one of my denser True Buttercreams, and I’d either use it in moderation (e.g., piping cupcakes, schmearing onto a sheet cake) or pair it with other lighter elements in the dessert so the dessert isn't overall too heavy.
What is the flavor of Russian Buttercream?
The flavor of Russian Buttercream is very unique, especially given how few ingredients it uses. There is a strong butteriness combined with a cooked, dairy-forward flavor of sweetened condensed milk. Combining these two ingredients creates a buttercream with a medium sweetness (32%) and a robust dairy flavor.
What is the stability of Russian Buttercream?
When emulsified properly, Russian buttercream has great stability for intricate piping and frosting onto cakes. My frosting does not have a runny or drippy texture; rather, it is ultra-creamy and quite substantial. This is the perfect frosting for beginners to start experimenting with piping and achieving extra-smooth sides on cakes.
Almost all of my True Buttercreams are stable at ambient room temperatures, up to 85 °F/30 °C. This is from the buttercreams containing a high butter (aka milkfat) ratio, which is the primary source of pressure and temperature stability. Milkfats start to liquefy at around 90-95 °F/32-35 °C.
My experiments show that other ingredients, such as eggs and syrups, play a minor role, and stability mostly depends on the type of fat in the buttercream and the emulsion's stability. Changing a portion or all of the fat to something like vegetable shortening will increase your stability by at least 10 °F/5 °C, but it will also affect the final flavor of your frosting.
To sum it all up, room temperature and out of direct sunlight are always best for True Buttercreams.
What ingredients do you need for Russian buttercream?
.avif)
1 | UNSALTED BUTTER
Butter provides fat, stability, flavor, and emulsifiers for this frosting. The unique combination of milkfat (around 80-84%) gives butter its wonderful, creamy, spreadable texture. Butter is integral to True Buttercreams because it contains emulsifiers that bind water-based and fat-based ingredients. I always use unsalted butter in all my frostings and add salt based on taste.
2 | POWDERED SUGAR
There are two sources of sugar in this recipe: powdered sugar and the sugar contained in condensed milk. The powdered sugar is used early in the recipe to pre-condition the butter for emulsification. It serves not only to help sweeten the overall buttercream but, used in this way, to flavor and slightly aerate (or “cream”) the butterfat, which gives the final frosting a dreamy, creamy texture.
3 | VANILLA EXTRACT
Vanilla extract is a general flavor enhancer for baked goods, and here it serves as the primary flavoring in this frosting. Extracts are generally interchangeable, making it easy to modify flavors. You can use vanilla bean paste if you like.
4 | SALT
A pinch of salt will enhance the flavor and also balance the overall sweetness of this frosting. I typically use a coarser grind of kosher salt in my baking, but crispy salt bits are not appealing in frostings, so I use finely granulated salt. This allows the salt to dissolve more readily within the frosting.
5 | SWEETENED CONDENSED MILK Sweetened condensed milk is a shelf-stable dairy product made by cooking milk and sugar until half of the water has evaporated. The result is a super syrupy, creamy, and thick milk sauce that easily incorporates into the frosting.
There are varying shades of sweetened condensed milk from off-white to tan. Some people are alarmed by this, but if you’re not past your expiration date, the can is not dented, and it's fully intact, your condensed milk is still good to use.
This color variation is due to the concentration of milk solids (milkfat, proteins, sugars, and micronutrients). Milkfats can appear yellow, depending on the cow’s diet. Milk proteins can brown when they interact with sugars during the Maillard reaction. Additionally, the Maillard reaction can occur slowly at room temperature, so as your sweetened condensed milk approaches its expiration date, it may appear slightly browner.
Step by step:
STEP 1 | PREPARE FROSTING BUTTER
WHY:
A big complaint about Russian Buttercreams (and, in general, most True Buttercreams) is that they feel and taste overly buttery. To address this, I’ve developed a pre-conditioning method for the butter. This makes what I call “Frosting Butter,” which aerates, sweetens, and flavors the butterfat, so that the final buttercream has a silky smooth texture that does not feel overly buttery on the palate.
Frosting Butter also has the optimal creamy texture and temperature for emulsification, which is perfect for True Buttercreams. (And if you’re worried that the extra powdered sugar changes the texture of this buttercream, it does but in a fantastic way! I’ve calibrated the recipe so that the powdered sugar eventually dissolves. To learn more about the science of Frosting Butter, ready my guide here.)
HOW:

For proper aeration, ensure the butter temperature is around 60-70°F/15-21°C (1a). You don’t need a thermometer, but when the butter is at this temperature, you should be able to slide the whisk attachment into the butter with moderate pressure (1a, inset.)

Add the butter to your mixing bowl and whisk on high speed for about 2 minutes (1b), scraping down the sides at least once (1c). After mixing, the butter will be lighter in color, smooth, soft, and ball inside the whisk (1d).

Add the powdered sugar, vanilla extract, and a pinch of salt to the aerated butter and whisk on high speed for about 2 minutes (1e). The Frosting Butter is complete! It will still ball inside the whisk and have a slightly glossier appearance (1f).
STEP 2 | ADD SWEETENED CONDENSED MILK INCREMENTALLY.
WHY:
The pre-conditioned butter is now ready for emulsification. In this recipe, butter is the fat component, and the water-based component is primarily condensed milk. Adding the condensed milk in increments allows your mixer to work the emulsion together gradually and ensure a thick and creamy consistency.
HOW:

Continue with the whisk attachment and add the condensed milk in three parts, mixing for one minute on high speed before adding the next portion (2a). Scrape the bowl down a few times during this process. Once all the milk has been added, mix on high speed for one minute. This ensures that the milk emulsifies with the butter, which can be difficult to see because the two are similar in color. At this point, the buttercream should be thick and creamy (2b).
Step 3 | Adjust for texture and flavor.
WHY:
The whisk worked well for emulsifying the condensed milk, but it left plenty of air pockets. Switching to a paddle attachment helps break up the bubbles and ensures a smooth finish for your dessert.
HOW:

The whisk attachment introduced many air pockets, so switch to the paddle attachment and mix on low speed for at least a few minutes to smooth out the frosting (3a). Give the frosting a taste and adjust for vanilla and salt, if needed.
The final frosting should be ultra smooth and creamy (3b).
Common pitfalls with Russian Buttercream
.avif)
Final buttercream is too loose/drippy:
The buttercream hasn’t been mixed long enough. Ensure you have the whisk attachment, and blend for longer or at a higher speed to fully emulsify the butter with the condensed milk fully.
The butter was too warm to begin with. Place the whole bowl with the attachment into the freezer for 3-4 minutes. This will give the bowl a slight chill. The cold will begin to solidify the butterfat slightly, giving the buttercream a firmer overall texture.
Final buttercream is too yellow/off-white, and you wanted a white buttercream:
The butter and condensed milk used were yellow/off-white/cream, and need to be counterbalanced. Butter brands are different shades of yellow to whiteish, depending on the cow’s diet. Also, the color of condensed milk varies between brands, and some can be quite tan. This is from the Maillard reaction, which is a browning reaction that occurs between proteins and sugars. To counteract a yellow or orange buttercream, add a slight dot of purple gel color, which will whiten your buttercream
Vanilla extracts are deep brown and can also make buttercreams appear creamier, so try a clear vanilla extract if you want a whiter buttercream. Clear vanilla extracts contain artificial flavorings, and I really like the Watkins brand for my baking (see here on Amazon).
Video
Honors Members Section
This extra material is accessible to Sugarologie Honors members.
Become a member to view extended research notes, technique analysis, and supplemental materials! Learn more about Sugarologie Honors here.
Already a member?
What is condensed milk, and how does it compare to other kinds of milk?
Dairy ingredients are fascinating at the molecular level, and since they’re pretty commonly used in baking, it’s a good idea to know what we’re working with. Russian Buttercream specifically relies on milk for flavor, amongst other things. These flavors and aromas are intensified during the production of sweetened condensed milk, which is made by slowly heating milk and sugar until the water evaporates. This leaves behind sugars, milk solids, and a bit of fat with a syrup-like texture.
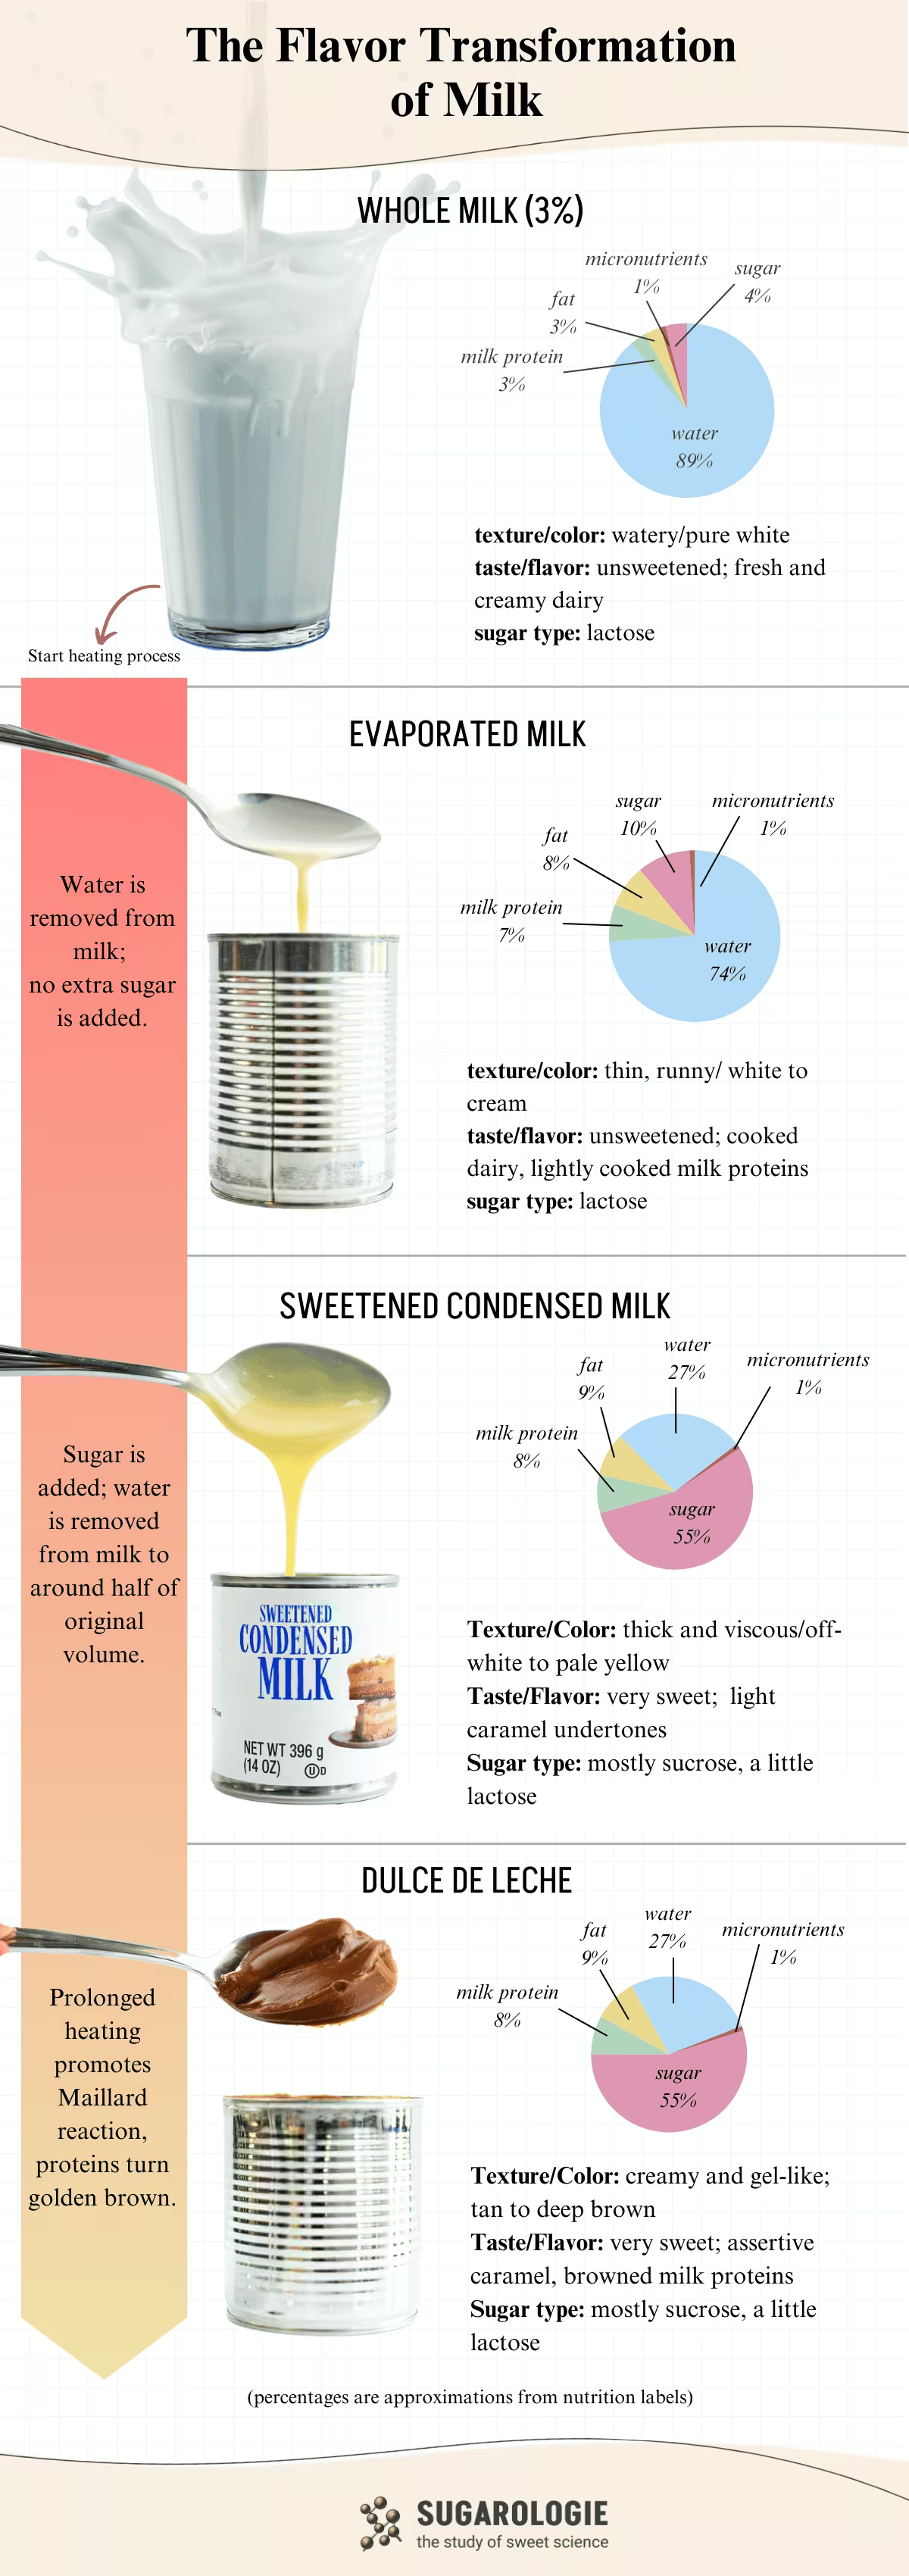
Notice that, as you move through the heating process from top to bottom, there are a few changes in chemical composition; this is why these milk products are typically not interchangeable without other modifications.
Emulsion-based buttercreams, which are the largest category of frostings on my site, rely on combining fat (usually butter) with another water-based ingredient. In Swiss meringue buttercream, that component is Swiss meringue. Here, it’s condensed milk, which really contains almost everything you need to complete a buttercream: sugar, protein, and water. Additionally, it’s all encased in a thick syrup that’s easy to just pour into the whipped butter.
Before starting the recipe, please read this!
Measure by weight, if possible.
Measuring by weight is the best way for you to replicate my recipes. I develop recipes using ingredients (even liquids) measured in grams, which is why you see them listed first in the recipe cards. For measurements under 5 grams, I will typically only list the volumetric measurements (teaspoons, etc.), as most home scales are not precise for such small weights.
In most cases, I have converted grams to volumetric measurements (aka US customary units) for bakers who prefer this method. However, the measurements are not as precise and may have awkward proportions. The recipes should still work, but for the ultimate precision, try to use weight.
This is the OXO scale I use daily. I also purchased this budget version of a good scale, which I keep at my Mom’s house for baking. If you’re interested in other tools I use for my baking, I’ve compiled a list here.
Use room temperature ingredients.
All my ingredients should be used at room temperature, or 65-75 °F/18-24 °C. I will always indicate if you need something outside this range. If no details are given, room temperature is the default.
Pay attention to the ingredient descriptions.
I try not to be brand-specific, but I will always note an interesting result from a type of ingredient, be it negative or positive.
A specific note regarding salt: I use Diamond Crystal Kosher salt for everything on this site except for frostings. In frostings, you want the salt to dissolve more easily, and kosher salt tends to leave granules behind. If you substitute table salt (more finely granulated) for recipes that list kosher salt, you must use half the volume indicated in my recipes.
Substitutions are hard.
That said, substitutions aren’t impossible but can be the toughest part of recipe development. Small swaps, like reduced-fat milk (2% fat) for whole milk (3.5% fat), usually work fine. However, bigger changes—such as replacing oil with applesauce or sour cream with Greek yogurt—can significantly impact texture and density.
Be wary of general, all-purpose substitutions in baking; I find that usually there is never a one size-fits-all solution. I carefully select ingredients for my recipes, so for the best results, start with the original recipe and modify with caution.
Read all the recipe instructions before beginning.
I’m in the “Pre-read the Chapter before Class Lecture” club... and I invite you to join! Baking new recipes can be intimidating, so let’s set you up for success. I want you to think about timeframes. Most fillings and frostings can be made ahead of time, and give you an extra day for mental space. Also, as you become a more proficient baker, you can anticipate and recognize steps. (“Oh, this has a meringue step, so I’ll need an extra clean bowl…” etc.) Ensure you go down the ingredient list and have everything at the right temperature.
.avif)

%20(1).png)


Vanilla Condensed Milk Buttercream
- 113 g (½ cups) unsalted butter, softened slightly
- 30 g (¼ cup) powdered sugar*, unsifted is fine
- tiny splash of vanilla extract
- pinch fine salt
- 77 g (¼ cup) sweetened condensed milk
For larger quantities or to pair with a cake recipe, go to my Cakeculator and choose “Vanilla Russian Buttercream.”
- 339 g (1 ½ cups) unsalted butter, softened slightly
- 90 g (¾ cup) powdered sugar*, unsifted is fine
- 1 teaspoon of vanilla extract
- ⅛ teaspoon of fine salt
- 230 g (¾ cup) sweetened condensed milk
For larger quantities or to pair with a cake recipe, go to my Cakeculator and choose “Vanilla Russian Buttercream.”
- Prepare the Frosting Butter:
Add the slightly softened butter to the mixing bowl and whisk on high speed for about 2 minutes, scraping down the sides at least once. After mixing, the butter will be lighter in color, smooth, soft, and will form a ball inside the whisk.
Add the powdered sugar, vanilla extract, and a small pinch of salt to the butter, then whisk again on medium-high speed for 1-2 minutes more. - Add the sweetened condensed milk.
Continue with the whisk attachment, adding the condensed milk in three parts, mixing for 1 minute on high speed before adding the next portion. Scrape the bowl down a few times during this process.
Once all the milk has been added, mix on high speed for one minute. Just looking at the mixture to see if it’s properly mixed is difficult because the butter and milk are similar colors, so this ensures proper emulsification and prevents a runny frosting. At the end of this step, the buttercream should be thick and creamy.
If your buttercream looks runny, greasy, curdled, or broken at any time during this process, it's not yet emulsified; turn up the speed or mix for longer until it comes together. - Flavor and smooth the frosting.
The whisk attachment introduced air pockets, so switch to the paddle attachment and mix on low speed for at least a few minutes to smooth the frosting. Give the frosting a taste and adjust for vanilla and salt, if needed.
The final frosting should be ultra smooth and creamy.

Recipe Card - Adriana's Notes
*Try to use the highest quality powdered sugar. In my experiments, I found that generic brands tend to use either a higher ratio of starch (typically corn or tapioca) or lower-quality starch to cut the powdered sugar, which can give the final frosting a slightly gritty or granular texture. The brands I use in my kitchen are C&H or Domino powdered sugar.
.avif)

Got room for more dessert?
Subscribe to my Crumby Data newsletter! I share behind-the-scenes looks at recipe development, flavor testing for the Cakeculator, and life as a content creator. It’s free, lands in your inbox every few weeks, and you can unsubscribe anytime...no strings attached :)
Feel free to take a look at previous newsletters here!
.ico)