.avif)
Yogurt Whipped Cream - one of my favorite whipped cream frostings!


My yogurt whipped cream is stable enough to fill cakes, frost smoothly, and even pipe crisp designs. It’s slightly less sweet than most frostings and has a light, tangy flavor from the added Greek yogurt.
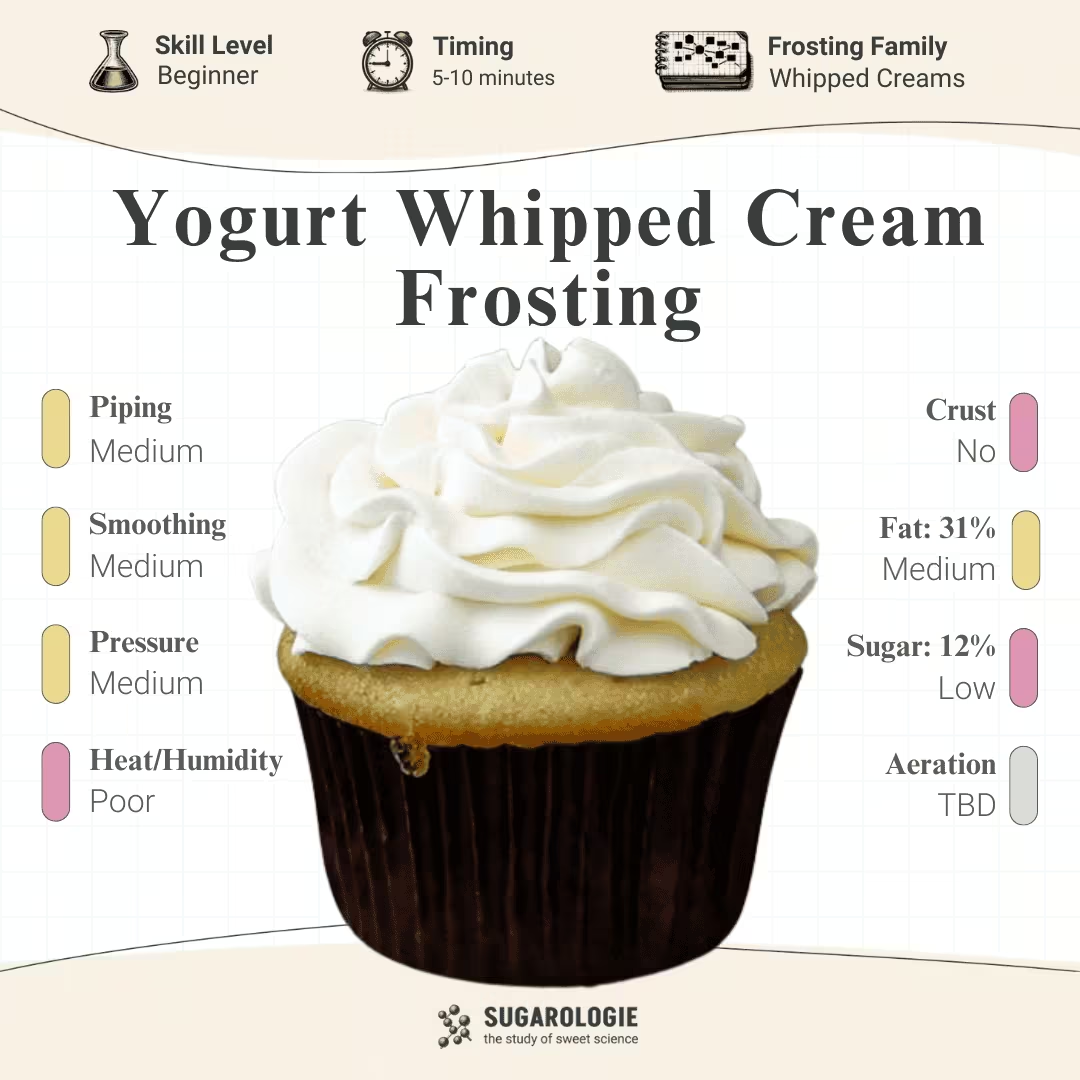
Of all the stabilizers for whipped cream I tested, this one with Greek yogurt is my favorite; it's relatively inexpensive, readily available in most supermarkets, and tastes fantastic.
Greek yogurt is a type of strained yogurt that is thicker and higher in protein than unstrained kinds. The thickness or creaminess of yogurts doesn’t come from fat but protein.
During yogurt fermentation, bacteria consume lactose, the sugar in dairy-based milk. A by-product of this fermentation process is lactic acid, which increases acidity.
This does a couple of things. It gives yogurt that delicious, tangy flavor, but also causes milk proteins to get sticky. The proteins cling together so well that they turn a liquid (milk) into a semi-solid gel (yogurt).
To make Greek yogurt, the milk is strained, and the watery portion (also called the whey) is removed. This creates a more highly concentrated yogurt in milk proteins.
There are a couple of ways that Greek yogurt stabilizes whipped cream. The high amount of protein adds bulk to the water part of the whipped cream, making it seem thicker. When tasting this whipped cream, you may notice that it doesn’t feel greasy or heavy, but it has more body, if that makes sense.
I use high-fat Greek yogurt in this recipe, which contains up to 5% fat. That helps a little because fat is the critical component surrounding air bubbles in whipped cream. However, it’s unnecessary—you can use any fat content.
Step by step:
Coming soon!
Video
Honors Members Section
This extra material is accessible to Sugarologie Honors members.
Become a member to view extended research notes, technique analysis, and supplemental materials! Learn more about Sugarologie Honors here.
Already a member?
Before starting the recipe, please read this!
Measure by weight, if possible.
Measuring by weight is the best way for you to replicate my recipes. I develop recipes using ingredients (even liquids) measured in grams, which is why you see them listed first in the recipe cards. For measurements under 5 grams, I will typically only list the volumetric measurements (teaspoons, etc.), as most home scales are not precise for such small weights.
In most cases, I have converted grams to volumetric measurements (aka US customary units) for bakers who prefer this method. However, the measurements are not as precise and may have awkward proportions. The recipes should still work, but for the ultimate precision, try to use weight.
This is the OXO scale I use daily. I also purchased this budget version of a good scale, which I keep at my Mom’s house for baking. If you’re interested in other tools I use for my baking, I’ve compiled a list here.
Use room temperature ingredients.
All my ingredients should be used at room temperature, or 65-75 °F/18-24 °C. I will always indicate if you need something outside this range. If no details are given, room temperature is the default.
Pay attention to the ingredient descriptions.
I try not to be brand-specific, but I will always note an interesting result from a type of ingredient, be it negative or positive.
A specific note regarding salt: I use Diamond Crystal Kosher salt for everything on this site except for frostings. In frostings, you want the salt to dissolve more easily, and kosher salt tends to leave granules behind. If you substitute table salt (more finely granulated) for recipes that list kosher salt, you must use half the volume indicated in my recipes.
Substitutions are hard.
That said, substitutions aren’t impossible but can be the toughest part of recipe development. Small swaps, like reduced-fat milk (2% fat) for whole milk (3.5% fat), usually work fine. However, bigger changes—such as replacing oil with applesauce or sour cream with Greek yogurt—can significantly impact texture and density.
Be wary of general, all-purpose substitutions in baking; I find that usually there is never a one size-fits-all solution. I carefully select ingredients for my recipes, so for the best results, start with the original recipe and modify with caution.
Read all the recipe instructions before beginning.
I’m in the “Pre-read the Chapter before Class Lecture” club... and I invite you to join! Baking new recipes can be intimidating, so let’s set you up for success. I want you to think about timeframes. Most fillings and frostings can be made ahead of time, and give you an extra day for mental space. Also, as you become a more proficient baker, you can anticipate and recognize steps. (“Oh, this has a meringue step, so I’ll need an extra clean bowl…” etc.) Ensure you go down the ingredient list and have everything at the right temperature.
.avif)

.avif)


Yogurt Whipped Cream
- 142 g (½ cup + 2 tablespoons) heavy whipping cream†, very cold from the fridge
- 57 g (¼ cup) plain Greek yogurt (the higher the fat, the better)
- 30 g (¼ cup) powdered sugar (sifted if clumpy)
- ½ teaspoon vanilla extract
For larger quantities or to pair with a cake recipe, go to my Cakeculator and choose “Yogurt Whipped Cream Frosting.”
- 284 g (1 ¼ cups) heavy whipping cream†, very cold from the fridge
- 113 g (½ cup) plain Greek yogurt (the higher the fat, the better)
- 60 g (½ cup) powdered sugar (sifted if clumpy)
- 5 g (1 teaspoon) vanilla extract
For larger quantities or to pair with a cake recipe, go to my Cakeculator and choose “Yogurt Whipped Cream Frosting.”
- Chill the mixing bowl.
Place one large mixing bowl with the mixer attachments into the freezer for 5-10 minutes. - Whip heavy cream with Greek yogurt.
After the bowl is nice and cold, add Greek yogurt and heavy whipping cream and whisk on medium-high until slightly thickened. - Whip in the sugar.
Add in the powdered sugar and vanilla. Whip on medium speed until you reach soft peaks. Turn off the mixer and remove the bowl. Using either the stand attachment or a handheld whisk, manually whisk the cream until you reach the desired texture. Use immediately.
If you reach a point where the cream is overly grainy or even chunky (but not separated—in that case, you've started to make butter and will have to start over), you can just add a splash of heavy cream until the smooth texture returns.

Recipe Card - Adriana's Notes
†Heavy whipping cream contains 36% or more fat. The higher the fat content, the more air you can incorporate into the whipped cream. See my Stabilized Whipped Cream post here for more information about different creams and the science behind whipped cream.
††My favorite is Fage 5%, but I have also used Chobani. Any fat percentage of Greek yogurt should work, so long as it’s nice and thick. I have also heard from you all about using labneh (which I LOVE), but I have not tested this myself. Theoretically, it should work - so if you try, drop me a DM on insta and tell me how it went!

.avif)

Got room for more dessert?
Subscribe to my Crumby Data newsletter! I share behind-the-scenes looks at recipe development, flavor testing for the Cakeculator, and life as a content creator. It’s free, lands in your inbox every few weeks, and you can unsubscribe anytime...no strings attached :)
Feel free to take a look at previous newsletters here!
.ico)
