.png)
.png)
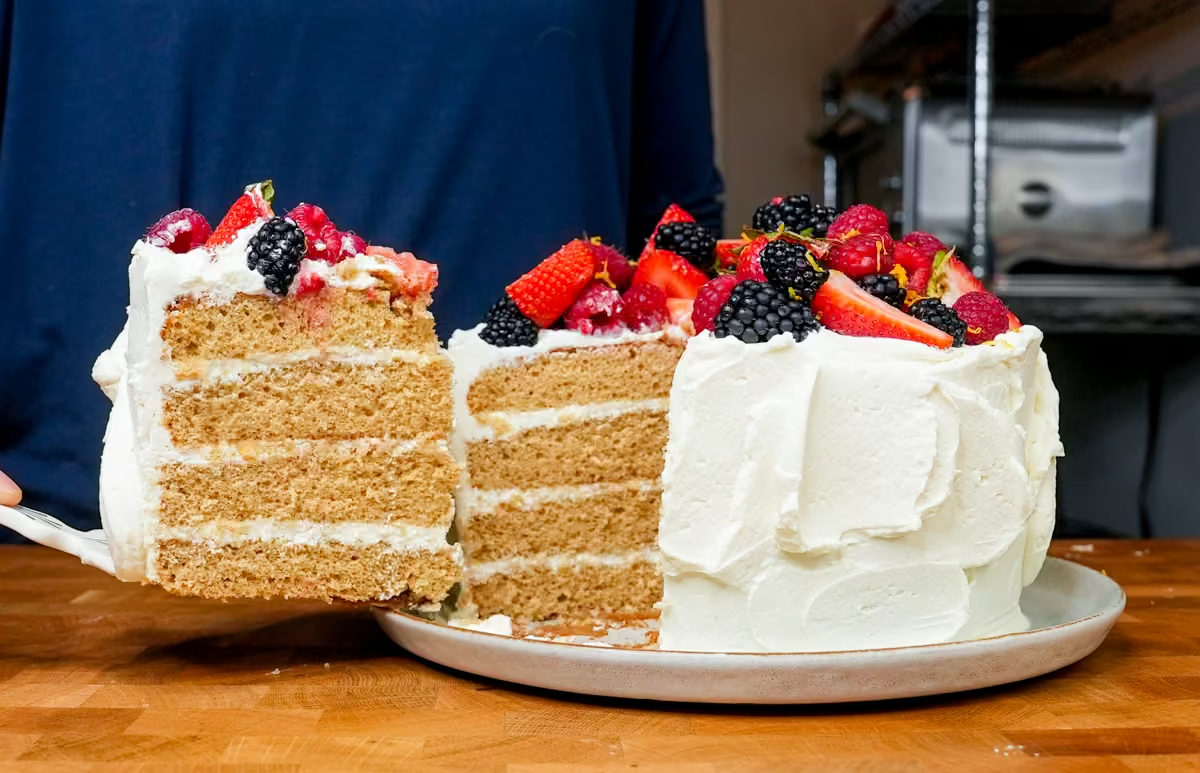
Earl Grey Chiffon Cake with Honey Whipped Cream and Berries


My Earl Grey Chiffon cake has a wonderful tea aroma and a feathery light crumb. The goal of this cake is to remind you of a comforting cup of Earl Grey tea, and along those lines, I’ve created a layer cake that is filled with honey whipped cream and topped with fresh berries. There’s a bit of finely grated lemon zest on the top to enhance the bergamot aroma from the Earl Grey Tea.
Earl Grey is a style of black tea that typically has bergamot orange oils added to create a roasted, nutty flavor with a hint of citrus. As a black tea, Earl Grey has a more intense flavor than its less-fermented and/or less-roasted cousins, such as green teas.
The key to imparting black tea flavor into my chiffon is to brew a very strong cup of tea using boiling water. I tested extraction in oil and water and found that boiling water is the easiest and most effective way to extract the maximum amount of aromatic compounds from the tea leaves. This is a concentrate (labeled “Earl Grey Concentrate ") that will replace the water in my Vanilla Chiffon base recipe. Try to use a high-quality loose-leaf tea if you can; you’re going to be able to smell and taste the lovely tea aroma in every bite of this cake.
For all of my cakes, I create “stat cards” that present all the information about the cake you’re about to make in terms of sweetness, flavor, and other things. Here’s the card for this cake:
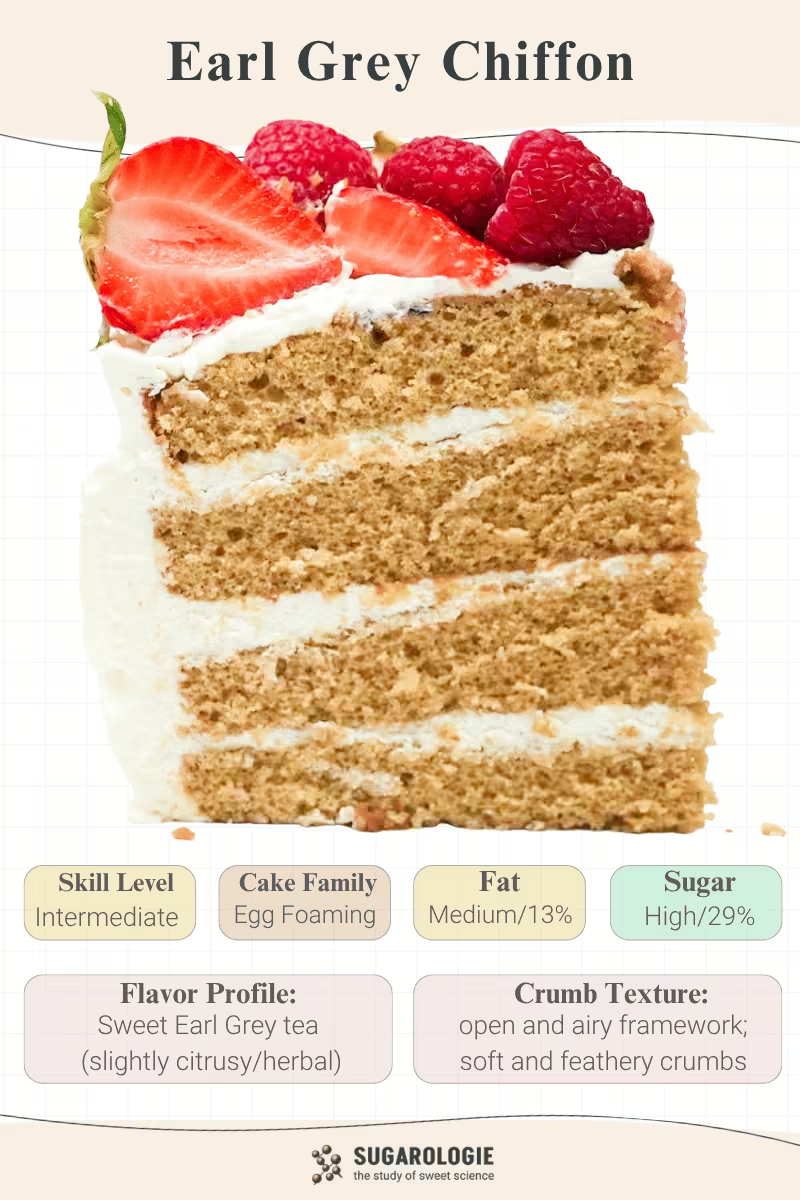
If you’re familiar with my Chiffon Cake recipe, you may notice that this variation leaves out the cream of tartar. Tea is an acidic ingredient (as is cream of tartar) and is sufficiently acidic on its own for the cake batter. When I add the cream of tartar as indicated in my Vanilla Chiffon recipe (which has no additional overtly acidic ingredients), the cake crumb sets a tad too fast. So I removed it from this recipe to ensure you get the tallest cake possible in this flavor variation.
What ingredients do you need to make my Earl Grey Chiffon Cake?
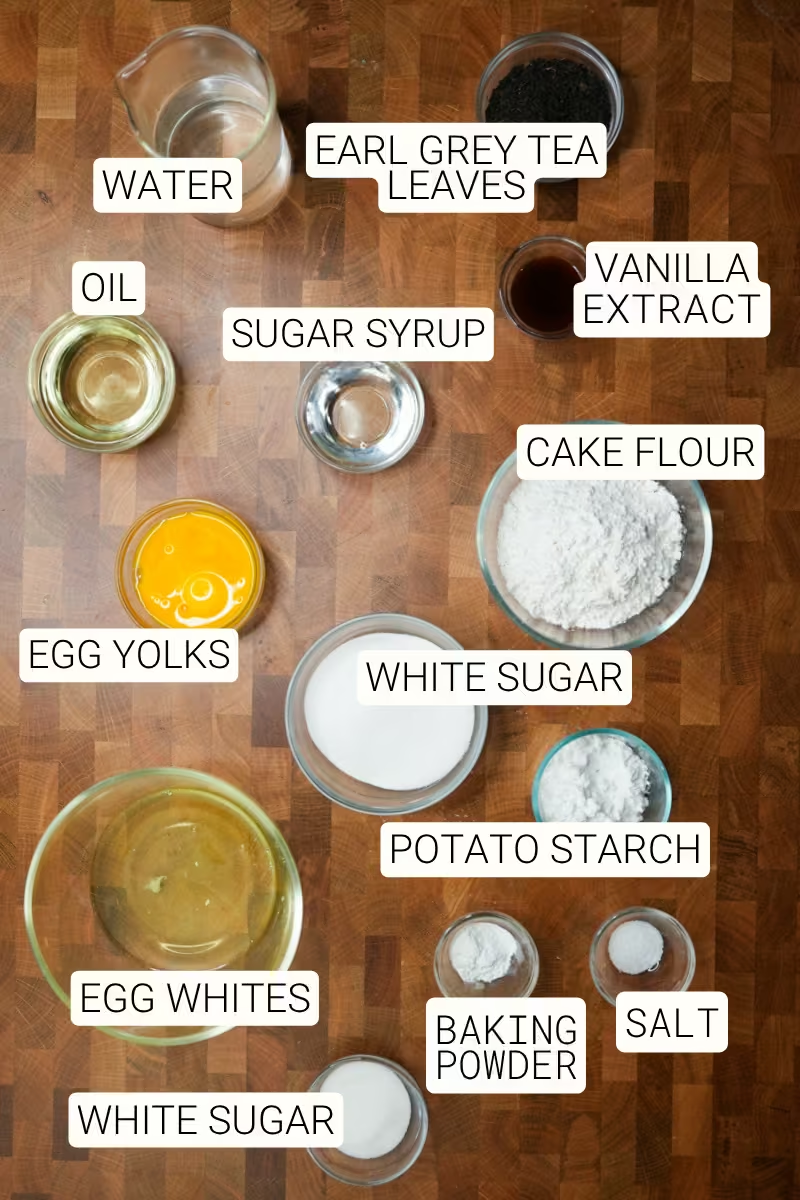
EARL GREY TEA, LOOSE-LEAF
Earl Grey tea is the primary flavoring in this cake, lending a floral, citrusy aroma to the vanilla cake crumb. The tea leaves contain aromatic oils and tannins, which we will steep in water at a high concentration. This creates a super-dark tea concentrate scented with bergamot oil (a citrus fruit grown primarily for its highly aromatic rind).
BOILING WATER
Different teas require different temperatures for optimal extraction; Earl Grey, a black tea, needs boiling water to effectively extract the aroma compounds from the leaves into the water.
CANOLA OIL
My base chiffon recipe uses oil as the main fat source. This keeps the cake soft and moist, but it is also important that it remains liquid during batter preparation. Chiffons are super light-textured when baked and, as such, require a light batter that can rise steadily in the oven. Oil helps us achieve this.
SUGAR SYRUP
A sugar syrup is one of many types of sugars that are dissolved in water to a super-high concentration. (Also called a “saturated” solution because the water is at its maximum holding capacity.) Its function is to add a tiny bit of sweetness, but, more importantly, it helps retain moisture in the cake over time. Because dissolved sugars are hygroscopic, meaning they attract and hold onto water, this slows staling - or drying out. You can use corn syrup, agave nectar, or even honey, which would be lovely in this cake.
EGGS
We’ll use eggs, separated into yolks and whites, for this chiffon recipe. The reason we do this with chiffons, or in general, is that eggs are such complex ingredients, with yolks serving different purposes than the whites do. The yolks provide richness, color, and emulsifying power.
The whites will form a foam, which is the primary aeration agent for my chiffons. Also called a meringue because sugar is added, whipping the egg whites into an airy foam depends on ensuring no fat (i.e., yolk) is in the egg white mixture, which is another reason we separate them.
VANILLA EXTRACT
Using extracts offers flavor boosts without impairing the cake’s final texture. Vanilla is the all-purpose seasoning for cakes, and in this cake, it will enhance and round out the floral tea flavors.
CAKE FLOUR
There are two varieties of cake flour, either bleached or unbleached, and both work well in this cake. Cake flour typically contains less gluten-forming protein than pastry, all-purpose, or bread flours. Because of this, there’s less potential for a gluten network to form when mixing the cake batter, which typically occurs when flours are mixed with water. Cake flour is also more finely milled, which means it will have a finer crumb structure than other flours.
POTATO STARCH
I love using an additional starch in my chiffon cakes, as it improves softness and creates a finer, fluffier texture. Potato starch absorbs water efficiently and weakens the gluten structure, but the more important contribution is a decrease in the concentration of amylose (potato starch has very little), which can retrograde and transform into a grainy texture in your baked cakes.
WHITE GRANULATED SUGAR
We’ll use granulated sugar in two parts of the chiffon method. First, it’s mixed into the flour component, which creates the base of the un-aerated chiffon batter. Second, we’ll use it to make the meringue, which we'll fold into the un-aerated chiffon batter to aerate it. The sugar has many functions in this cake, such as sweetening and adding moisture to the final product.
BAKING POWDER
The meringue will provide the initial air bubbles to aerate the cake batter, and the baking powder will expand them in the oven. They do this by releasing carbon dioxide gas during mixing and baking, helping the cake rise.
KOSHER SALT
Every cake needs salt to balance out the sweetness.
Step by step:
Coming Soon!
Did you know that you can create your own cake recipe with Cakeculator?
My Cakeculator tool lets you modify cake recipes to bake the one you want. The options I selected to create this recipe are:
Cake Flavor: Earl Grey Chiffon
Pan Size: 8" (20.3cm) round, 2-layer
Frosting Flavor: Vanilla Whipped Cream (subbing out honey for the sugar)
Frosting Level: Medium Coverage
Here are some great suggestions for you to experiment with:
Earl Grey Chiffon Sheet cake with Vanilla Whipped Cream (9x13” pan)
Earl Grey 6” layer Chiffon Cake with Honey Buttercream (Two 6-inch round layers)
Earl Grey 6” layer Chiffon Cake with Honey Buttercr
Video
Honors Members Section
This extra material is accessible to Sugarologie Honors members.
Become a member to view extended research notes, technique analysis, and supplemental materials! Learn more about Sugarologie Honors here.
Already a member?
Before starting the recipe, please read this!
Measure by weight, if possible.
Measuring by weight is the best way for you to replicate my recipes. I develop recipes using ingredients (even liquids) measured in grams, which is why you see them listed first in the recipe cards. For measurements under 5 grams, I will typically only list the volumetric measurements (teaspoons, etc.), as most home scales are not precise for such small weights.
In most cases, I have converted grams to volumetric measurements (aka US customary units) for bakers who prefer this method. However, the measurements are not as precise and may have awkward proportions. The recipes should still work, but for the ultimate precision, try to use weight.
This is the OXO scale I use daily. I also purchased this budget version of a good scale, which I keep at my Mom’s house for baking. If you’re interested in other tools I use for my baking, I’ve compiled a list here.
Use room temperature ingredients.
All my ingredients should be used at room temperature, or 65-75 °F/18-24 °C. I will always indicate if you need something outside this range. If no details are given, room temperature is the default.
Pay attention to the ingredient descriptions.
I try not to be brand-specific, but I will always note an interesting result from a type of ingredient, be it negative or positive.
A specific note regarding salt: I use Diamond Crystal Kosher salt for everything on this site except for frostings. In frostings, you want the salt to dissolve more easily, and kosher salt tends to leave granules behind. If you substitute table salt (more finely granulated) for recipes that list kosher salt, you must use half the volume indicated in my recipes.
Substitutions are hard.
That said, substitutions aren’t impossible but can be the toughest part of recipe development. Small swaps, like reduced-fat milk (2% fat) for whole milk (3.5% fat), usually work fine. However, bigger changes—such as replacing oil with applesauce or sour cream with Greek yogurt—can significantly impact texture and density.
Be wary of general, all-purpose substitutions in baking; I find that usually there is never a one size-fits-all solution. I carefully select ingredients for my recipes, so for the best results, start with the original recipe and modify with caution.
Read all the recipe instructions before beginning.
I’m in the “Pre-read the Chapter before Class Lecture” club... and I invite you to join! Baking new recipes can be intimidating, so let’s set you up for success. I want you to think about timeframes. Most fillings and frostings can be made ahead of time, and give you an extra day for mental space. Also, as you become a more proficient baker, you can anticipate and recognize steps. (“Oh, this has a meringue step, so I’ll need an extra clean bowl…” etc.) Ensure you go down the ingredient list and have everything at the right temperature.
.avif)

%20(1).png)


Earl Grey Chiffon Cake with Honey Whipped Cream and Berries
For Earl Grey Chiffon Cake Layers:
(makes two 8-inch round layers, approx 1.75 inches/ 4.5 cm tall)
- 28 g (7 tablespoons) Earl Grey loose-leaf tea
- 236 g (1 cup) boiling water
- 148 g (10 tablespoons) Earl Grey tea concentrate
- 110 g (8 tablespoons) oil, canola or another veg-based
- 84 g (4 tablespoons) sugar syrup*
- 80 g (4 large) egg yolks
- 16 g (3 teaspoons) vanilla extract
- 180 g (1 ½ cups) cake flour, bleached or unbleached
- 56 g (8 tablespoons) potato starch**
- 200 g (1 cup) white granulated sugar (for flour 🌾)
- 2 teaspoons baking powder
- 1 teaspoon kosher salt
- 38 g (3 tablespoons) white granulated sugar (for meringue 🥚)
- 120 g (4 large) egg whites
For Honey Whipped Cream:
(makes about 5 cups):
- 650 g (2 ¾ cups) heavy whipping cream, cold⟡
- 75 g (5 tablespoons) honey
- 2-3 teaspoons of Whip-It Stabilizer⟡⟡
For Decorating:
- assorted berries, washed and dried (optional)
- fresh, finely grated lemon zest
Bake the Earl Grey Chiffon Layers:
- Preheat the oven.
Move your oven rack to the middle position and preheat the oven to 350°F/180°C. - Prepare the pans.
Line the bottoms of two 8-inch cake pans (not non-stick) with parchment paper circles. Do not grease or flour the sides of the pans.
- Prepare the Earl Grey tea concentrate.
Add the loose-leaf Earl Grey tea to a large mug or heatproof bowl. Pour boiling water over the tea leaves and gently stir. Steep for 5 minutes, then strain into another cup, pressing the leaves to extract as much liquid as possible.
Measure the exact amount of tea concentrate needed for the recipe, as listed next to “Earl Grey tea concentrate” in the ingredient list, either in grams or tablespoons.
Depending on the density of your tea leaves and how much water they absorb, you may not have enough concentrate after the first steep. The recipe intentionally uses minimal water to create a stronger tea flavor. If needed, simply pour a little more boiling water through the strained tea leaves a second time until you reach the required amount.
- Prepare the wet and dry ingredients.
In a measuring cup, combine the Earl Grey tea concentrate, oil, sugar syrup, egg yolks, and vanilla. Mix with a fork until well emulsified. If the tea concentrate is still warm, that’s ideal because it helps the batter emulsify more evenly. Set aside.
In a large bowl, sift together the cake flour, potato starch, granulated sugar (labeled “for flour 🌾”), and baking powder. Add the kosher salt and whisk for 30 seconds.
- Mix the wet and dry ingredients.
Make a well in the center of the flour mixture and slowly whisk in the tea mixture, gradually incorporating the flour to avoid lumps. Mix until just combined, then set aside. - Whip the egg whites.
Place the granulated sugar labeled “for meringue 🥚” into a small bowl for easy addition during whipping.
In a clean mixing bowl, beat the egg whites on medium speed until thick and foamy. Gradually add the sugar, waiting 5–10 seconds between additions. Continue beating until stiff, glossy peaks form.
- Fold the egg whites into the batter.
Add about one-third of the meringue to the cake batter and gently fold until fully incorporated. Repeat with the remaining meringue. The finished chiffon batter should be smooth, tan, and airy. - Fill the pans and bake for 30-35 mins.
Evenly distribute the batter between the prepared cake pans.Begin checking the cakes during the last 5 minutes of baking. Chiffon cakes will usually dome during baking and flatten slightly near the end. The cakes are done when the sides begin pulling away from the pans. You can also test with a skewer inserted into the center, which should come out clean, or check that the internal temperature reaches 195–200°F (90.5–93°C). - Cool the cakes.
Transfer the pans to a wire rack and allow the cakes to cool in the pans. Some cakes, especially chiffons, may deflate slightly, but all of these cakes are designed to cool upright in their pans.Remove the cakes while they are still slightly warm to help preserve moisture. Once the pans are cool enough to handle, run a knife around the edges to loosen the cakes. Carefully invert each pan onto a wire rack or plate. The cakes should release easily, and the parchment can then be peeled from the bottom.
If you are frosting the cakes immediately, you can leave them uncovered at room temperature. Otherwise, if more than 30 minutes will pass before assembly, wrap the cakes in plastic wrap to reduce moisture loss. The cakes must be completely cooled before assembly.
Make the Honey Whipped Cream
- Prep the mixing bowl.
Place your mixing bowl and whisk attachment in the freezer for about 15 minutes. A cold bowl helps keep the milk fat solid, allowing the whipped cream to trap air more efficiently and achieve a loftier texture. - Whip the heavy cream.
Add the heavy whipping cream to the chilled bowl and whisk on medium speed until slightly thickened. - Whip in the honey.
Add the honey, then continue whisking on medium speed. Once the whipped cream reaches soft peaks, add two teaspoons of Whip-It stabilizer. Mix on low speed until you reach the desired frosting consistency. If it seems a little too loose, add a sprinkle more of the stabilizer.
If the whipped cream becomes overly grainy or slightly chunky—but has not fully separated—you can usually smooth it back out by whisking in a small splash of heavy cream.
Assemble the Cake
- (Optional) Slice the cake layers in half.
You can slice each cake layer horizontally to create 4 thinner layers in total.
This is ideal if you prefer a more even frosting-to-cake ratio or want to incorporate special fillings between the layers.
To slice the cakes, use a long serrated knife and carefully cut around the perimeter first, gradually working toward the center.
If you divide the cakes into 4 layers, you will need to repeat the layering step two additional times to use all the layers.
- Add the first layer of cake.
Spread a small smear of frosting onto a large plate, cake board, or serving platter at least 10 inches in diameter. Place the first cake layer on top with the flattest side facing down against the plate.
Add frosting to the top of the cake layer and spread it evenly with a spatula.
- Repeat with the remaining layers.
Place the next cake layer gently on top of the frosting.
If this is your final layer, place the cake with the bottom side facing up. Since the bottom baked against the pan is naturally flatter, this creates a smoother and cleaner top surface for decorating.
Use gentle pressure with your hand to level the cake. It also helps to check the cake at eye level to ensure the layers are aligned evenly.
Use small amounts of frosting to fill any gaps between the layers so the cake remains level and forms a smooth cylindrical shape for frosting.
- Apply a crumb coat.
Spread a very thin layer of frosting over the entire cake. This crumb coat traps loose crumbs and helps create a cleaner final finish.
Because this cake is especially soft and crumbly, this step is important. The crumb coat should be thin enough that you can still see the cake through the frosting.
You can place the cake in the fridge to firm up a bit, although know that whipped cream does not firm up like a butter-based frosting.
- Apply the final coat of frosting.
Spread a thicker final layer of frosting over the entire cake.
For a casual finish, create decorative swirls with a spatula. For a smoother, more polished finish, use a cake scraper to smooth the sides and top.
- Optionally, decorate the cake.
Transfer the remaining frosting to a piping bag and pipe borders or decorative details onto the cake. Finish by topping the cake with berries and sprinkling on some freshly grated lemon zest.

Recipe Card - Adriana's Notes
*Dissolved sugar syrups are the secret to long-lasting moisture and softness in my chiffon cakes. My favorite is to use equal parts agave and corn syrup, as it strikes a nice balance between sweetness and long-term moisture. To do this, split the total syrup weight in half: use half agave (light or dark) and half corn syrup. You can also use 100% corn syrup, agave, or honey. For the honey swap, since it has added acidity, your cake will be just a bit less; it’s minor, about ¼ inch (6 mm) less in height.
**I recommend two starch options for this recipe. The first is potato starch. Don’t use potato flour, which is cooked, dried, and ground from whole potatoes. Potato starch is a fine white powder that just contains the starches, whereas potato flour contains all the components of the potato, including proteins, fiber, fats, etc. Your country may have different terminology, so double-check your labels.
You can also use sweet rice flour (Mochiko is great), but because it has a slightly stronger gelling capability than potato starch, we need to use half the amount specified in the recipe. For example, if your recipe calls for “28g (4 tablespoons) of potato starch,” then you will add 14 grams of sweet rice flour and 14 grams of the cake flour you used. You have to use weight conversions for this because the volumetric conversions for potato starch and rice flour are not equivalent.
Don’t use cornstarch; I used to have it in my chiffons, but after thorough experimentation, I’ve found it's probably the worst starch to put in a cake because it causes retrogradation, resulting in a grainy, stale-feeling texture.
⟡Heavy creams with a fat content of 36% or higher work best for whipped cream frostings. In the US, these are typically labeled “heavy cream” or “heavy whipping cream.” Some heavy creams also contain hydrocolloids, such as carageenan. These stabilizers prevent water leakage after whipping and provide sturdiness to the final cream. These are excellent heavy creams for whipped-cream frostings if you can find them.
⟡⟡Whip It or Sahnesteif is a starch-based stabilizer (buy on Amazon, here). It’s a fine white powder that thickens the excess water in whipped cream, stabilizing it to a firmer consistency and reducing the leakage that normally occurs without stabilizers. Feel free not to use any stabilizers at all if you’re comfortable with whipped cream by itself, or use one of my other methods, which you can find in my Whipped Cream Stabilizing Guide here.
.avif)
.avif)

Got room for more dessert?
Subscribe to my Crumby Data newsletter! I share behind-the-scenes looks at recipe development, flavor testing for the Cakeculator, and life as a content creator. It’s free, lands in your inbox every few weeks, and you can unsubscribe anytime...no strings attached :)
Feel free to take a look at previous newsletters here!
.ico)
