
.avif)
Whipped Cream: The Ultimate Guide + Recipe


Whipped Cream has a lightly sweet flavor and ethereally light texture that complements so many things in the dessert world. And while whipped cream is relatively easy to make, the technique does have some nuance. In this guide, we’ll walk through everything you need to know, from the science of whipped cream ingredients to the logic behind the mixing method so that you can make perfect whipped cream every time.
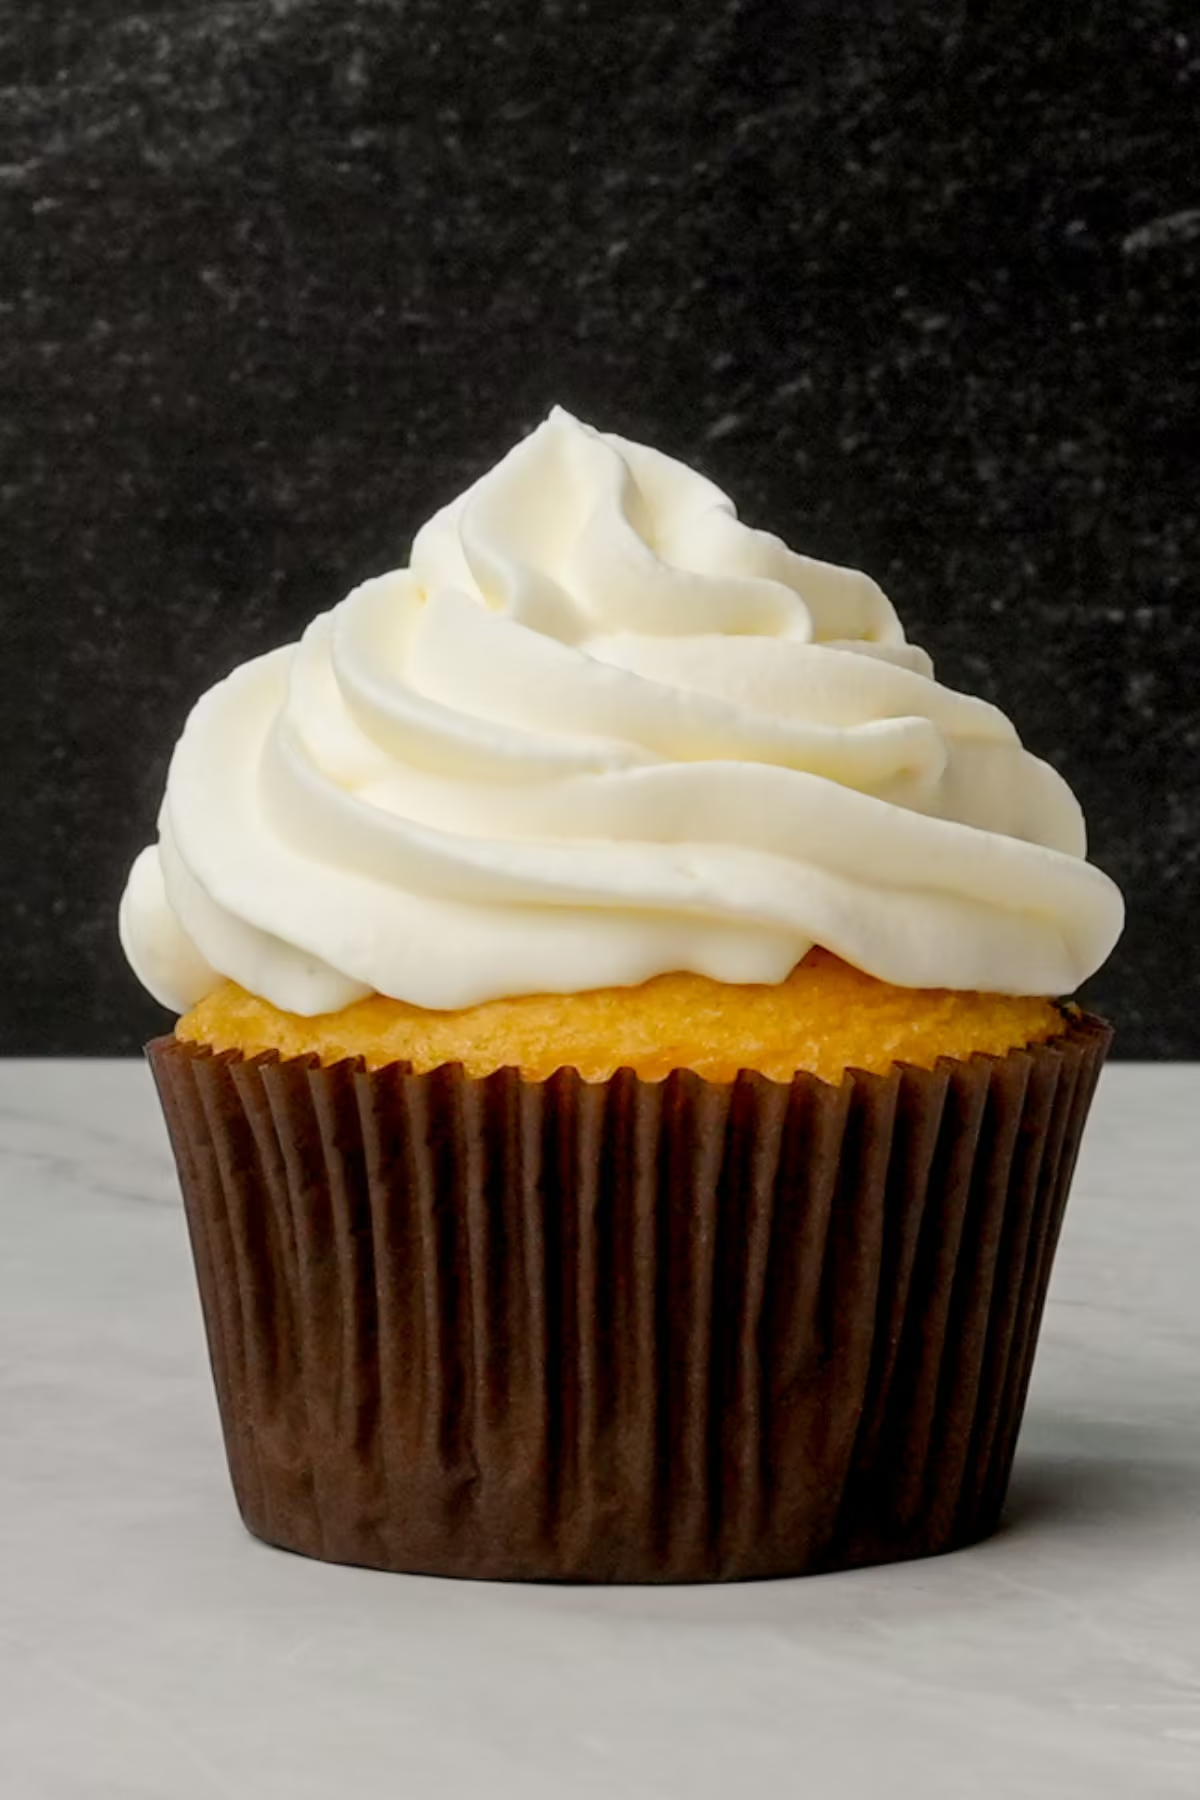
Welcome to the parent recipe for all other whipped cream recipes on my site. This guide includes all the background knowledge and techniques required to make all its child recipes, including the stabilized versions.
As written in the recipe card below, this recipe is ideal for any dessert that requires an unstructured topping, such as one-layer cakes, cheesecakes, pound cakes, and pies, or for light piping, as seen in the cupcake above. It can also help aerate various desserts when folded into things like mousses, pastry creams, puddings, and cake batters.
For more demanding applications (such as frostings and cake fillings) where the final structure of the whipped cream needs to stay intact, I highly recommend stabilizing it. I’ve researched 12 different methods and compiled them into a comprehensive guide. Heads up, though: my guide will direct you back here to get your bearings on whipped cream basics first, so I suggest reading this one and then moving over to the guide to make your selection.
If you don’t need any additional stabilization, you’ll be all set with this recipe. Let’s get started!
What is whipped cream?
At its core, whipped cream is a <span class="def-term" data-term="foam">foam</span> created by whipping heavy cream and incorporating air. And to understand how this process works, we have to back up for a second and go over the anatomy of the main ingredient: heavy cream.
Cream is an <span class="def-term" data-term="oil-in-water-emulsion">oil-in-water emulsion</span>, where milkfat droplets (commonly referred to as “fat globules" or just “<span class="def-term" data-term="globule">globules</span>”) are dispersed throughout the water. As you move from dairy-based milks (containing 1, 2, or 3.5% milkfat) all the way up to dairy-based creams, the percentage of the milkfat floating around in the water increases.
Once you have enough milkfat and reach “cream territory” (or greater than 16%), you can make a milkfat-supported foam. And that’s because the milkfat plays a significant role in how the oil-in-water emulsion transforms into a foam, or whipped cream.
There are many ways to incorporate air or aerate heavy cream. Popular ways include using a hand (or stand) mixer fitted with a whisk attachment, a blender or food processor, a whipped cream canister charged with N₂O, or even a hand whisk and your arm if you have the patience. And what all of these things have in common is that they are vigorously mixing such that they essentially use force to disrupt the protective membrane surrounding the milkfat globules. This mixing also pulls in air bubbles into the cream. (A whipped cream canister works a little differently because the gas is incorporated under pressure rather than mechanically whipped into the cream.)
As we continue to mix and break apart enough milkfat globules in our cream, they'll want to reattach to each other. And they do this in a way that specifically surrounds the air bubbles.
.avif)
In the cartoon above, you’ll see all the blue air bubbles, varying in size. The gray background represents water, which encases other things like sugars, proteins, extra nutrients, and some intact milkfat globules, since not all of them are disrupted during whipping. (in yellow).
The disrupted milkfats (orange) migrate to the air bubbles, where they partially clump together and form a network that supports the foam. They do this largely because fat and water don’t like to mix. Whipping breaks open the fat globules and exposes more of that fat, which then moves toward the air bubbles where it can avoid the surrounding water.
How long and how vigorously you whip will affect the final texture of your whipped cream.
💡TIP: Decide now what texture you’re aiming for, and my instructions will tell you exactly when to stop to achieve it.
Use this graphic to figure out which texture is best for your dessert:
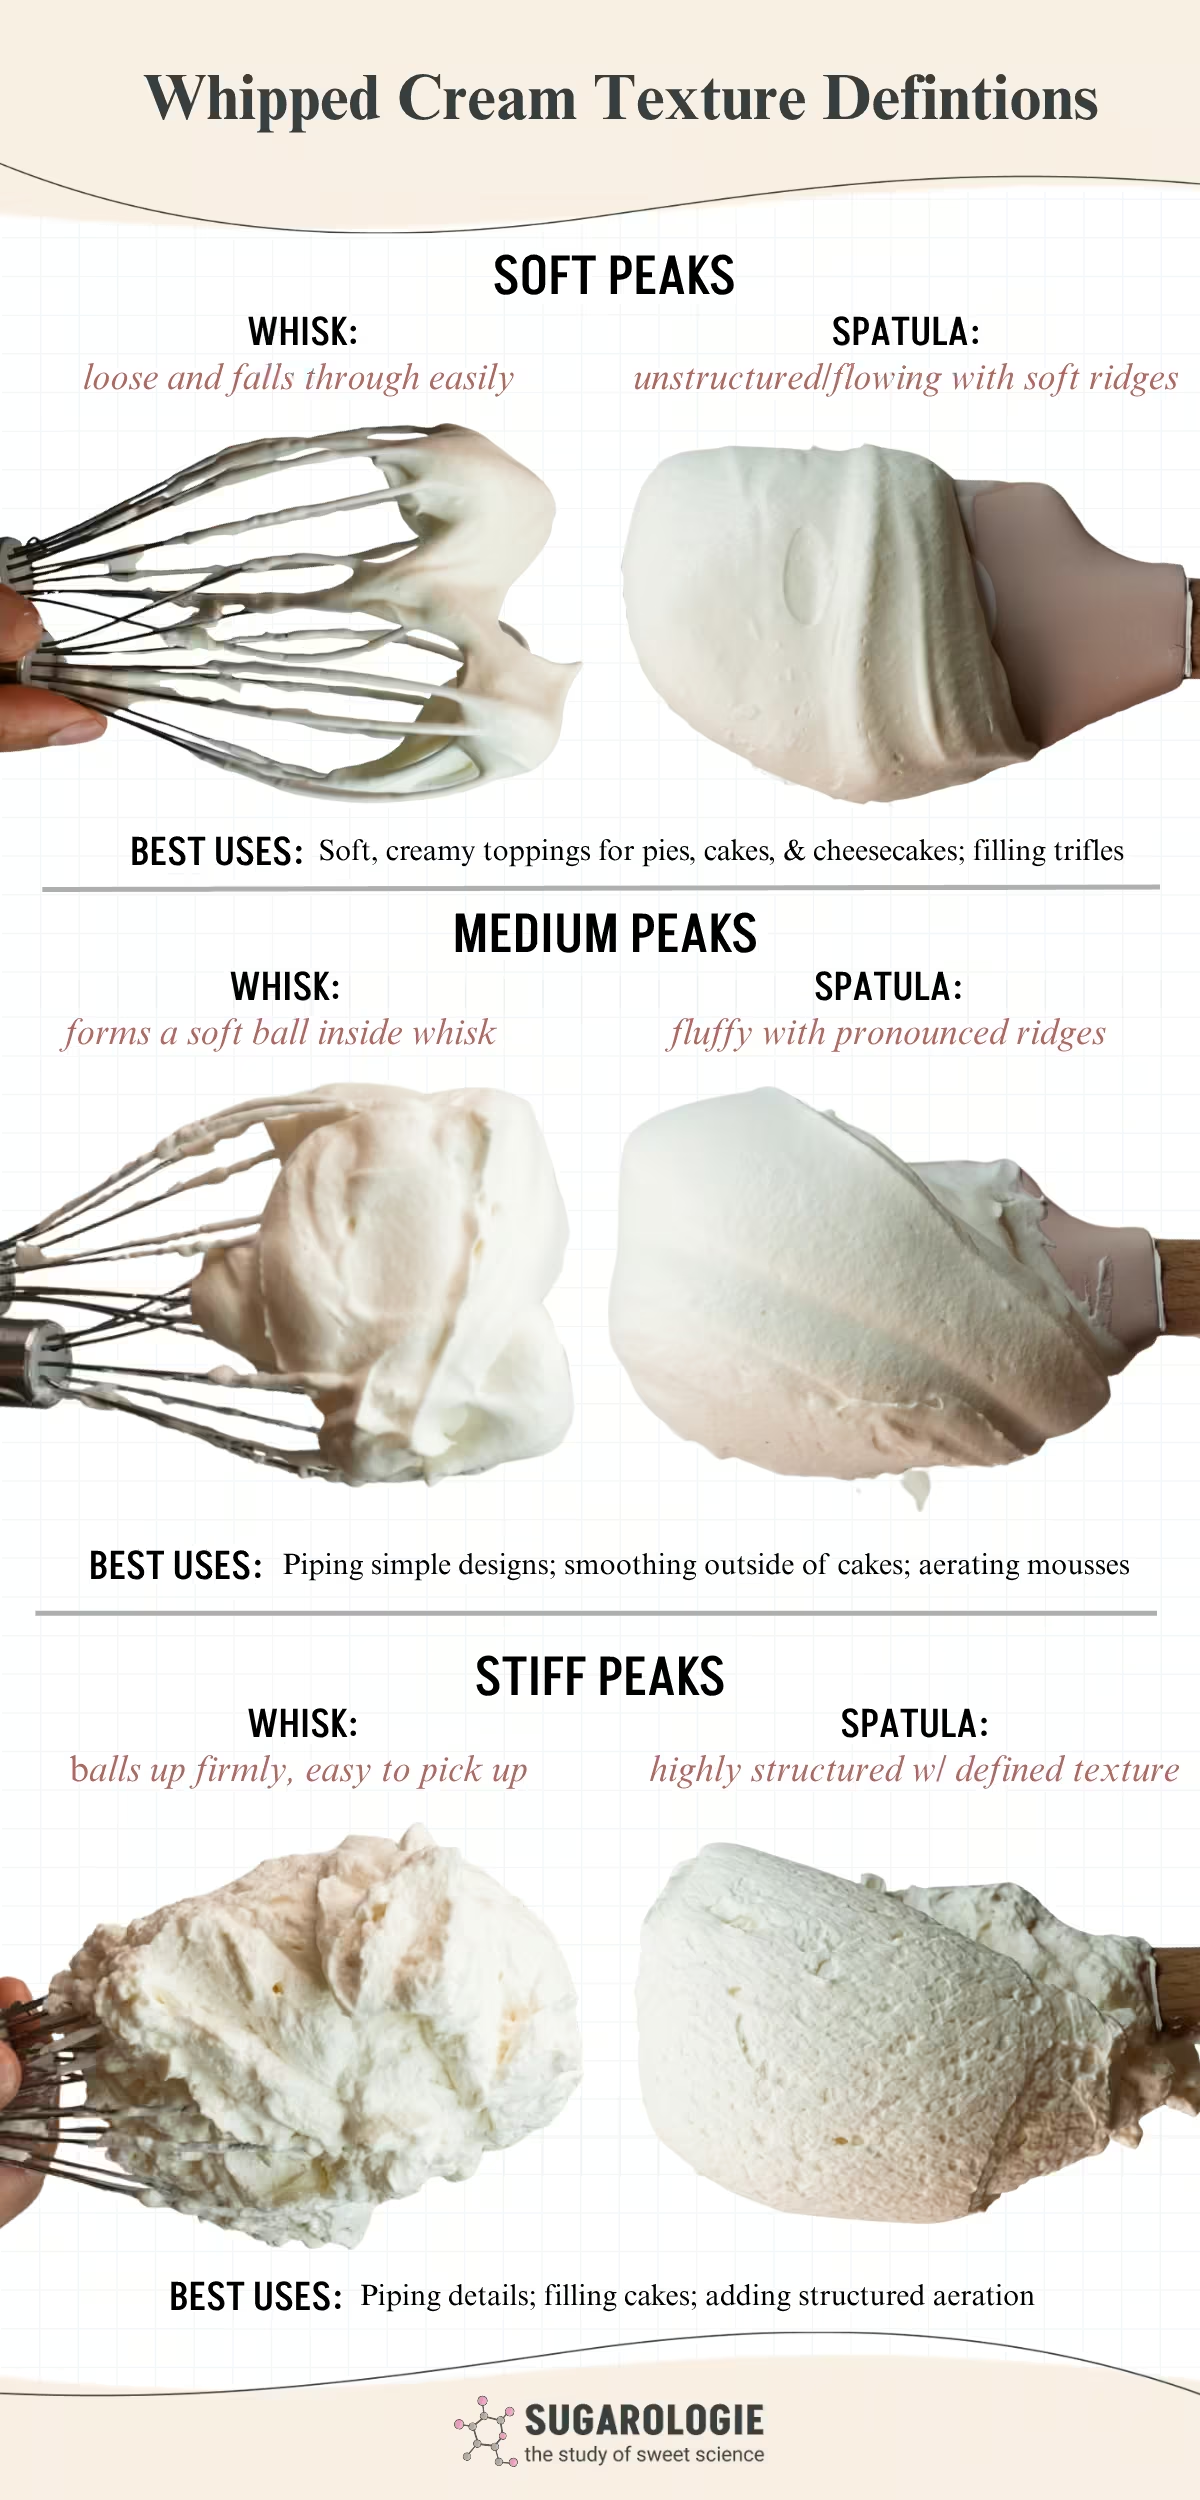
Another way we can control how well whipped cream whips up is by how much milkfat it has.
What cream is best for making whipped cream?
You can buy many different types of cream, with the main difference being their fat content.
I whipped up creams with varying fat contents so we can better visualize their effectiveness in aeration:
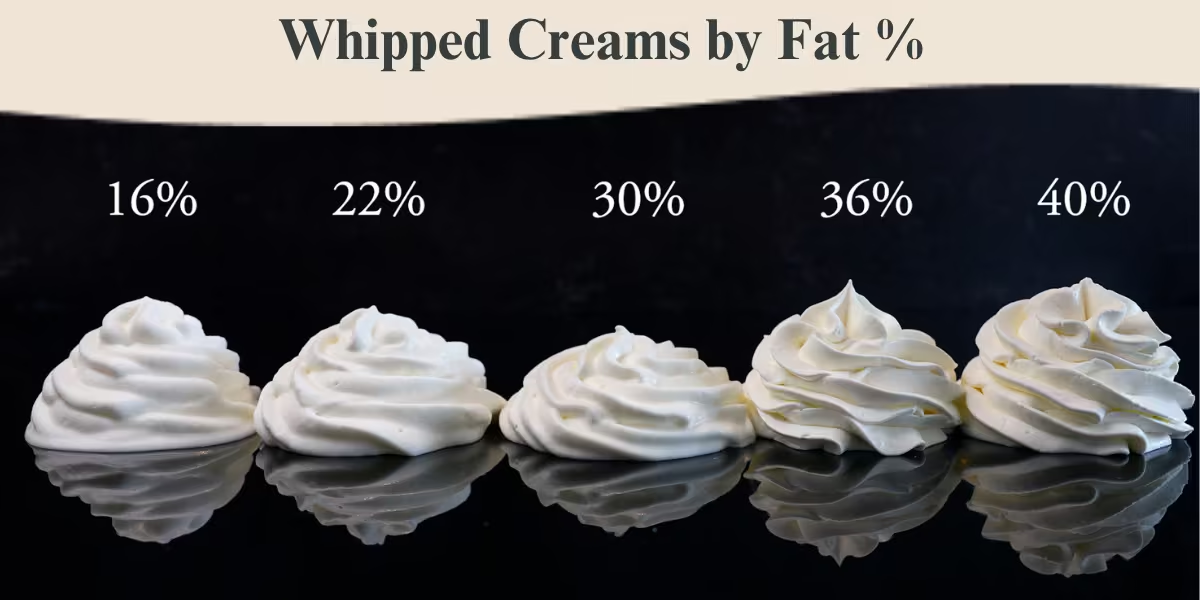
💡TIP: Creams with a higher fat content whip faster and produce a firmer whipped cream. In almost all cases, I highly recommend using a cream with a fat content above 36%.
In my photo above, you can see how the cream gets firmer as you move from low to high milkfat content. There is a slight decrease once you hit 30%, which is interesting! I think what’s happening here is a transition point between milk-protein-supported air bubbles and milkfat-supported air bubbles.
Initially, milk proteins surround and support the air bubbles. But as whipping breaks down more milkfat globules, the fats also want to gather around those bubbles and can push some of those proteins out of the way. So I wonder if the 30% is some sort of middle point. There's enough milkfat to start changing how the bubbles are supported, but not quite enough to form a strong fat network yet. The result, at least in my test, was a slightly less aerated foam.
The takeaway from this graphic is that 36% and above is best for any type of whipped cream with good aeration. I piped these swirls here from left to right, and by the time I got to 40%, the 16% cream already started deflating and leaking fluid. It simply doesn’t have enough support to hold things together.
Ok, here’s the hard part when using the right fat content for your whipped cream. Sometimes the fat content is listed on the front of the packaging, but more often, companies use naming conventions instead. These are strict labeling standards defined by the FDA, and here’s how you can decipher them:
Although I’d like to use 40% milkfat creams, they're harder to find and a bit pricier. I found mine at Smart & Final, and I know that some restaurant supply stores often carry very high-fat creams as well. However, 36% heavy whipping cream should be sufficient for probably all home-baking-based desserts. Because it's the most readily available type in the US, I used it for all my experiments on my site and will always annotate if I deviate from this. Keep in mind, though, that if you do end up using 40% heavy whipping cream, you’ll get a slight boost in aeration and stability in terms of pressure, temperature, smoothing, and piping.
US-based Whipped Cream often already contains stabilizers
Another difference between creams is that they usually already contain various stabilizers and gums in addition to the heavy cream. Dairy manufacturers do this to ensure the heavy cream doesn’t separate (into fat on top of water) and maintain their emulsion during high-heat pasteurization, and this, in turn, prolongs its shelf life.
These stabilizers added during manufacturing are important to note because they not only keep the cream in liquid form but also stabilize the final whipped cream foam we’re trying to make.
This detail matters because I will read/see claims that “whipped creams don’t need stabilizers” as they provide examples as to how theirs whips up nice and sturdy straight from the container. This is largely inaccurate, but at no fault of those making the claims. Generally, there is a lack of information provided about ingredient functionality in recipes, but we're here to remedy that! Stabilizers in general will be covered in depth in my Whipped Cream stabilization guide.
Alright, those technical bits aside, let’s get into the ingredients and methods for making whipped cream.
What ingredients will you need to make Whipped Cream?
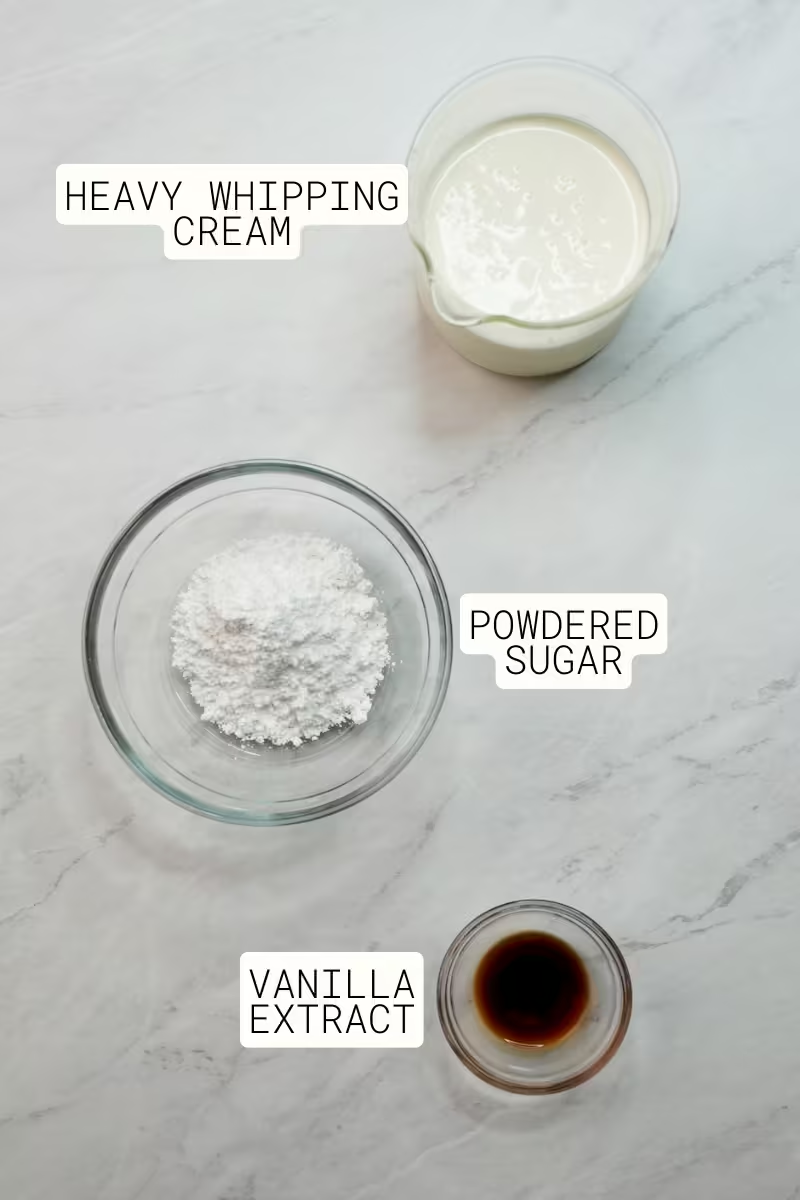
HEAVY WHIPPING CREAM is a dairy product that contains more than 36% milkfat. This provides enough milk fat to form a stable network around air bubbles as it is whipped. It’s super important to keep the cream cold, as it helps some of that fat remain partially solid, allowing the whipped cream to build structure and hold its shape. The heavy whipping cream I use for all of my demos and experiments contains 36% milkfat and carrageenan as a stabilizer.
POWDERED SUGAR should be sifted first if it is clumpy. Its fine particles dissolve quickly into the cream, which adds sweetness. Because there is far more water in the cream than sugar, it dissolves readily, creating a very dilute sugar syrup that encases the air bubbles in the whipped cream foam. You can substitute granulated sugar here, but be sure to use the weight measurements when making this swap.
VANILLA EXTRACT adds aromatic vanilla compounds that give the whipped cream a fuller, more rounded flavor.
What equipment will you need to make Whipped Cream?
There are many great ways to make whipped cream, and this recipe is applicable using the following:
HAND MIXER:
If you’re a beginner, I highly suggest using a hand mixer fitted with the whisks, if possible. I know some hand mixers only come with the paddle/flat beaters, and that will work too, but the process will take a little longer. A hand mixer is great because it offers both manual control and automatic high-speed mixing. You have to be present during the entire mixing process to hold the mixer and, in doing so, you can closely observe and feel the textural changes as they happen.
STAND MIXER:
Once you are accustomed to your whipped cream recipe or you have a good amount of experience with your stand mixer, feel free to use one. Since almost the entire process is automated, watch the texture so you don't overmix, especially when running the mixer at high speeds. Going from cold heavy cream liquid to a slightly aerated, but runny foam usually takes the longest. However, going from a slightly aerated foam to very tight, evenly mixed whipped cream happens in a much shorter time span. I always compare stand mixers to driving a car that can go very fast. Don’t reach those high speeds until you know your car and the roads (or your mixer and the recipe ;) )
MANUAL WHISK:
You can certainly use a manual hand whisk and a bowl, but this does require a bit of effort and time. Just keep whisking until you match the textures I show for each step before moving forward with the recipe.
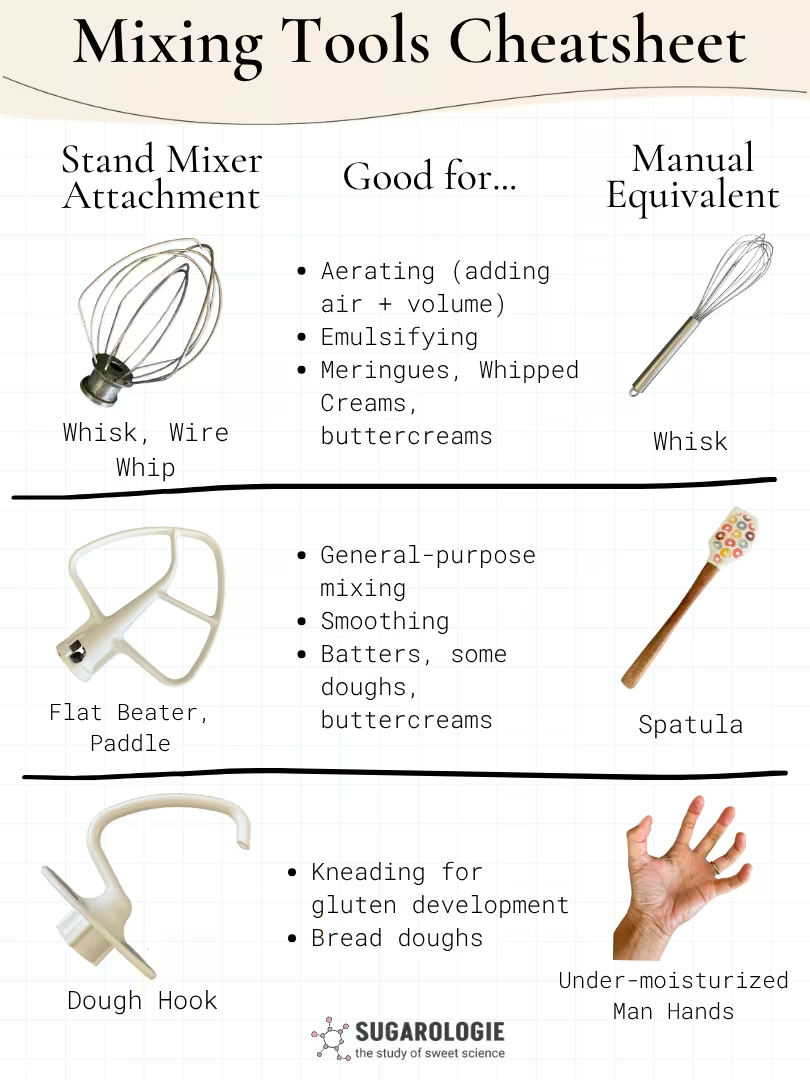
The key here is that I’m using a whisk attachment for all equipment types because it has multiple wires.
In other words, it’s the most efficient tool. However, you can make whipped cream using the flat beater/paddle attachments; it will just take a little longer. Here’s a handy dandy mixing tool cheat sheet outlining the stand mixer attachments, but they will work similarly to hand mixer attachments:
Step by step:
STEP 1 | CHILL THE MIXING BOWL AND WHISK(S).
WHY:
Keeping the equipment cold helps the milk fat in the cream stay partially solid. These semi-solid fat crystals help surround and contain the air bubbles created during whipping, giving the whipped cream a more aerated texture that is firmly supported.
HOW:
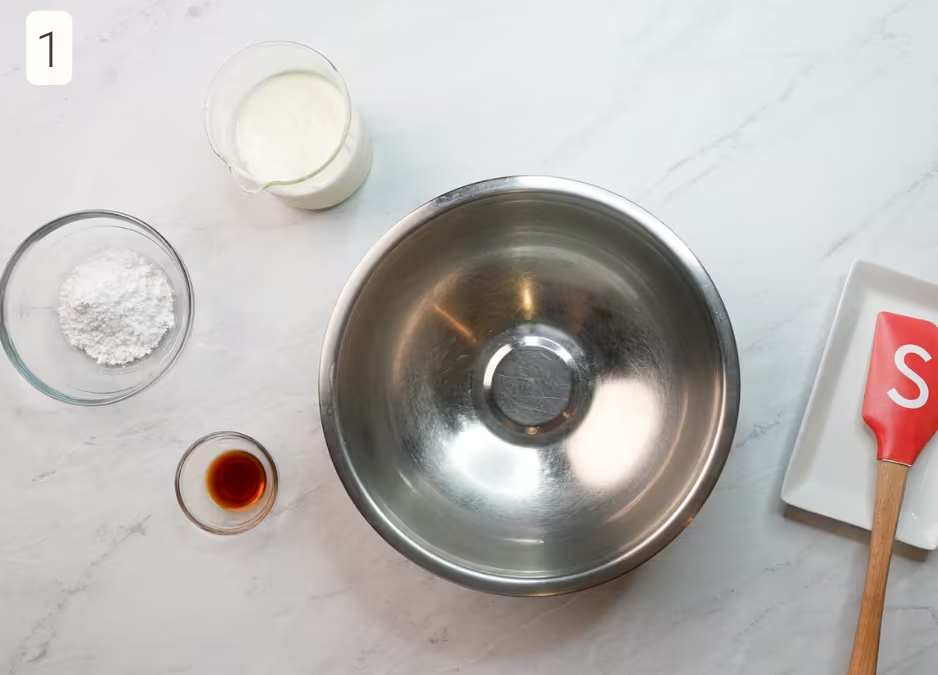
Place the mixing bowl and whisk attachment(s) in the refrigerator for about 15 minutes before whipping. I usually use a glass bowl for my demos so you can see what’s going on from various angles, but here I’m making sure to use my metal bowl. Metal cools quickly and efficiently transfers that chill to the cream, helping keep the milkfat cold while I whip.
STEP 2 | WHIP THE HEAVY CREAM TO SOFT PEAKS.
WHY:
Whipping incorporates air into the cream. You’re going to see that I’m going to move very slowly through the soft, medium, and stiff peak stages (be sure to look at my graphic in the intro section to identify your goal texture!) This is because moving from medium to stiff peaks happens very quickly, so we’re going to do our flavor adjustments early on to prevent overwhipping. Overbeating the cream is partially reversible to a certain point, and I’ll annotate potential fixes when applicable in the following steps.
Also, building liquid heavy cream to a soft peak stage typically takes the longest (aside from chilling the bowl in step 1) because it takes time and agitation to destabilize the fat globules so they can begin to surround the incorporated air.
The initial bubbling and aeration you see in this step is actually from a protein foam! Milk proteins quickly coat the newly formed air bubbles and help keep them from collapsing. As whipping continues, more milkfat globules attach to the air bubbles, displacing some of those proteins and partially coalescing with neighboring fat globules. Eventually, this fat network becomes the main structure supporting the whipped cream.
🤓 Fun Science Fact: The foam on your cappuccino is also primarily a milk-protein foam! Regular milk contains far less milkfat (about 1–3.5%) than whipping cream (about 30% and up), so there isn’t enough fat to form the extensive fat network that takes over much of the air-bubble stabilization in the same way it does in whipped cream.
HOW:
.avif)
Add the cold heavy whipping cream to the chilled bowl (2a). Using the whisk attachment, whip on medium-high speed until the cream forms very soft, loose peaks (2b).
So what are soft peaks?
.avif)
The whipped cream will be loose, yet thick (2c). It should still run off a spatula if you try to pick it up. I had a bit of trouble even picking it up on my whisk (2d).
⚠️Potential pitfall: If you have trouble whipping your heavy cream at this initial stage, the likely culprit is that your cream is too warm. The milkfat needs to be partially solid (<span class="def-term" data-term="crystalline">crystalline</span>) to build the fat network that supports the incorporated air successfully. For best results, keep your cream below about 50°F /10°C while whipping. If it’s gotten too warm, place the bowl of cream back in the fridge (US fridges are commonly set at or below 40°F/4°C) until both the bowl and cream are thoroughly chilled.
STEP 3 | FLAVOR WITH SUGAR AND VANILLA.
WHY:
The powdered sugar will sweeten the cream, while the vanilla adds flavor. Do this right after you reach soft peaks, because you may want to stop mixing here if you prefer a lighter cream.
HOW:
.avif)
Add the sugar and vanilla and whisk on low speed or use a spatula to stir (3a, b). The purpose here is not to create firmness, but rather just flavor your whipped cream. Taste and add more sugar if needed. If your goal was a whipped cream with soft peaks, STOP HERE.
STEP 4 | ADJUST THE FINAL TEXTURE.
WHY:
For medium or firm peaks, continue mixing until you reach the desired consistency.
Pay close attention if you’re going for firm peaks, because I find there’s a small gap between firm peaks and super firm, which can look a bit textured and clumpy. However, going from super firm to irreversible butter clumps takes a pretty long time with a hand mixer. It’s still possible, as you can see with the last picture, and in this case you’ve done a phase inversion (congratulations? ;) ) and turned an oil-in-water emulsion into the beginning phases of a water-in-oil emulsion.
In this case, otherwise known as homemade butter! You’ll need to start over if you’ve done this, but don’t throw your homemade butter away! I haven't made a tutorial on this yet, but I often use it for frosting, or you can wash it and go the homemade butter route. (I like Chef Jean-Pierre’s demo on this the best.)
HOW:
.avif)
If you prefer whipped cream with medium peaks, whisk on medium speed until it has an aerated, soft structure that holds on a spatula (4a) and forms balls inside the whisk (4b). STOP HERE for medium peaks.
.avif)
If you prefer whipped cream with firm peaks, continue whisking until the cream thickens. This happens pretty quickly, so when I’m using a mixer (hand or stand), I remove the attachment and do this manually. I have complete control over the process and can assess it visually and by how thick the cream feels as I slowly whisk.
.avif)
When you’re done, the stiff or firm peak whipped cream will ball up tightly inside the whisk (4e). It will feel much thicker when you try to scoop it with a spatula and may even have a rough surface (4f).
.avif)
If you don’t like how firm your whipped cream is, add a splash of heavy cream (4g) and mix with a spatula until you like the consistency (4h). This will help the texture get a little softer and smoother, but it’s hard to get back to a soft-peak, smooth consistency once you’ve gone too far. This is why I stress moving through this process slowly the first few times: it is hard to go back, but very easy to overdo it.
Speaking of overdoing it….
.avif)
⚠️Potential pitfall: Overwhipping heavy cream causes the milkfats to stick together so firmly that they start expelling all the buttermilk from the foam (4i). Eventually you’ll get yellow-orange fat clusters. Once you get to this point, it is nearly impossible to reverse. In this case, you will have to start over.
Make Ahead and Storage Tips
I typically do not make whipped cream ahead of time, especially if I haven’t added a stabilizer. Even with some stabilizers, whipped cream is not an inherently long-lasting foam. Over time, the water surrounding the air bubbles will drain, causing the foam to collapse a bit.
Fortunately, whipped cream is relatively quick to make, so I’ll often prepare it right before adding it to a dessert, such as a cheesecake.
If I’m using whipped cream as a cake frosting, I’ll make it right before I need it, frost and pipe the cake, and then place the finished cake in the fridge. Keeping whipped cream cold helps maintain its structure because more of the milkfat remains solid, and if you’ve gotten this far in my guide, you’ll know that it helps support the fat network around the air bubbles. :)
Refrigeration is also important for food safety. It’s recommended that whipped cream and desserts containing whipped cream should generally be refrigerated within 2 hours at room temperature (or 1 hour if the temperature is above 90°F/32°C). If it’s cool in my house, and the cake has been chilled thoroughly, I’m comfortable leaving it out for a few hours.
Did you know that you can create your own frosting or cake recipe with my Vanilla Whipped Cream Frosting?
I have a tool for you to try called the Cakeculator, which lets you customize cake flavors and pan sizes, and use this frosting to make a custom cake! I will list 3- and 4 ½-cup recipes for this buttercream in the recipe card below, but you can choose other frosting sizes using the Cakeculator.
Some ideas to get you started:
- 2 ¼ cup recipe for Vanilla Whipped Cream (enough to generously top a 9-inch pie or cheesecake)
- Vanilla Chiffon Cake with Vanilla Whipped Cream (8-inch, 1 layer cake - bake a cake, top with cream and pile on with any fruit)
Video
Honors Members Section
This extra material is accessible to Sugarologie Honors members.
Become a member to view extended research notes, technique analysis, and supplemental materials! Learn more about Sugarologie Honors here.
Already a member?
Before starting the recipe, please read this!
Measure by weight, if possible.
Measuring by weight is the best way for you to replicate my recipes. I develop recipes using ingredients (even liquids) measured in grams, which is why you see them listed first in the recipe cards. For measurements under 5 grams, I will typically only list the volumetric measurements (teaspoons, etc.), as most home scales are not precise for such small weights.
In most cases, I have converted grams to volumetric measurements (aka US customary units) for bakers who prefer this method. However, the measurements are not as precise and may have awkward proportions. The recipes should still work, but for the ultimate precision, try to use weight.
This is the OXO scale I use daily. I also purchased this budget version of a good scale, which I keep at my Mom’s house for baking. If you’re interested in other tools I use for my baking, I’ve compiled a list here.
Use room temperature ingredients.
All my ingredients should be used at room temperature, or 65-75 °F/18-24 °C. I will always indicate if you need something outside this range. If no details are given, room temperature is the default.
Pay attention to the ingredient descriptions.
I try not to be brand-specific, but I will always note an interesting result from a type of ingredient, be it negative or positive.
A specific note regarding salt: I use Diamond Crystal Kosher salt for everything on this site except for frostings. In frostings, you want the salt to dissolve more easily, and kosher salt tends to leave granules behind. If you substitute table salt (more finely granulated) for recipes that list kosher salt, you must use half the volume indicated in my recipes.
Substitutions are hard.
That said, substitutions aren’t impossible but can be the toughest part of recipe development. Small swaps, like reduced-fat milk (2% fat) for whole milk (3.5% fat), usually work fine. However, bigger changes—such as replacing oil with applesauce or sour cream with Greek yogurt—can significantly impact texture and density.
Be wary of general, all-purpose substitutions in baking; I find that usually there is never a one size-fits-all solution. I carefully select ingredients for my recipes, so for the best results, start with the original recipe and modify with caution.
Read all the recipe instructions before beginning.
I’m in the “Pre-read the Chapter before Class Lecture” club... and I invite you to join! Baking new recipes can be intimidating, so let’s set you up for success. I want you to think about timeframes. Most fillings and frostings can be made ahead of time, and give you an extra day for mental space. Also, as you become a more proficient baker, you can anticipate and recognize steps. (“Oh, this has a meringue step, so I’ll need an extra clean bowl…” etc.) Ensure you go down the ingredient list and have everything at the right temperature.
.avif)
.avif)
.png)

Vanilla Whipped Cream
- 357 g (1 ½ cups) heavy whipping cream*, very cold
- 30 g (¼ cup) powdered sugar**, sifted if clumpy
- 1 teaspoon vanilla extract
For larger quantities or to pair with a cake recipe, go to my Cakeculator and choose “Vanilla Whipped Cream Frosting.”
- 357 g (1 ½ cups) heavy whipping cream*, very cold
- 30 g (¼ cup) powdered sugar**, sifted if clumpy
- 1 teaspoon vanilla extract
For larger quantities or to pair with a cake recipe, go to my Cakeculator and choose “Vanilla Whipped Cream Frosting.”
- 536 g (2 ¼ cups) heavy whipping cream*, very cold
- 45 g (⅓ cup) powdered sugar**, sifted if clumpy
- 1 ½ teaspoons vanilla extract
For larger quantities or to pair with a cake recipe, go to my Cakeculator and choose “Vanilla Whipped Cream Frosting.”
- Chill the mixing bowl.
Place your mixing bowl and whisk attachment(s) in the freezer for about 15 minutes. - Whip heavy cream to soft peak stage.
Add the cold heavy whipping cream to the chilled bowl and, using the whisk attachment, mix on medium speed until it forms a very soft, loose peak. - Flavor the whipped cream.
Add the powdered sugar and vanilla extract. Mix on very low speed or use a spatula to mix in. Taste and add more sugar if needed.
For soft-peak/loosely structured whipped cream: stop here and use immediately. - Whip for a firmer texture (optional).
For a medium-peak whipped cream:
Mix the whipped cream on medium speed until it forms soft peaks inside the whisk. When you lift the whipped cream, it should not flow off the spatula.
For a stiff-peak whipped cream:
I like to do this last adjustment manually by removing the whisk attachment(s) and using the attachment(s) to mix until I like how the whipped cream feels and looks. It’s reached a stiff peak stage when the whipped cream balls up firmly inside the whisk. When picked up with a spatula, the texture should be highly structured and perhaps even a bit textured from the clumped milkfats. You can also do this adjustment with a mixer, but watch as it goes from medium peak to stiff peaks very quickly.
Conversely, if the cream becomes overly grainy or too thick for your liking, add a splash of heavy cream and gently stir until the smooth texture returns. You may need to add a bit of cream to reach your preferred texture, and there’s also a limit to how far back to softness you can go. Because the fat may have stuck together too much, you may not be able to achieve anything less than a medium-firm texture without losing too much body.
Overwhipping: If you see distinct butter-like curds forming and liquid separating from the cream, the fat has begun to undergo phase inversion and is on its way to becoming butter. At this point, it's nearly impossible to fix. You’ll very likely have to start the process over again.

Recipe Card - Adriana's Notes
*You can buy different types of cream, with the main difference being their milkfat content. Sometimes the percentage is listed on the packaging (e.g., 36% milkfat), but more often, companies use different names instead. In the US, the best options for frosting are labeled “heavy whipping cream” or sometimes just “heavy cream.” Both contain at least 36% milkfat, as required by U.S. labeling regulations, which helps produce a more stable whipped cream.
**You can substitute white granulated sugar for powdered sugar; just use the weight measurement to add the equivalent amount. You can also use more sugar if you prefer a sweeter whipped cream. I’ve provided a lower-end sugar amount, so taste after adding it and increase as needed.
.avif)

Got room for more dessert?
Subscribe to my Crumby Data newsletter! I share behind-the-scenes looks at recipe development, flavor testing for the Cakeculator, and life as a content creator. It’s free, lands in your inbox every few weeks, and you can unsubscribe anytime...no strings attached :)
Feel free to take a look at previous newsletters here!

.ico)
.avif)