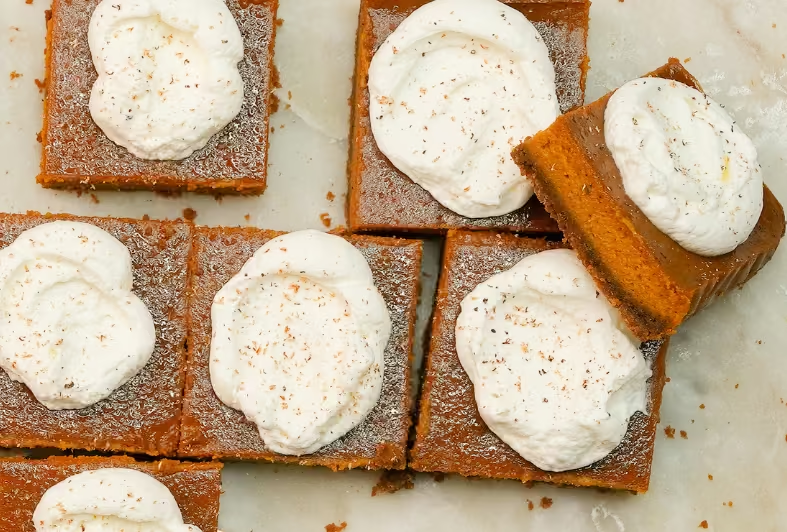

Dulce de Leche Pumpkin Pie Bars with Biscoff Crust


My pumpkin pie bars have dulce de leche and pumpkin baked into a soft, creamy, spiced custard. This sits atop an easy-to-make Biscoff cookie crust with the perfect crust-to-filling ratio for a handheld dessert. Top it with some nutmeg-dusted whipped cream, and you’ve got the perfect Fall bar.
This recipe is an easier adaptation of my super flavorful Pumpkin Pie recipe, which also features a dulce de leche pumpkin custard baked in a Biscoff cookie crust. In that recipe, the custard-to-crust ratio is much higher because it's a thick pie, and this one features a thinner, slightly firmer (though still quite creamy) custard layer so you can eat the slices as bars.
When developing this recipe, I focused on a few things to streamline this for beginners:
- No extra steam bath for the oven; because the bars are thinner, they are not as delicate as the thicker pie version.
- No special equipment: No food processor or stand mixer? No problem! You can of course use those if you want but all really you need is a stove, a bowl + whisk, and a pan.
- Easy-to-buy ingredients with minimal leftovers: for instance, if you make the 9x13 pan, you’ll need one whole can of pumpkin puree, one standard pack of Biscoff cookies, and most of a can of dulce de leche. The rest are pretty standard ingredients: eggs, butter, flour, spices, with the outlier being the milk powder, but that’s totally optional.
- Faster bake-to-eating time :) Because these are bars, you just need 30 minutes of cooling in the oven after baking, then 2 hours of cooling in the refrigerator for the custard to set.
- Perfect make-ahead dessert for parties: Save yourself the time and effort by making this ahead of time if you need to. In fact, just like a good curry or stew, the spices intensify the next day. Bake everything as directed, then during the final cooling step in the refrigerator, cover your bars with a layer of oiled plastic wrap. This will ensure that you don’t mess up the surface of your bars and protects them from potential odors in the fridge. Add the whipped cream right before serving.
What is the flavor and texture of my Sugarologie Pumpkin Bars?
These pumpkin pie bars taste first of a sweet, spicy pumpkin with the milky, toasted flavor of dulce de leche. The <span class="def-term" data-term="maillard-reaction">Maillard reaction</span> is a powerful flavor intensifier that adds deep roasted flavors, and we use it in two ways in these bars: in the dulce de leche and by making brown butter. We then toast the spices in said brown butter to intensify the spice flavor even further.
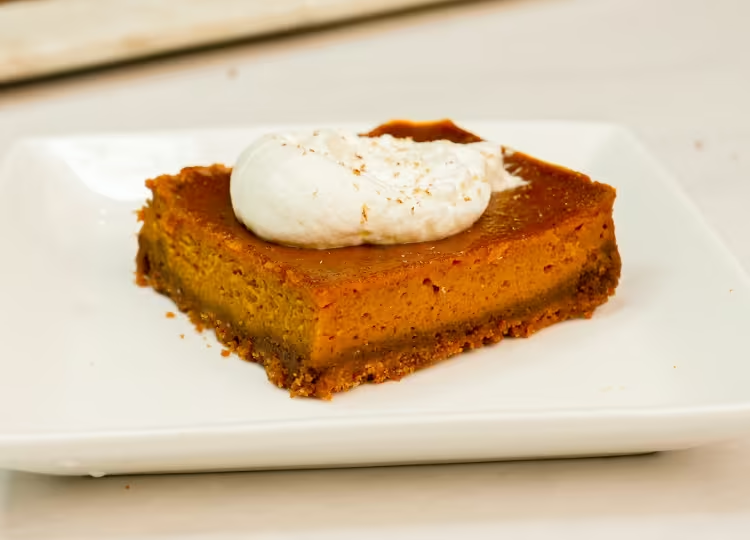
Texture-wise, the custard sets up smooth and creamy-soft, almost like a softened cream cheese. The Biscoff Crust is pre-baked before baking the custard, and it's slightly soft where it touches the custard and firm and cookie-like near the bottom. This gives the pumpkin bars their portability, should you need to eat these by hand!
What ingredients are needed to make my Pumpkin Pie Bars?
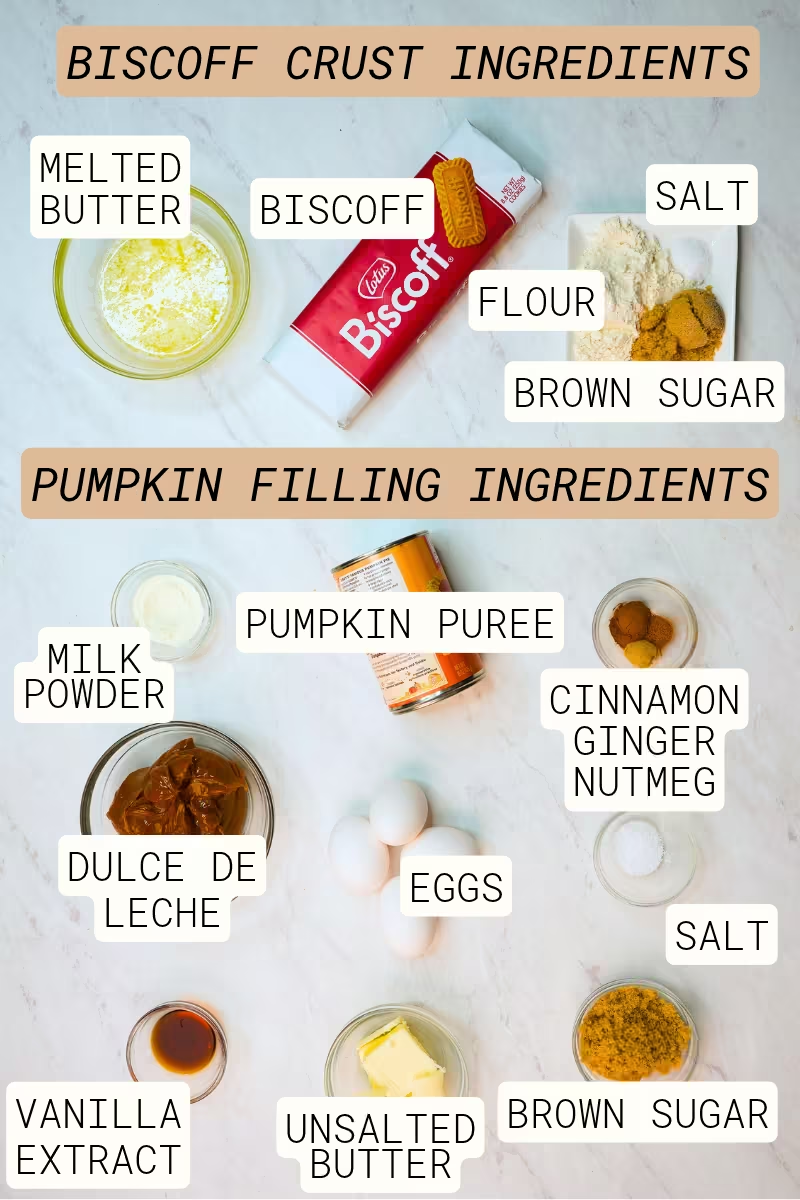
BISCOFF COOKIES are crisp, caramelized biscuits with a warm, spiced flavor. You can substitute an equal amount of graham crackers (by weight), but the Biscoff cookies add wonderful spice and brown-sugar notes to the crust that pair well with pumpkin desserts.
UNSALTED BUTTER is used in two areas of this recipe. First, it coats the cookie crumbs and flour, helping them stick together. As the crust cools, the butterfat solidifies, creating a firmer structure that holds its shape when sliced.
The second addition of butter goes into the custard and is browned, or melted until the milk solids toast. It also toasts the spices.
ALL-PURPOSE FLOUR is also used in two parts of this recipe. First, it helps bind the cookie crumbs and adds structure to the crust. Second, it's optional: use it when you substitute sweetened condensed milk for dulce de leche, and it adds a bit of structure to the baked custard.
BROWN SUGAR adds sweetness and a subtle molasses flavor that complements the pumpkin pie in both the crust and the custard.
KOSHER SALT balances the cookies' sweetness and brown sugar while enhancing their warm, caramelized flavors.
MILK POWDER is made by removing most of the water from milk, leaving behind concentrated milk proteins, sugars, and minerals. We add it to the browned butter to increase the milk solids available for toasting, giving the final pumpkin pie an even richer, toasted milk flavor.
GROUND CINNAMON, GINGER, & NUTMEG are my trinity of warm Fall spices. You’ll see me use this trio often in my holiday recipes. The ratio I usually go by is 1/0.5/0.25 teaspoons of cinnamon/ginger/nutmeg. This combination imparts a warm, sweet, woody aroma that complements the pumpkin and caramel notes of the dulce de leche. If you can get whole nutmeg and a microplane grater, it’s like night and day for the perfumed aromas it brings. I also use it on top of these bars, although you could definitely do the same with cinnamon if you like.
PURE CANNED PUMPKIN provides the base of the filling, contributing moisture and sweetness. Make sure you buy pure pumpkin puree, not “Pumpkin Pie Mix,” which contains extra sugar and spices we don’t need.
DULCE DE LECHE is made by slowly heating sweetened milk until it develops a thick consistency and deep caramel-like flavor. During heating, milk proteins and sugars undergo the <span class="def-term" data-term="maillard-reaction">Maillard reaction</span>, producing complex toasted, nutty, and caramel flavors.
EGGS provide the main structure that allows the pumpkin filling to set. As the filling heats, egg proteins unfold and bond together, forming a delicate network that traps moisture and thickens the mixture into a soft, sliceable custard.
VANILLA EXTRACT adds a sweet, fragrant aroma that complements the pumpkin spices and caramel notes. Although it contributes relatively little sweetness, its aromatic compounds make the filling taste warmer, richer, and more rounded.
For the Whipped Cream, you'll need a few ingredients that aren't pictured: Heavy Whipping Cream, Powdered Sugar, and Vanilla Extract. Typically, pie toppings don’t need reinforced structure or stabilization as cakes do. Just whip (<span class="def-term" data-term="aeration">aerate</span>) your heavy cream and it’s ready to use! You can also do this a few hours before serving; just place the whipped cream in a bowl and cover with plastic wrap. If the cream has leaked fluid, gently whisk to reincorporate before serving.
Step by step:
STEP 1 | Bake the Biscoff cookie crust.
WHY:
These bars are based on my pumpkin pie, which is a multi-component dessert. We have the crust, filling, and optionally, the whipped cream topping. Because each component sets (or, in the case of the whipped cream, is prepared) at different temperatures and therefore has different timing constraints, it’s best to focus on one thing at a time. This way, you get a toasted, firm crust, a fully set custard, and fluffy whipped cream.
To start, we’ll bake the cookie crust first. These crumb crusts are by far the easiest to make because the cookies are already baked. We’re really just reshaping the cookies so they fit nicely into the bottom of our pan, using a bit of butter and sugar to make the process easier and a bit tastier.
Let's talk about the pan. Line your baking pan if you plan to remove the pumpkin pie bars for prettier slicing. You can definitely slice in the pan, but be aware that a knife may scratch your nicer metal pan. I like to use parchment, but foil will work too.
💡TIP: You can also do this step in a food processor! In fact, you can make this whole pumpkin pie bar recipe using just a food processor. It’s an extra piece of equipment to wash, so I wanted to show how to make these bars by hand in case you don’t want to deal with that or don’t have access to a larger-style food processor.
HOW:
Choose your pan size (either 8× 8 inches or 9×13 inches) and use the corresponding ingredient quantities for the crust and filling throughout the recipe. For this demo, I'll use a 9×13-inch pan.
Preheat the oven to 350°F (180°C).
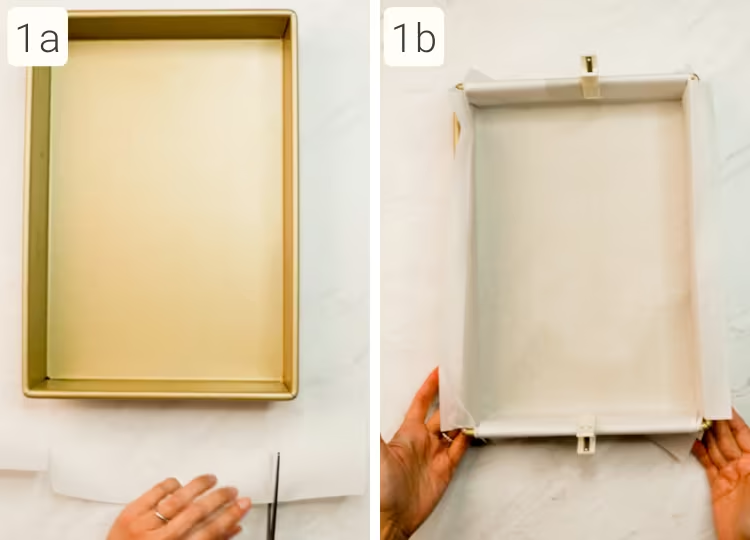
Line your baking pan with foil or parchment paper, leaving enough overhang on the sides to lift the bars out later (1a, b). Right now I have plastic clips holding the overhangs in place while I prep the crumbs, but I will remove them before baking.
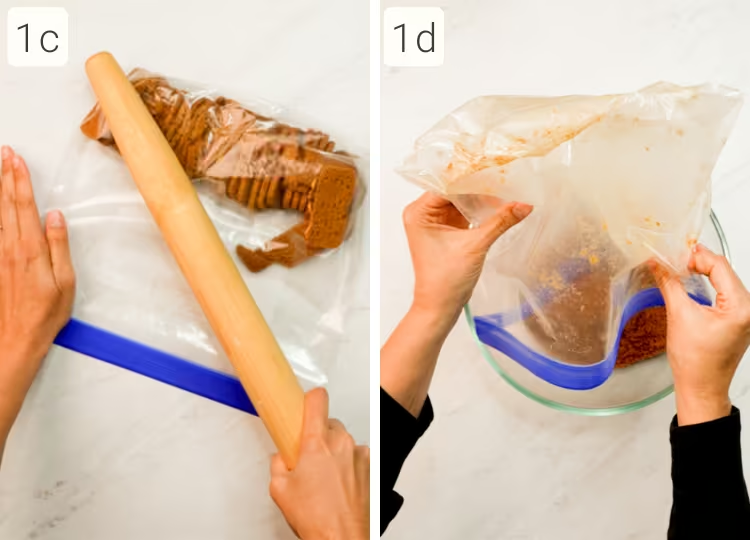
Add the Biscoff cookies to a large zip-top bag. Use a rolling pin to crush the cookies into fine, sandy crumbs (1c). Transfer the crumbs to a large mixing bowl (1d).
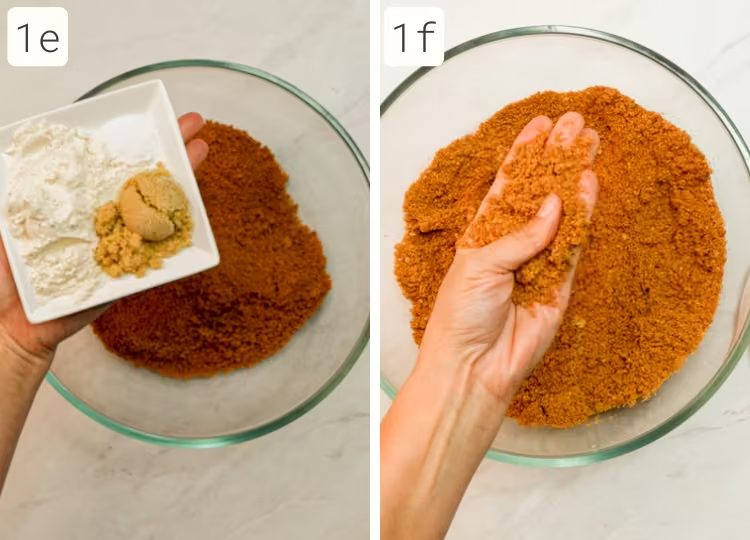
Add the flour, brown sugar, and salt, and whisk to combine (1e). The flour and sugar should be evenly distributed like this (1f).
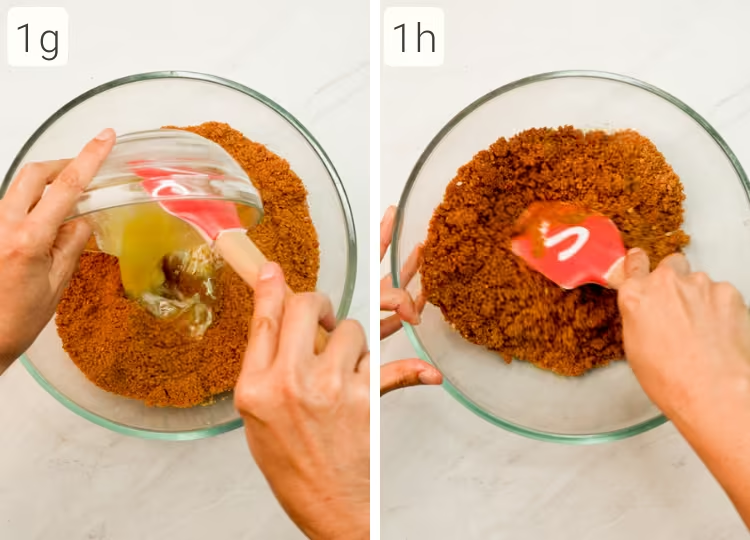
Add the melted butter (1g) and stir with a spatula until the crumbs are evenly coated (1h).
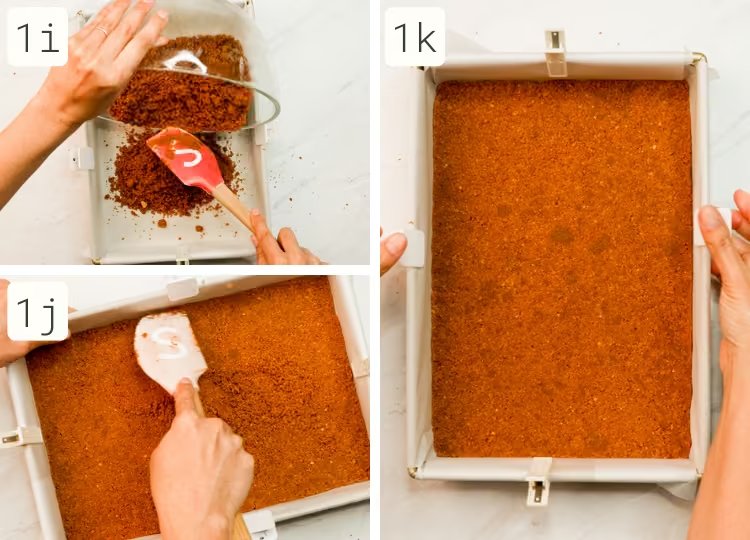
Pour the crumbs into the lined pan (1i). (Save this bowl for the next step; no need to wash it.) Use a spatula or flat-bottomed cup to press them firmly into the bottom, keeping the thickness as even as possible (1j, k).
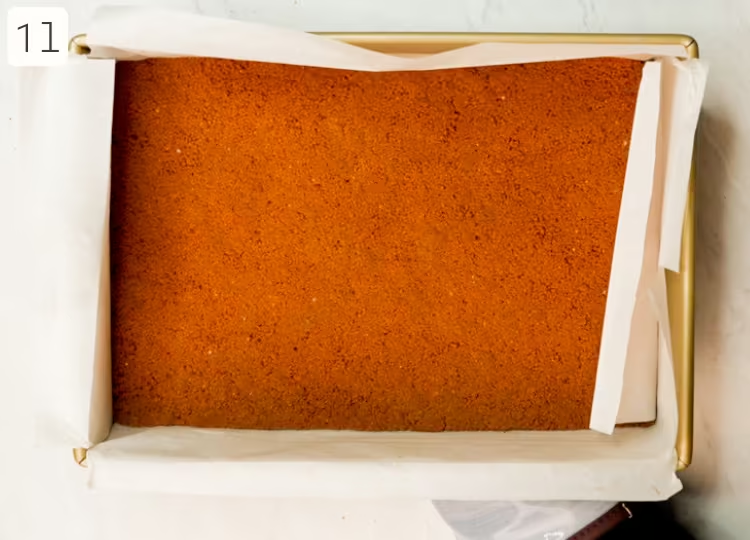
Bake for 12–15 minutes, until the crust darkens slightly and smells fragrant (1l). Set aside to cool slightly while you prepare the filling.
Reduce the oven temperature to 300°F (150°C).
STEP 2 | Make the pumpkin filling.
WHY:
The key contributors to my pumpkin filling’s deep, toasted flavor are the flavor compounds from the <span class="def-term" data-term="maillard-reaction">Maillard reaction</span>. Making dulce de leche uses this process to turn regular milk into a magical ingredient I love to work with. We’ll also add a bit of brown butter, which uses the Maillard reaction. This will also serve as the fat we roast our spices in, infusing every bite of this bar with the wonderful aromas of cinnamon, ginger, and nutmeg.
This will require us to use the stove briefly, but the payoff is well worth the extra effort. I often think about how to maximize dessert flavors, and pre-cooking my ingredients (and browning butter) is one easy way to do it.
HOW:
Measure the milk powder (if using) into a small bowl. In another bowl, combine the cinnamon, ginger, and nutmeg. Measure the pumpkin purée according to your selected pan size.
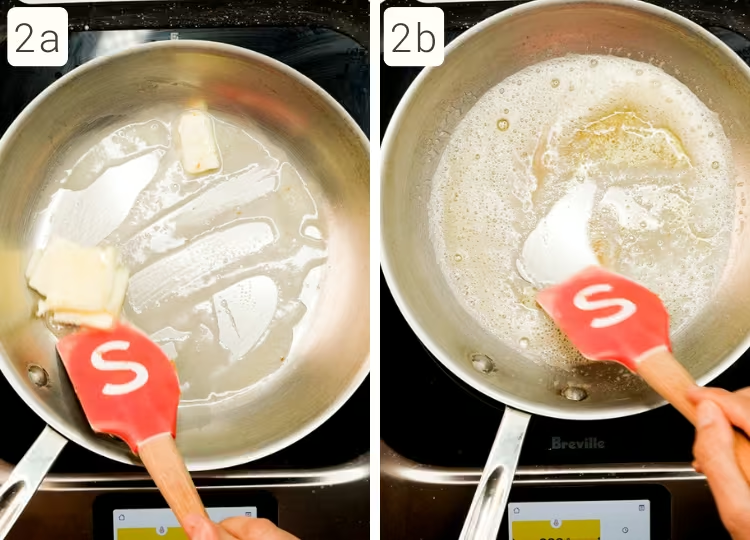
Brown the butter by melting it in a shallow pan over medium-low heat (2a), stirring constantly once the foaming subsides until medium-brown specks appear (2b).
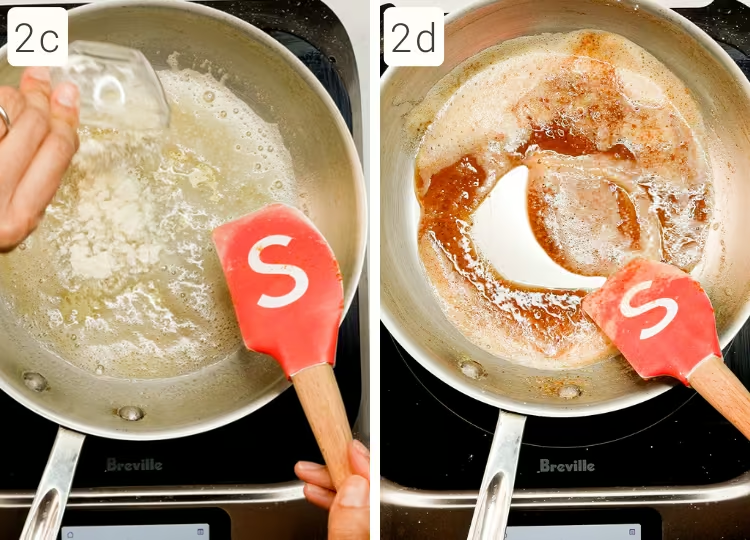
If using milk powder, remove the pan from the heat and stir it into the hot butter (2c). Return the pan to medium-low heat and stir until the milk powder turns honey-amber (2d). A few clumps are fine.
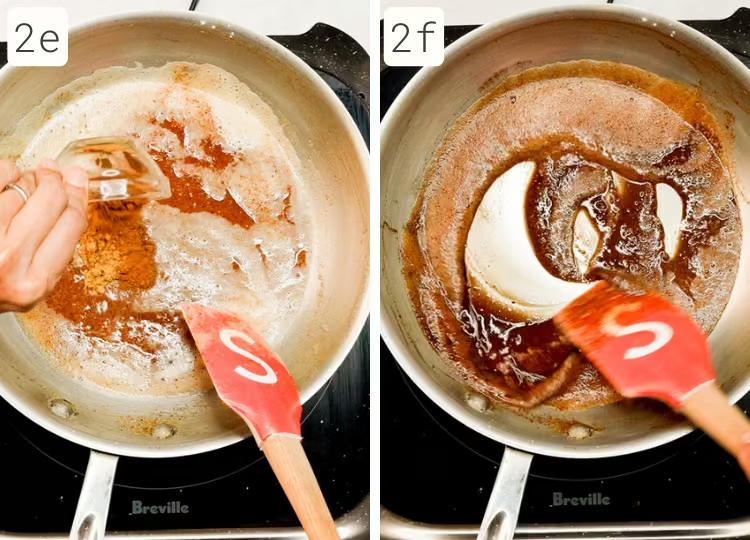
Add the spices and stir until fragrant (2e, f), about 30 seconds.
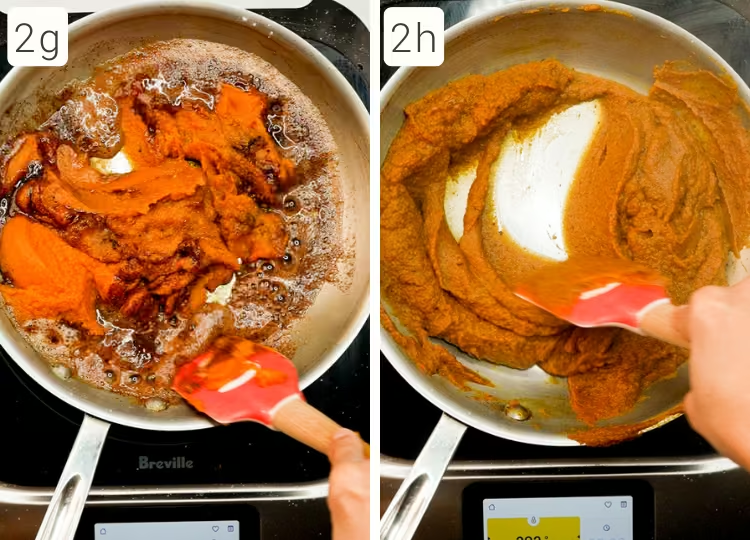
Mix in the pumpkin purée and continue stirring for another 30 seconds (2g, h).
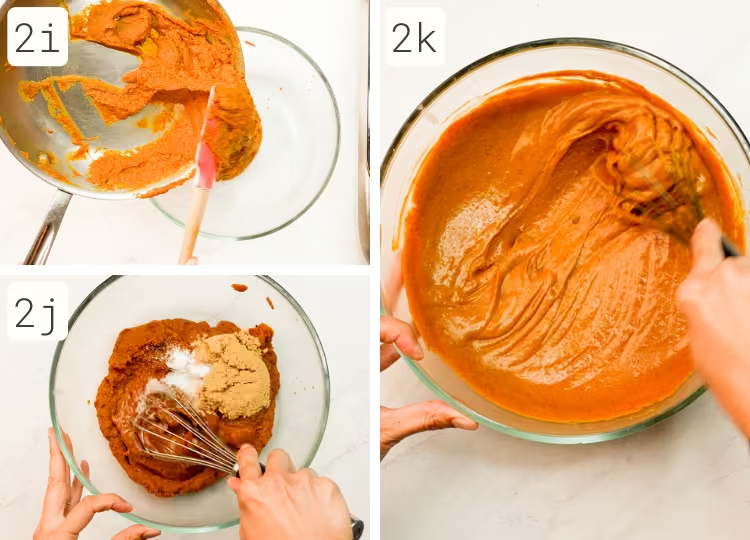
Transfer the hot pumpkin-butter paste to the large mixing bowl used for the crust (2i).
Add the brown sugar, salt, and either the dulce de leche or the sweetened condensed milk and flour, using the quantities specified for your selected filling variation and pan size (2j). Whisk until combined (2k).
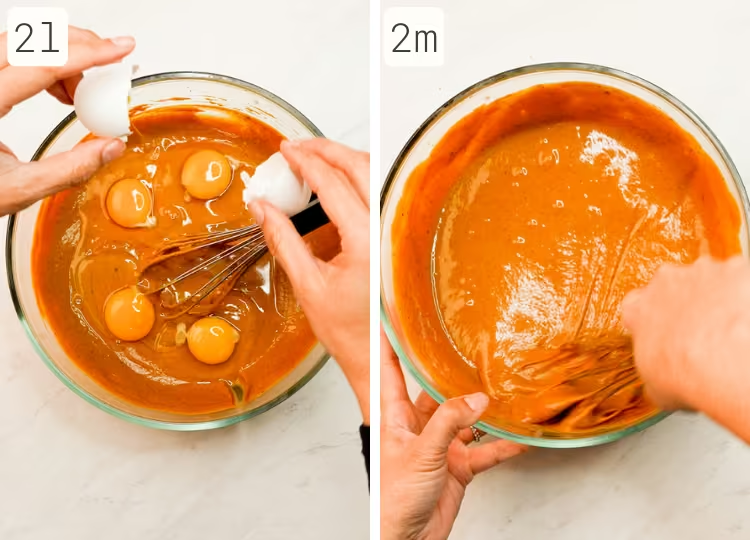
Add the cold eggs and vanilla, then whisk until completely smooth (2l,m).
💡TIP: If you’re concerned about cooking the eggs, don’t worry; the previous mixing step with the dulce de leche and brown sugar will have reduced the temperature of the cooked pumpkin puree pretty significantly. I’ve measured it, and it usually ends up around 120°F/49°C before adding the cold eggs. That’s exactly why using cold eggs matters. Eggs set around 160°F-ish, and it’s even higher when other molecules get in the way, like the extra sugars and fats we have here.
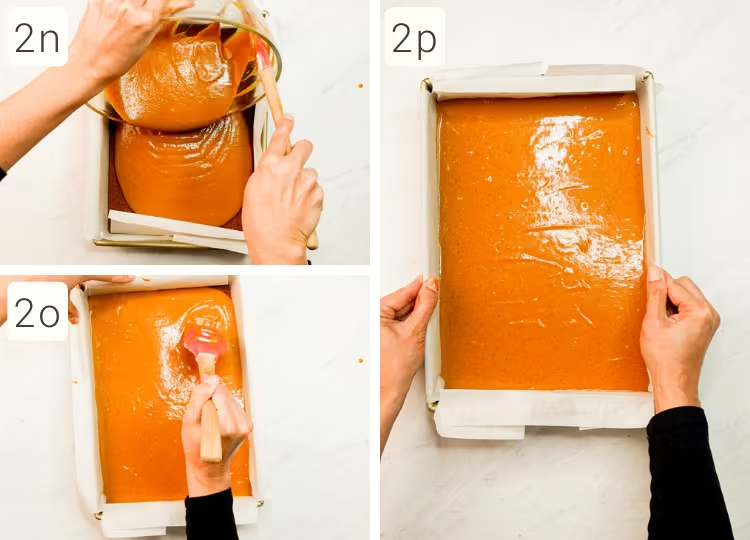
Pour the filling over the prebaked Biscoff crust (2n,o,p).
STEP 3 | Bake and cool the pumpkin pie bars.
WHY:
Pumpkin pie filling is a <span class="def-term" data-term="custard">custard</span>, and setting it sets the egg-based proteins within the watery pumpkin base. This happens as the filling heats: the egg proteins unfold and begin bonding with one another (also called <span class="def-term" data-term="coagulation">coagulation</span>), creating a delicate network that thickens and holds the pumpkin mixture in place.
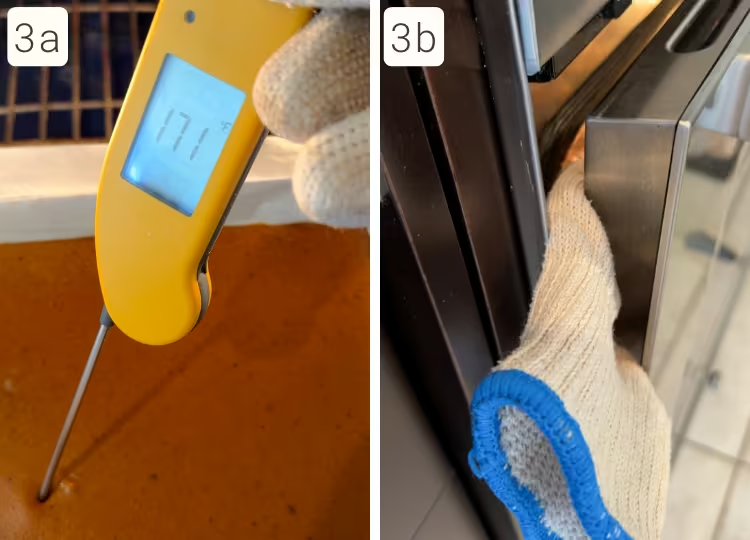
My pumpkin fillings (either in bar or pie format) are always baked at a relatively low temperature of 300°F (150°C). This lets the egg-based proteins unravel slowly and connect more gradually. As the pumpkin filling bakes, the center should reach 170–175°F (77–79°C). At this point, the custard has developed enough structure to finish setting as it cools. You don’t need a thermometer, though; you'll know it's done when the custard sets up firm.
As with most custards, cooling matters just as much as baking. As the custard cools, its structure continues to firm up. However, cooling too quickly can cause the proteins to contract unevenly, increasing the chance of cracks. Let the bars cool gradually in the turned-off oven to reduce this temperature shock.
Finally, refrigerate for at least 2 hours, as this firms the filling and makes the bars much easier to slice neatly.
HOW:
Bake the bars on the middle oven rack using the baking time for your selected pan:
8×8-inch pan: 20–25 minutes.
9×13-inch pan: 30–35 minutes.
The filling is done when it no longer moves when the pan is gently shaken. An instant-read thermometer inserted into the center should register 170–175°F (77–79°C) (3a). Turn off the oven, crack the oven door slightly, and leave the bars inside for 20-30 minutes to cool gradually (3b).
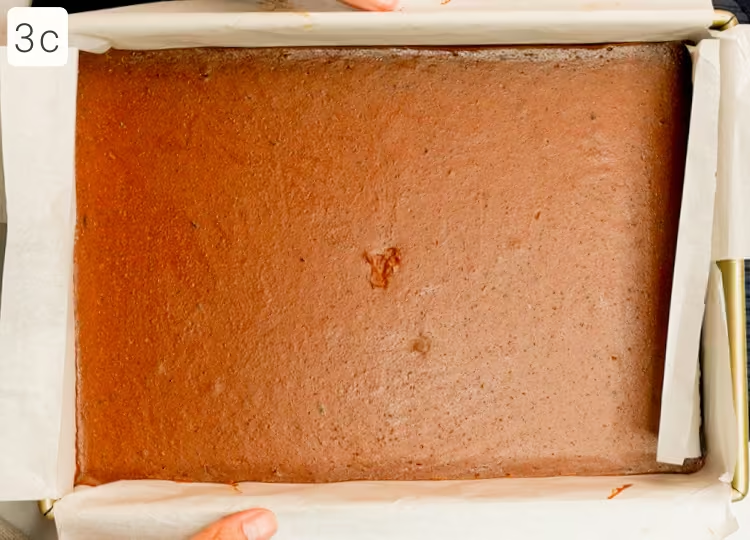
Transfer to the refrigerator and chill for at least 2 hours before slicing (3c). You can see where I poked the center of the bars to take the temperature. I never worry about those sorts of things because I’m going to cover it with whipped cream anyway.
Also, you may notice that my bars are “sweaty” in the next steps (they have little droplets on their surface) :) This is sugary condensation collecting on the surface because I put the bars in the fridge while they were still slightly warm. You can either let the bars cool to room temperature for a bit before refrigerating, or blot them with a paper towel if it bothers you.
STEP 4 | Make the whipped cream (optional).
WHY:
Whipped cream forms when you trap tiny air bubbles in cold cream. As you whip, some of the fat globules in the cream begin to stick together, forming a delicate network around the air bubbles. This is what transforms liquid cream into a light, fluffy <span class="def-term" data-term="foam">foam</span>.
HOW:
Chill the mixing bowl and whisk attachment for 15 minutes. Add the cold heavy cream and whip on medium speed until very soft peaks form. Add the powdered sugar and vanilla, mixing on low speed or folding gently to combine. Taste and adjust the sweetness, then continue whipping until you reach your preferred firmness. To learn more about making whipped cream, I highly suggest reading my complete guide.
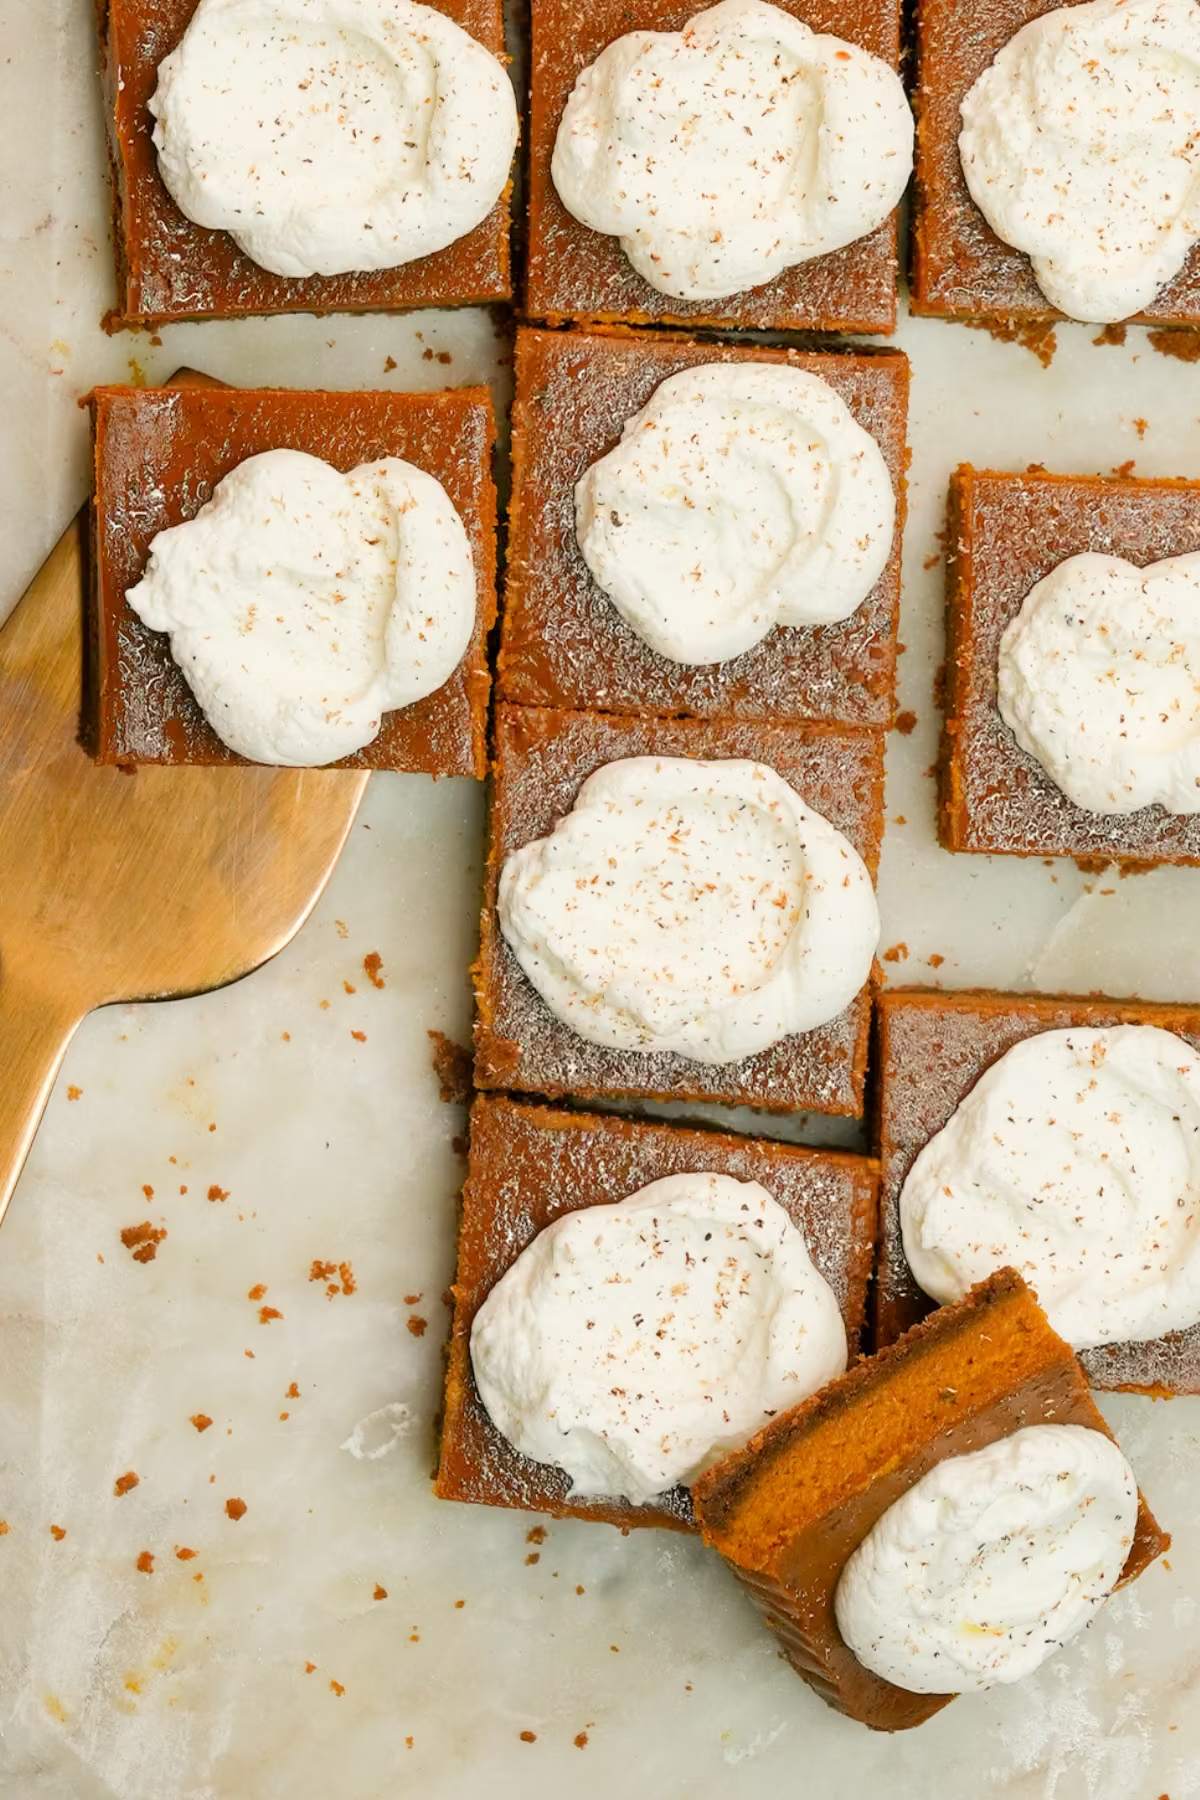
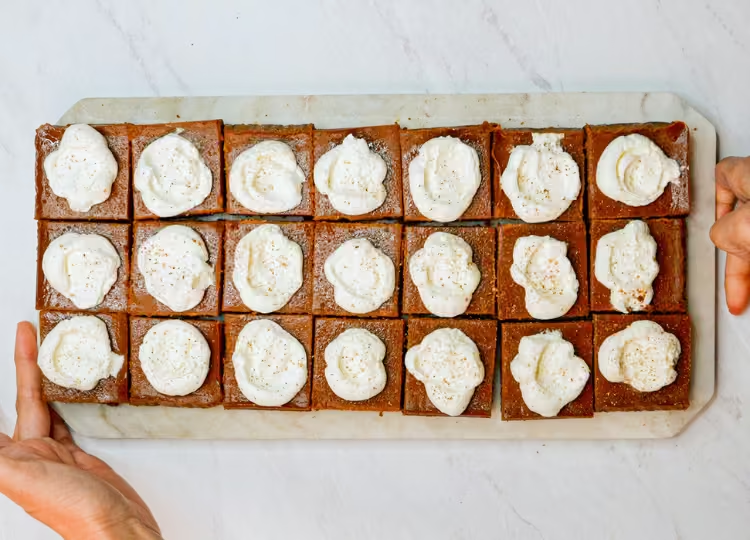
First, I cut my 9x13 pan of bars into 24 squares. I used a ruler to measure out 4 columns and 6 rows.
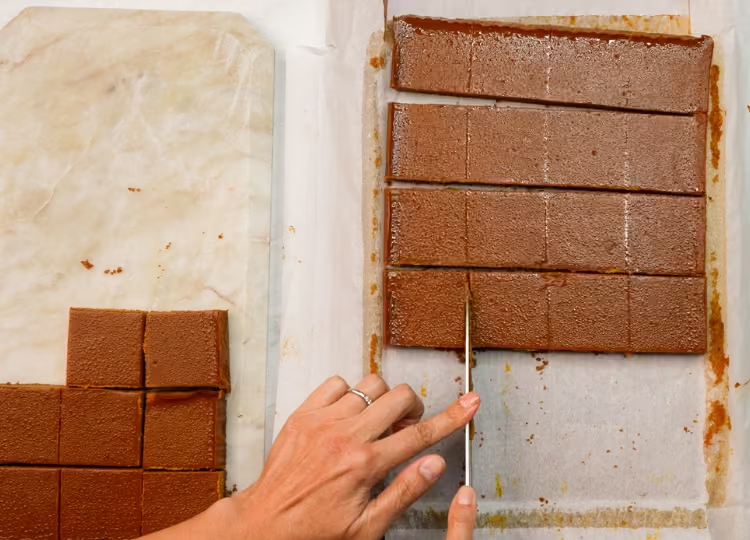
Of course, you can cut the bars into whatever size pieces, but I’ll include more cutting details in the recipe card below if you want neat bars. I’ve read that guests often don’t want to cut into something that looks really nice, so if I’m serving anything, I usually remove a slice to show that it’s ok if you cut it or cut into smaller pieces beforehand, which is what I’m doing here :)
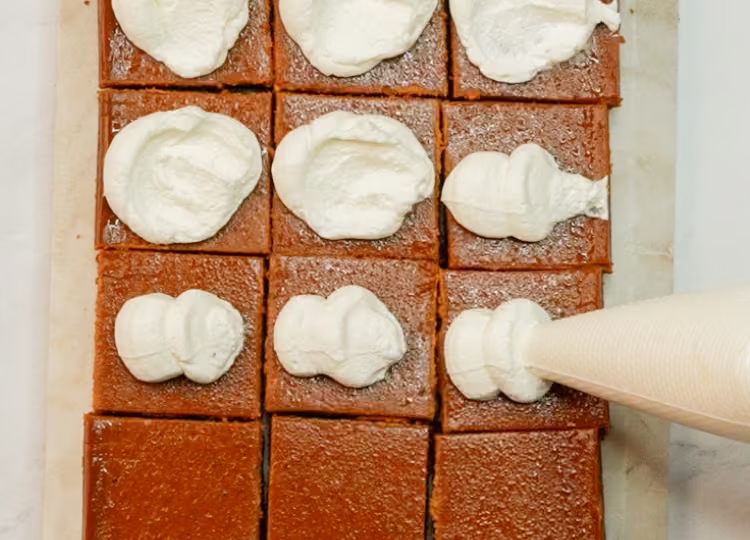
I then added my whipped cream to a piping bag (you could easily use a ziptop bag) and snipped the tip off. I then piped a small amount of cream on each square:
You can also just serve the whipped cream in a bowl alongside your pumpkin pie bars :)
Video
Honors Members Section
This extra material is accessible to Sugarologie Honors members.
Become a member to view extended research notes, technique analysis, and supplemental materials! Learn more about Sugarologie Honors here.
Already a member?
Before starting the recipe, please read this!
Measure by weight, if possible.
Measuring by weight is the best way for you to replicate my recipes. I develop recipes using ingredients (even liquids) measured in grams, which is why you see them listed first in the recipe cards. For measurements under 5 grams, I will typically only list the volumetric measurements (teaspoons, etc.), as most home scales are not precise for such small weights.
In most cases, I have converted grams to volumetric measurements (aka US customary units) for bakers who prefer this method. However, the measurements are not as precise and may have awkward proportions. The recipes should still work, but for the ultimate precision, try to use weight.
This is the OXO scale I use daily. I also purchased this budget version of a good scale, which I keep at my Mom’s house for baking. If you’re interested in other tools I use for my baking, I’ve compiled a list here.
Use room temperature ingredients.
All my ingredients should be used at room temperature, or 65-75 °F/18-24 °C. I will always indicate if you need something outside this range. If no details are given, room temperature is the default.
Pay attention to the ingredient descriptions.
I try not to be brand-specific, but I will always note an interesting result from a type of ingredient, be it negative or positive.
A specific note regarding salt: I use Diamond Crystal Kosher salt for everything on this site except for frostings. In frostings, you want the salt to dissolve more easily, and kosher salt tends to leave granules behind. If you substitute table salt (more finely granulated) for recipes that list kosher salt, you must use half the volume indicated in my recipes.
Substitutions are hard.
That said, substitutions aren’t impossible but can be the toughest part of recipe development. Small swaps, like reduced-fat milk (2% fat) for whole milk (3.5% fat), usually work fine. However, bigger changes—such as replacing oil with applesauce or sour cream with Greek yogurt—can significantly impact texture and density.
Be wary of general, all-purpose substitutions in baking; I find that usually there is never a one size-fits-all solution. I carefully select ingredients for my recipes, so for the best results, start with the original recipe and modify with caution.
Read all the recipe instructions before beginning.
I’m in the “Pre-read the Chapter before Class Lecture” club... and I invite you to join! Baking new recipes can be intimidating, so let’s set you up for success. I want you to think about timeframes. Most fillings and frostings can be made ahead of time, and give you an extra day for mental space. Also, as you become a more proficient baker, you can anticipate and recognize steps. (“Oh, this has a meringue step, so I’ll need an extra clean bowl…” etc.) Ensure you go down the ingredient list and have everything at the right temperature.


Dulce de Leche Pumpkin Pie Bars with Biscoff Crust
Biscoff Cookie Crust
- 70 g (5 tablespoons) unsalted butter, melted
- 250 g (8.8 oz or about 32) Biscoff cookies
- 30 g (4 tablespoons) all-purpose flour
- 20 g (1 ½ tablespoons) brown sugar
- ½ teaspoon kosher salt
Pumpkin Filling
- 1 teaspoon nonfat milk powder* (optional)
- 1 teaspoon ground cinnamon
- ½ teaspoon ground ginger
- ¼ teaspoon ground nutmeg; freshly grated if you can
- 425 g (1¾ cups, or one 15 oz. can) canned pure pumpkin**
- 56 g (4 tablespoons) unsalted butter, cold from the fridge
- 306 g (1 cup) dulce de leche***
- 40 g (3 tablespoons) brown sugar, light or dark
- 1 teaspoon kosher salt
- 4 large (200 g) eggs, cold from the fridge
- 2 teaspoons vanilla extract
Whipped Cream Topping****
(makes about 2 cups)
- 238 g (1 cup) heavy whipping cream
- 15 g (2 tablespoons) powdered sugar
- 1 teaspoon vanilla extract
- Additional cinnamon or nutmeg for dusting atop the finished bars
Biscoff Cookie Crust
- 70 g (5 tablespoons) unsalted butter, melted
- 250 g (8.8 oz or about 32) Biscoff cookies
- 30 g (4 tablespoons) all-purpose flour
- 20 g (1 ½ tablespoons) brown sugar
- ½ teaspoon kosher salt
Pumpkin Filling
- 1 teaspoon nonfat milk powder* (optional)
- 1 teaspoon ground cinnamon
- ½ teaspoon ground ginger
- ¼ teaspoon ground nutmeg; freshly grated if you can
- 425 g (1¾ cups, or one 15 oz. can) canned pure pumpkin**
- 56 g (4 tablespoons) unsalted butter, cold from the fridge
- 306 g (1 cup) dulce de leche***
- 40 g (3 tablespoons) brown sugar, light or dark
- 1 teaspoon kosher salt
- 4 large (200 g) eggs, cold from the fridge
- 2 teaspoons vanilla extract
Whipped Cream Topping****
(makes about 2 cups)
- 238 g (1 cup) heavy whipping cream
- 15 g (2 tablespoons) powdered sugar
- 1 teaspoon vanilla extract
- Additional cinnamon or nutmeg for dusting atop the finished bars
Biscoff Cookie Crust
- 35 g (2½ tablespoons) unsalted butter, melted
- 125 g (about 16) Biscoff cookies
- 15 g (2 tablespoons) all-purpose flour
- 10 g (2¼ teaspoons) brown sugar
- ¼ teaspoon kosher salt
Pumpkin Filling
- ½ teaspoon nonfat milk powder* (optional)
- ½ teaspoon ground cinnamon
- ¼ teaspoon ground ginger
- ⅛ teaspoon ground nutmeg; freshly grated if you can
- 213 g (¾ cup + 2 tablespoons, or ½ of a 15 oz. can) canned pure pumpkin**
- 28 g (2 tablespoons) unsalted butter, cold from the fridge
- 153 g (½ cup) dulce de leche***
- 20 g (1½ tablespoons) brown sugar, light or dark
- ½ teaspoon kosher salt
- 100 g (2 large) eggs, cold from the fridge
- 1 teaspoon vanilla extract
Whipped Cream Topping****
(makes about 1 cup)
- 119 g (½ cup) heavy whipping cream
- 7.5 g (1 tablespoon) powdered sugar
- ½ teaspoon vanilla extract
- Additional cinnamon or nutmeg for dusting atop the finished bars
- Bake the Biscoff Crust. (Use ingredients under “Biscoff Cookie Crust”)
Place one oven rack in the middle position. Preheat to 350°F (180°C).
Line your baking pan with foil or parchment paper, allowing for a longer side to lift the bars out if needed.
Add the Biscoff cookies to a large ziptop bag. Use a rolling pin to crush the cookies into sandy crumbs. Add the crumbs to a large mixing bowl along with the flour, brown sugar, and salt. Whisk to combine, then add the melted butter and stir with a spatula until evenly coated.
Pour the crumbs into the lined pan. Save this bowl for the next step; no need to wash. (You can also do this step using a food processor.)
Use a spatula or flat-bottomed cup to press the crumbs firmly into the bottom, keeping the thickness even.
Bake for 12-15 minutes until darker and fragrant. Set aside to cool slightly while you prepare the filling.
Reduce the oven to 300°F (150°C).
- Make the pumpkin filling (Use ingredients under “Pumpkin Filling”)
Measure the milk powder (if using) into a small bowl. Combine the cinnamon, ginger, and nutmeg in another. Open the can of pumpkin puree (or measure out if making the 8x8 pan recipe). Set these ingredients aside for easy access later.
First, brown the butter by adding it to a shallow pan over medium-low heat. Once foaming subsides, stir constantly until medium-brown specks appear. Remove the browned butter from the heat. If using milk powder, stir it into the hot butter, then return to medium-low heat and stir until the milk powder turns honey-amber. A few clumps are fine.
Add the bowl of spices and stir until fragrant, about 30 seconds. Mix in the pumpkin puree and stir to combine, then stir constantly for another 30 seconds.
Add the hot pumpkin-butter paste to the previously used large mixing bowl. Add the dulce de leche (or condensed milk and flour), brown sugar, and salt. Whisk until combined. Add the cold eggs and vanilla. Whisk until completely smooth. (Alternatively, mix everything in a food processor.)
Pour the pumpkin filling over the baked Biscoff crust.
- Bake and cool the bars.
Bake on the middle rack until the filling does not move when gently shaken. If you have an instant-read thermometer, the direct center should be 170-175°F (77–79°C). (The thermometer probe will have wet custard after checking; this is normal as the custard's interior sets completely while cooling.)
For the 9x13 pan, bake for 30-35 minutes.
For the 8x8 pan, bake for 20-25 minutes.
Turn off the oven, crack the oven door slightly, and leave the bars inside for 20-30 minutes to cool gradually and reduce cracking. Transfer to the refrigerator and chill for at least 2 hours before slicing.
My advice on cutting neat-looking bars:
For the 9×13-inch pan, make 24 bars by dividing the 13-inch side into 6 sections and the 9-inch side into 4 sections. Each bar will measure approximately 2¼ × 2⅙ inches (5.7 × 5.5 cm).
For the 8×8-inch pan, cut into 9 bars: Cut into 3 rows × 3 columns. Each bar is approximately 2⅔ × 2⅔ inches (6.8 × 6.8 cm).
- (Optional) Make the Whipped Cream.
Chill the bowl and whisk attachment for 15 minutes.
Whip the cold cream on medium speed to very soft peaks. Add the powdered sugar and vanilla, mixing on low or folding gently. Taste and adjust sweetness, then whip to your preferred firmness.
Refrigerate covered until serving, ideally the same day. If liquid separates, whisk briefly to restore the texture.
Serve a bowl of whipped cream alongside your pumpkin pie bars for guests to add, or use a piping bag to pipe the cream onto the bars. Sprinkle the whipped cream with additional grated nutmeg or ground cinnamon if desired.

Recipe Card - Adriana's Notes
*Milk powder adds roasted flavor to the pumpkin filling. You can use nonfat, whole, or buttermilk powder. Break up any clumps before adding it to the hot butter.
**While homemade pumpkin puree may be tempting, canned pumpkin ensures recipe consistency because its components (water, starches, sugars, etc.) are uniform, and you should get the same result I get in my kitchen.
***I use canned La Lechera dulce de leche, widely available in U.S. grocery stores. To substitute sweetened condensed milk, use 306 g (1 cup) plus 1½ teaspoons of flour for the 9×13-inch pan, or 153 g (½ cup) plus ¾ teaspoon of flour for the 8×8-inch pan.
The main differences are flavor and color. Condensed milk produces a brighter, muted-orange custard with a clean pumpkin flavor. Dulce de leche creates a deeper orange-brown custard with richer, roasted caramel notes. Both produce a soft, creamy custard. See my pumpkin pie recipe for more details.
****For whipped cream toppings, choose heavy whipping cream or heavy cream. Both contain at least 36% milkfat under U.S. labeling standards, producing a more stable whipped cream. You can substitute granulated sugar for powdered sugar using the same weight. Start with lightly sweetened whipped cream; taste and add more sugar as desired. See my whipped cream guide for more details on making perfect whipped cream
Recommended Sugar Lab Recipes + Experiments


Got room for more dessert?
Subscribe to my Crumby Data newsletter! I share behind-the-scenes looks at recipe development, flavor testing for the Cakeculator, and life as a content creator. It’s free, lands in your inbox every few weeks, and you can unsubscribe anytime...no strings attached :)
Feel free to take a look at previous newsletters here!