
.avif)
Soft and Chewy Snickerdoodles (That Actually Stay Soft)


My soft, chewy snickerdoodles have a classic buttery, cinnamon-sugar flavor with a chewy center and a crispy edge. They stay tender with my balanced cookie dough, which holds onto moisture, allowing the cookie to get softer and chewier over time. This is one of my favorite kid-friendly recipes in my collection - no chilling required and easy enough to get some little hands to help roll the dough balls in the requisite cinnamon-sugar.
.avif)
What is the texture of my Chewy Snickerdoodle Cookies?
My snickerdoodles have this wonderful chewy texture that I just love, and they get even better with time. Now, when talking about textures, I’m not referring to just-baked cookies - those are always soft and delicious, and these snickerdoodles are no different in that area. But sometimes we need cookies for later or have leftovers we’re hoping to save. So in this case, I’m referring to the finished texture of a cookie - what’s it like when it cools? Or how about even the next day?
%20(1).avif)
In the picture above, you can see the anatomy of my Soft and Chewy Snickerdoodle. There’s an outer crust coated in a generous layer of cinnamon sugar. On the first day, there is a crisp edge along the cookie's perimeter. Both of these add textural contrast to the cookie's soft, chewy interior. There are distinct crumbs inside, which are from a specific ratio of baking soda to cream of tartar, which are the acid-base ingredients to create carbon dioxide gas in the micropockets encased in the dough. When we zoom in even further, the crumbs themselves have a chewy, toothsome texture due to my ratio of butterfat, eggs, white sugar, and flour.
And while these ingredients can make a fantastic cookie, they need a little help to achieve that long-lasting chewy texture. And that is a concentrated sugar syrup. For this recipe, I use agave nectar. And we don’t need too much - just a little bit will carry us pretty far in the texture game for this cookie- but I find it necessary to get that wonderful texture I’d been searching for in my snickerdoodle cookies.
This works because agave is high in <span class="def-term" data-term="fructose">fructose</span>, which is one of the most <span class="def-term" data-term="hygroscopic">hygroscopic</span> sugars we can use in baking. This means it attracts and holds on to water very tightly. And water, or moisture content, is one of the key players in maintaining softness in baked goods. You may have heard about how brown sugar can make cookies chewy for that same reason - brown sugar has molasses, which contains a bit of fructose. Agave nectar, however, contains a much higher percentage of it and is my secret ingredient to a soft and chewy Snickerdoodle!
What is the flavor of my Chewy Snickerdoodle Cookies?
The most prominent flavors of my soft and chewy snickerdoodles are sweet vanilla-scented butter mixed with warm cinnamon from the outer coating. It’s not an overly sweet cookie, and that’s due to the balancing act of acids, which can naturally temper our perception of sweetness. In this recipe, the acidic flavor comes mainly from cream of tartar, a powder used with baking soda to slightly aerate the cookie dough.
💡TIP: Here's the quick chemistry lesson about acids and bases in baking: when acids and bases are mixed in a dough, they react and can neutralize one another. If there’s a correct proportion of acid to base, they'll all get used up. So there will be little to no residual acidic or alkaline flavor, just the results of the reaction, which is typically CO2 gas (plus a bit of water + salt!)
Sometimes you’ll hear people say that acids and bases can “cancel each other out,” which kinda makes sense, since there will be no acidic or alkaline taste; thus, they are “canceled.” Although that’s not entirely accurate in chemistry, but it’s okay; we don’t need to go over the granular details and this explanation is usually enough to get us some great baked goods. In this recipe, I’ve balanced the amounts of cream of tartar, baking soda, and other acidic ingredients to create the characteristic "tangy" snickerdoodle flavor.
What ingredients do you need for my Chewy Snickerdoodle Cookies?
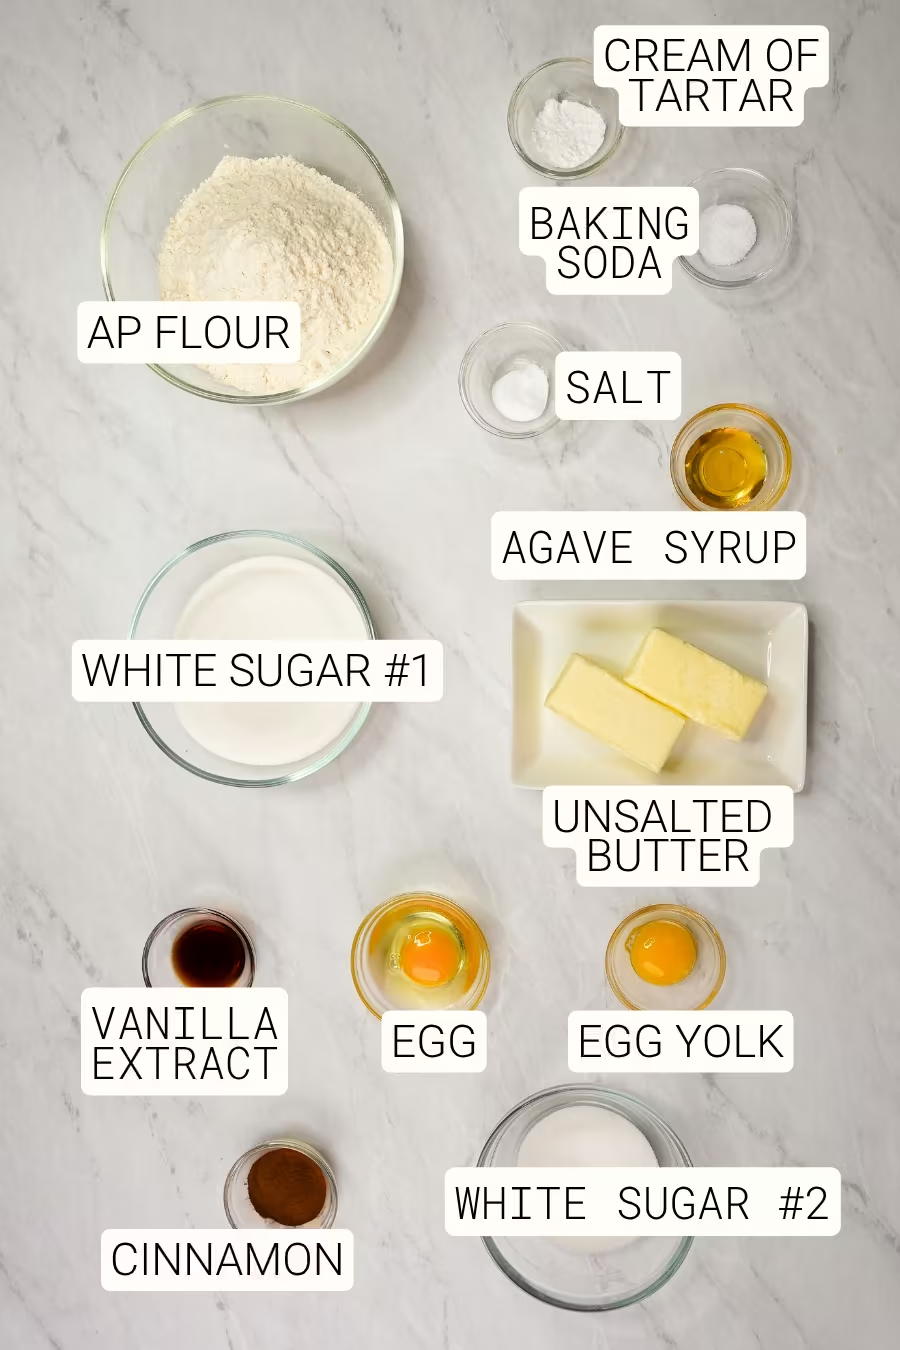
ALL-PURPOSE (AP) FLOUR forms the structure of the cookie by providing the starch, which absorbs moisture and <span class="def-term" data-term="gelatinization">gelatinizes</span> during baking, helping the cookies set with a soft, chewy texture.
CREAM OF TARTAR is an acidic powder made from potassium bitartrate, a natural byproduct of fermenting grapes into wine. Combining cream of tartar with baking soda produces carbon dioxide gas, which causes the cookies to rise and crack as they bake.
BAKING SODA is an alkaline powder that does a few things. In snickerdoodles, it reacts with the cream of tartar to create carbon dioxide gas. It also enhances the cookie's toasted brown exterior. Baking soda also increases the rate of the <span class="def-term" data-term="maillard-reaction">Maillard reaction</span>, but for the most part, we’ve neutralized this effect by adding a touch more acidity in the form of cream of tartar.
One last thing it does, which is actually quite important, is cause cookies to spread. Alkaline doughs can interfere with the <span class="def-term" data-term="coagulation">coagulation</span> of egg proteins. You can think of these egg proteins as an inner scaffolding; the extent to which they link together determines the final cookie's shape.
💡 TIP: I find that baking soda is overused in baking recipes (oh gosh, especially in snickerdoodles). Now, baking soda in and of itself isn’t a terrible ingredient, but its use is a vestige of older styles/recipes before baking powder was the norm. I love alkaline flavors (pretzels, black cocoa), but they have to be used judiciously. More often than not, it’s overused because the recipe compensates for excessive use of structural ingredients by adding more baking soda to increase spread. My recipe is specifically formulated not to taste overly alkaline, as I like snickerdoodles to taste a touch acidic. In any case, it’s always important to measure this powder carefully. Stir the baking soda in its container, as this usually breaks up any clumps. Then scoop and level before adding to your dough.
UNSALTED BUTTER provides richness, tenderness, and buttery flavor through its milk fat. Slightly softened butter creams more easily with sugar, trapping tiny air bubbles that help the cookies bake up lighter while still spreading evenly.
WHITE GRANULATED SUGAR is used in two areas of this recipe. First, the larger amount is used directly in the dough, which, of course, sweetens it and, with the butter, creams to slightly aerate the butterfat, yielding a slightly airier cookie. The second, smaller amount is used for the cinnamon sugar mixture, which coats the raw dough balls before they bake.
An EGG plus an EGG YOLK add moisture, protein, and fat to the cookie dough. And I know it can be a pain to use just egg yolks in recipes, but eggs are such complex ingredients! (I mean, think about it - you’re growing an entire organism from everything that’s encased in that shell.)
An egg white differs markedly in molecular makeup and function from the yolk. Sometimes we can get away with using a whole egg in baking recipes, but I find this limits us quite a bit in terms of achieving the best textures in our baked goods - especially when it comes to cookies. Generally, cookies are very low-moisture recipes, and egg whites simply add so much water that they can throw off the texture, typically veering it towards cakey rather than crispy or chewy. But yolks, on the other hand, are full of <span class="def-term" data-term="emulsification">emulsifying</span> fats and proteins with just a smidge of water. Using them without their accompanying whites allows us to add structure without all the extra water.
AGAVE SYRUP is the secret to this cookie’s super soft interior. The key to achieving a long-lasting chewy texture in this cookie is using a concentrated sugar syrup, which helps bind water and slow moisture loss. And some sugars are better at this than others, with agave and honey topping the list because they contain a high concentration of <span class="def-term" data-term="fructose">fructose</span>.
VANILLA EXTRACT and SALT are flavor enhancers and round out the flavor by balancing the sweetness and complementing the butter and cinnamon.
The CINNAMON-SUGAR MIXTURE creates the cookie’s signature coating and warm spiced flavor. I tested different types of sugar, including the more expensive, larger-crystal varieties, but honestly, I like regular white granulated sugar best. It created a dusty, sparkly appearance on the finished snickerdoodle and evenly dispersed the cinnamon over the cookie. As for the cinnamon, feel free to sub in spices you enjoy (allspice, nutmeg, chai spices, pumpkin pie spice mix, etc.).
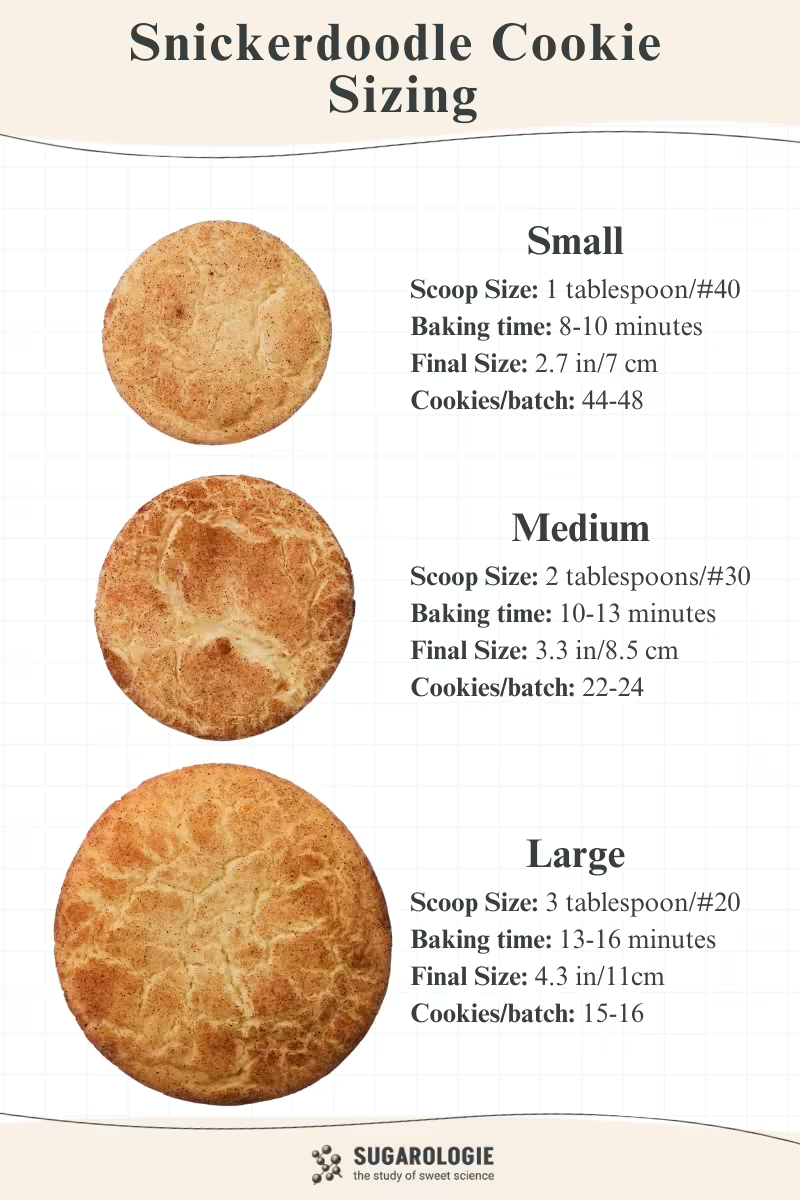
How to customize the size of your Soft and Chewy Snickerdoodle Cookies:
You can use my recipe to make cookies in 3 sizes. You’ll just need to vary the cooking time:
Step by step:
STEP 1 | PREP THE OVEN, PANS, AND CINNAMON SUGAR COATING.
Arrange a rack in the middle of your oven and preheat to 375°F (190°C). Line one or more baking sheets with parchment paper.
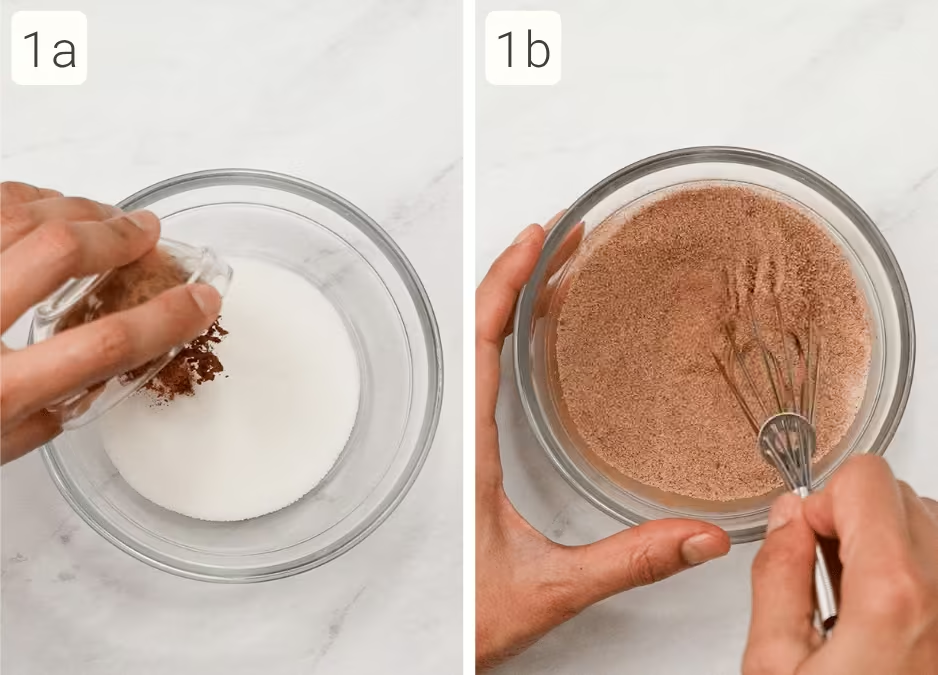
In a small bowl, combine the sugar and cinnamon listed under the Cinnamon-Sugar Topping heading and stir until evenly mixed (1a, b).
STEP 2 | COMBINE THE DRY INGREDIENTS.
WHY:
Whisking the dry ingredients together distributes the leavening agents and salt evenly throughout the flour. When we add it to the cookie dough in later steps, it ensures the cream of tartar and baking soda react evenly during baking, giving the snickerdoodles their signature lift and cracked tops.
HOW:
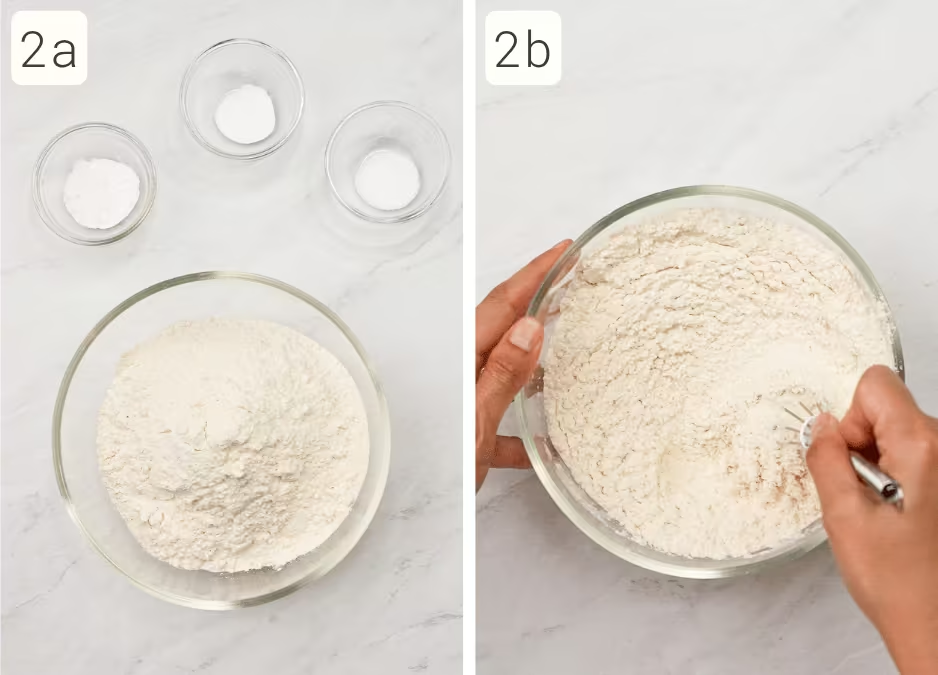
In a medium bowl, whisk together the flour, cream of tartar, baking soda, and kosher salt until thoroughly combined (2a, b).
STEP 3 | MIX THE WET INGREDIENTS.
WHY:
Creaming the butter first breaks up the butterfat and slightly raises the temperature, making it easier to mix in the following steps. If your butter is too cold to start, this is a good way to bring it to room temperature, which is required for it to mix properly with the eggs. We’ll add the sugar along with the eggs to create a consistent, fat-based dough that the flour can sit inside.
HOW:
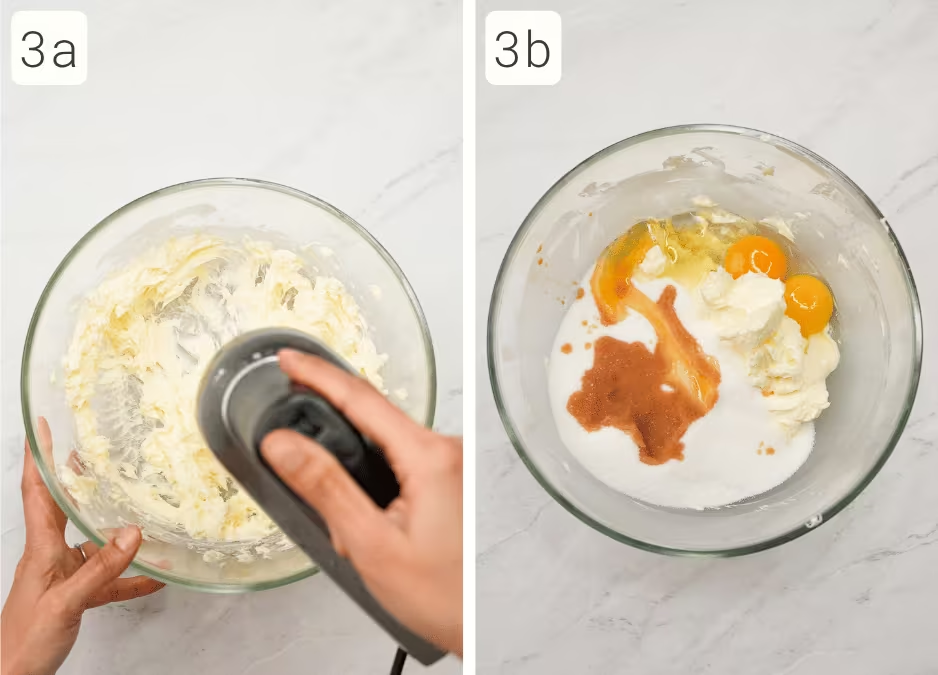
Add the slightly softened butter to a mixing bowl. Using a hand mixer or stand mixer fitted with the paddle attachment, mix on medium-low speed until the butter is smooth and creamy (3a). Add the granulated sugar, egg, egg yolk, agave syrup, and vanilla extract (3b).
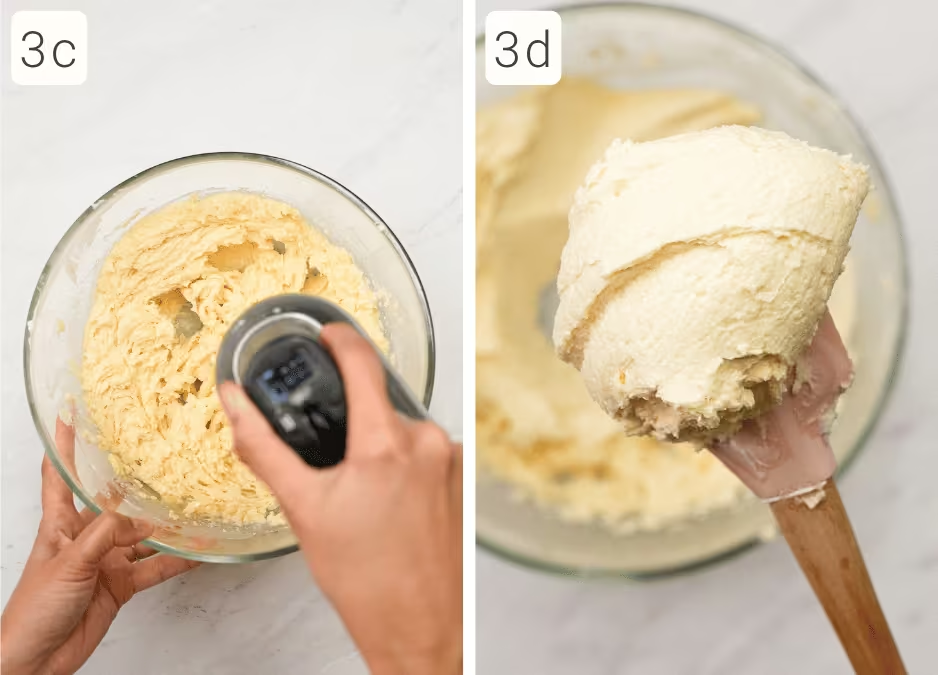
Mix on medium speed until the mixture becomes slightly lighter in color and more aerated (3c). The mixture should be fully combined with no separation of the butter and eggs, although it will still appear somewhat grainy because much of the sugar remains undissolved (3d).
STEP 4 | MIX IN THE FLOUR.
WHY:
Adding the flour in 3 additions helps the ingredients incorporate evenly, especially with a hand mixer. Mixing only until the flour disappears limits gluten development, producing cookies that are tender rather than tough.
HOW:
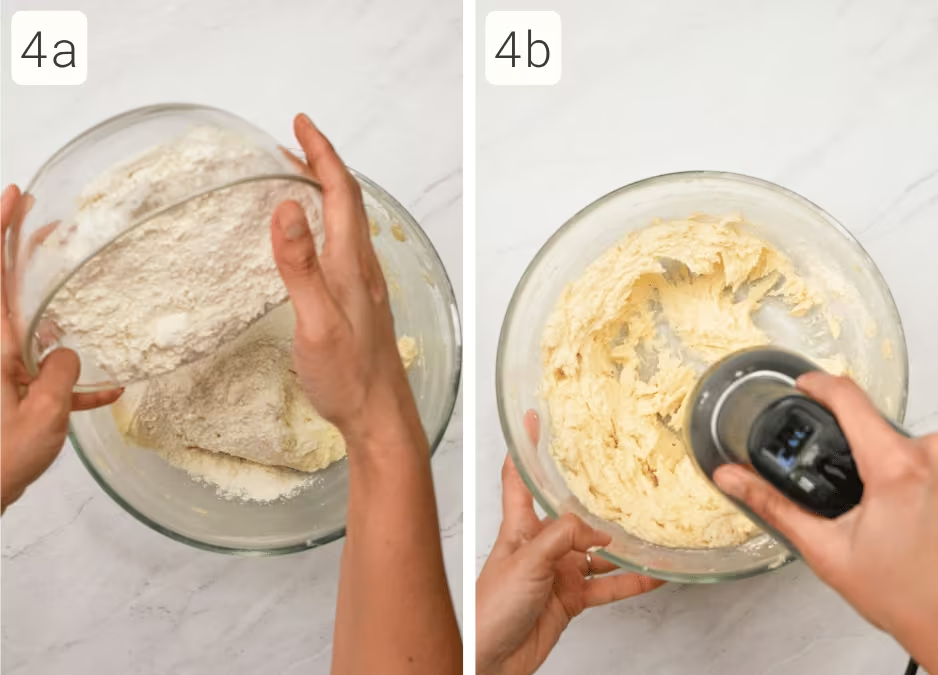
Add the flour mixture to the butter mixture in three additions (4a), mixing on low speed after each addition (4b). Scrape down the sides and bottom of the bowl with a rubber spatula, then mix again just until no dry flour remains.
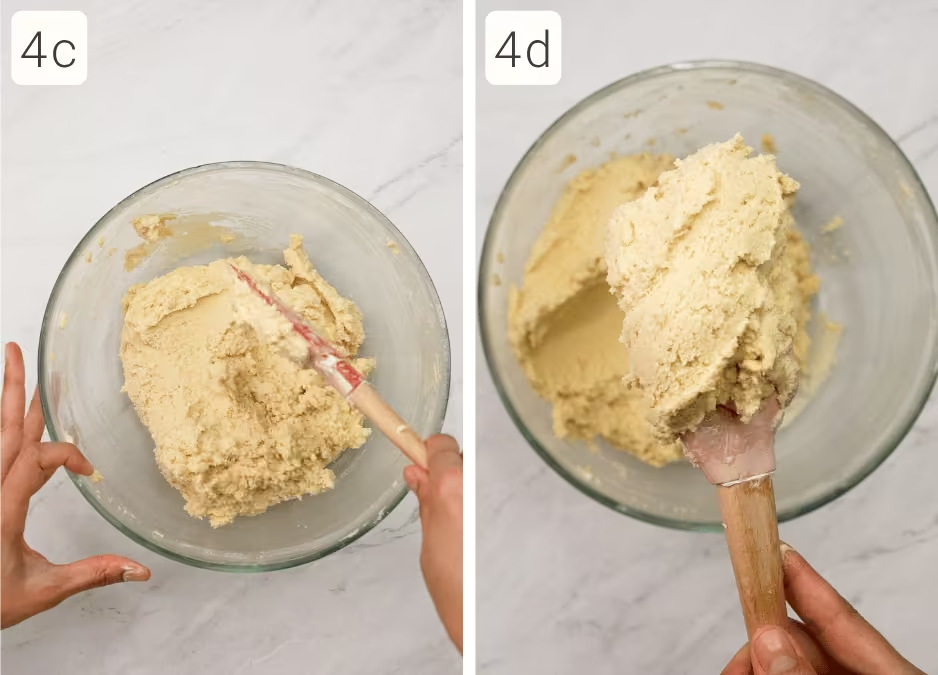
The dough is ready when it forms a cohesive ball that feels slightly tacky but not sticky (4c,d).
<span class="def-term" data-term="DDT">DDT</span>: Did you know that cookie dough temperature affects the final texture of your cookie? In my recipes, I like to give the DDT (or Desired Dough Temperature) as a guideline to ensure we’re all on the same page. It’s not at all mandatory, but if you’re having issues with the recipe or see something off with your dough, you can whip out the thermometer to give it a temperature checkup.
Right now, since we’ve used room-temperature ingredients and worked the dough a bit (a stand mixer and a hand mixer introduce friction, which slightly heats the dough), we should have the dough at around 70-78°F/21-26 °C. This will also depend on your kitchen's temperature. This dough bakes best when it’s at room temperature, so if it's leaning either way (hot or cold), refrigerate it or let it sit out until it reaches room temperature before shaping and baking.
STEP 5 | SCOOP, COAT, AND BAKE.
WHY:
Rolling the dough into smooth balls will create pretty circular cookies with rounded edges when baking. The cinnamon-sugar coating creates the classic snickerdoodle flavor, so be sure to get every surface of your rolled cookies covered - even the bottoms!
These cookies run slightly acidic due to the cream of tartar, which means they will bake up into a tighter disc (as acids help coagulate egg proteins more quickly) and have a pale appearance. This is perhaps why snickerdoodles are dusted in cinnamon-sugar before baking - otherwise they’d be pretty plain and pale looking - almost like an unfrosted sugar cookie :)
HOW:
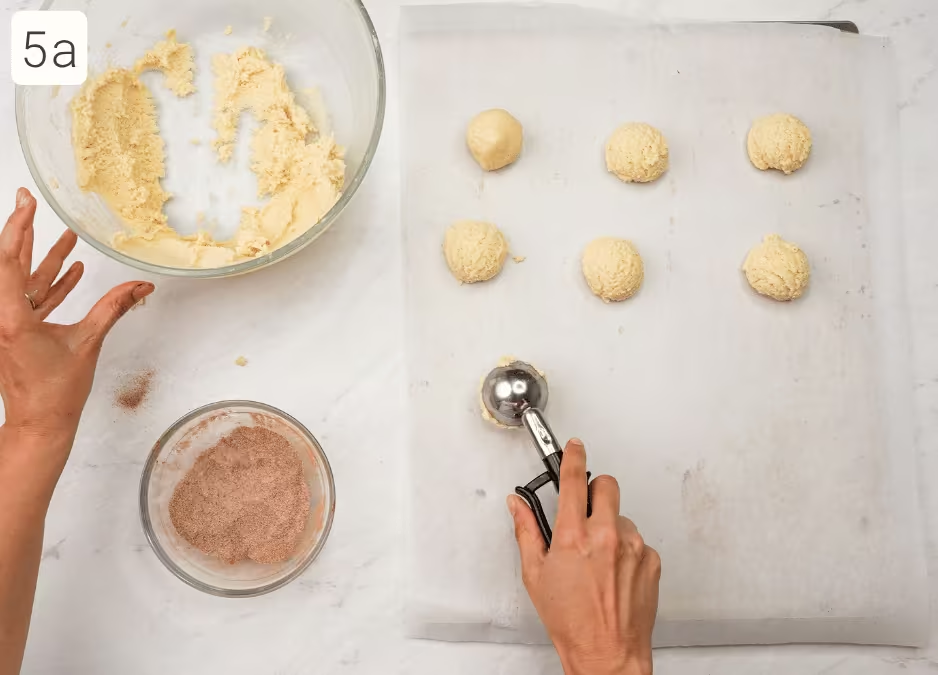
Scoop the dough into evenly sized portions onto your prepared cookie sheet (5a). (Take a look at my chart in the sections above to see which size you need.) I like to do the portioning first so I can get an idea of how much dough I have and whether I need to make the cookie portions bigger or smaller.
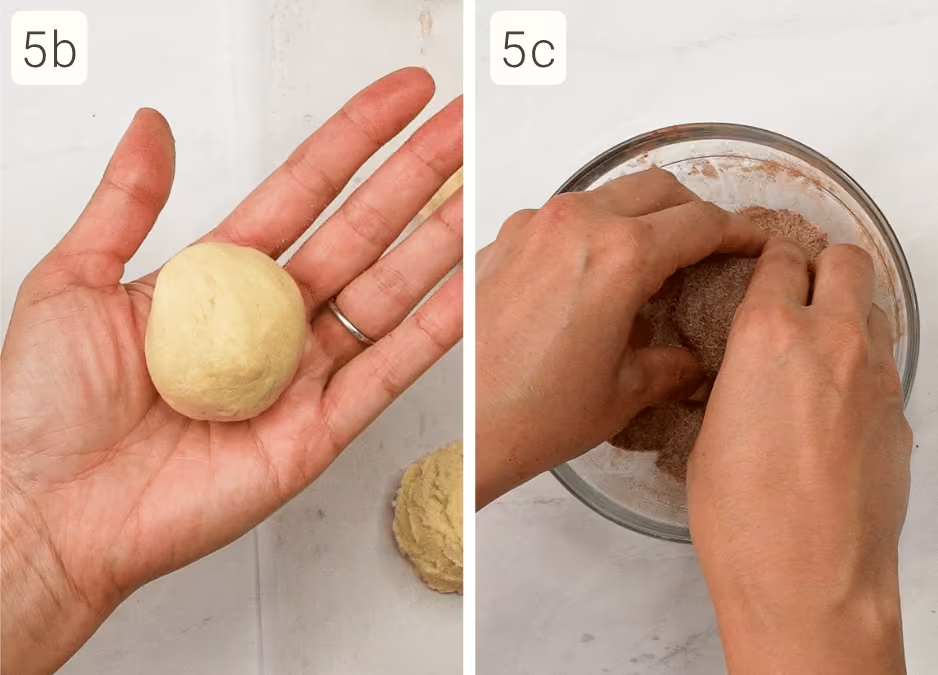
Then, roll each into a smooth sphere (5b). Coat each dough ball thoroughly in the cinnamon-sugar mixture (5c).
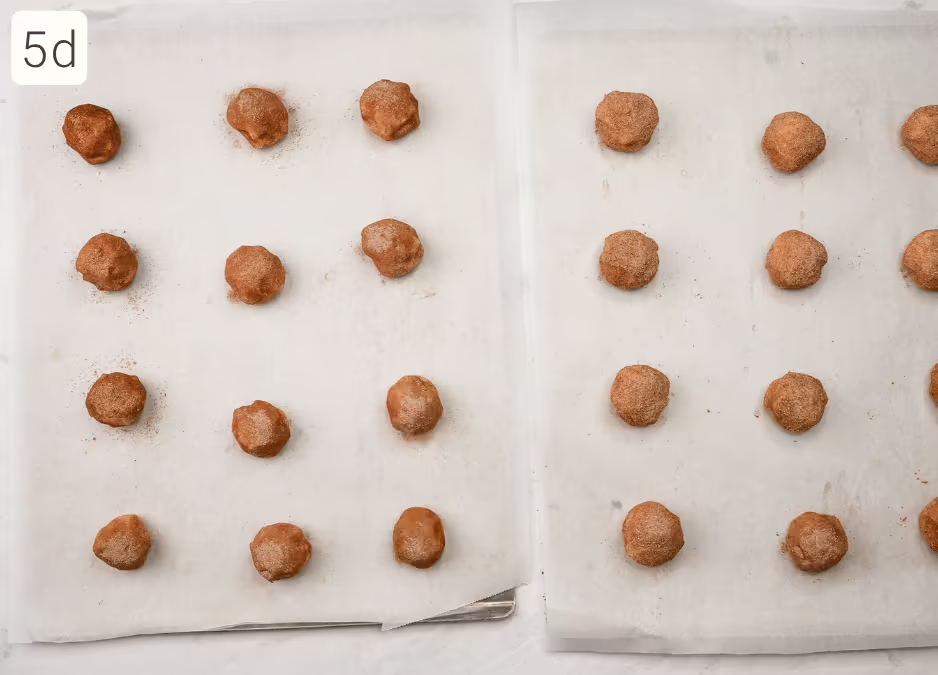
Arrange the cinnamon-sugar-coated dough balls on the prepared baking sheet, about 2 inches (5 cm) apart for the 2-tablespoon balls (5d).
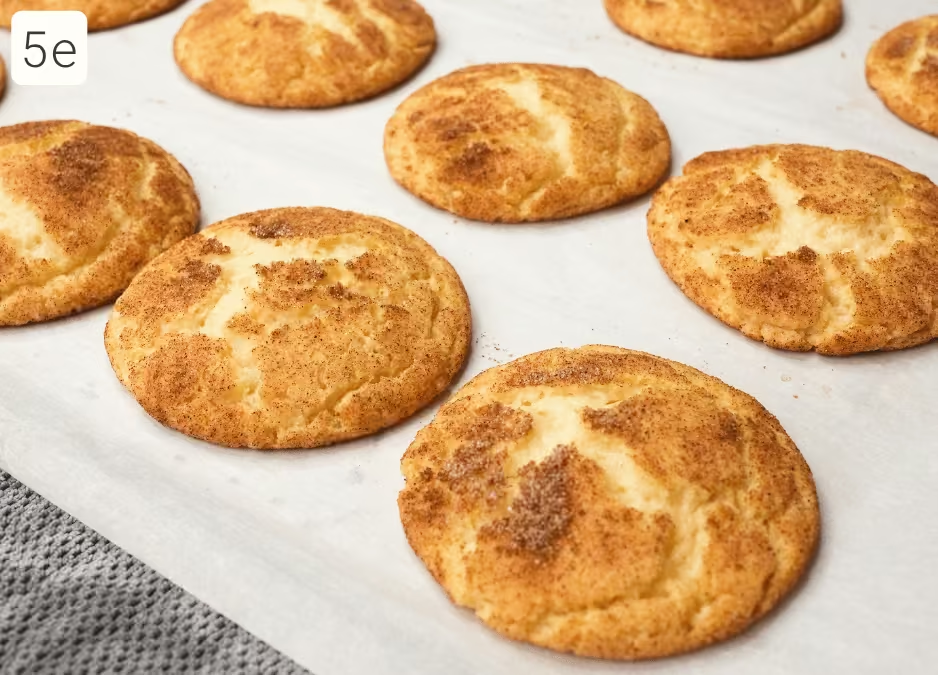
Bake until the cookies spread into flat discs with slightly puffy, rounded tops (5e). The cookies will develop large cracks with gooey-looking pale dough in their crevices. If you're worried they're not "done" due to their gooey centers, take the temperature of the cookie centers. They are safe to consume if they are 165°F/74°C or higher.
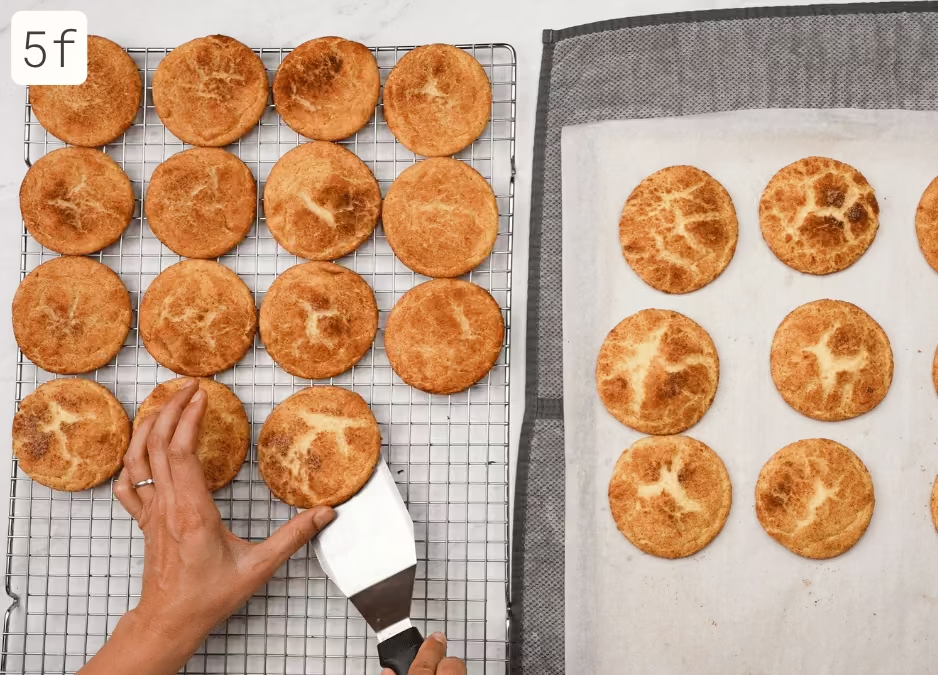
Allow the cookies to cool on the baking sheet for a couple of minutes. During this time, the crevices will close up a tad, creating a flatter cookie. Transfer them to a wire rack to cool completely (5f).
Video
Honors Members Section
This extra material is accessible to Sugarologie Honors members.
Become a member to view extended research notes, technique analysis, and supplemental materials! Learn more about Sugarologie Honors here.
Already a member?
My Honor’s Members get more insights and experiments that make up my recipes, and with my Snickerdoodles, you can get an insider’s look at how I did things and what I’m currently testing for a particular recipe.
When I develop recipes, I often start with a pretty good idea of the goal, and for this cookie, it was definitely to make a snickerdoodle with a long-lasting chewy texture. I’ve had way too many Snickerdoodles that are just crumbly and dry, even within the same day of baking. I also wanted the recipe to be relatively straightforward, since Snickerdoodles are cookies my kids and I often make together, so it should be relatively kid-friendly.
I also try to make the recipes as ingredient-efficient as possible - so my formula should yield exactly two dozen cookies, etc. The one inefficiency with this recipe is that there’s a leftover egg white - the bane of many of your baking recipes, as many of you have told me. But I couldn’t sacrifice the texture of this cookie so we could use up that singular egg white - it’s just too good when we leave it out. Chewy and wonderful!
One night in the middle of my snickerdoodle trials, I was making chicken parmesan for the family. It’s a pretty standard recipe - chicken breast flattened, coated in flour, then egg white (saved from Snickerdoodle testing!), then Italian breadcrumbs, and fried.
But I thought - could I use it as an egg wash for the cookies to make the sugar cinnamon stick better? Dredging a cookie dough perchance?
.avif)
On the left is my normal chewy snickerdoodle cookie from the recipe card, and on the right is a dough ball dipped in egg white, then in cinnamon sugar. It’s darker not because it's burnt, but because it picked up much more of the cinnamon-sugar mixture and formed a dried crust on the cookie. It was like an exterior “skin” of crispy cinnamon sugar, almost akin to a thin craquelin we see on choux pastry!
The caveat here is that it seems there has to be a somewhat consistent ratio of cinnamon sugar to egg white, with just enough moisture to dry out and leave behind a crackly cinnamon sugar crust. And because of this I had about a 50% success rate.
Fifty percent is way too low for me to publish anything, but it is delicious and interesting enough to shelve for later testing. Do I have to make a paste of some sort? Should I add another ingredient? Is it feasible in general to "dredge" cookie dough balls with some other component for added texture complexity?
I still obviously have many things to iron out before it gets published, but maybe some of you will want to experiment!
You just take the extra egg white leftover from the yolk and set it aside until you’re ready to roll the dough balls. Then a quick bath in there before being completely coated in cinnamon sugar. And just like making chicken parmesan, this is a messy ordeal - you’ll likely be dealing with wet spheres of dough depending on how much egg white is there. Good luck!
Before starting the recipe, please read this!
Measure by weight, if possible.
Measuring by weight is the best way for you to replicate my recipes. I develop recipes using ingredients (even liquids) measured in grams, which is why you see them listed first in the recipe cards. For measurements under 5 grams, I will typically only list the volumetric measurements (teaspoons, etc.), as most home scales are not precise for such small weights.
In most cases, I have converted grams to volumetric measurements (aka US customary units) for bakers who prefer this method. However, the measurements are not as precise and may have awkward proportions. The recipes should still work, but for the ultimate precision, try to use weight.
This is the OXO scale I use daily. I also purchased this budget version of a good scale, which I keep at my Mom’s house for baking. If you’re interested in other tools I use for my baking, I’ve compiled a list here.
Use room temperature ingredients.
All my ingredients should be used at room temperature, or 65-75 °F/18-24 °C. I will always indicate if you need something outside this range. If no details are given, room temperature is the default.
Pay attention to the ingredient descriptions.
I try not to be brand-specific, but I will always note an interesting result from a type of ingredient, be it negative or positive.
A specific note regarding salt: I use Diamond Crystal Kosher salt for everything on this site except for frostings. In frostings, you want the salt to dissolve more easily, and kosher salt tends to leave granules behind. If you substitute table salt (more finely granulated) for recipes that list kosher salt, you must use half the volume indicated in my recipes.
Substitutions are hard.
That said, substitutions aren’t impossible but can be the toughest part of recipe development. Small swaps, like reduced-fat milk (2% fat) for whole milk (3.5% fat), usually work fine. However, bigger changes—such as replacing oil with applesauce or sour cream with Greek yogurt—can significantly impact texture and density.
Be wary of general, all-purpose substitutions in baking; I find that usually there is never a one size-fits-all solution. I carefully select ingredients for my recipes, so for the best results, start with the original recipe and modify with caution.
Read all the recipe instructions before beginning.
I’m in the “Pre-read the Chapter before Class Lecture” club... and I invite you to join! Baking new recipes can be intimidating, so let’s set you up for success. I want you to think about timeframes. Most fillings and frostings can be made ahead of time, and give you an extra day for mental space. Also, as you become a more proficient baker, you can anticipate and recognize steps. (“Oh, this has a meringue step, so I’ll need an extra clean bowl…” etc.) Ensure you go down the ingredient list and have everything at the right temperature.
.avif)

.avif)

Chewy Soft Snickerdoodle Cookies
For the cinnamon-sugar topping:
- 38 g (3 tablespoons) white granulated sugar
- 2 teaspoons ground cinnamon
For cookie dough:
- 360 g (3 cups) all-purpose flour, unbleached
- 1 ¼ teaspoons cream of tartar
- ¾ teaspoon kosher salt
- ½ teaspoon baking soda
- 226 g (1 cup) unsalted butter, slightly softened (around 65-75°F/18-24°C)
- 300 g (1 ½ cups) white granulated sugar
- 50 g (1 large) egg
- 20 g (1 large) egg yolk
- 20 g (1 ½ tablespoons) agave syrup/nectar, light or dark
- 10 g (2 teaspoons) vanilla extract
For the cinnamon-sugar topping:
- 38 g (3 tablespoons) white granulated sugar
- 2 teaspoons ground cinnamon
For cookie dough:
- 360 g (3 cups) all-purpose flour, unbleached
- 1 ¼ teaspoons cream of tartar
- ¾ teaspoon kosher salt
- ½ teaspoon baking soda
- 226 g (1 cup) unsalted butter, slightly softened (around 65-75°F/18-24°C)
- 300 g (1 ½ cups) white granulated sugar
- 50 g (1 large) egg
- 20 g (1 large) egg yolk
- 20 g (1 ½ tablespoons) agave syrup/nectar, light or dark
- 10 g (2 teaspoons) vanilla extract
- Prep the oven, pans, and cinnamon sugar mixture.
Arrange a rack in the middle of your oven and preheat to 375°F/190°C.
Place a sheet of parchment paper atop a cookie baking sheet(s).
Add the sugar and cinnamon (underneath the “cinnamon-sugar topping” heading) to a small bowl and mix to combine. - Combine the dry ingredients.
In a medium bowl, whisk together the flour, cream of tartar, kosher salt, and baking soda. - Mix the wet ingredients.
Add the slightly softened butter to your mixing bowl. Using a hand or stand mixer, mix on medium-low speed until butter is smooth and creamy.
Add the white granulated sugar, egg, egg yolk, agave syrup, and vanilla extract to the butter and mix on medium speed until slightly paler and aerated. There should be no separation of egg and butter, but the mixture will still be quite grainy from all the undissolved sugar. - Mix the dry ingredients into the wet ingredients.
Add the flour mixture into the butter mixture in three parts, mixing on low speed after each addition. Scrape down the sides of the bowl with a rubber spatula and mix again until no flour remains.
You know you’re done mixing when you have a cohesive dough ball that is slightly tacky.
- Scoop and bake.
Scoop the dough into (1, 2, or 3 tablespoons) evenly sized portions onto your prepared cookie sheet. Roll each into a smooth sphere. Coat each dough ball thoroughly in the cinnamon-sugar mixture.
Arrange the cinnamon-sugar-coated dough balls on the prepared baking sheet, about 2 inches (5 cm) apart.
Bake the trays one at a time using the timing below based on the dough ball size:
1 tablespoon: 8-10 minutes
2 tablespoons: 10-13 minutes
3 tablespoons: 13-16 minutes
Check during the last 3 minutes; the cookies will have spread into flat discs with slightly puffy, rounded tops. They will also develop large cracks with gooey-looking, pale dough in their crevices.
Allow the cookies to cool on the baking sheet for a couple of minutes. During this time, the crevices will close up a tad, creating a flatter cookie. Transfer them to a wire rack to cool completely.
STORAGE NOTES:
These cookies are wonderfully crisp along the edges with a soft, chewy center on the day that they’re made. If you’re making them ahead of time or have leftovers, store them in an airtight container or a zip-top bag. The edges will lose their crispness, but the cookie will be super soft and chewy throughout. They will last for at least 3 days with this chewy texture due to the concentrated sugar syrup (agave nectar).

Recipe Card - Adriana's Notes
Recommended Sugar Lab Recipes + Experiments
.avif)
.avif)

Got room for more dessert?
Subscribe to my Crumby Data newsletter! I share behind-the-scenes looks at recipe development, flavor testing for the Cakeculator, and life as a content creator. It’s free, lands in your inbox every few weeks, and you can unsubscribe anytime...no strings attached :)
Feel free to take a look at previous newsletters here!
.ico)
.avif)