.png)
.png)
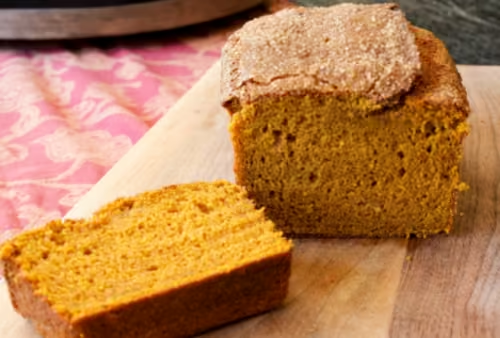
My Pumpkin Loaf Recipe – When Pumpkin Pie Meets Cake


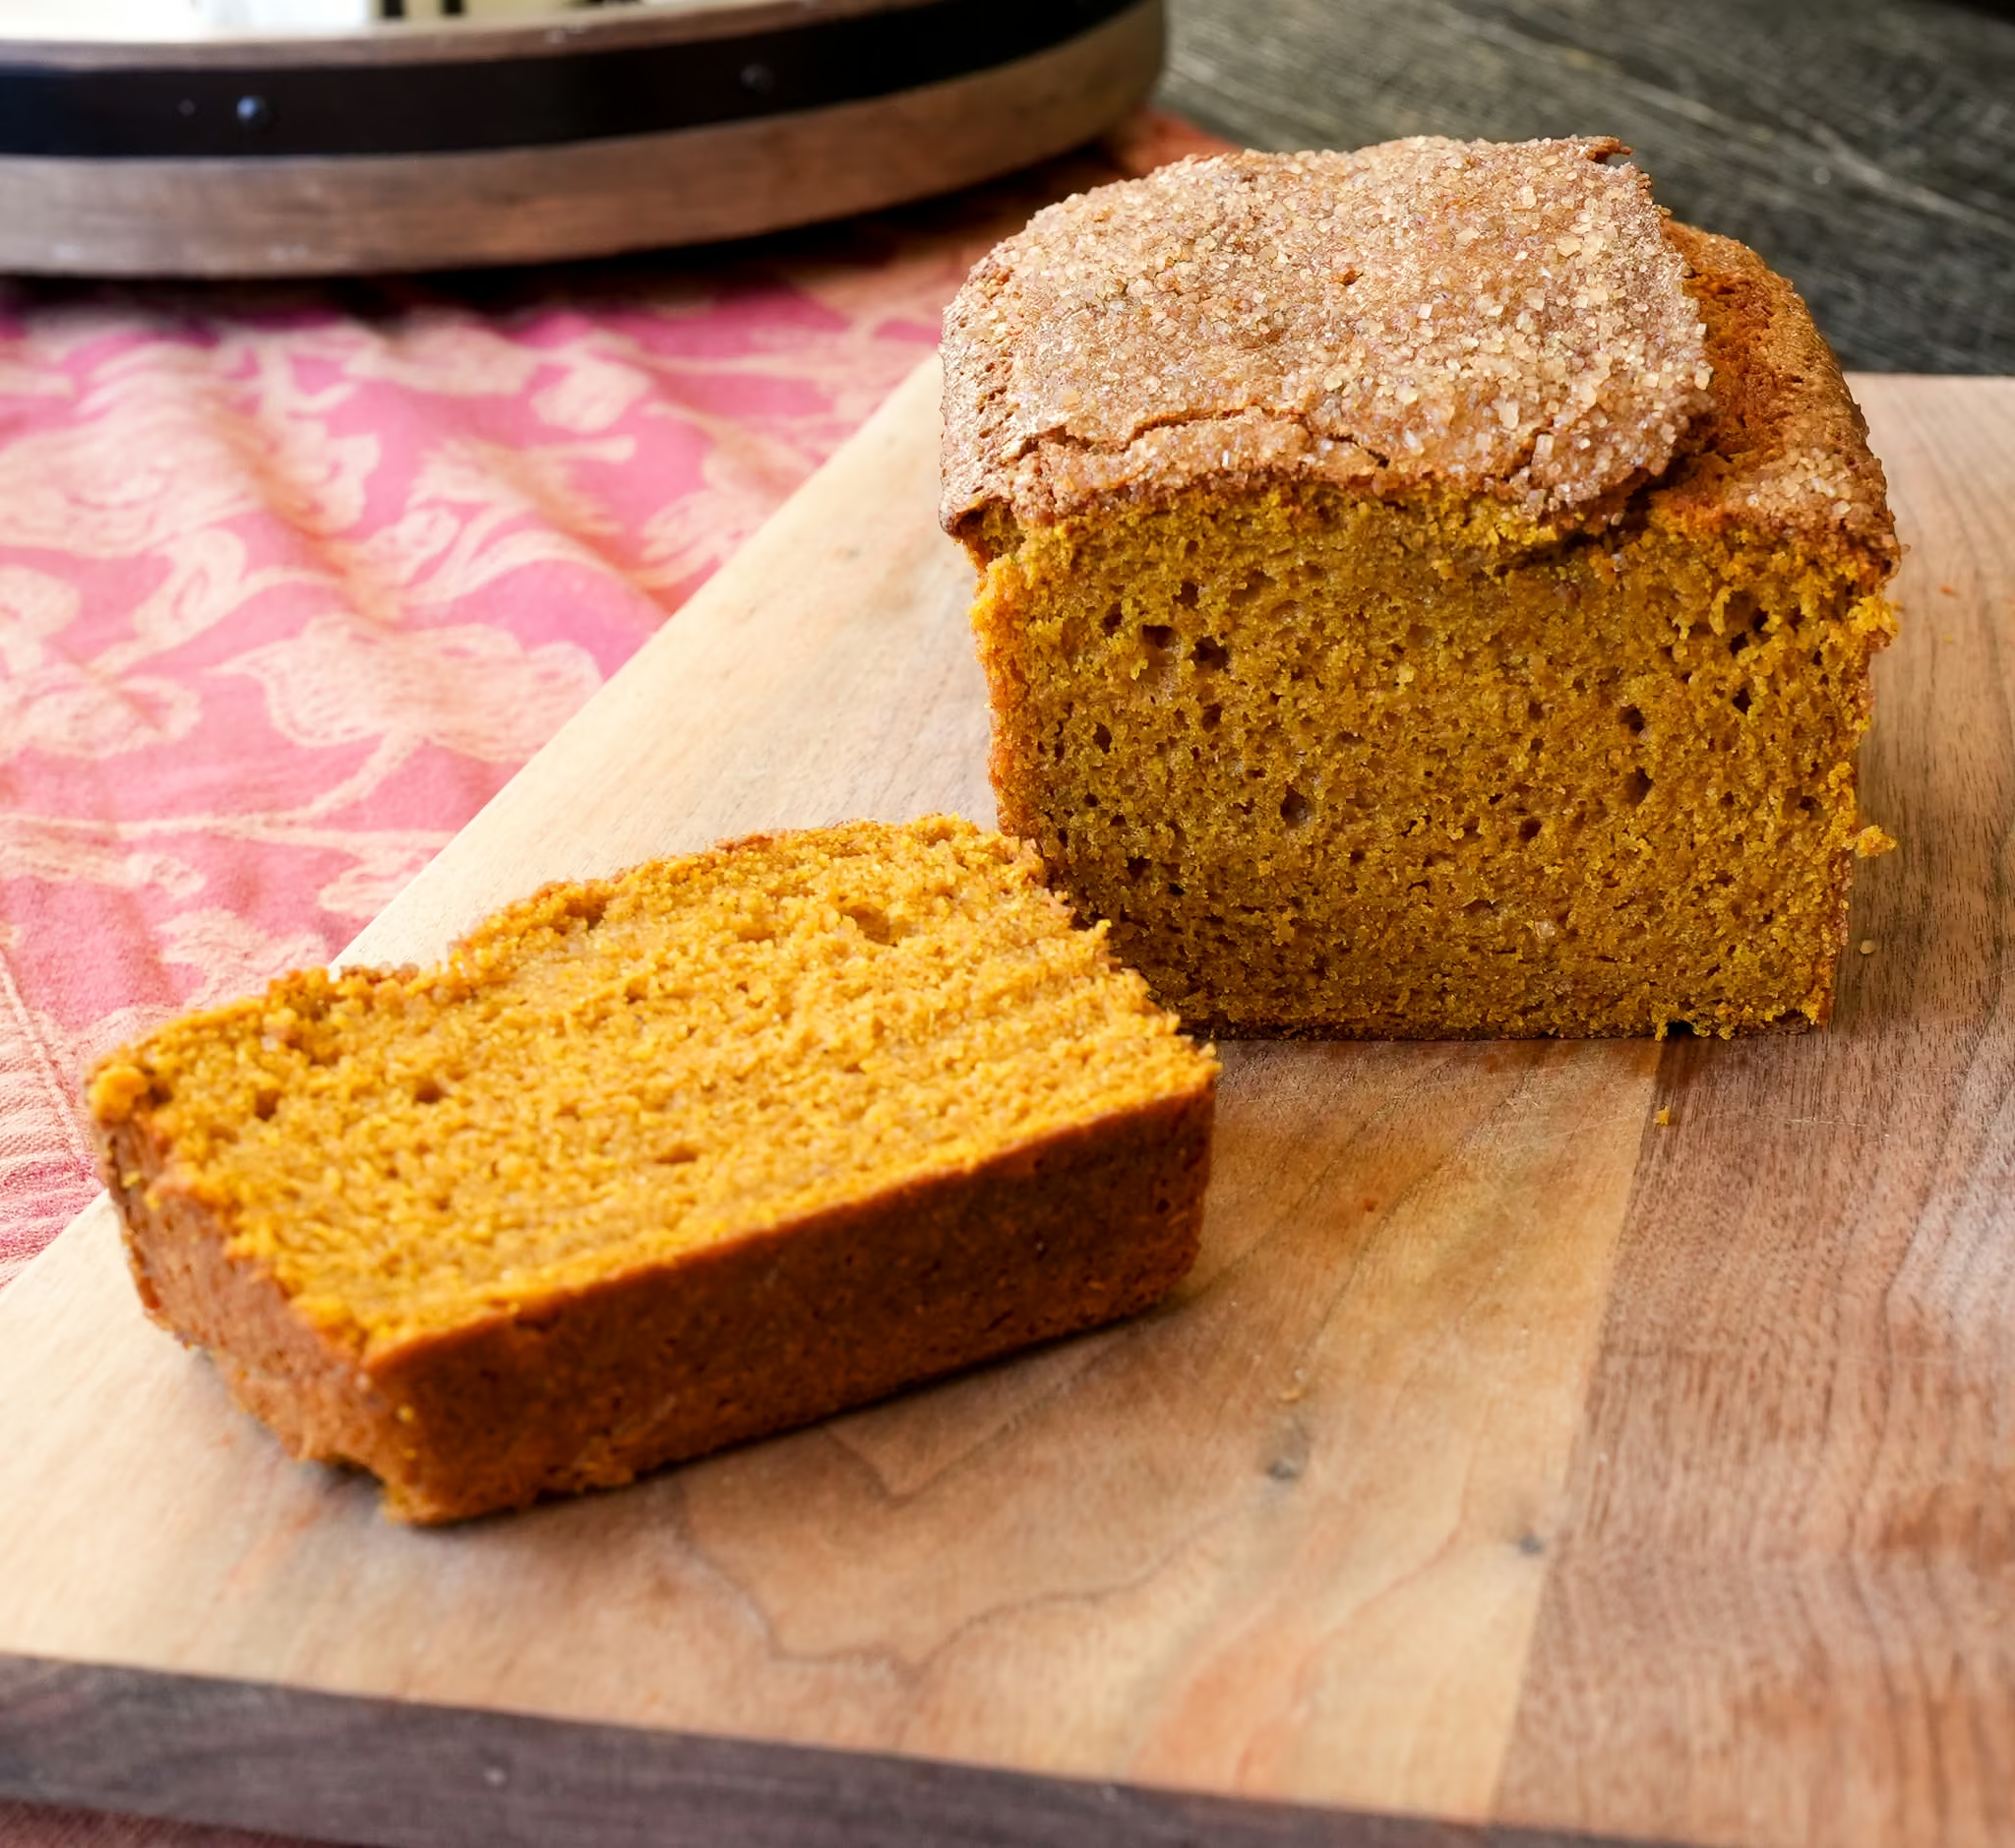
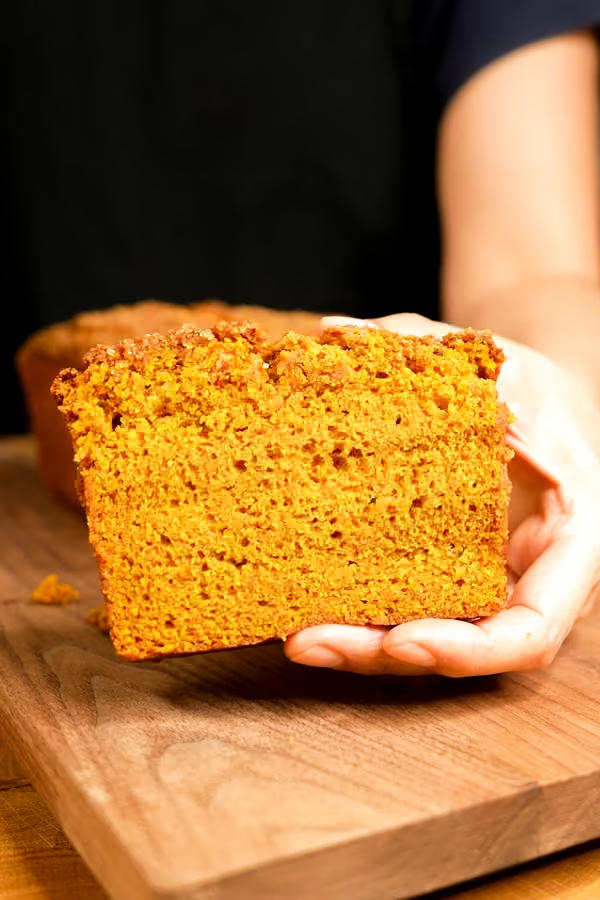
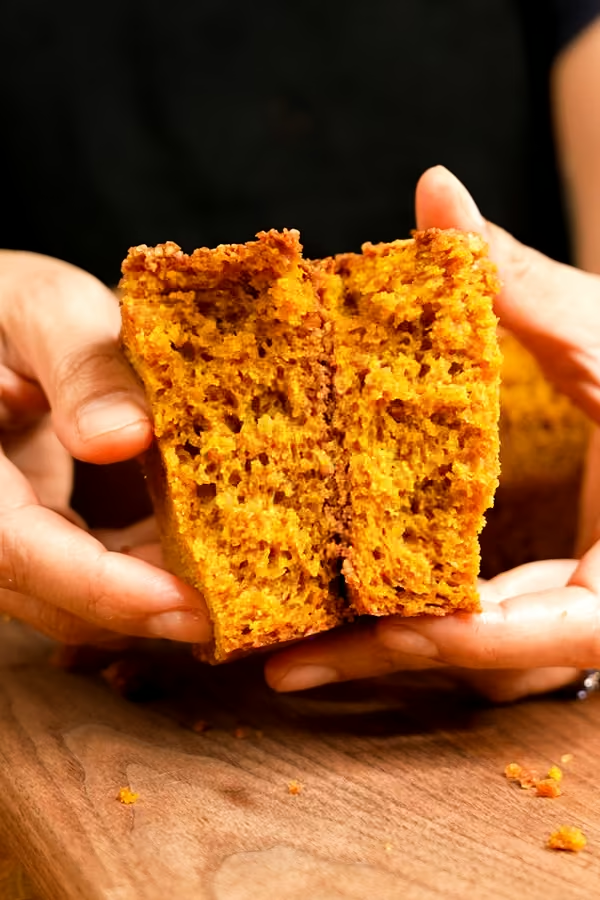
My pumpkin pie loaf is the most pumpkin-y cake I’ve ever made. The name is because it tastes just like a pumpkin pie custard, with a thick, substantial texture, a moist crumb, and a spiced, not-too-sweet pumpkin aroma. The top is delightfully crusty, reminiscent of a gingersnap topping, providing a perfect contrast to the creamy interior. This is a treat for those who crave the taste of pumpkin pie all year round.
As with most spice-laden foods, such as curries, this loaf intensifies in flavor the next day, making this the perfect dessert to make ahead of time. Just be sure to wrap it tightly to keep all the moisture intact.
And if you have any slices leftover, I highly recommend toasting slices in a bit of butter for a delicious breakfast treat - this is my favorite way to eat this bread:
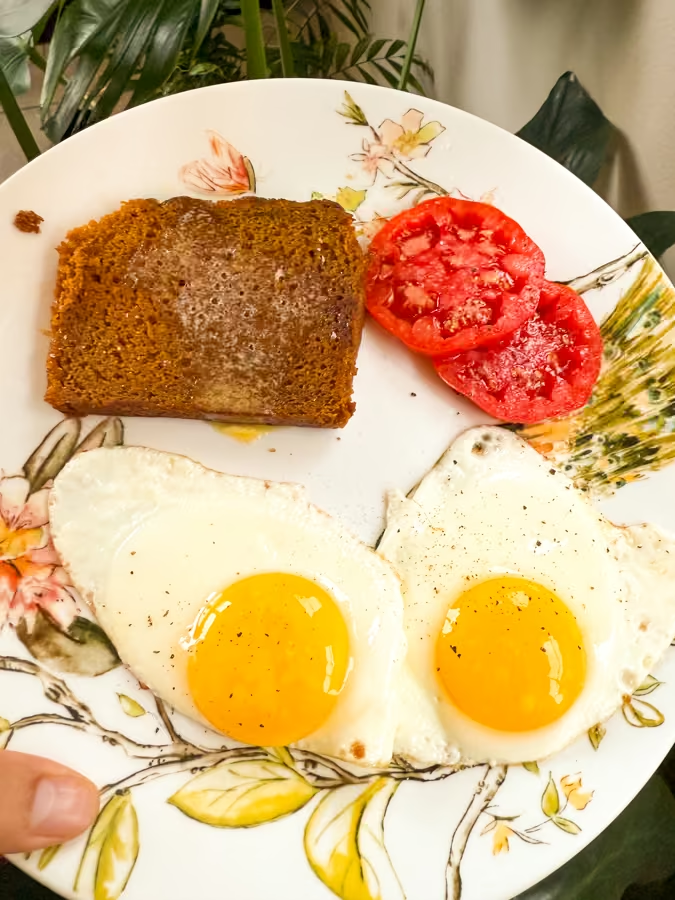
It tastes like French toast and pumpkin pancakes had a baby!
What is the taste, flavor, and texture of my pumpkin pie loaf?
This recipe utilizes an entire 15-oz can of pumpkin purée in just one loaf (for context, most recipes use one can for two loaves), resulting in intense flavor, texture, and color.
And that is completely by design - I started working on this recipe last year and shelved it because I couldn’t get the intensity of pumpkin I was looking for. I resumed testing earlier this year, which is a bit depressing to do pumpkin desserts in Spring because by Fall, I'm a bit tired of the flavor. But, I finally have it down.
I love baking with pumpkin, but, like most squashy vegetables, it contains more water than we need in most desserts. To concentrate its flavor, I had to cook it down to remove most of the water. To start this, I first fry some spices in butter. This releases aromatic compounds in the butterfat. I then mix in and reduce the purée, leaving behind pumpkin that’s been toasted in spiced butter. This creates a loaf that is full of spices and super moist and creamy - I would describe it as custard-like.
Wait, why do you call it a loaf - is this bread or… cake?
The naming conventions for these types of loaf-shaped baked goods are nebulous at best. I believe these are called “a pumpkin loaf” or “pumpkin bread” due to the shape of the pan in which we bake them. These pans are called loaf pans, which are also used to bake loaves of bread. However, you can typically use this type of batter in a muffin pan and then call the final baked good “muffins” as well.
Technically, these baked goods (including muffins and those called “quick breads”) are more related to a cake than a bread in that the ingredient ratios and mixing method ensure there is little to no gluten formation as the structural component of the final product. This leads to a cakier type of soft crumb rather than a chewy one. There may be other opinions, but this is how I’ve delineated things in my head.
What ingredients will you need to make my Pumpkin Pie Loaf Cake?
1 | CANNED PUMPKIN PUREE
This provides moisture, structure, and earthy sweetness. Pumpkin is rich in natural pectins and fibers, which help retain moisture and give baked goods a soft, dense texture. Its mild acidity can also subtly affect the pH of the batter, influencing color and leavening.
2,3,4 | GROUND CINNAMON/GINGER/NUTMEG
These spices add warm, sweet notes that enhance the flavor complexity and pair well with pumpkin-flavored desserts.
5 | KOSHER SALT
Salt enhances flavor and balances sweetness, making the spices more vibrant.
6 | ALL-PURPOSE FLOUR
Flour provides the structural framework from the starches contained within.
7 | BAKING POWDER
This chemical leavener releases carbon dioxide when mixed with water and heated, helping the batter rise to create a fluffy loaf. It’s a blend of an acid and a base, often including baking soda and cream of tartar, which react twice: once when wet and again with heat.
Side note: Most pumpkin loaves rely on baking soda, which needs an acidic ingredient to activate and create rise. Pumpkin is mildly acidic, but not nearly enough to neutralize the amount of baking soda I often see in pumpkin loaf recipes. Generally, I find baking soda overused in cakes. Its flavor can be harsh, and if the ratio is off, it can mess with rise, spread, and color. It dulls pumpkin’s natural orange, overbrowns the crust, and doesn’t create the sturdy, even crumb I want in a large loaf. (pH in cakes is an often overlooked characteristic that affects so many things.) Baking powder, by contrast, has a balanced acid-base ratio built in, making it more predictable and less disruptive to the recipe’s other elements.
8 | UNSALTED BUTTER
Butter adds richness and a tender crumb. Here, we melt it to bloom the spices and infuse flavor into the base. I tested browned butter, but its impact was minimal—spice-forward recipes like this tend to overpower its subtle nuttiness. Brown butter shines more in recipes with milder flavor profiles, like chocolate chip cookies or vanilla cake.
9 | VANILLA EXTRACT
Vanilla enhances sweetness and rounds out the flavor profile. It contains vanillin and other aromatic compounds that deepen the perception of richness and warmth.
10 | EGGS
Eggs provide structure, moisture, and emulsification. Proteins in the whites help set the structure as they coagulate, while yolks contribute fat and emulsifiers like lecithin for a smooth texture.
11 | BROWN SUGAR
Brown sugar adds sweetness along with molasses, which provides moisture, a deeper flavor, and a slightly acidic pH. The acidity can enhance leavening when combined with baking powder. Dark brown sugar will offer a stronger molasses flavor than light brown.
Step by step:
STEP 1 | COOK THE SPICED PUMPKIN BUTTER.
WHY:
Most pumpkin loaves have only a small portion of pumpkin puree in the recipe, but I wanted an assertive pumpkin flavor and used an entire can of pumpkin. I was able to do this by removing water from the puree, which makes up a large part of canned pumpkin. (Using a whole 15-oz can of pumpkin in a 1-lb loaf cake without modifying the recipe significantly would be disastrously soggy.) Pre-cooking the puree concentrates the flavor and removes excess moisture, ensuring the loaf has a dense yet creamy crumb. I also intensify the flavor by frying some spices in hot butter. The spices contain aromatic compounds, which upon heating get released and absorbed into the butter. This then coats every crumb of the cake with a depth of spicy flavor.
Also, the orange color pigment in pumpkins and various squash (called carotenoids) is soluble in fat. This means they mix in fat-based ingredients instead of water-based ingredients. While you fry the pumpkin in butter, you’ll see the butter turn orange! This is why my loaf is a beautiful orange hue - we’re breaking down the pumpkin plant cells and removing that color pigment and dispersing it into every crumb of the loaf. You’ll see this in my carrot cake, too, which also contains carotenoids that are cooked in butter.
HOW:
.avif)
Melt the butter until liquid (1a). Add the spices and salt and fry until fragrant (1b).
.avif)
Turn off the heat and mix all the pumpkin puree until it resembles an oily pumpkin butter. The liquid butter will appear separated at first (1c), but it will then blend into a loose, shiny mixture.
Return the mixture to medium-low heat and stir constantly until you have achieved 480 grams (about 2 cups) of spiced pumpkin butter. During this process, the pumpkin butter will cook and brown on the sides of the pan, so just keep scraping (1d).
.avif)
You can use a measuring cup or scale to know when it's done. If you don’t reach this amount, continue cooking. If you have less than 2 cups, simply add water to make it two cups (1e). Remember, we're just cooking out water so if you overdo it - no big deal, just add some water back in!
Allow the pumpkin butter to cool slightly before adding it to the batter. It can’t be piping hot, but it’s ok if it’s still a little warm to the touch. To speed up cooling, pour it onto a tray and place it in the freezer for 5-10 minutes.
STEP 2 | PREPARE THE PAN/OVEN.
WHY:
Lining the loaf pan will make it extremely easy to remove the baked loaf from the pan.
HOW:
.avif)
Prepare a 1-lb (8.5-in x 4.5-in x 2.75-in or 22 cm x 11.5 cm x 7 cm) loaf pan with a parchment paper or foil sling for easy removal, and coat it generously with baking spray.
Place an oven rack in the lower-third position and preheat the oven to 350°F/177°C.
STEP 3 | FLUFF UP THE EGGS AND SUGAR.
WHY:
Beating eggs with sugar introduces air, which helps provide tiny air bubbles that will expand within the cake. You can use a hand mixer or stand mixer, but the stand mixer will create a slightly taller cake because it’s a bit more efficient at mixing.
HOW:
.avif)
In a large bowl, add eggs and brown sugar. Mix on high speed for 3–5 minutes until the mixture becomes lighter in color and slightly fluffy. Meanwhile, I’m whisking my flour and baking powder together in a small bowl for the next step.
STEP 4 | ALTERNATE ADDING FLOUR AND PUMPKIN BUTTER
WHY:
Alternating flour with the pumpkin puree helps prevent the batter from becoming overmixed, which could toughen the loaf. It also promotes even distribution of moisture and dry ingredients, giving a uniform crumb structure and texture.
HOW:
.avif)
Add flour in 3 parts (4a) and pumpkin butter in 2 parts (4b).
.avif)
I like to stir at the very end to ensure there are no flour pockets or clumps of puree remaining (4c).
STEP 5 | BAKE
WHY:
Piping some butter along the surface of the loaf helps create an area where a bit of steam can easily release to create a more uniform loaf shape. Sprinkling coarse sugar on top of the loaf makes a crunchy final texture that contrasts with the creamy interior. Ensure that you use the coarsest sugar you can find, as more finely granulated sugars will dissolve into the high moisture contained in the batter while the loaf bakes.
HOW:
.avif)
Pour the thick batter into your prepared pan (5a). This loaf naturally cracks along the sides as it bakes, but if you want a cleaner look, pipe a line of softened butter along the top center of the batter (5b).
.avif)
Add a few tablespoons of turbinado sugar all along the top (5c). I like to completely cover the top because, as it bakes, this dries out the surface so you get the texture and flavor of a gingersnap on the top of your loaf. Bake for 1 hour to 1 hour and 10 minutes (5d).
STEP 6 | COOL BEFORE CUTTING
WHY:
Cooling allows the loaf to finish setting.
HOW:
.avif)
On the left (6a), you’ll see a loaf with the central butter line that I piped, whereas the loaf on the right (6b) did not contain the butter. It has a minimal effect, but if you want a more uniform domed surface, the addition of a bit of butter helps slightly.
Let the loaf cool in the pan for 10 minutes, then lift it out using the parchment/foil sling and transfer to a cooling rack. Wait until slightly warm before slicing.
Video
Honors Members Section
This extra material is accessible to Sugarologie Honors members.
Become a member to view extended research notes, technique analysis, and supplemental materials! Learn more about Sugarologie Honors here.
Already a member?
Before starting the recipe, please read this!
Measure by weight, if possible.
Measuring by weight is the best way for you to replicate my recipes. I develop recipes using ingredients (even liquids) measured in grams, which is why you see them listed first in the recipe cards. For measurements under 5 grams, I will typically only list the volumetric measurements (teaspoons, etc.), as most home scales are not precise for such small weights.
In most cases, I have converted grams to volumetric measurements (aka US customary units) for bakers who prefer this method. However, the measurements are not as precise and may have awkward proportions. The recipes should still work, but for the ultimate precision, try to use weight.
This is the OXO scale I use daily. I also purchased this budget version of a good scale, which I keep at my Mom’s house for baking. If you’re interested in other tools I use for my baking, I’ve compiled a list here.
Use room temperature ingredients.
All my ingredients should be used at room temperature, or 65-75 °F/18-24 °C. I will always indicate if you need something outside this range. If no details are given, room temperature is the default.
Pay attention to the ingredient descriptions.
I try not to be brand-specific, but I will always note an interesting result from a type of ingredient, be it negative or positive.
A specific note regarding salt: I use Diamond Crystal Kosher salt for everything on this site except for frostings. In frostings, you want the salt to dissolve more easily, and kosher salt tends to leave granules behind. If you substitute table salt (more finely granulated) for recipes that list kosher salt, you must use half the volume indicated in my recipes.
Substitutions are hard.
That said, substitutions aren’t impossible but can be the toughest part of recipe development. Small swaps, like reduced-fat milk (2% fat) for whole milk (3.5% fat), usually work fine. However, bigger changes—such as replacing oil with applesauce or sour cream with Greek yogurt—can significantly impact texture and density.
Be wary of general, all-purpose substitutions in baking; I find that usually there is never a one size-fits-all solution. I carefully select ingredients for my recipes, so for the best results, start with the original recipe and modify with caution.
Read all the recipe instructions before beginning.
I’m in the “Pre-read the Chapter before Class Lecture” club... and I invite you to join! Baking new recipes can be intimidating, so let’s set you up for success. I want you to think about timeframes. Most fillings and frostings can be made ahead of time, and give you an extra day for mental space. Also, as you become a more proficient baker, you can anticipate and recognize steps. (“Oh, this has a meringue step, so I’ll need an extra clean bowl…” etc.) Ensure you go down the ingredient list and have everything at the right temperature.
.avif)

%20(1).png)


Pumpkin Pie Loaf
For pumpkin pie loaf batter:
- 425 g (one 15 oz can or about 1 ¾ cups) canned pumpkin puree*
- 1 ½ teaspoons ground cinnamon
- 1 teaspoon ground ginger
- ⅛ teaspoon each of ground nutmeg, allspice, and cloves
- 2 teaspoons kosher salt
- 168 g (¾ cups/12 tablespoons) unsalted butter, cold from the fridge
- 200 g (1 ⅔ cups) all-purpose flour, unbleached
- 2 ¾ teaspoons baking powder
- 150 g (3 large) eggs, room temperature
- 345 g (1 ⅔ cups) brown sugar, light
- 2 teaspoons vanilla extract
For topping:
- A few tablespoons of coarse turbinado sugar**, for sprinkling on the loaf
- Optionally, some lightly sweetened whipped cream for serving
- Cook the pumpkin butter (you can do this ahead of time).
Measure out your canned pumpkin puree (or just open your 15-oz can.) To know when the puree is done cooking, we’ll use either the volume or the weight of the final puree. For volume, you’ll need a measuring cup that holds at least 2 cups. If using weight, any heatproof container works. Set those aside.
To a small bowl, add the ground spices and salt. Set that aside.
Cut the unsalted butter into large chunks and melt in a pan over medium-low heat, stirring until fully liquid. Add the spices and salt, turn the heat up to high, and fry your spices in the fat to release all the aromatic compounds—about 30 seconds. Turn off the heat.
Add the pumpkin puree and stir until it forms a thick, oily paste. Return the pan to medium-high heat and cook, stirring constantly and scraping the toasty pumpkin bits, until reduced to 480 grams (about 2 cups). This usually takes 5 to 10 minutes. To check, scrape the mixture back into its measuring container—if it’s over, return some to the pan and keep cooking; if under, add water to get it back up to 480 grams/2 cups.
Let the pumpkin butter cool slightly before using. It can still be warm to the touch, just not hot. For faster cooling, spread it onto a tray.
You can make this ahead—store in an airtight container and bring to room temperature before mixing into the batter. - Prepare the pan and the remaining recipe components.
When you’re ready to bake, place an oven rack in the lower third position and preheat the oven to 350°F/177°C.
Line a 1-lb loaf pan (8.5 x 4.5 x 2.75 inches / 22 x 11.5 x 7 cm) with a parchment or foil sling for easy removal (see step-by-step above). Coat generously with baking spray.
In a small bowl, whisk together the flour and baking powder. Set aside. - Fluff up the eggs and sugar.
To a large bowl, add the eggs, brown sugar, and vanilla. Mix on high speed (medium-high for a stand mixer) for 4-5 minutes. This step is what creates the tiny air bubbles that expand during baking to create a rise in your loaf. A hand mixer will create a shorter (but still yummy!) loaf, whereas a stand mixer will create a slightly taller loaf. - Alternate adding the flour and pumpkin butter.
Add the flour in 3 additions and the pumpkin butter mixture in 2 additions as follows:
a. Add half the flour and mix on low speed until just incorporated. Scrape down the bowl with a spatula.
b. Add half of the pumpkin butter, mix on low, and scrape the sides of the bowl.
c. Add half of the remaining flour mixture, mix on low, and scrape the sides again.
d. Add the remaining pumpkin butter, mix on low, and scrape.
e. Finally, add the remaining flour and mix until the ingredients are fully combined. - Bake until dark golden brown.
Pour the batter into the prepared pan.
The pumpkin loaf naturally cracks around the perimeter of the dome as it bakes, but if you want a more defined and central “crack,” pipe a line of softened butter, about half a centimeter in diameter, along the top and center of the pumpkin cake batter.
Liberally sprinkle coarse turbinado sugar along the top of the loaf until it covers the entire surface. This will give it the "gingersnap-like" crust.
Bake for 1 hour to 1 hour 10 minutes. To test for doneness, insert a skewer directly into the middle, which should come out oily but clean. Even better, a thermometer placed in the center of the loaf should read around 190°F (88°C). - Allow the loaf to cool completely before cutting.
Cool in the pan for 10 minutes, then lift out using the sling and cool completely on a wire rack before slicing.
To serve, I like to cut this loaf into fat slices. You can also make some lightly sweetened whipped cream and serve it on a plate.
This loaf will be wonderfully creamy-textured and flavorful for the next few days. Just wrap tightly in plastic wrap and store on a cool countertop for a couple of days. My husband really likes this loaf cold, so you can also keep it in the refrigerator for as long as it lasts ;)

Recipe Card - Adriana's Notes
*I know it may be tempting to use your own homemade pumpkin puree, but using canned pumpkin ensures that you will get the same recipe I’m making here since the components of the puree (water, starches, sugars, etc.) are more consistent. I'm using the Libby's brand in this tutorial but have also used generic Walmart and Target brand.
**Try to use the coarsest sugar you can find, also called turbinado or sometimes “sugar in the raw.” These are fat crystals that are less likely to dissolve into the highly hydrated pumpkin batter while it bakes, leaving behind a crispy, crunchy top that tastes like a gingersnap cookie.
Recommended Sugar Lab Recipes + Experiments
.avif)

Got room for more dessert?
Subscribe to my Crumby Data newsletter! I share behind-the-scenes looks at recipe development, flavor testing for the Cakeculator, and life as a content creator. It’s free, lands in your inbox every few weeks, and you can unsubscribe anytime...no strings attached :)
Feel free to take a look at previous newsletters here!
.ico)