.avif)
Dulce De Leche Chocolate Chip Cookies (version 2.0)


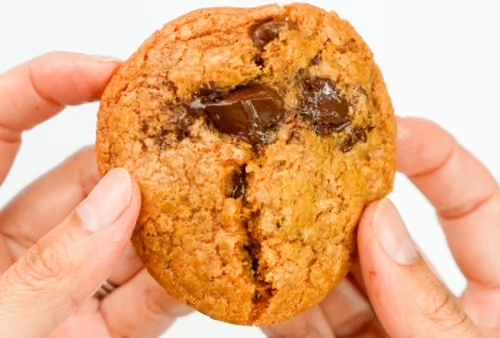
My dulce de leche cookie tastes of deeply roasted milk and brown butter, with the ultimate chewy texture. The secret is to use dulce de leche and browned butter as the base of the cookie dough, which creates an intensely delicious toasted flavor that permeates every single crumb. It’s an incredible technique that also keeps the cookie incredibly soft for at least 3 days.
.avif)
In this updated version of my cookie, I’ve addressed all the comments and suggestions from you all about overspreading and butter leakage. I have retested this cookie several times and now have a much better understanding of it and drop cookies in general! You'll find this reformulated recipe bakes up more consistent by just changing a few things from the original recipe.
How is this cookie recipe different from my original Dulce de Leche Cookie recipe?
The primary issue for some bakers was that version 1.0 of my Dulce de Leche cookie either spread too much or leaked along the edges. Based on pictures and descriptions I was getting from bakers, I was able to replicate the result, which is pictured below:
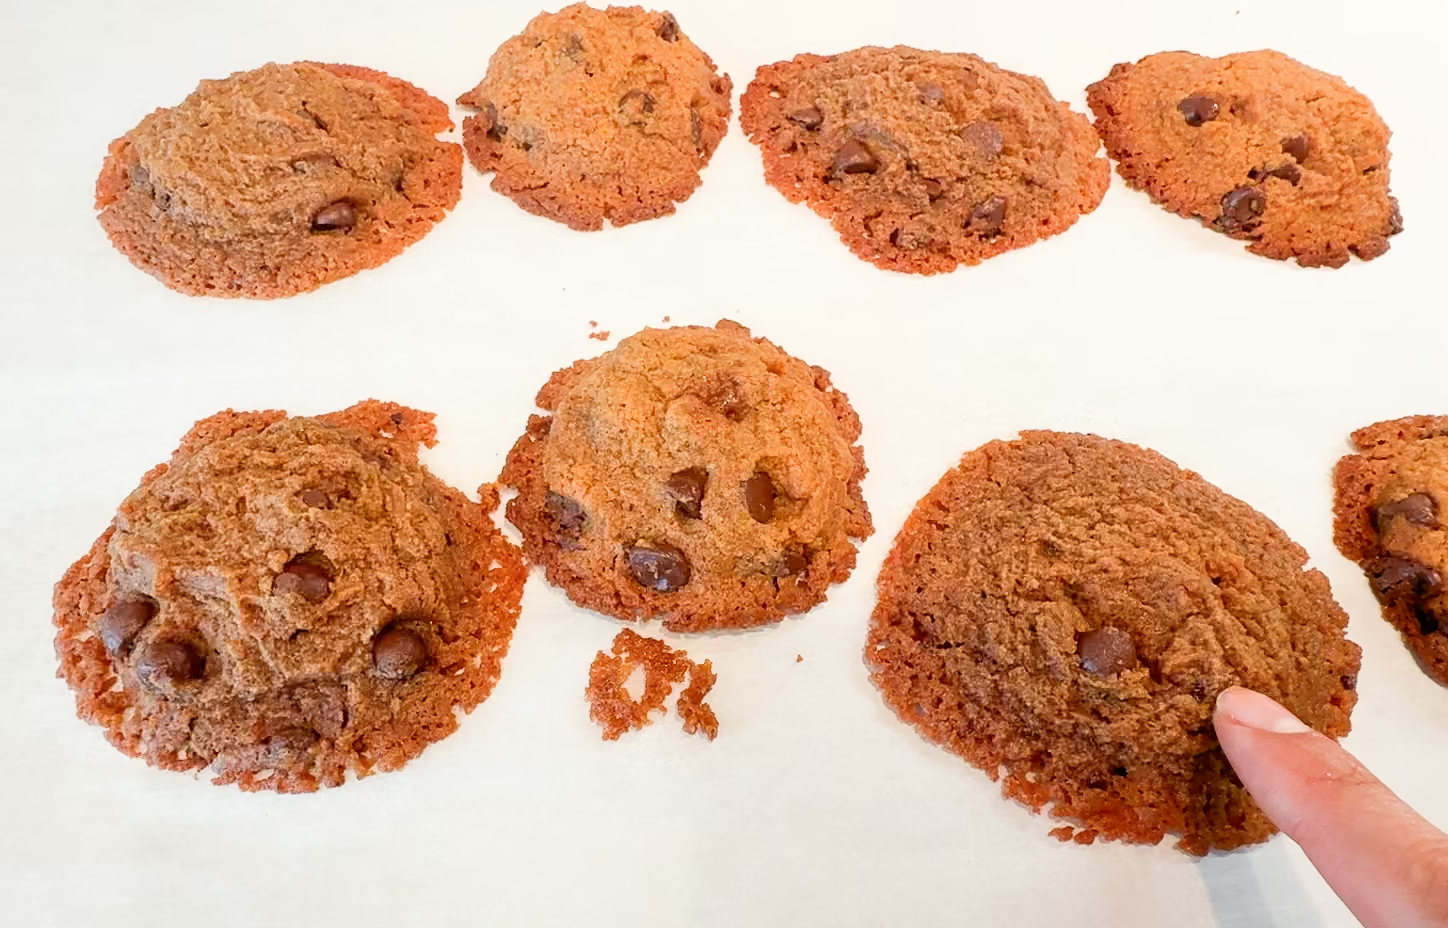
It seems that, with these cookies, the emulsion was not formed properly during the butter-mixing stage with the dulce de leche. Notice how there's a kinda lacy artifact around the edges of the cookie; these edges were actually quite delicious! And that’s because it’s mostly butter and sugar. (Like lace cookies! Have you ever tried them?) The butter-sugar-dulce de leche mixture is not being held in place and is leaking out of the cookie before it can set.
So what’s causing this?
It could be undermixing, mismeasuring ingredients, or a plethora of other things. Taking those things into consideration, the main takeaway for me is that:
- I need to work on a lacy cookie bc those edges were yummy, and more importantly,
- my original recipe was perhaps too reliant on exact ingredient proportions, mixing timings, and ingredient temperatures. In other words... too finicky.
How, then, could I make my recipe more user-friendly and less of a pain in the cinnamon buns?
The main way I achieved a more consistent recipe was by adding an egg yolk. In my previous recipe, I relied on the emulsion between the butter and the dulce de leche. But the temperatures and mixing times had to be exactly right for everything to come together properly.
The egg yolk in this newer recipe is a bit of insurance to help establish the emulsion in the initial steps. With the lecithin in the yolk holding things together a little more securely, we’re able to form a more consistent cookie dough that spreads evenly in the oven.
A second way to achieve greater consistency is to reduce the amount of dulce de leche, thereby reducing its impact on the cookie's texture and the formation of the emulsion. I had to fine-tune this so that we still get the flavor hit from the dulce de leche. This part of the recipe is still a work in progress because I hope to make this cookie agnostic about the type of dulce de leche you have access to. Right now, I’ve only tested two kinds, and they reliably create a fantastic flavor and texture for the final cookie.
Another modification you may notice in this newer method is that I’m going to give you more temperature cues. I’m finding that cookie recipes, in general, can be inconsistent in their results because we’re all over the place with temperatures. We "brown" the butter, then “cool” it, or we use “hot” butter, or we “rest” the cookie dough in the fridge before baking. Does that mean we bake when cold? Freezing? Room temperature?
I’m guilty of these nonspecific recipe details too, but what do those descriptors even mean?! Cookie spread depends quite heavily on heat transfer through the ingredients, so initial temperatures influence how the cookie spreads and sets, which in turn affects the final texture.
Moving forward, I will try to provide temperature cues. This is largely inspired by my recent adventures in bread baking, which give us DDTs, or Desired Dough Temperatures. DDT is essential in bread baking to ensure a consistent environment for proper fermentation, but I’d like to extend that thinking to other baked goods, including cookies. Although we’re (usually) not concerned with fermentation temperatures in cookies, I think providing the DDT will help us achieve the most replicable results, which we can all agree are a bit unpredictable at times.
Ok, onto the cookie recipe!
What is the flavor of the dulce de leche chocolate chip cookie?
Dulce de leche is one of my favorite ingredients to use in baking; it’s truly a gift from the Latin kitchen gods. My rationale for using dulce de leche in cookie recipes is that it significantly enhances flavor with an intense, toasted dairy note. In cookies, we only have a limited time and temperature span to bake in the oven. Sometimes it’s sufficient, such as in shortbreads or other cookies where ingredients are highlighted in their more “native,” untoasted state.
In chocolate chip cookies, however, it’s fun to aim for more developed flavors; you’ll often see descriptions such as toffee-like, butterscotch, or caramely. All of those things take heat and much longer times than baking a cookie, so we often have to resort to adding ingredients that have already undergone such reactions. Dulce de leche is one such ingredient, as it is milk that has been super-toasted.
The Spanish translation of dulce de leche (pronounced DOOL-say day LAY-chay) is “candy [made] of milk” or “sweet [made] of milk,” and it is often described as a milk-based caramel. Still, the flavor is predominantly due to the Maillard reaction rather than caramelization. And I get it - "Maillard reaction milk" is not as appealing sounding as "milk caramel." 🙂
What is the texture of the dulce de leche chocolate chip cookie?
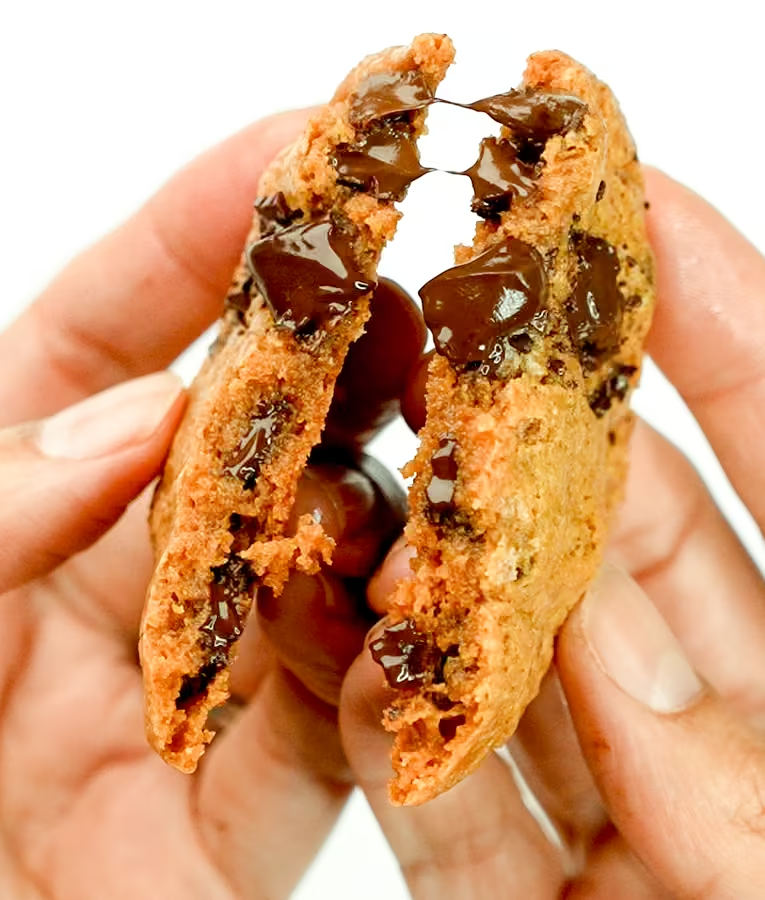
Texturally, this cookie is very chewy. There are no crispy tops or edges on this one. Once it comes out of the oven, it's super soft, and as it cools, it gets this awesome chewy texture that lasts for at least 3 days in an airtight container. (I have not tested for longer, as they seem to disappear before I can make any observations.) Along these lines, this is an excellent make-ahead recipe.
These cookies stay soft and chewy because the dulce de leche contains a sugar syrup, or a highly concentrated form of dissolved sugar. This syrup has a bit of water, which the sugar is holding onto very tightly, and it’s going to keep that water as long as it possibly can. This is what causes the cookie to remain soft. You may encounter the term “humectant,” which is another name for this sugar syrup, as it helps retain moisture in the cookie. If you ever wonder why your baked goods with honey or other syrups stay moist or attract water on their surfaces, it’s because they contain humectants.
What kind of dulce de leche can you use in this recipe?

With this newer version, I’ve tested two types of dulce de leche available in the US. They are
- Nestle La Lechera from a squeeze bottle (pictured on the left)
- Nestle La Lechera from a can (pictured on the right)
The difference between these two is the presence of agar in the canned version, which I surmise is to “thicken” the dulce de leche. It does indeed have a scoopable texture rather than the pourable consistency of the squeeze bottle version.
From a food standpoint, there is nothing wrong with using agar as a thickener; I just really hope it’s for other purposes (perhaps to enhance the product's longevity) rather than cutting corners by using 100% milk and sugar to achieve the same result, albeit at a higher cost. Anyways.
Flavor-wise, these two products are similar, resulting in an identically flavored cookie. Texturally, because the agar imparts the thickening of the dulce de leche in the can, it thickens the dough in the same regard. This, in turn, affects how the cookie dough bakes and sets, so I have noted that less flour should be used when using the can.
Can you use another type of dulce de leche?
It may work - maybe try a half recipe first to give you a feel for the substitution. Here are my suggestions if you choose to be adventurous with this recipe:
- If you go with homemade dulce de leche, use only dulce de leche made in an airtight container. There are many methods for making dulce de leche, including baking it in an open dish in the oven. These methods are not recommended for this recipe.
The dulce de leche must be made without any further evaporation of water from the condensed milk. This ensures that the composition of the dulce de leche remains consistent in its ratios of water, sugar, and protein. Some bakers like to do this directly in the can it came in, whereas I pour condensed milk into a jar and pressure-cook it. For this method, use the HIGH FLOUR AMOUNT indicated in the recipe card. - Other brands of Dulce de Leche may work if the only ingredients are primarily milk and sugar. Sometimes other ingredients, such as glucose or preservatives, are added. In these cases, I’d experiment with a half recipe and start with the LOW FLOUR AMOUNT and work your way up from there.
What ingredients do you need for dulce de leche chocolate chip cookies?

Dulce de leche is sweetened condensed milk cooked over a prolonged period, containing sugars and milk proteins. This changes the flavor, color, and texture of the condensed milk. The flavor is deeply complex, with notes of caramel, nuttiness, and toasted goodness from both the Maillard and caramelization reactions. This changes the color, which can range from tan to deep brown.
Brown sugar supplements the dulce de leche sugar, which is the primary source of sweetness in this recipe. The brown sugar adds a bit of molasses to the cookie, giving it a deeper flavor and darker color.
Unsalted butter is the primary source of fat in this recipe. It’s also browned, which is a process that heats the butterfat to a high enough temperature to toast the milk solids.
Butter is a magical ingredient that contains all the necessary components for the Maillard reaction, which requires proteins and sugars to produce these toasty aromatic compounds. Also, it’s not just the toasted milk solids that are the flavor; during the Maillard reaction, many aromatic compounds are created, and some only dissolve in fats. So, cooking these milk proteins in the butterfat creates a flavorful liquid that coats every bite of this cookie with roasty, toasty goodness.
I also use unsalted butter in most baking applications because it has a more consistent salt content and is used in large quantities, which can make your recipes overly salty.
Egg yolk is the glue that holds this recipe together. It has low moisture, which keeps the cookie nice and chewy (rather than cakey or spongy), and, most importantly, it contains lecithin. As an emulsifier, lecithin holds fat and water-based ingredients together. The dulce de leche-butter emulsion is held in place by the egg yolk, forming the foundation on which the flour and other ingredients sit to create the cookie dough.
Vanilla extract and salt are the flavoring enhancers.
Baking soda is an alkaline powder that does a few things. It reacts with acidic ingredients in recipes (in this case, brown sugar) to create carbon dioxide gas, which expands tiny air bubbles and gives a slightly aerated texture. It also contributes to the cookie's browned exterior. Baking soda increases the rate of the Maillard reaction, which is the browning and toasting that occurs between sugars and proteins when exposed to heat. And lastly, as it increases the dough's alkalinity, it also affects the spread. Eggs set less readily in alkaline environments, so you’ll see that cookies with baking soda spread outwards more instead of baking like a lump.
All-purpose (or plain) flour is the starch in this recipe and gives the cookie structure. You can use bleached or unbleached flour, but I use unbleached in all my recipes as I prefer the flavor.
Chocolate chips and chunks add bulk and structure to the finished cookie. This recipe uses half chocolate chips and half chocolate chunks from a solid bar.
Chocolate chips come in a wide variety, but for the most part, these chips are manufactured with a special fat formulation (rather than pure cocoa butter) that helps them retain a classic “drop” shape even at high baking temperatures. This also makes them slightly cheaper than real chocolate products. I like to use semi-sweet chips from Costco in my cookies.
For chocolate chunks, you’ll need a bar that you'll chop into ¼-inch chunks. This type of chocolate melts more easily at baking temperatures because of its cocoa butter content. This melts into irregular globs in the cookie dough, but upon cooling, they solidify, creating delicious, creamy pockets of chocolatey goodness. The type of chocolate is purely a matter of preference, but I usually combine milk and dark chocolate. My favorite kind of chocolate bar comes from Trader Joe’s.
Step by step:
In this second version of my Dulce de Leche Chocolate Chip Cookie, I’m going to get super detailed in this next section about the process. I’ll give DDTs (desired dough temperatures) and show you exactly what the dough should look and feel like before baking.
Heads up: It’s not necessary, but for ultimate precision, use an instant-read thermometer. Just this purchase alone will substantially improve your baking because taking the temperature of things (doughs, liquids, and even your baked goods) is incredibly consistent. There’s no relying on the feel or looks of things, which is called a qualitative observation. And although your qualitative observation skills will improve with time and experience, more quantitative measures, such as temperature taking, will help guide you at first. 70°F cookie dough is 70°F - whether it’s in my kitchen or yours.
I use a Thermapen, but I have a lower-cost option (on Amazon here) that I keep at my Mom’s house, and it works fine.
STEP 1 | Determine the correct amount of flour
WHY:
The two Nestle Dulce De Leche products differ in that the canned version contains agar, whereas the squeeze-bottle version does not. Agar helps bind water and creates a thicker filling, so less flour is needed to achieve the same cookie structure and spread.
HOW:
Check your dulce de leche before starting:
- If using Nestlé canned dulce de leche with agar, use the LOW FLOUR AMOUNT: 196 g (1½ cups + 2 tablespoons) all-purpose flour.
- If using Nestlé squeeze-bottle dulce de leche or any dulce de leche without agar, use the HIGH FLOUR AMOUNT: 240 g (2 cups) all-purpose flour.
STEP 2 | Prepare the oven, pans, and chocolate.
Preheat the oven to 375°F (190°C) with a rack in the middle position. Line a baking sheet with parchment paper or a silicone baking mat. If using a chocolate bar, chop it into ½-inch (1 cm) chunks and set aside.
STEP 3 | Brown the butter.
WHY:
This cookie dough gets its flavor from many angles, but the two biggest contributors have to be dulce de leche and brown butter. I’ve tried this cookie without browning the butter, and it’s just not as flavorful. That’s because browning butter creates rich caramel and toffee flavors through Maillard reactions involving the milk solids. And most importantly, it distributes those tasty flavor compounds, some of which mix only into fats, into every single crumb of this cookie.
Once we make the brown butter, immediately pour it into the dulce de leche mixture. This does a couple of things: 1) it slightly dissolves the brown sugar, although not completely, as there is not nearly enough water to do this to completion, and 2) it cools down the brown butter mixture.
The process of butter browning will likely have exceeded 340°F / 171°C, as that is the temperature required to toast the milk solids in earnest. The next step involves making an emulsion, which needs an egg yolk. But if we were to add the yolk straight into the hot butter, it would most certainly cook the yolk, which coagulates (or gels) starting at 149°F / 65°C. Firming up the egg yolk in this way is not ideal because we need proteins to gel when the cookie bakes - not when we’re mixing the cookie dough! And to lower the temperature, we mix the hot butter with room-temperature dulce de leche and brown sugar, which immediately cools the butter for the egg.
HOW:
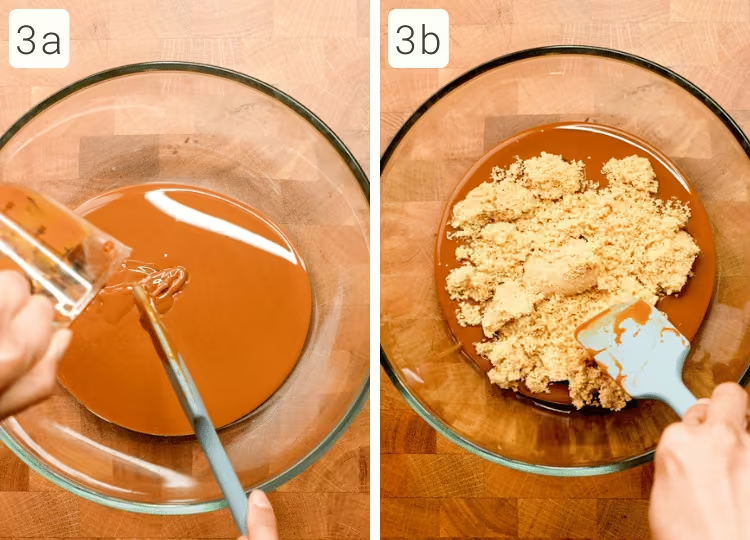
Add the dulce de leche (3a) and light brown sugar (3b) to a large heat-proof mixing bowl, then place the bowl near the stovetop. I’m using the Nestle Dulce de Leche from a squeeze bottle, which drips into the measuring cup. If I had used the canned version, it would be more scoopable. Set this bowl right next to where you’ll brown the butter for easy access.
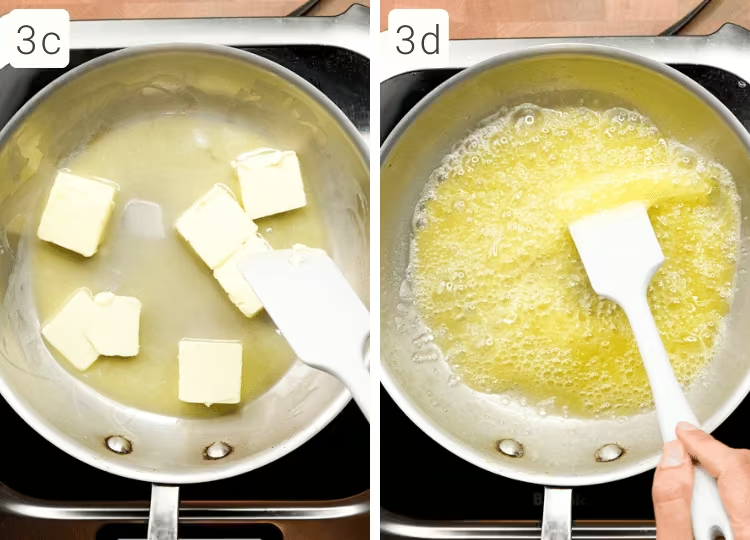
Melt the butter in a light-colored pan over medium-low heat (3c). Swirl or stir the pan with a spatula as it foams (3d).
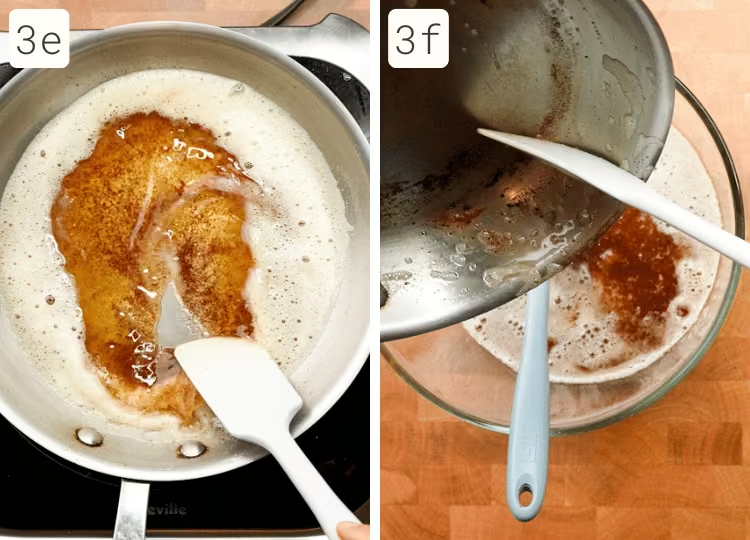
Watch carefully; the foaming will slow down, and there will be no “crackling” sound as the milk solids turn medium brown (3e). Immediately pour the browned butter into the bowl containing the dulce de leche and brown sugar, scraping in all of the browned bits with a spatula (3f).

Stir the hot mixture for about 1 minute to cool the mixture so the eggs do not cook when added (3g). The mixture can still be quite warm and doesn’t need to be completely cool to proceed. No need to measure, but I’m just showing you that mine is around 90-100°F/32-38°C when I’m done with this step (3h). I’m going to add the egg yolk directly to this warm mixture.
STEP 4 | Add the egg yolk and flavoring ingredients.
WHY:
Once we cool the butter mixture a bit, we can mix in the cold egg yolk, vanilla, and salt. The cold yolk further reduces the risk of it cooking prematurely in the butter mixture.
This step is the primary emulsification step for this cookie dough. The egg yolk contains lecithin, a molecule with both water-loving and fat-loving parts. You can think of it as a tiny molecular “adapter” that can connect water and lipids. (Lipids are the broader category that includes oils, which are liquid at room temperature, and fats, which are solid at room temperature.)
Generally, lipids and water don’t mix because they prefer to hang out with their own kind. Still, once you add the lecithin - or the adapter - you can now get a dispersion of the water with the lipid rather than it separating from each other. And that’s the important part- although you may be able to mix water and oil initially, they will naturally separate over time. The emulsifier prevents this from happening as readily. And this is the main difference between the older recipe and this new one - the egg yolk will hold things in place a little better, ensuring that the cookie dough’s foundation, which is this emulsion, is much more stable and therefore yields a cookie that spreads more evenly.
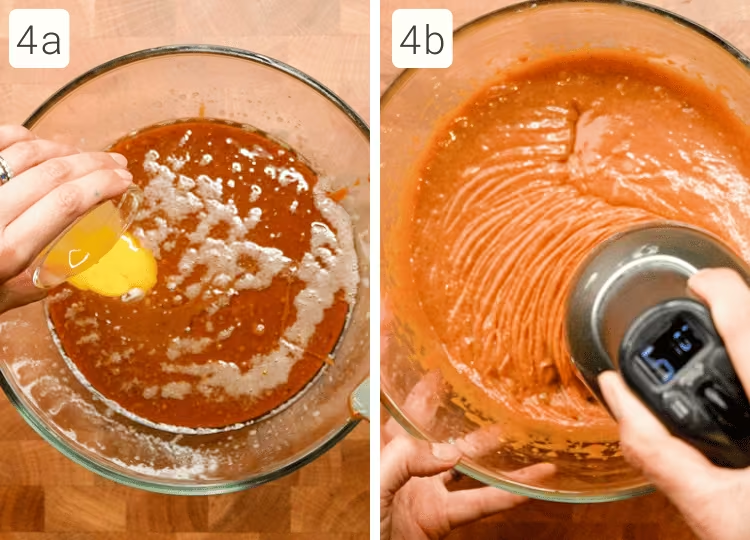
Add the cold egg yolk, vanilla extract, salt, and baking soda to the mixing bowl (4a). Using a hand mixer or a stand mixer fitted with a paddle attachment, mix slowly at first, then increase to medium-high speed and mix for 1-2 minutes (4b).
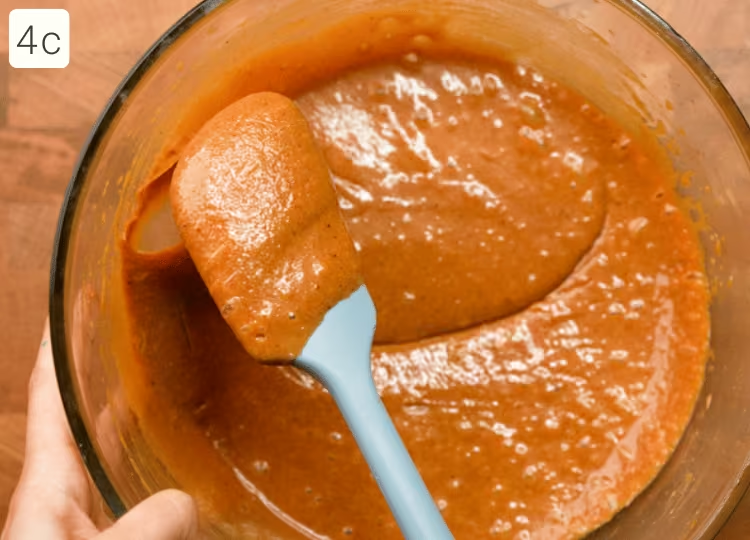
Scrape down the bowl several times to incorporate any butterfat clinging to the sides. The mixture should look glossy, grainy, and thick with no visible butterfat separation (4c).
STEP 5 | Add the flour and chocolate.
WHY:
Another great source of structure for this cookie is the flour. While the emulsion we created earlier serves as the foundation for this cookie, the flour will fill in the gaps, providing additional structure. Chocolate chip cookies of this kind (melted butter, chewy, etc.) tend to run very dry because they are extremely low in moisture. So there is actually very little starch gelatinization occurring, say, compared to a cake, where you’re getting super fluffy, aerated, and hydrated crumbs. Here, the flour, I think, acts more as a space filler, with very little overall gelatinization in the cookie. Nonetheless, it is a very powerful structural component of the cookie, as you may have experienced if you’ve ever added too much flour to one.
HOW:
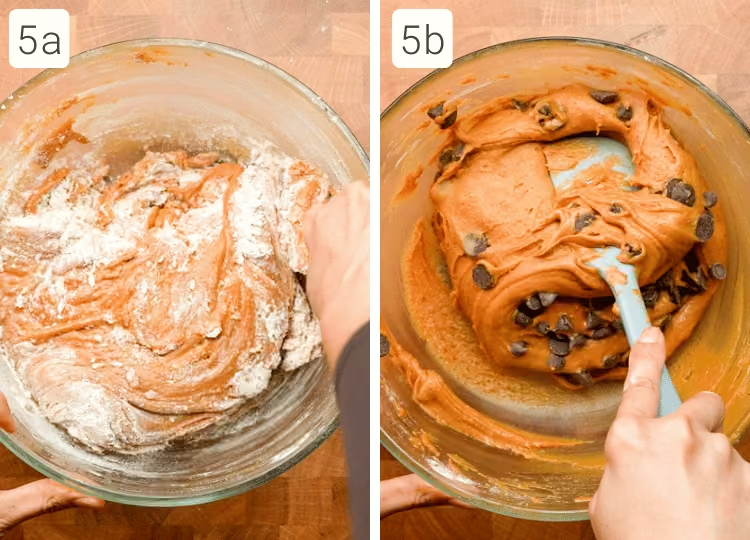
Stir the flour into the dough with a spatula until no dry flour remains (5a). Fold in the chocolate and any mix-ins using a rubber spatula until evenly distributed (5b).
STEP 6 | Cool the dough to 65–70°F (18–21°C).
WHY:
The dough is likely still warm from the browned butter. I can make this cookie dough fairly quickly, and usually, at this point, before cooling, my dough is around 78-85°F / 26-30°C. However, if you were to shape and bake the dough at this temperature, you’ll likely experience more spreading, as the butterfat melts before any other structural setting has occurred.
The DDT or Desired Dough Temperature before baking is 65–70°F (18–21°C). If your ambient room temperature is high, aim for a lower temperature, as the dough's temperature will inevitably rise as you roll it into spheres. At this point, you can easily shape the cookie dough into balls without it smearing everywhere, and, more importantly, you’ll achieve an even spread of the dough into the flat disc.
HOW:
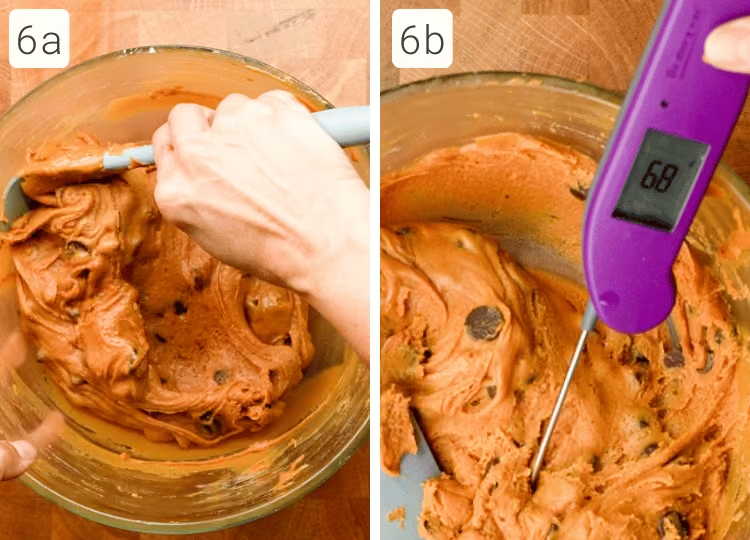
Place the bowl in the refrigerator or freezer for 5 to 10 minutes if needed. Stir and fold the dough every 5 minutes while monitoring the temperature. Continue until the dough reaches 65–70°F (18–21°C) (6a, b).
STEP 7 | Scoop and bake.
WHY:
The only thing you have to pay attention to is how you shape your dough for baking.
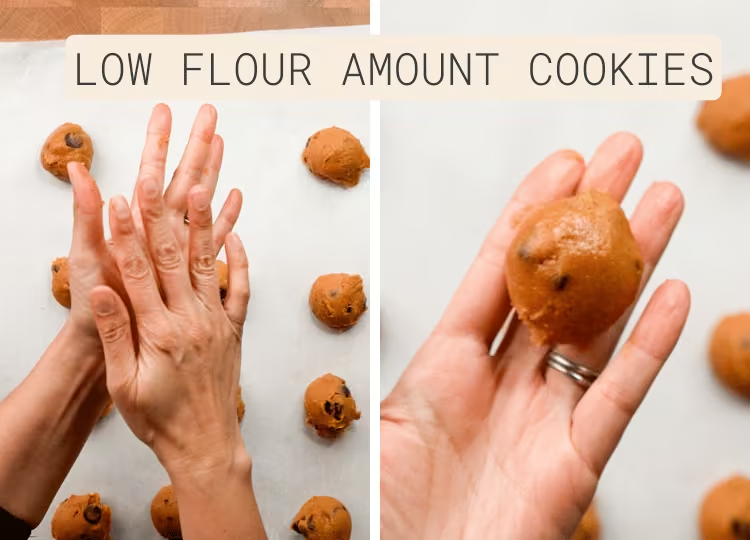
For the Low Flour Amount Cookies (non-agar-containing dulce de leche), shape the dough balls into spheres.
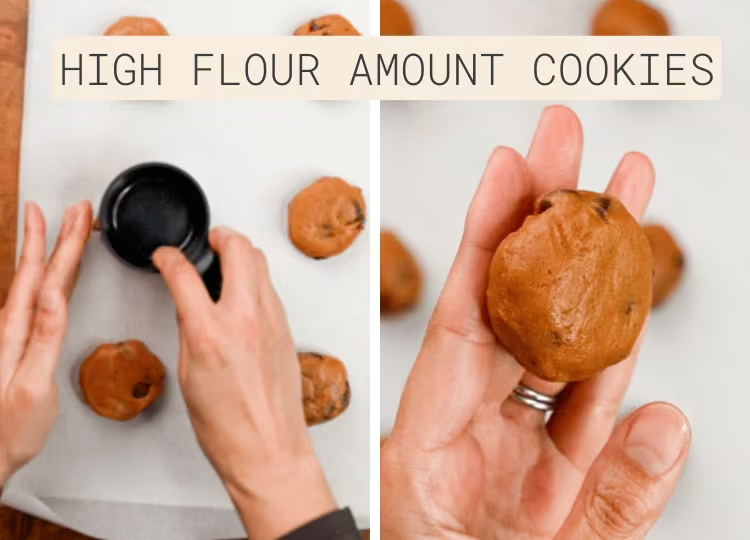
For the High Flour Amount Cookies (agar-containing dulce de leche), shape the dough into spheres and flatten. The reason you have to flatten the cookies is that the agar is already a preset thickener in the cookie dough, which slows the spread. If you leave the dough in spheres, you’ll get thicker cookies; if you want thinner cookies like mine, flatten them slightly.
HOW:
Using a 2-tablespoon (#30) scoop, portion the dough onto the prepared baking sheets. Roll each portion after scooping. Arrange cookies about 2 inches apart, with approximately 12 per half-sheet tray.
For LOW FLOUR AMOUNT COOKIES, roll each portion into a sphere, place on the baking sheet:
For HIGH FLOUR AMOUNT COOKIES, roll each portion into a sphere and place on the baking sheet. Use your palm or a flat measuring cup to press the balls slightly into 2-cm-high discs.
If you’ve ever baked premade cookie dough that comes in a slab of connected patties (is this a US thing?) - it’s kinda that shape. Or maybe like little falafel patties.
Bake for 10-13 minutes, or until the cookies have spread into flat circles and remain slightly puffy. My sweet spot for these cookies is 12 minutes per tray.
Also, don’t worry about leaving the cookie dough out. As long as you chill it to the proper temperature and again, your ambient household temperature is within normal range, you should be fine.
When baked, your cookies should look like this:
.avif)
But they’re a little plain, so I often decorate with extra chunks and bits of chopped dark chocolate. Allow the cookies to cool on the baking sheet for about 1 minute. During this time, I like to decorate each cookie with additional chopped dark chocolate. The residual heat from the pan and cookie will slightly melt the chocolate, so it sticks to the surface. I then transfer them to a wire rack to cool completely.
.avif)
Store in an airtight container once fully cooled to maintain moisture and freshness.
Video
Please check out my video on chocolate chip cookie science here:
Honors Members Section
This extra material is accessible to Sugarologie Honors members.
Become a member to view extended research notes, technique analysis, and supplemental materials! Learn more about Sugarologie Honors here.
Already a member?
Before starting the recipe, please read this!
Measure by weight, if possible.
Measuring by weight is the best way for you to replicate my recipes. I develop recipes using ingredients (even liquids) measured in grams, which is why you see them listed first in the recipe cards. For measurements under 5 grams, I will typically only list the volumetric measurements (teaspoons, etc.), as most home scales are not precise for such small weights.
In most cases, I have converted grams to volumetric measurements (aka US customary units) for bakers who prefer this method. However, the measurements are not as precise and may have awkward proportions. The recipes should still work, but for the ultimate precision, try to use weight.
This is the OXO scale I use daily. I also purchased this budget version of a good scale, which I keep at my Mom’s house for baking. If you’re interested in other tools I use for my baking, I’ve compiled a list here.
Use room temperature ingredients.
All my ingredients should be used at room temperature, or 65-75 °F/18-24 °C. I will always indicate if you need something outside this range. If no details are given, room temperature is the default.
Pay attention to the ingredient descriptions.
I try not to be brand-specific, but I will always note an interesting result from a type of ingredient, be it negative or positive.
A specific note regarding salt: I use Diamond Crystal Kosher salt for everything on this site except for frostings. In frostings, you want the salt to dissolve more easily, and kosher salt tends to leave granules behind. If you substitute table salt (more finely granulated) for recipes that list kosher salt, you must use half the volume indicated in my recipes.
Substitutions are hard.
That said, substitutions aren’t impossible but can be the toughest part of recipe development. Small swaps, like reduced-fat milk (2% fat) for whole milk (3.5% fat), usually work fine. However, bigger changes—such as replacing oil with applesauce or sour cream with Greek yogurt—can significantly impact texture and density.
Be wary of general, all-purpose substitutions in baking; I find that usually there is never a one size-fits-all solution. I carefully select ingredients for my recipes, so for the best results, start with the original recipe and modify with caution.
Read all the recipe instructions before beginning.
I’m in the “Pre-read the Chapter before Class Lecture” club... and I invite you to join! Baking new recipes can be intimidating, so let’s set you up for success. I want you to think about timeframes. Most fillings and frostings can be made ahead of time, and give you an extra day for mental space. Also, as you become a more proficient baker, you can anticipate and recognize steps. (“Oh, this has a meringue step, so I’ll need an extra clean bowl…” etc.) Ensure you go down the ingredient list and have everything at the right temperature.
.avif)

.avif)


Dulce Delicious Chocolate Chip Cookies
- 308 g (1 cup) dulce de leche*
- 147g (⅔ cup) light brown sugar (packed if measuring by volume)
- 169 g (12 tablespoons) unsalted butter
- 20 g (1 large) egg yolk**, cold from the fridge
- 14 g (1 tablespoon) vanilla extract
- 1 teaspoon salt
- ¼ teaspoon baking soda
- 240 g (2 cups) or 196 g (1 ½ cups + 2 tablespoons)*** all-purpose flour, unbleached (this amount depends on the type of dulce de leche)
- 226 g (8 ounces) chocolate chips, chocolate chunks from a bar, or add-ins****
- 56 g (2 ounces) extra chopped chocolate chunks or chips, optional - for decorating
- Determine your flour amount.
Check your dulce de leche to determine how much flour to use based on your dulce de leche:
- If using Nestlé canned dulce de leche with agar → Use the LOW FLOUR AMOUNT: 196 g (1 ½ cups + 2 tablespoons) all-purpose flour.
- If using a Nestlé squeeze bottle or dulce de leche without agar → Use the HIGH FLOUR AMOUNT: 240 g (2 cups) all-purpose flour.
- Prep the pans, oven, and the chocolate.
Preheat the oven to 375°F (190°C) with a rack in the middle. Line a baking sheet with parchment or a silicone mat. If using a chocolate bar, chop it into ½-inch (1 cm) chunks and set aside. - Brown the butter.
To a large heat-proof mixing bowl, add the dulce de leche and brown sugar. Set aside next to where you are browning your butter.
Melt butter in a light-colored pan over medium-low heat. Swirl as it foams and watch for the milk solids to turn medium brown; be careful as they burn easily. Immediately pour into the mixing bowl containing the dulce de leche and brown sugar, scraping all the browned bits with a spatula.
Stir the hot butter mixture for about 30 seconds to cool down the butter a bit; we don’t want to cook the eggs. - Add the egg yolk and flavoring ingredients.
Add the cold egg yolk, vanilla extract, salt, and baking soda to the mixing bowl. With a hand mixer or a stand mixer fitted with a paddle attachment (a metal one without silicone works best), mix slowly at first, then increase the speed to medium-high and mix for 1-2 minutes. Scrape down the bowl a few times to ensure all the butterfat from the edges is incorporated. When done, the batter should be grainy, glossy, and thick with no separation of butterfat. - Add the flour + chocolate.
(Reminder: If you use dulce de leche from a can with “agar,” please add only 196 g (1 ½ cups + 2 tablespoons). All other types of dulce de leche, including homemade or Nestle dulce de leche from a squeeze bottle, can use the original amount of 240 g (2 cups) of flour.Stir in the flour with a spatula until you no longer see any traces of flour.
Fold in the chocolates and mix-ins with a rubber spatula. - Cool the dough to 65-70°F/18-21°C.
Baking the dough immediately after mixing will result in a thinner cookie, as it is still warm from the butter, so it’s best to rest the dough for a beautiful circular shape. I work quickly through this process, and by this point, my dough is usually around 77-78°F (25-25.5°C). You can place the bowl of dough in the fridge or freezer for 5-10 minutes, stirring and folding it every 5 minutes until it reaches the correct temperature. - Scoop and bake.
Portion the dough onto the parchment-lined trays using a 2-tablespoon scoop (also labeled #30 scoop). After the dough has been portioned onto the trays, roll each portion.
For HIGH FLOUR AMOUNT COOKIES: Roll each portion into a sphere, place them on the cookie sheet, and gently flatten them with your palm until they are 2 cm thick. See my pictures above.
For LOW FLOUR AMOUNT COOKIES: Roll each portion into a sphere, and place them on the cookie sheet. Do not flatten.
My trays comfortably hold about 12 cookies, about 2 inches apart. Bake for about 11 to 14 minutes (remember that if you use a scoop of a different size than mine, you’ll have to adjust the timing). My sweet spot for these cookies and my oven is 12 minutes.
If you have only one tray, bake the sheets one at a time, allowing each to cool before baking the next. To help the sheets cool quickly, I run them under cold water for a few seconds until I can touch them, wipe them dry, and place the parchment back on.
The cookies are done when spread into flat circles and are slightly puffy. If you take the temps and their centers are 160°F, they have reached a safe temperature to consume.Allow them to cool on their trays for about 2 minutes, then transfer them to a cooling rack to finish cooling. Once they cool, store them in an airtight container to maintain their moisture.

Recipe Card - Adriana's Notes
*Please read my intro to ensure you use the correct dulce de leche for this recipe, as some may not be compatible.
**Eggs come in so many sizes these days, and sometimes I get a tiny yolk in my eggs. It’s super important to get 20 grams for this recipe, so everything comes together in the emulsion. Make sure you weigh your yolk.
****If you use dulce de leche from a can with “agar,” please add only 210 g (1 ¾ cups) of flour. All other types of dulce de leche, including homemade or Nestle dulce de leche from a squeeze bottle, can use the original amount of 240 g (2 cups).
We need this modification because agar is a thickener in this context, so we need to compensate by adding less flour to allow the cookie to spread properly.
*****This cookie tastes incredible when you add other ingredients that also undergo the Maillard reaction. My favorites are chopped Heath bars, pretzels, caramelized white chocolate, roasted pecans, or salted caramel chips from Trader Joe’s. If you use any of these ingredients, substitute them for a portion of the chocolate chips.
Recommended Sugar Lab Recipes + Experiments
.avif)
.avif)

Got room for more dessert?
Subscribe to my Crumby Data newsletter! I share behind-the-scenes looks at recipe development, flavor testing for the Cakeculator, and life as a content creator. It’s free, lands in your inbox every few weeks, and you can unsubscribe anytime...no strings attached :)
Feel free to take a look at previous newsletters here!
.ico)