.avif)
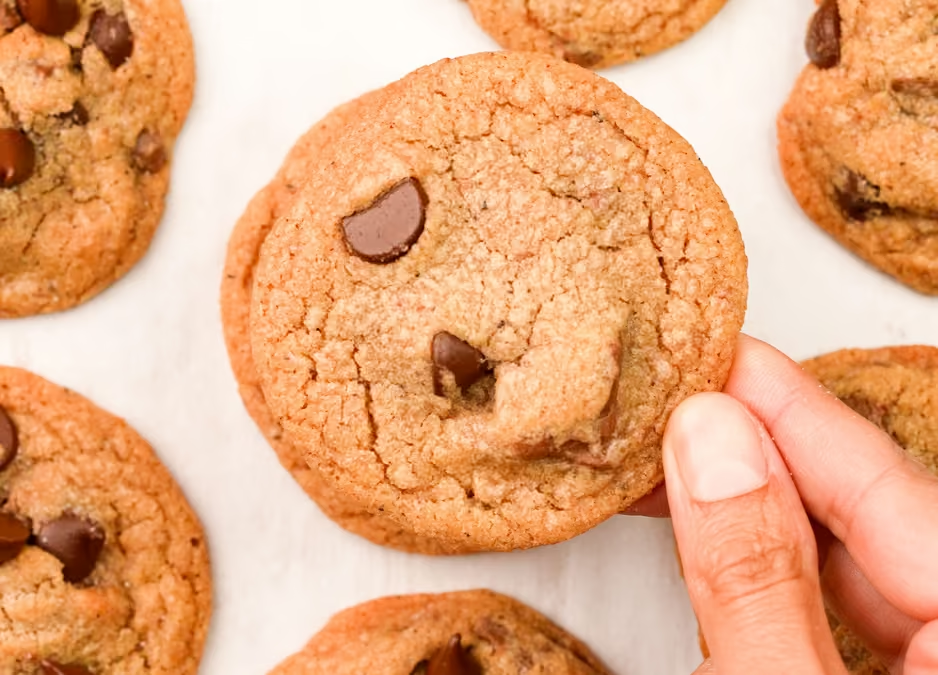
Classic Chewy Browned Butter Chocolate Chip Cookies


My classic chocolate chip cookie has a rich, browned-butter flavor with toasted butterscotch notes from the dark brown sugar. We’ll use a mixing method that ensures a chewy texture with a slightly crispy edge by combining slightly cooled melted butter with a precise ratio of brown to white sugar.
I’ve created this master chocolate chip cookie recipe from two of my older recipes: Classic-Chewy Chocolate Chip Cookies and Triple Browned Butter Chocolate Chip Cookies. Both have their advantages in texture and flavor, but I have learned so much from all my cookie recipes that I really wanted to build a single master recipe that bakers can learn from and customize.
What are the texture and flavors of my Classic Chewy Brown Butter Chocolate Chip Cookies?
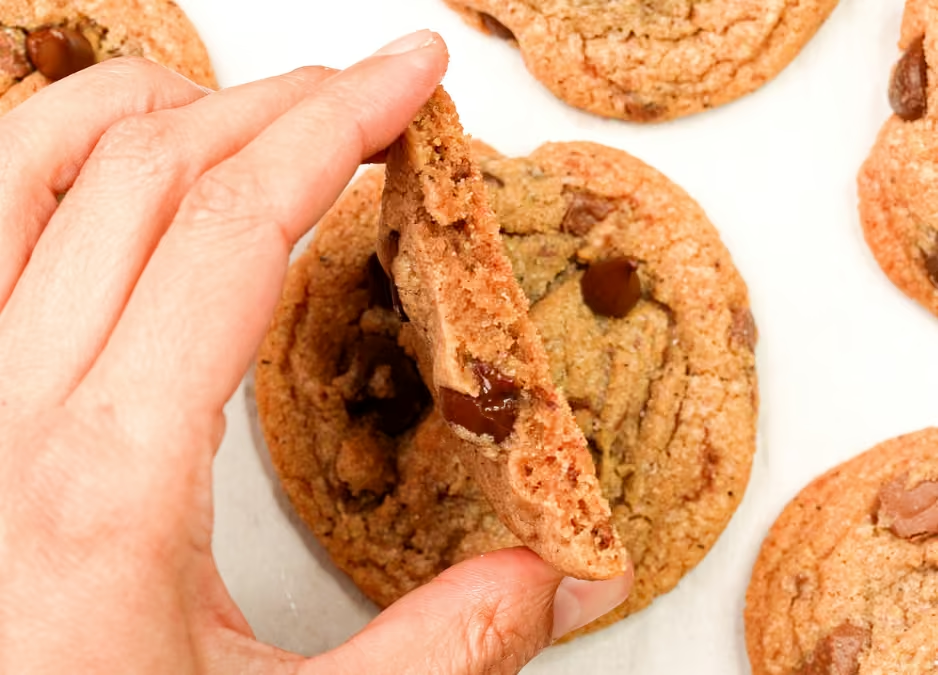
Texturally, my cookies have a slightly aerated yet creamy crumb with a pleasant chew that intensifies over time.
Now, I often see blanket statements like: “Use melted butter for chewy cookies.” And although that can be a major player in defining a cookie’s texture, melted butter alone is typically not enough to create a chew in a cookie; in fact, I can make you a cakey/crumbly/crispy cookie using melted butter as well.
Usually, the chewy texture of a cookie is due to melted butter, temperature, AND how you mix the sugars. This is a much longer conversation, but the gist of how this relates to a cookie’s texture is that the melted butter is usually warm (sometimes hot!) in brown butter cookies. Its temperature can dictate how much sugar dissolves into the water in the cookie dough. This will then affect the spread and texture of a cookie.
Realizing how much these butter temperatures (and therefore dough temperatures) affect cookie spread and texture was why I started introducing <span class="def-term" data-term="DDT">DDT</span>, or Desired Dough Temperature information, in my cookie recipes. Often used in bread baking to ensure proper <span class="def-term" data-term="fermentation">fermentation</span> (which is heavily dependent on temperature, amongst other factors), DDTs reduce recipe variability. For cookies, it's just another helpful data point I can pass on to you to help prevent mishaps, such as cookies overspreading and textural differences. In other words, it ensures you get the same cookie that I’m designing and baking over here!

Flavorwise, this cookie is infused with the deep aromas of brown butter. We can amplify this effect by adding a bit more milk powder, as shown in the picture above. On the left is the recipe without extra milk powder, and the cookie on the right has it. The extra milk powder makes the cookie spread a little less and gives it a slightly darker appearance due to the extra milk solids in the brown butter. I’ll let you know how to do that in the recipe card down below. In addition to the brown butter, there’s a sweet molasses flavor from the brown sugar and a bit of salt to balance it all out. And of course... the chocolate! The type you choose will define the sweetness of your cookie, so choose wisely! (Actually, there's no wrong choice here, just choose what you like to eat :) )I prefer a mix of semi-sweet and bittersweet chocolate.
These are only a few of the ingredients that contribute to flavor, so let’s dive into all of them and briefly learn what each one does in this recipe.
What ingredients do you need for my classic browned butter chocolate chip cookies?

Unsalted butter is the primary source of fat in this recipe. To increase flavor, we’ll brown the butter, which melts the butterfat, evaporates the water, and toasts the milk solids. Butter is a magical ingredient in that it inherently contains the necessary components for the <span class="def-term" data-term="maillard-reaction">Maillard reaction</span>: protein and sugar. All we have to do is provide heat, which speeds up the reaction, resulting in toasted, nutty aromatic compounds that are released into the butterfat. I also tend to use unsalted butter in most baking applications because salted butter varies in salt concentration; you cannot remove salt, but you can always add more, so baking with salted butter carries the risk of oversalting.
Nonfat milk powder is a dehydrated form of milk (meaning all excess water is removed). This is an optional ingredient and adds an extra layer of toasty flavor to the finished baked cookie. Milk powder is made primarily of milk-based proteins, sugars, vitamins, and minerals. It is the “milk solids” that are often referenced when making brown butter; so, in essence, adding more milk solids to the browning process enhances the toasty flavor profile, as butter has only a limited amount of milk solids. There are many types of milk powders available, such as nonfat, whole, and sweet cream buttermilk, to name a few, but I like nonfat milk powder because it is the most concentrated in protein and sugars, which are the key players in the Maillard reaction.
An egg plus an extra yolk add moisture, protein, and fat to the cookie dough. And I know it can be a pain to use just egg yolks in recipes, but eggs are such complex ingredients! (I mean, think about it - you’re growing an entire organism from everything that’s encased in that shell.)
An egg white differs markedly in molecular makeup and function from the yolk. Sometimes we can get away with using a whole egg in baking recipes, but I find this limits us quite a bit in terms of achieving the best textures in our baked goods - especially when it comes to cookies. Generally, cookies are very low-moisture recipes, and egg whites simply add so much water that they can make chocolate chip cookies overly cakey and puffy by swelling the starches in the flour. But yolks, on the other hand, are full of emulsifying fats and proteins with just a smidge of water and add such a great chewy texture to a cookie recipe.
Brown sugar is one of the sugars we’ll need for this cookie. It contains a small fraction of molasses, giving it its brown color and a more complex roasted-sugar flavor.
The ratio and types of sugars are important in chocolate chip cookie recipes because they dictate the cookie's spread and final texture. Generally, a higher ratio of brown sugar to white sugar helps to make a cookie chewier, as in this cookie. This is because the types of sugars in molasses are generally more <span class="def-term" data-term="hygroscopic">hygroscopic</span>.
This recipe is written for dark brown sugar, but you can sub light brown sugar too. It will have a lighter molasses flavor and a lighter final color when baked.
White sugar is the second type of sugar. It provides sweetness, a bit of spread, and some structure.
Vanilla extract and salt are the flavoring ingredients.
Baking soda is an alkaline powder that does a few things. It reacts with acidic ingredients in recipes (in this case, brown sugar) to create carbon dioxide gas, which expands tiny air bubbles and gives a slightly aerated texture. It also enhances the cookie's toasted brown exterior. Baking soda also increases the rate of the <span class="def-term" data-term="maillard-reaction">Maillard reaction</span>, which is the browning and toasting of proteins when exposed to sugar and heat.
One last thing it does, which is actually quite important, is cause cookies to spread. Alkaline doughs can interfere with the <span class="def-term" data-term="coagulation">coagulation</span> of egg proteins. You can think of these egg proteins as an inner scaffolding; the extent to which they link together determines the final cookie's shape.
I find that baking soda is overused in baking recipes - so much so that it imparts an alkaline flavor that is unpleasant. To me, that’s a signal that the ratios are off because the recipe is compensating for an overuse of structural ingredients by adding more baking soda to increase spread. So be careful when measuring baking soda - scoop very carefully and level off the tops.
All-purpose (or plain) flour is the starch in this recipe and gives the cookie structure. I prefer unbleached as I enjoy the taste, but you can also use bleached if that’s all you have access to.
Chocolate chips or chunks from a chocolate bar add bulk and structure to the finished cookie.
Chocolate chips come in a wide variety of flavors and sizes. Still, for the most part, these chips are manufactured with a special fat formulation (rather than pure cocoa butter) that helps them retain a classic “drop” shape even at high baking temperatures. This also makes them slightly cheaper than real chocolate products.
For chocolate chunks, you’ll need a bar that you'll chop into ¼-inch chunks. Because of its cocoa butter content, this type of chocolate melts more easily at baking temperatures. This melts into irregular globs in the cookie dough, but upon cooling, they solidify, creating delicious, creamy pockets of chocolatey goodness.
💡 TIP: As the cocoa trade sees declining harvests, chocolate seems to be more expensive every time I go to the store. I analyze prices for recipe testing, and so far, Costco and Sam’s Club seem to have the most competitive pricing for chocolate chips; however, they come in larger bags. For chocolate bars, Trader Joe’s Pound Plus Bars offer the best value for the price. If you don’t have access to a Trader Joe’s, check the candy aisle (not just the baking aisle) of your grocery store, as they often have sales on bars you can use for baking!
How to customize the size of your chocolate chip cookie:
I’ve tested small, medium, and large cookies with this recipe. They all work equally well and create texturally identical cookies by just adjusting the bake time and number of cookies per tray:
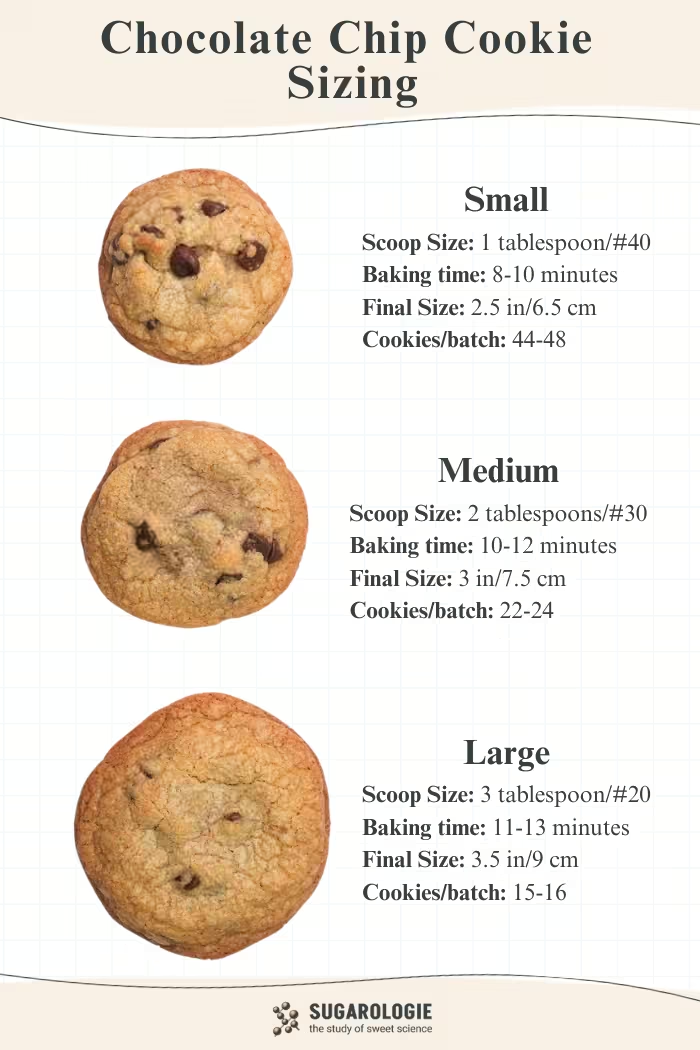
For this tutorial, I’ve used the 2-tablespoon or #30 scoops to make my cookies.
Step by step:
STEP 1 | Prep the pans, oven, and chocolate.
Arrange a rack in the middle of your oven and preheat to 375°F (190°C). Line a baking sheet with parchment paper. If using a chocolate bar, chop it into bite-sized chunks.
STEP 2 | Brown the butter.
WHY:
Browned butter is one of the most flavorful additions you can add to a chocolate chip cookie, achieved through the <span class="def-term" data-term="maillard-reaction">Maillard reaction</span>.
Backing up for a second, this step is so powerful flavor-wise for cookies because cookies have a relatively short bake time or exposure to high heat. For toasting to occur, the dough temperature must exceed 340°F (171 °C). You may get that on the exterior of the cookie or along the edges or bottom, but that’s usually the extent to which those yummy toasted bits occur.
Browning the butter before using it in a recipe ensures that every bit of the butter is infused with a toasted milk flavor, which then permeates every crumb of the cookie, inside and out, before it even hits the oven.
Extra milk powder can be added at this step to further enhance the toasted flavors.
HOW:

Have a small heatproof bowl or measuring cup ready for the hot butter. If using the optional milk powder customization, measure it into a small bowl before starting.
Add the unsalted butter to a light-colored saucepan and melt over medium heat (2a). The butter will first melt, then a cream-colored foam will rise to the surface. If the butter sputters or pops excessively, reduce the heat slightly.
Using a wooden spoon or silicone spatula, stir continuously. The milk solids will begin collecting along the bottom and sides of the pan after a few minutes. Scrape the pan often so they brown evenly instead of sticking and burning.
Once the milk solids reach a light brown color, turn off the heat and continue stirring until they deepen to a medium brown (2b).
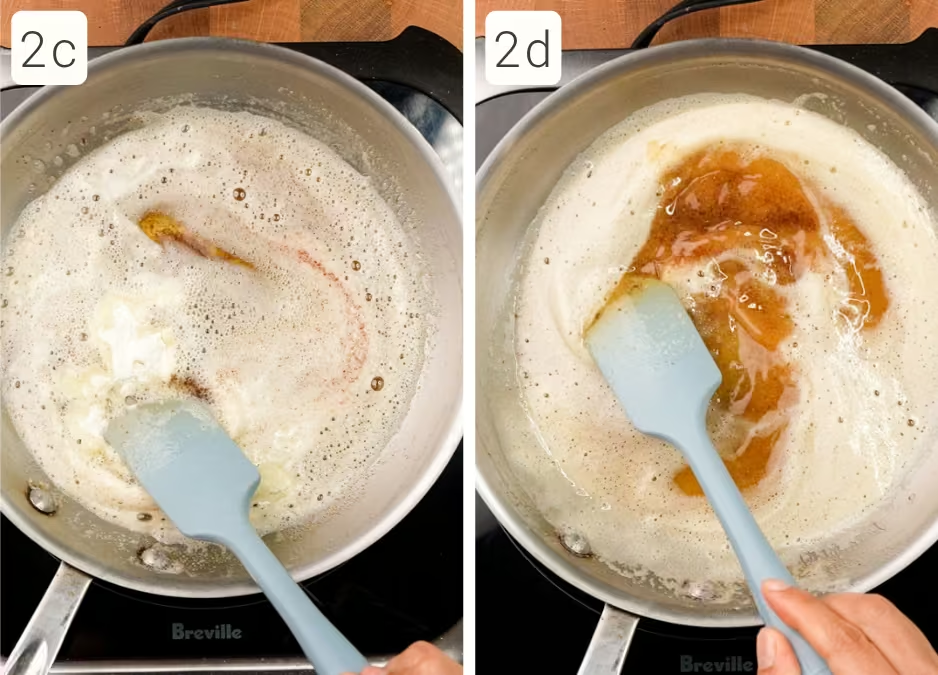
If using milk powder, immediately stir it into the hot butter (2c) and continue stirring until the added milk solids toast to the same deep medium-brown color (2d).
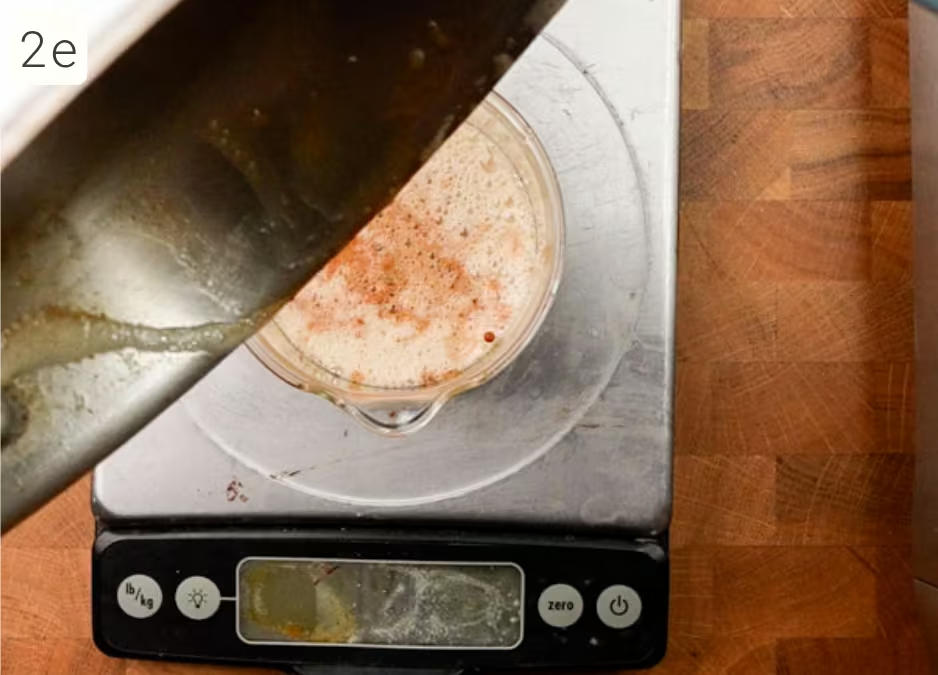
Immediately pour the browned butter into the bowl you set aside (2e), scraping every bit of the toasted milk solids into the bowl.
STEP 3 | Cool the browned butter.
WHY:
The butter needs to cool slightly before the sugars and eggs are added. The Maillard reaction heats the butterfat to at least 350°F (177°C). That’s way too hot if we add the next set of ingredients, which are the eggs and sugar. Eggs start to coagulate (or set) at around 140-149°F/60-65°C, so we need to cool them substantially; otherwise, we risk cooking the eggs prematurely.
Cool the butter until it reaches around 100°F/38°C. When adding the cold eggs in the next step, I find this temperature gets our dough to the perfect temperature for scooping right after we make the batter.
You can do this by leaving the butter out at room temperature or even in the fridge if you keep an eye on it. I like to use an ice bath because I can easily monitor the temperature with my instant-read thermometer while I tidy up around the kitchen.
HOW:

Allow the browned butter to cool to 90–100°F (32–38°C). The butter will still be completely liquid. To speed this up, I place my measuring cup into an ice bath, and the butter is sufficiently cool in about 10 minutes. You can also let the butter sit at room temperature.
STEP 4 | Mix the wet ingredients.
WHY:
One way to customize a cookie’s texture is by how you combine the sugars into the dough. To get a chewy texture, I like to add the sugars to the melted, cooled, browned butter, along with the eggs, and mix until fully combined. This allows the sugars to dissolve into the water contained in the eggs, which then gets emulsified with the butterfat. This method creates a chewier cookie with a crispy exterior that lasts for about 24 hours. After that time, the cookie becomes chewy from edge to center as the water distribution eventually equilibrates to the drier/crispy parts.
Pay attention to the consistency as you mix; you know you’re done when the mixture is fully combined, slightly paler in color, and lighter in texture. It will, however, remain quite granular, as there is not nearly enough water to dissolve all the sugar.
💡 TIP: If you prefer a slightly crumbly-chewy cookie with a crispy exterior, fully emulsify the butterfat and eggs first, then carefully stir in the sugars by hand using a spatula. As mixing with a stand or hand mixer will help the sugars dissolve, mixing by hand slowly with a spatula will prevent them from dissolving too much. The more granular sugar in the recipe will bake up crumbly and crispier.
HOW:
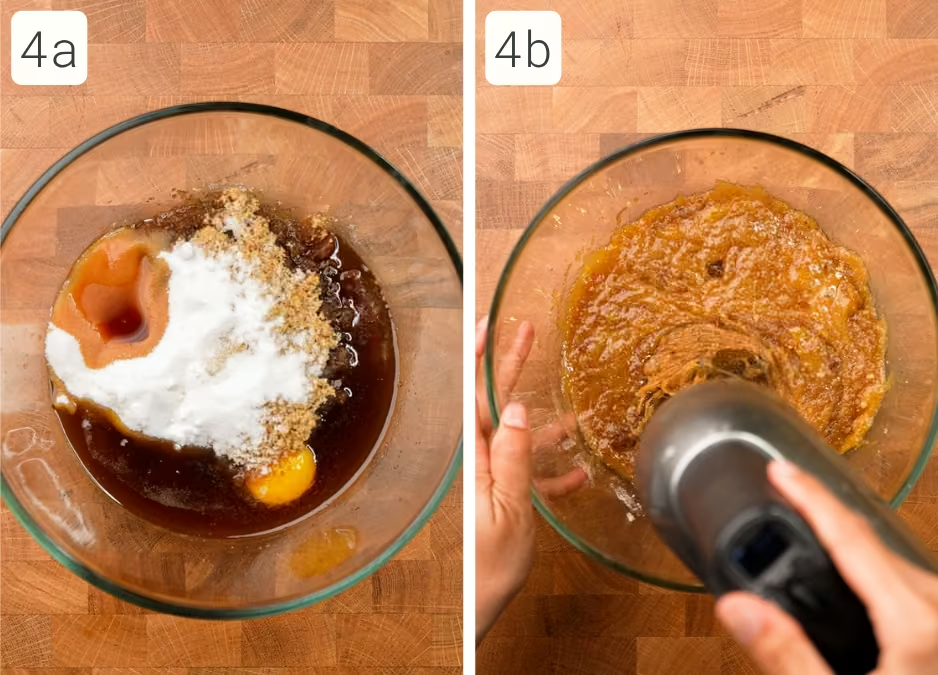
Pour the cooled, melted butter into a large mixing bowl. Add the room-temperature whole egg, egg yolk, brown sugar, granulated white sugar, and vanilla (4a). Using a mixer, blend on medium-high speed for about 2 minutes. Take a look at the color and consistency; to start, the mixture will be greasy and darker in color (4b).
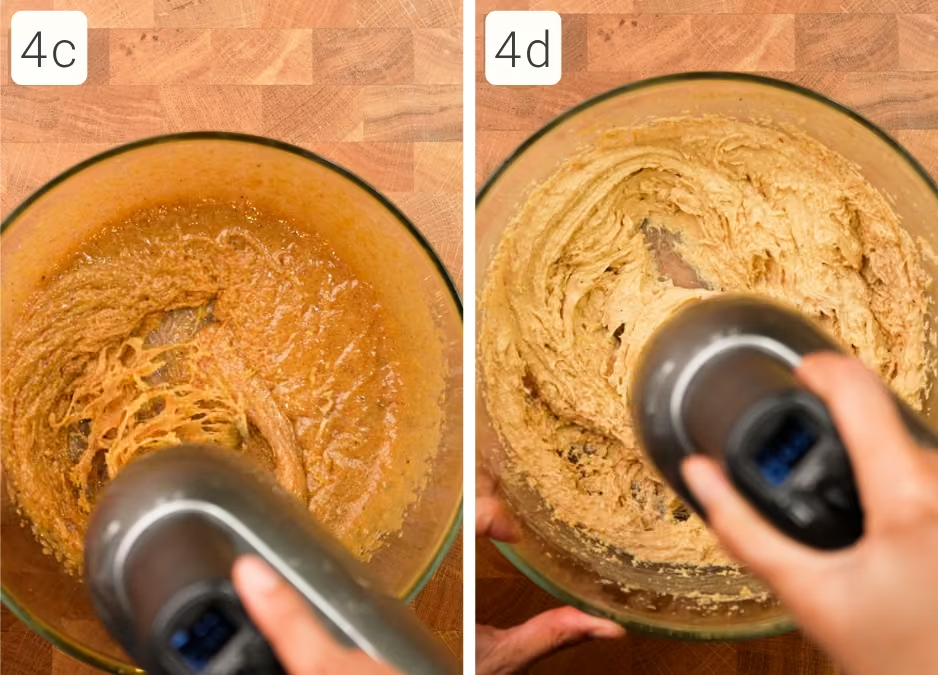
As you continue to mix, you should notice the dough start to lighten (4c). Scrape down the bowl as needed to ensure you’re incorporating all the sugars. Keep mixing until the dough is lighter in color and texture (4d).

You know you’re done when the dough looks something like this. Remember, it’s all relative, and my dough may be different in color from yours due to the type of butter you used, how brown you browned the butter, and whether you used the optional milk powder. Also, the dough will still be quite granular from all the undissolved sugar. (4e)
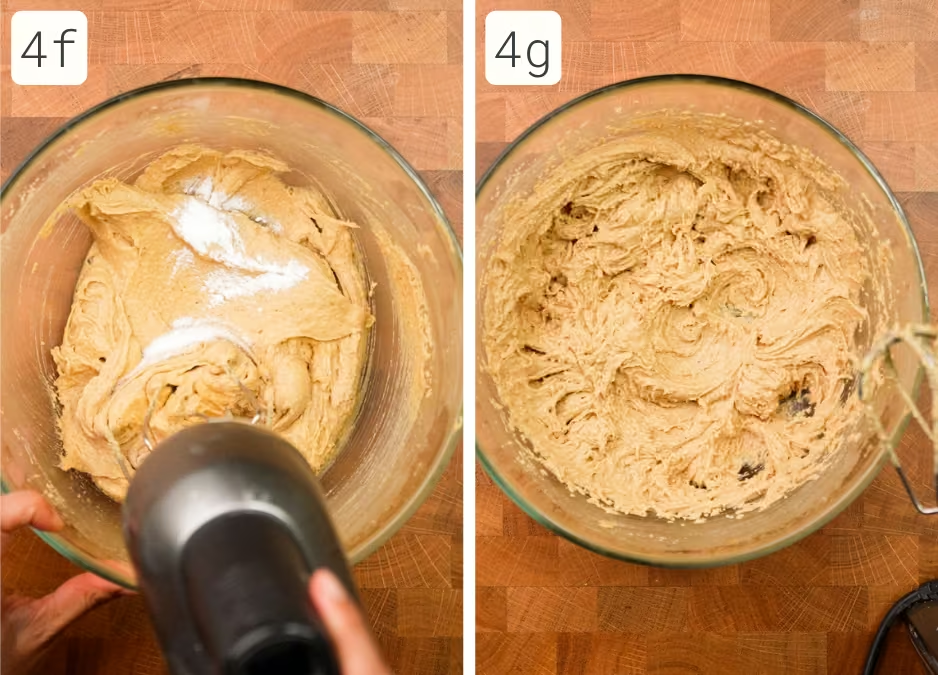
Add the baking soda and salt (4f) and mix until thoroughly combined (4g).
STEP 5 | Mix in the flour and chocolate.
WHY:
Flour gives the cookies structure, while the chocolate is folded in after the dough forms so it's evenly distributed without overmixing.
HOW:
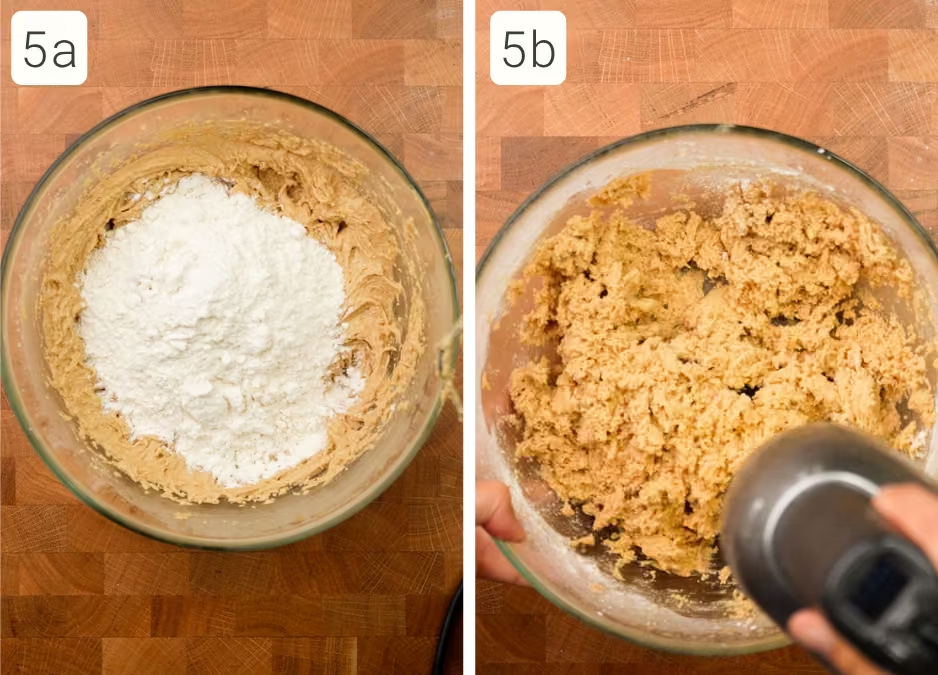
Add the flour (5a) and mix on low speed just until a dough forms (5b).

Mix in the chocolate chips (5c). The finished dough should be firm enough to scoop, hold its shape, and feel slightly tacky. It’s important to have the dough at a cooler room temperature, and by the end of this process, my dough is around 72°F. (5d).
If your dough is warmer than 75°F/24°C, let it sit at room temperature to cool, or place the bowl in the fridge until it’s around 65-75°F/18-23°C.
STEP 6 | Scoop and bake.
WHY:
This particular cookie recipe can be scooped into 1-, 2-, or 3-tablespoon portions with no problem. Just ensure that, no matter what size you’re working with, you portion your dough evenly on the baking pan.
HOW:

Using your preferred scoop size (1-, 2-, or 3-tablespoon portions), place the dough onto the prepared baking sheets, leaving about 2 inches (5 cm) between each cookie (6a). These are 2 tablespoon dough balls pictured, and I can fit 12 onto one of my flat sheet pans. After I scoop the dough onto the tray, I like to roll each piece into a perfect sphere so it bakes nice and round.
💡 TIP: Rolling the dough between your palms will inevitably warm the butterfat a bit, which may cause the dough to spread slightly more when baked. You can chill your dough before rolling if your hands run warm or just work super fast. As long as your dough stays around 70°F (or 60°F if you prefer chubbier cookies), you should be fine.
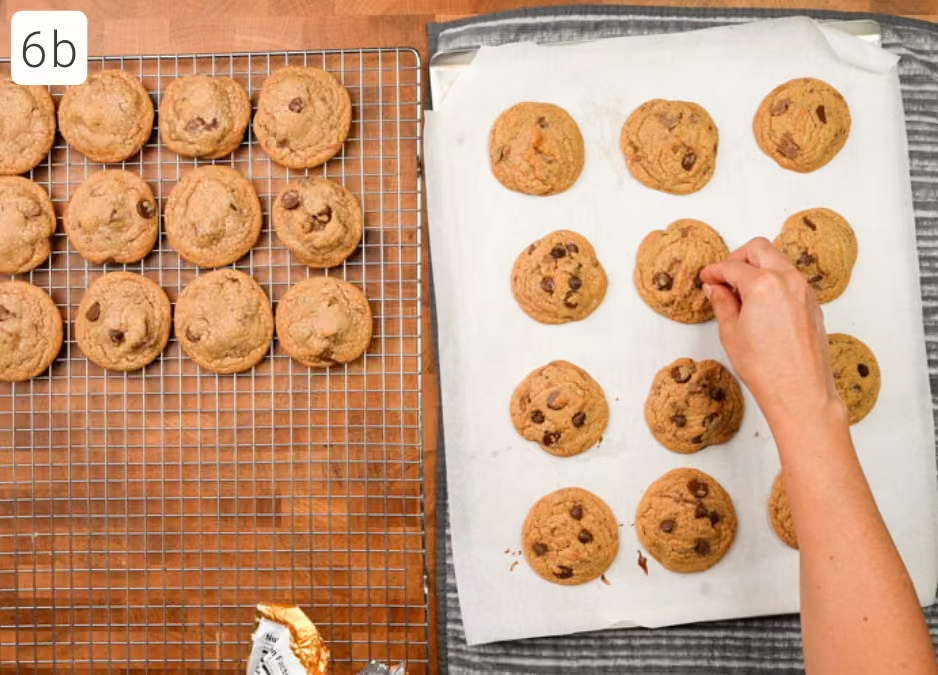
Bake until the edges are deeply golden brown while the centers remain lighter in color and slightly puffed (6b). Again, these are 2-tablespoon cookies, so they bake for about 10-11 minutes in my oven. If you’re scared that your cookies look overly gooey and aren’t sure if they’re done, you can poke your instant-read thermometer in the direct center - once it hits 160°F (71°C), it’s safe to consume.
Allow the cookies to cool on the baking sheet for a couple of minutes. If desired, immediately use an upside-down bowl or a round cookie cutter to swirl the cookies into a perfectly round shape. Or you can make the cookies super fancy by adding a few chocolate chips to the tops (6b) or shaved chocolate with a sprinkle of sea salt.
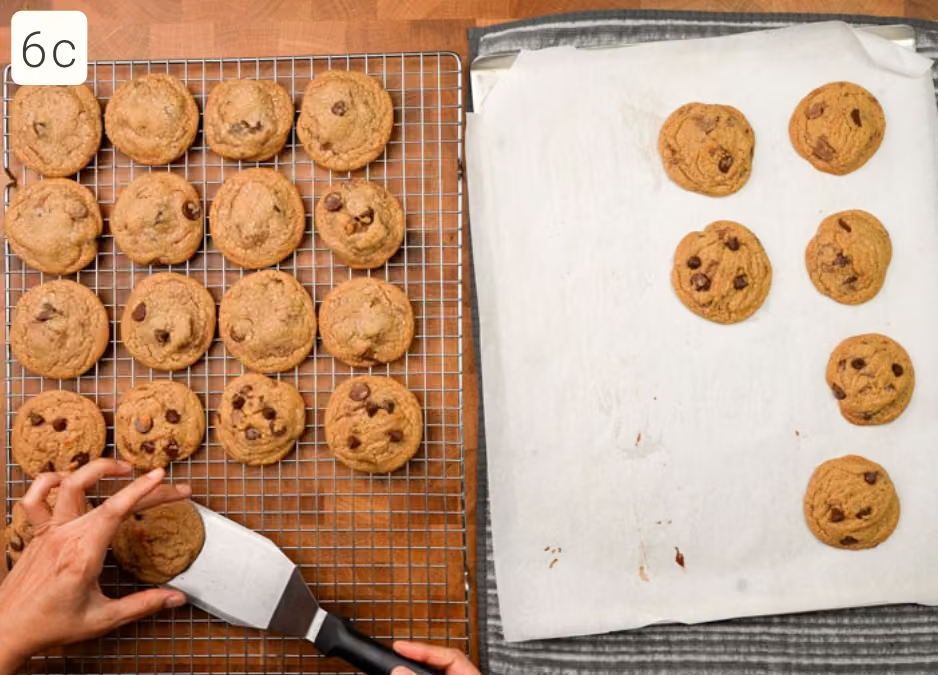
Move them to a cooling rack to cool completely (6c).
Does this dough need to be refrigerated before baking?
My cookie dough can be baked right after mixing.
Some chocolate chip cookie doughs require refrigeration before baking. This can be done either to make the dough too soft to bake (and thus prevent it from spreading too much in the oven), to enhance the cookie’s internal texture, or to “allow the flavors to mature.”
In my previous versions of this cookie, I did not see any meaningful advantage in those areas for my recipe. (That is probably because I engineered the recipes to maximize flavor and texture right after mixing, using brown butter, sugar ratios, etc.) The only benefit would be storing unbaked cookie dough for later baking. However, with this updated recipe, I have yet to do my final set of tests. To be continued!
Video
If you're interested in learning a bit more about the science of chocolate chip cookies, I have a video here:
Honors Members Section
This extra material is accessible to Sugarologie Honors members.
Become a member to view extended research notes, technique analysis, and supplemental materials! Learn more about Sugarologie Honors here.
Already a member?
Before starting the recipe, please read this!
Measure by weight, if possible.
Measuring by weight is the best way for you to replicate my recipes. I develop recipes using ingredients (even liquids) measured in grams, which is why you see them listed first in the recipe cards. For measurements under 5 grams, I will typically only list the volumetric measurements (teaspoons, etc.), as most home scales are not precise for such small weights.
In most cases, I have converted grams to volumetric measurements (aka US customary units) for bakers who prefer this method. However, the measurements are not as precise and may have awkward proportions. The recipes should still work, but for the ultimate precision, try to use weight.
This is the OXO scale I use daily. I also purchased this budget version of a good scale, which I keep at my Mom’s house for baking. If you’re interested in other tools I use for my baking, I’ve compiled a list here.
Use room temperature ingredients.
All my ingredients should be used at room temperature, or 65-75 °F/18-24 °C. I will always indicate if you need something outside this range. If no details are given, room temperature is the default.
Pay attention to the ingredient descriptions.
I try not to be brand-specific, but I will always note an interesting result from a type of ingredient, be it negative or positive.
A specific note regarding salt: I use Diamond Crystal Kosher salt for everything on this site except for frostings. In frostings, you want the salt to dissolve more easily, and kosher salt tends to leave granules behind. If you substitute table salt (more finely granulated) for recipes that list kosher salt, you must use half the volume indicated in my recipes.
Substitutions are hard.
That said, substitutions aren’t impossible but can be the toughest part of recipe development. Small swaps, like reduced-fat milk (2% fat) for whole milk (3.5% fat), usually work fine. However, bigger changes—such as replacing oil with applesauce or sour cream with Greek yogurt—can significantly impact texture and density.
Be wary of general, all-purpose substitutions in baking; I find that usually there is never a one size-fits-all solution. I carefully select ingredients for my recipes, so for the best results, start with the original recipe and modify with caution.
Read all the recipe instructions before beginning.
I’m in the “Pre-read the Chapter before Class Lecture” club... and I invite you to join! Baking new recipes can be intimidating, so let’s set you up for success. I want you to think about timeframes. Most fillings and frostings can be made ahead of time, and give you an extra day for mental space. Also, as you become a more proficient baker, you can anticipate and recognize steps. (“Oh, this has a meringue step, so I’ll need an extra clean bowl…” etc.) Ensure you go down the ingredient list and have everything at the right temperature.
.avif)
.avif)

.avif)

Classic Chewy Browned Butter Chocolate Chip Cookies
- 170 g (¾ cup) unsalted butter
- 6 g (2 teaspoons) nonfat milk powder*, sifted if lumpy (optional)
- 50 g (1 large) egg, room temperature
- 20 g (1 large) egg yolk, room temperature
- 160 g (¾ cup) brown sugar, dark**
- 100 g (½ cup) white sugar
- 10 g (2 teaspoons) vanilla extract
- ¾ teaspoon kosher salt
- ¼ teaspoon baking soda
- 232 g (1 ¾ cup + 3 tablespoons ) all-purpose flour, unbleached
- 226 g (10 ounces) chocolate chips, any flavor*** (I like using half chips and half chunks chopped from a chocolate bar)
- Prep the pans, the oven, and the chocolate.
Arrange a rack in the middle of your oven and preheat to 375°F/190°C.
Place a sheet of parchment paper atop a cookie baking sheet(s).
Chop your chocolate bar into chunks, if using. - Brown the butter.
Have a small heatproof bowl or measuring cup ready to hold the hot, melted butter, and set it aside. If you are using the milk powder customization, measure out the powder into a small bowl for easy access.
Add the unsalted butter to a light-colored pan and melt over medium heat. The butter will first melt, and a cream-colored foam will rise. If the butter sputters and pops, turn the heat down a little so it doesn’t make a mess. Take a wooden or silicone spatula and start stirring. The milk solids usually form around the edge and bottom of the pan first. This may take a couple of minutes. Scrape the pan so milk solids don’t stick and burn.
Turn off the heat once the solids are light brown, then continue stirring until they reach medium brown. If you are using the milk powder, add it to the hot butter now and stir until all the milk solids from the powder match the color of the toasted milk solids from the butter, which is a deep medium brown.
Immediately pour the melted butter into the heatproof bowl/cup, making sure to scrape off the toasted milk solids.
This should yield approximately 136-140 grams (about ½ cup and 2 tablespoons) of melted butter OR around 145 grams of butter if you’ve used the extra milk powder. - Allow the melted butter to cool.
The butter has to cool to around 90-100°F/32-38°C. This ensures the cookie dough is not too warm during subsequent steps, which can cause the sugars to dissolve excessively and create a flat, overly spread final cookie.
You can hasten the cooling by placing the bowl in a larger bowl filled with ice water, or by letting the butter sit at room temperature until it cools.
The butter will still be liquid at the end of this step. - Add the egg/yolk, sugars, water, flavoring ingredients, and egg.
Add the room-temperature egg and yolk, sugars, and vanilla to the slightly warm melted butter and mix on medium-high speed until fully emulsified, about two minutes. Pay attention to the dough's initial color and texture (see my pictures above for reference); you’re done when it's lighter in color and softer in texture. It will still be quite grainy, though, due to the undissolved sugar.
Add the salt and baking soda on low speed just until combined.
- Mix in the flour and chocolate.
Add the flour to the bowl and mix on low speed until the dough comes together. Stir in your chocolate chips and chunks. The dough should be firm enough to scoop and hold its shape, with a slightly tacky texture.
<span class="def-term" data-term="DDT">DDT</span>: The temperature of your dough should be around 65-75°F/18-23°C. This ensures you get a slightly mounded cookie shape when baking. If you like a more mounded/chubbier style of cookie, place the bowl in the fridge for about 5-10 minutes and stir until the dough reaches about 60-65°F/16-18°C.
- Scoop and bake.
Choose the size of cookie you want to bake (see my image above for what 1-, 2-, and 3-tablespoon cookies look like), portion the dough onto the parchment-lined trays. Leave about 2 inches between cookie balls.
For 1 tablespoon cookies, bake for 8-10 minutes.
For 2 tablespoon cookies, bake for 10-12 minutes.
For 3 tablespoon cookies, bake for 11-13 minutes.
(refer to the chart in my intro section to get more details on sizing)
The cookies are done when they are slightly puffy in the center and toasty brown on the edges. If you take the temps and their centers are 160°F, they have reached a safe internal temperature.
Allow the cookies to cool on the baking sheet for a couple of minutes before transferring them to a wire rack. If desired, immediately use an upside-down bowl or a round cookie cutter to swirl the cookies into a perfectly round shape. Or you can make cookies super fancy by adding a few chocolate chips to the tops or shaved chocolate with a sprinkle of sea salt. The residual heat from the pan will melt the chocolate and weld it to the cookie’s surface.
Move them to a cooling rack to cool completely.
Storage notes:
These cookies are best enjoyed within 24 hours of baking. During this time, they will maintain their crispy exteriors and chewy interiors. You can also save these in an airtight container for a few days, but after the first day, any remaining moisture from the centers will migrate to the surface, so that it will no longer have that crispy texture. Instead, you’ll have a chewy cookie from edge to center.

Recipe Card - Adriana's Notes
*You can use either non-fat, whole, or sweet cream buttermilk powders. I prefer nonfat milk powder as it has the highest percentage of milk proteins and sugars and contributes best to the Maillard reaction. Some nonfat milk powders can be a little clumpy, so sift them into your small bowl. Also, be sure that when you add it to the hot butter mixture, you mix it into the butterfat a little at a time to ensure it breaks apart and can toast properly.
**Dark brown sugar has a bit more molasses than light brown sugar, but you can use light if that’s what you have. Your cookies will be slightly paler.
***For chocolate chunks, you’ll need a bar that you'll chop into ¼-inch chunks. I prefer a half-and-half mix of chocolate bars and chips, preferably bittersweet and semi-sweet.
Recommended Sugar Lab Recipes + Experiments
.avif)
.avif)

Got room for more dessert?
Subscribe to my Crumby Data newsletter! I share behind-the-scenes looks at recipe development, flavor testing for the Cakeculator, and life as a content creator. It’s free, lands in your inbox every few weeks, and you can unsubscribe anytime...no strings attached :)
Feel free to take a look at previous newsletters here!
.ico)
.avif)