.avif)
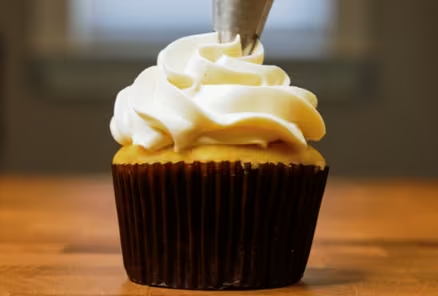
A lighter American buttercream (aka Sweet Cream Frosting)


My Sweet Cream Frosting has a unique light, yet creamy texture. It contains less fat than heavy cream, which is possible via a combination of my mixing technique and emulsifying ingredients. Using butter, milk, sugar, and buttermilk powder gives this frosting a lightly tangy flavor reminiscent of vanilla ice cream with a fantastic and stable texture for frosting cakes and piping atop cupcakes.

This is my second iteration of an American-style buttercream. The parent frosting recipe is American Buttercream, which has characteristics of being a little on the sweeter side, easy to make, and combining powdered sugar with butter.
How does this frosting contain less fat?
First, to preface, when I talk about fat content, it’s not from a nutrition or health perspective. You’re definitely on the wrong page for that stuff. I tend to look at things from a biochemical lens, and when I mention low fat, I’m talking about how that affects the functionality of the frosting, such as texture, stability, and taste perception.
Fats (or lipids) play a special role in frostings and baked goods. In frostings, it has lots to do with temperature and pressure stability, as they are pretty sturdy molecules. Regarding texture, sometimes a high fat content can be undesirable. It can feel dense or greasy or just overall too heavy.
And as far as I know, there has yet to be a frosting that is stable without the use of a high ratio of fat.
To illustrate this a little further, here is a graph of frostings I’ve covered and their relative fat content:
.avif)
Heavy cream starts off with a fat content of 36% typically, and used in frosting, the fat content can go down to around 32%. I can’t include it in this graph here because it’s not technically a buttercream emulsion and contains a bunch of air, which contributes to its texture. But it’s such a familiar frosting for bakers that I like to think about its fat content when comparing frostings.
Now typically, when there’s less fat in frosting, there’s less stability. But I seem to have found a good breaking point with a fat content between 25% supplemented with additional emulsifiers.

My emulsion in the buttercream was stable enough to hold up a large 8-inch layer cake, frost beautifully on the sides, and pipe tall swirls atop cupcakes.
How long can sweet cream frosting be left out at room temperature?
I would treat this frosting similar to one that contains cream cheese. And it’s not because of stability issues (like the melting that can occur with whipped cream frostings) but more because it does contain a higher ratio of water. Although, it also contains a good amount of butter and sugar, which are safe at room temperature.
So given those details, if you want to be super cautious, refrigerate within 2 hours after being in room temperature. For me, I’m comfortable with leaving this cake out in my house for 4-5 hours. Overnight, I will place the cake in the fridge.
What ingredients do you need for this Sweet Cream Frosting?
.avif)
Unsalted butter is the primary source of fat in this recipe. The fats as well as milk-derived proteins serve as emulsifiers, or molecules that hold fat and water-based ingredients together in a stable way. The butter also has a bit of water contained within, and that’s going to help dissolve the sugar. I always use unsalted butter in my frosting recipes as salted butter can be overly salty, particularly in a recipe such as this one where lots of butter is being used.
Sweet Cream Buttermilk Powder is a fine cream or yellow powder. When butter is churned, the liquid that runs off is sweet cream buttermilk. This is different than liquid cultured buttermilk that you may find in the refrigerated dairy section. That type of buttermilk is low-fat milk that has been inoculated with live cultures, which then ferments the lactose in the milk, creating lactic acid. This gives cultured buttermilk that tanginess and sour buttery flavor.
Here’s a little graphic that summarizes their differences. I see that many recipes and websites (including mine before I researched this) states that these two are the same. Chemically speaking, they have different molecular compositions and pH's, so unless the recipe specifically says so, I would not substitute one for another.

Not all buttermilk powders are the same. I’ve tested a few major brands during my experiments, and by far my favorite is Bob’s Red Mill Sweet Cream Buttermilk powder. It’s got the lightest color and most balanced and beautiful creamy-tangy flavor. I can buy it in my local grocery store, but you can also order it on Amazon, here.
My second favorite is Judee’s. Saco brand, which can be found in most big grocery stores is an interesting product because it’s a combination of both sweet cream and cultured buttermilks. (BTW, I think the reason they do this is to increase the acidity of the powder so that it CAN be interchangeable with liquid cultured buttermilk, since that's the flavor that most Americans associate with buttermilk.) I’ve tested Saco with this recipe and it works, though it will have a more pronounced tangy flavor that using a straight up sweet cream powder.
Whole (4% fat) milk adds water to help dissolve the sugar. It also contributes milkfat and milk proteins, which act as emulsifiers and hold the buttercream together. I’ve experimented with different fat-content milks and whenever I used skim milk (containing no milkfat) the emulsion would fall apart unless I added more buttermilk powder to compensate. So this recipe is specifically formulated to use whole milk, containing around 4% milkfat.
Powdered sugar is the sweetener for this buttercream. It’s a finely granulated sugar with a bit of cornstarch added to prevent caking. I like using powdered sugar in this recipe because it dissolves more readily during the mixing process, creating both a sugar syrup and emulsion simultaneously. Be sure to use a high quality sugar, and I’ll remind you about that in the recipe card.
Fine salt and vanilla extract are optional and added at the end of the buttercream process to enhance the flavor. I prefer this buttercream with a good pinch of salt but no vanilla extract. I find this combo enhances the sweet cream dairy flavor without overpowering it.
Step by step:
Please note that you do need a stand mixer to make this frosting. The speed and power is required to homogenize the ingredients so that it forms a buttercream.
This recipe here is based on my Sugarologie method for frostings, where we make a sugar syrup (usually by heating liquid and sugar) and emulsifying it into butter. And although that method is still one of my favorites, it can be challenging and time-consuming. So I worked through many experiments in trying to simplify the process. This one here combines both the syrup making and emulsifying in one straightforward process.
Step 1: Whip the butter and buttermilk powder.

Remove the butter from the fridge to warm up for about 15 minutes, then cut into chunks. Add to your stand mixer bowl with the sweet cream buttermilk powder (1a) and with whisk attachment, beat on high speed for 3 minutes (1b). It should be grainy from the powder, yet lighter in texture and slightly paler (1c).
Step 2: Add milk #1.
In the recipe below, you’ll see that I’ve labeled the milk and powdered sugar #1 and #2. Making this buttercream successfully depends on adding the right amount of ingredients at the right time and mixing them in gradually before moving on to the next step. I split the amounts for us to prevent adding too much of one ingredient at one time, which can cause the buttercream to break.

Add the cold whole milk #1 in at least 4 additions (2a), mixing in thoroughly, and mix for an entire minute on high speed (2b). At the end of this step, butter mixture should look like this (2c).
To check if the milk has been properly emulsified, you should watch my video below. Un-emulsified buttercream looks like what I call the “washing machine.” The butter is in slippery chunks that slide around the bowl, like clothes inside a washing machine. Once the milk fully integrates within the butter, it will “catch” the side of the bowl, smooth out, thicken, and look like a normal frosting.
Step 3: Add powdered sugar #1.

The powdered sugar also has to be added in increments. Using a one cup scoop, add approximately one cup of powdered sugar to the butter mixture (3a). Mix until you see no traces of powdered sugar, then add another scoop. Repeat this until all the sugar has been added, then mix on high speed for one whole minute (3b).
⚠️ CHECKPOINT:
I’ve added a checkpoint here to assess whether or not the initial emulsion is successfully made. I find that if you make it to this point, it’s harder to mess up with the second addition of ingredients.

So make sure that your buttercream looks like this (3c):
- Creamy smooth
- Slightly yellow
- No curdling or soupiness
- When picked up with a spatula, it does not drip off easily
- No milk leaking or powdered sugar streaks throughout
If your frosting looks curdled, your buttercream is not emulsified and it means your butter is too cold. Keep mixing on high speed until it comes together.
If your frosting looks soupy, your buttercream may be emulsified, but your butterfat is too soft to continue. Place the bowl with the buttercream inside into your fridge for about 5-10 minutes, just enough to put a slight chill on the bowl. Then place it back on the stand mixer, and mix until it thickens and comes together.
Step 4: Add milk #2.

Just as in step 2, add the second portion of cold whole milk in at least 4 additions (4a), mixing thoroughly after each addition. The frosting will be lighter in texture, like this (4b).
Step 5: Add powdered sugar #2.

Taste the buttercream. For me, this is perfect sweetness. This powdered sugar is optional if you want, so add in a little at a time, tasting until you like the sweetness. Don’t add more than indicated in the recipe though, or the buttercream might break. You can also add the salt and vanilla in this step.
Step 6: Adjust for color and texture of the frosting.

This frosting is naturally cream colored. Add a speck of purple food coloring to remove the yellow undertones (6a).
Switch to the paddle attachment and mix for at least a couple of minutes to smooth it all out. It’s now ready to use (6b).
Storage Tips
Leftover buttercream stores well in the fridge or freezer. Additionally, this buttercream can be made ahead of time for larger cake projects.
For a detailed tutorial, check out my How to Store Buttercream Guide.
Video
Honors Members Section
This extra material is accessible to Sugarologie Honors members.
Become a member to view extended research notes, technique analysis, and supplemental materials! Learn more about Sugarologie Honors here.
Already a member?
Before starting the recipe, please read this!
Measure by weight, if possible.
Measuring by weight is the best way for you to replicate my recipes. I develop recipes using ingredients (even liquids) measured in grams, which is why you see them listed first in the recipe cards. For measurements under 5 grams, I will typically only list the volumetric measurements (teaspoons, etc.), as most home scales are not precise for such small weights.
In most cases, I have converted grams to volumetric measurements (aka US customary units) for bakers who prefer this method. However, the measurements are not as precise and may have awkward proportions. The recipes should still work, but for the ultimate precision, try to use weight.
This is the OXO scale I use daily. I also purchased this budget version of a good scale, which I keep at my Mom’s house for baking. If you’re interested in other tools I use for my baking, I’ve compiled a list here.
Use room temperature ingredients.
All my ingredients should be used at room temperature, or 65-75 °F/18-24 °C. I will always indicate if you need something outside this range. If no details are given, room temperature is the default.
Pay attention to the ingredient descriptions.
I try not to be brand-specific, but I will always note an interesting result from a type of ingredient, be it negative or positive.
A specific note regarding salt: I use Diamond Crystal Kosher salt for everything on this site except for frostings. In frostings, you want the salt to dissolve more easily, and kosher salt tends to leave granules behind. If you substitute table salt (more finely granulated) for recipes that list kosher salt, you must use half the volume indicated in my recipes.
Substitutions are hard.
That said, substitutions aren’t impossible but can be the toughest part of recipe development. Small swaps, like reduced-fat milk (2% fat) for whole milk (3.5% fat), usually work fine. However, bigger changes—such as replacing oil with applesauce or sour cream with Greek yogurt—can significantly impact texture and density.
Be wary of general, all-purpose substitutions in baking; I find that usually there is never a one size-fits-all solution. I carefully select ingredients for my recipes, so for the best results, start with the original recipe and modify with caution.
Read all the recipe instructions before beginning.
I’m in the “Pre-read the Chapter before Class Lecture” club... and I invite you to join! Baking new recipes can be intimidating, so let’s set you up for success. I want you to think about timeframes. Most fillings and frostings can be made ahead of time, and give you an extra day for mental space. Also, as you become a more proficient baker, you can anticipate and recognize steps. (“Oh, this has a meringue step, so I’ll need an extra clean bowl…” etc.) Ensure you go down the ingredient list and have everything at the right temperature.
.avif)

.avif)


Sweet Cream Frosting
- 98g (7 tablespoons) unsalted butter, softened slightly
- 13g (4 teaspoons) sweet cream buttermilk powder*
- 41g (3 tablespoons) whole milk #1, cold from fridge
- 100g (¾ cup + 1 teaspoon) powdered sugar** #1, unsifted
- 41g (3 tablespoons) whole milk #2, cold from fridge
- 20g (3 tablespoons) powdered sugar #2, unsifted (optional)
- Pinch of fine salt (optional, but do it)
- ¼ tsp vanilla extract (optional, but I don’t)
For larger quantities or to pair with a cake recipe, go to my Cakeculator and choose “Sweet Cream Frosting".
- 283g (1 ¼ cups) unsalted butter, softened slightly
- 40g (¼ cup) sweet cream buttermilk powder*
- 122g (½ cup) whole milk #1, cold from fridge
- 300g (2 ½ cups) powdered sugar** #1, unsifted
- 122g (½ cup) whole milk #2, cold from fridge
- 90g (¾ cup) powdered sugar #2, unsifted (optional)
- Pinch of fine salt (optional, but do it)
- ¼ tsp vanilla extract (optional, but I don’t)
For larger quantities or to pair with a cake recipe, go to my Cakeculator and choose “Sweet Cream Frosting".
Equipment Note: You will need a stand mixer for this recipe.
- Whip the butter and buttermilk powder. Remove the butter from the fridge, cut into 2-inch chunks, and allow to soften slightly, about 10 mins at room temperature. It will still be cool (around 55-65°F/13-18°C is okay to start this recipe).
Add the butter chunks to the bowl of a stand mixer along with the buttermilk powder. With the whisk attachment, start slow to soften the butter a bit and incorporate the buttermilk powder on low speed, then beat on high speed for 3 minutes.
When finished, the butter will be grainy from the powder, and but slightly lighter in color and texture. Scrape down the bowl at least once during this process.
- Add milk #1 to the butter. For this recipe, always add the milk in (at least) four additions to allow the emulsion to build gradually. The amounts do not have to be precise (I eyeball it) but the only important thing is to add it gradually. Also, allow the milk to emulsify before adding the next portion. You’ll know it’s emulsified when it turns creamy rather than chunky and sticks to the bowl rather than sliding around everywhere. (See the video above where I show you exactly what this looks like.)
For every addition, start by pulsing the mixer so it doesn’t splash milk everywhere, then move to medium or high speed to fully emulsify. When all the milk has been added, and the buttercream is no longer sliding around the bowl, mix on high speed for one full minute.
- Add powdered sugar #1 to the frosting. This is the larger portion of powdered sugar and also has to be added in portions. Use a 1 cup volume scoop measure and add the sugar in approximately 1 cup portions. Start by pulsing to reduce the mess, then increase to medium speed to fully mix. The sugar mixes much more quickly into the emulsion than the milk.
Once all the sugar has been added and you see no traces of powdered sugar, mix the frosting on high speed for a full minute.
⚠️ CHECKPOINT: Check the pics or video above to make sure your frosting matches the consistency of my buttercream. It’s easier to solve problems right now rather than later on in the process.
The buttercream should be yellow from the buttermilk solids, slightly aerated but creamy in texture, and have no traces of powdered sugar or milk leaking. This is fully emulsified and means you can proceed with the rest of the steps.
If your buttercream seems curdled, it’s not emulsified because the butter is too cold. Just keep mixing until it is smooth and creamy. If your buttercream is soupy, it may be emulsified, but your butterfat is too warm to proceed. You need to place the bowl with the buttercream inside the fridge for 5-10 minutes. This creates a chill on the bowl. Then, mix again, and the buttercream will gradually cool and thicken.
- Add milk #2 to the frosting. Before adding these last ingredients, give the frosting a taste. It should taste like a thick American Buttercream with a slight granularity from the powdered sugar. It’s still a little thick so again, we’re going to add the milk in (at least) four parts. Adding milk at this stage does take a little longer than Step 2, but just keep whisking before adding the next addition.
Add the milk in at least 4 additions, and allow to mix fully until adding the next portion. For every addition, start by pulsing the mixer so it doesn’t splash milk everywhere, then move to medium or high speed to fully emulsify. When all the milk has been added, and the buttercream is no longer sliding around the bowl, mix on high speed for one full minute.
- Taste and add powdered sugar #2 to the frosting. This powdered sugar is optional, so taste the frosting first. You will have a different preference for sweetness than I do. (I like it without powdered sugar #2.) If you prefer it sweeter, add a little at a time mixing after each addition. You can add a bit of vanilla here, but it easily overpowers the delicate, tangy flavor, so start small and taste until you like it. I also like to add a pinch of finely granulated salt to round out the sweetness. Once you are okay with the flavor, mix on high speed for one full minute and scrape down the bowl.
- Adjust for color and texture of the frosting. This frosting is naturally cream-colored, depending on the intensity of yellow in your buttermilk powder. If you prefer a whiter buttercream, add the smallest dot of purple gel food coloring, which should cancel out the yellow undertones.
Now, switch to the paddle attachment to remove any large air pockets and smooth out the texture for at least 2-3 minutes. The frosting should have a melt-in-your-mouth texture similar to a very dense whipped cream but a smooth and glossy appearance.

Recipe Card - Adriana's Notes
*Sweet cream buttermilk is a byproduct of butter processing, which is a water-based liquid full of lactose, milk fat, and proteins. The liquid is then spray-dried to create a fine powder. It is different than (most) liquid buttermilks sold in cartons. You can read more about this in the article above. I definitely have my preferences for buttermilk powders, as some are better than others for this recipe. My favorite is Bob’s Red Mill Sweet Cream Buttermilk powder (you can find it on Amazon here), as it has the sweetest flavor and lightest color. Coming in second is Judee’s (here, on Amazon).
**Use good quality powdered sugar if you can. I’ve used C&H powdered sugar in my experiments, and when I switched to the generic Safeway brand, there was a noticeable graininess, probably from the uncooked cornstarch. They likely use a higher ratio of it in their product.
.avif)

Got room for more dessert?
Subscribe to my Crumby Data newsletter! I share behind-the-scenes looks at recipe development, flavor testing for the Cakeculator, and life as a content creator. It’s free, lands in your inbox every few weeks, and you can unsubscribe anytime...no strings attached :)
Feel free to take a look at previous newsletters here!
.ico)
