.avif)
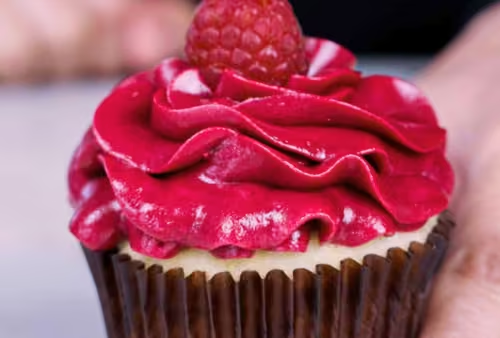
No (Artificial) Dye Red Frosting


This is a no dye red frosting using beet powder with a red velvet flavor of vanilla, cocoa and tangy buttermilk. There is no beet flavor in the finished frosting because I extract a beet juice containing the color pigment and very little flavor and this is then boiled to make a sweet and tangy syrup. If you don't prefer the red velvet flavor, I'll give you the option to make a vanilla red frosting in the recipe card below.
As for the color, it's definitely a magenta or raspberry red instead of a pure red, and that's because of the color pigment in beets.

Heads up, this is probably one of the most challenging frosting recipes I have on my site.
It is based on the Sugarologie method for frostings, which is similar to the black no dye frosting. This is just a tad more finicky, but as always, I will explain as much as possible.
It requires an instant-read thermometer, scale, stand mixer, and immersion blender for a deeper red. Because of this, I am also posting smaller quantities that you can try and I suggest trying the 1 frosting recipes first below to get the method down before trying the larger quantities. Those are a little harder to get right, and I wouldn't want you wasting ingredients.
What Ingredients will you need to make this red frosting?

Unsalted butter that is cut into ½ tablespoon chunks and frozen for at least 30 minutes prior to using is required for stability and thickening of the buttercream. Butter contains emulsifiers, which are components that hold oil and water together in a stable way. I always use unsalted because salted butter may end up making the finished frosting too salty.
Beetroot powder is dehydrated and ground up beets. The color pigment within beets is called betacyanins or betanins, and gives vegetables a purple-ish red hue. I use beet powder because it’s a precise way to get a concentrated amount of the pigment. If you try to use fresh beet juice, you’ll probably still get this recipe to work, but the final frosting will likely not be as vibrant.
Different brands of beet powder (and even different lots within the same brand) have slightly different colors and granule sizes. This is probably due to specific brand manufacturing. It should not matter which brand you choose with my method. Here are three different brands of beet powder I've tested. You can see the difference just from the powder alone:

Boiling hot water hydrates the beetroot powder and dissolves the water soluble betacyanins and sugars contained within the beet solids. It also dissolves the sugar, cocoa powder, and buttermilk during the syrup stage of this process.
Buttermilk powder is the dried component of cultured buttermilk. This helps add a bit of body to the finished buttercream and a slightly tangy flavor, which is common in red velvet cakes. If you don’t have access to or prefer not to use buttermilk, you can use dried milk powder in its place.
Cocoa powder helps with the red velvet flavor, as there is always a hint of cocoa in a good red velvet cake recipe. In this frosting, you’ll need to use either natural or Dutch-processed cocoa to keep the acidity up, which helps the beet powder stay vibrant and red. If you prefer, you can leave this ingredient out.
White granulated sugar contributes to the sweet flavor (along with the natural sugars in the beetroot powder) and is the base of the syrup, which we emulsify into the butter.
Cream of tartar is a fine white powder that is acidic and derived from winemaking. You can find it in the spice aisle. I love cream of tartar because it’s a solid form of acidity we can add to recipes, which in this one is to prevent crystallization of the sugars during the cooking and cooling process. If you don’t have cream of tartar, you can substtitue double the amount of lemon juice or apple cider vinegar.
Vanilla extract and salt enhances the flavors of this buttercream.
Step by step:
Video
Honors Members Section
This extra material is accessible to Sugarologie Honors members.
Become a member to view extended research notes, technique analysis, and supplemental materials! Learn more about Sugarologie Honors here.
Already a member?
Before starting the recipe, please read this!
Measure by weight, if possible.
Measuring by weight is the best way for you to replicate my recipes. I develop recipes using ingredients (even liquids) measured in grams, which is why you see them listed first in the recipe cards. For measurements under 5 grams, I will typically only list the volumetric measurements (teaspoons, etc.), as most home scales are not precise for such small weights.
In most cases, I have converted grams to volumetric measurements (aka US customary units) for bakers who prefer this method. However, the measurements are not as precise and may have awkward proportions. The recipes should still work, but for the ultimate precision, try to use weight.
This is the OXO scale I use daily. I also purchased this budget version of a good scale, which I keep at my Mom’s house for baking. If you’re interested in other tools I use for my baking, I’ve compiled a list here.
Use room temperature ingredients.
All my ingredients should be used at room temperature, or 65-75 °F/18-24 °C. I will always indicate if you need something outside this range. If no details are given, room temperature is the default.
Pay attention to the ingredient descriptions.
I try not to be brand-specific, but I will always note an interesting result from a type of ingredient, be it negative or positive.
A specific note regarding salt: I use Diamond Crystal Kosher salt for everything on this site except for frostings. In frostings, you want the salt to dissolve more easily, and kosher salt tends to leave granules behind. If you substitute table salt (more finely granulated) for recipes that list kosher salt, you must use half the volume indicated in my recipes.
Substitutions are hard.
That said, substitutions aren’t impossible but can be the toughest part of recipe development. Small swaps, like reduced-fat milk (2% fat) for whole milk (3.5% fat), usually work fine. However, bigger changes—such as replacing oil with applesauce or sour cream with Greek yogurt—can significantly impact texture and density.
Be wary of general, all-purpose substitutions in baking; I find that usually there is never a one size-fits-all solution. I carefully select ingredients for my recipes, so for the best results, start with the original recipe and modify with caution.
Read all the recipe instructions before beginning.
I’m in the “Pre-read the Chapter before Class Lecture” club... and I invite you to join! Baking new recipes can be intimidating, so let’s set you up for success. I want you to think about timeframes. Most fillings and frostings can be made ahead of time, and give you an extra day for mental space. Also, as you become a more proficient baker, you can anticipate and recognize steps. (“Oh, this has a meringue step, so I’ll need an extra clean bowl…” etc.) Ensure you go down the ingredient list and have everything at the right temperature.
.avif)

.avif)


No dye Red Velvet Buttercream
- 113 g unsalted butter, cut and frozen
- 11 g beet powder*
- 80 g boiling water
- 53 g beet juice (made from powder + water, above)
- 3 g (1 teaspoon) buttermilk (or milk powder)**
- 2 g (1 teaspoon) natural or dutch process cocoa
- 83 g white granulated sugar
- 1/8 teaspoon cream of tartar***
- 1/2 teaspoon vanilla extract
- 1/8 teaspoon salt
- 339 g unsalted butter, cut and frozen
- 32 g beet powder*
- 240 g boiling water
- 160 g beet juice (made from powder + water, above)
- 8 g (1 tablespoon) buttermilk (or milk powder)**
- 6 g (1 tablespoon) natural or dutch process cocoa
- 250 g white granulated sugar
- 1/4 teaspoon cream of tartar***
- 2 teaspoon vanilla extract
- 1/4 teaspoon salt
- Prepare the butter
Cut the butter into approximately half-inch chunks and place them in the freezer while performing the next steps. (They should be in there for at least 30 minutes.) - Prepare the beet juice
Add the red beet powder to a small bowl with boiling hot water. Stir thoroughly to hydrate the powder and allow this to sit for 5 minutes. As the beet powder rehydrates, the mixture will thicken and turn a deep dark red color.
Line a sieve/strainer with a *wet* paper towel (or a wet cheesecloth that you don’t mind dyed bright red). Pour the beet juice through the strainer and into a saucepan, using a spatula to stir and facilitate draining the liquid. You can do this straight into the saucepan placed over a scale to ensure you get the right amount of juice out, or into a bowl, which you can then portion out.
Gently fold the paper towel over the beet solids and push all the liquid out. It’s ok if you get a few beet solids in the juice, but if you get too many, you’ll get a red-speckled buttercream (which is cute too) instead of a silky smooth one. Keep squeezing until you get the amount of juice needed (labeled “beet juice”) in the ingredients. - Cook the syrup
Whisk in the cocoa powder and buttermilk powder until you don’t see any more lumps. Place the pan on your heat source and turn the heat to low/medium-low.
Once you see a bit of steam rising, pour in the white granulated sugar and cream of tartar. Use a spatula to scrape the sides so all the syrup is neatly within the pan and then turn the heat to medium and cook until 230-234°F/110-112°C. For the larger batches (3 cups/4.5 cups), this can take up to 10 minutes. Just let it keep bubbling away and try not to stir until you reach your final temp. - Cool the Syrup
This next step is done completely with a spatula, and the important thing is to keep stirring for this whole step.
Remove the pan from the heat. Grab your butter from the freezer, add a half-tablespoon chunk, and stir it into the syrup with the spatula.
Pour the hot syrup (careful!) into the stand mixer bowl scraping with the spatula. Add your thermometer to the bowl and about 10% of the frozen butter and stir. Keep stirring until it reaches 160F(71C), scraping the sides of the bowl continuously. It is important to keep the syrup moving to continuously cool it and prevent crystallization (graininess) for the buttercream’s texture.
Once you reach 160F(71C) add the rest of the frozen butter chunks and continue to stirring and scraping with a spatula. You can remove the thermometer to it’s easier and keep stirring until the butter is about 75-80% melted. The syrup will be dark red and thickened slightly. - Emulsify the buttercream
Add the bowl to your stand mixer, along with the salt and vanilla, and with the attachment, pulse on a low speed to prevent butter chunks from flying out. Then once the mixer can manage, turn on low speed and mix until the butter-syrup mixture reaches 68-73F (20-23C). If after mixing and all the butter has melted but the temp is still higher, you can put the bowl in the freezer for about 5 minutes. Don’t chill for too long, you just want to put a chill on the bowl so that it brings the frosting’s temp down.
Turn the mixer onto medium-high speed and mix until the frosting comes together. Once the frosting has emulsified and is thick and creamy, mix for an additional minute on high speed.
To smooth it out, mix on low speed with the paddle for a minute. Your frosting should be a dark pink to medium red, depending on your type of beet powder. - Allow the frosting to rest for at least a couple hours
Right after making, the frosting will seem a little loose. You can work with it and it will be like a super loose Swiss meringue buttercream. If you allow it to set for a few hours at room temperature, it will have a slightly firmer texture. It’s actually best the next day, and will get a little deeper in color as well. For this, I just leave it out overnight at room temperature in a covered container.

Recipe Card - Adriana's Notes
To make a red vanilla flavored frosting, substitute mik powder for buttermilk powder and don’t use any cocoa powder. All the other ingredients should remain the same.
*There are different brands of beet powder and they all have slightly different colors and granule sizes (probably due to specific brand manufacturing.) It doesn’t matter which one you choose since I’ve created this recipe to use the juice rather than the powder. Once you hydrate the powder, the beet powder should swell and turn a deep dark red. I use beet powder because it’s a very precise way for use to get a concentrated amount of the pigment. If you try to use fresh beet juice, you’ll probably still get this recipe to work, but the final frosting will likely not be nearly as vibrant.
**Use milk powder instead of buttermilk powder if you don’t want a slight tanginess (and it is very slight) or if you’re making the plain vanilla red frosting. Any fat content of these milk powders will work.
***Cream of tartar is an acidic ingredient used here to prevent crystallization and also give the frosting a bit of acidity. If you don’t have it, you can substitute with lemon juice, but double the amount listed.
.avif)

Got room for more dessert?
Subscribe to my Crumby Data newsletter! I share behind-the-scenes looks at recipe development, flavor testing for the Cakeculator, and life as a content creator. It’s free, lands in your inbox every few weeks, and you can unsubscribe anytime...no strings attached :)
Feel free to take a look at previous newsletters here!
.ico)