
.avif)
The Ultimate Chewy Brownies


My Chewy Brownies have a rich chocolate flavor without being overly sweet - these are by far my favorite brownie recipe ever. From the sugar-to-water ratio to the chocolate choices, each component has been optimized to prioritize a chewy texture, deep chocolate flavor, and a reliable crackly top. Here I’m happy to show you my favorite recipe from all my brownie experiments; you'll learn the baking science that lets you troubleshoot, adapt, and consistently bake extraordinary homemade brownies.
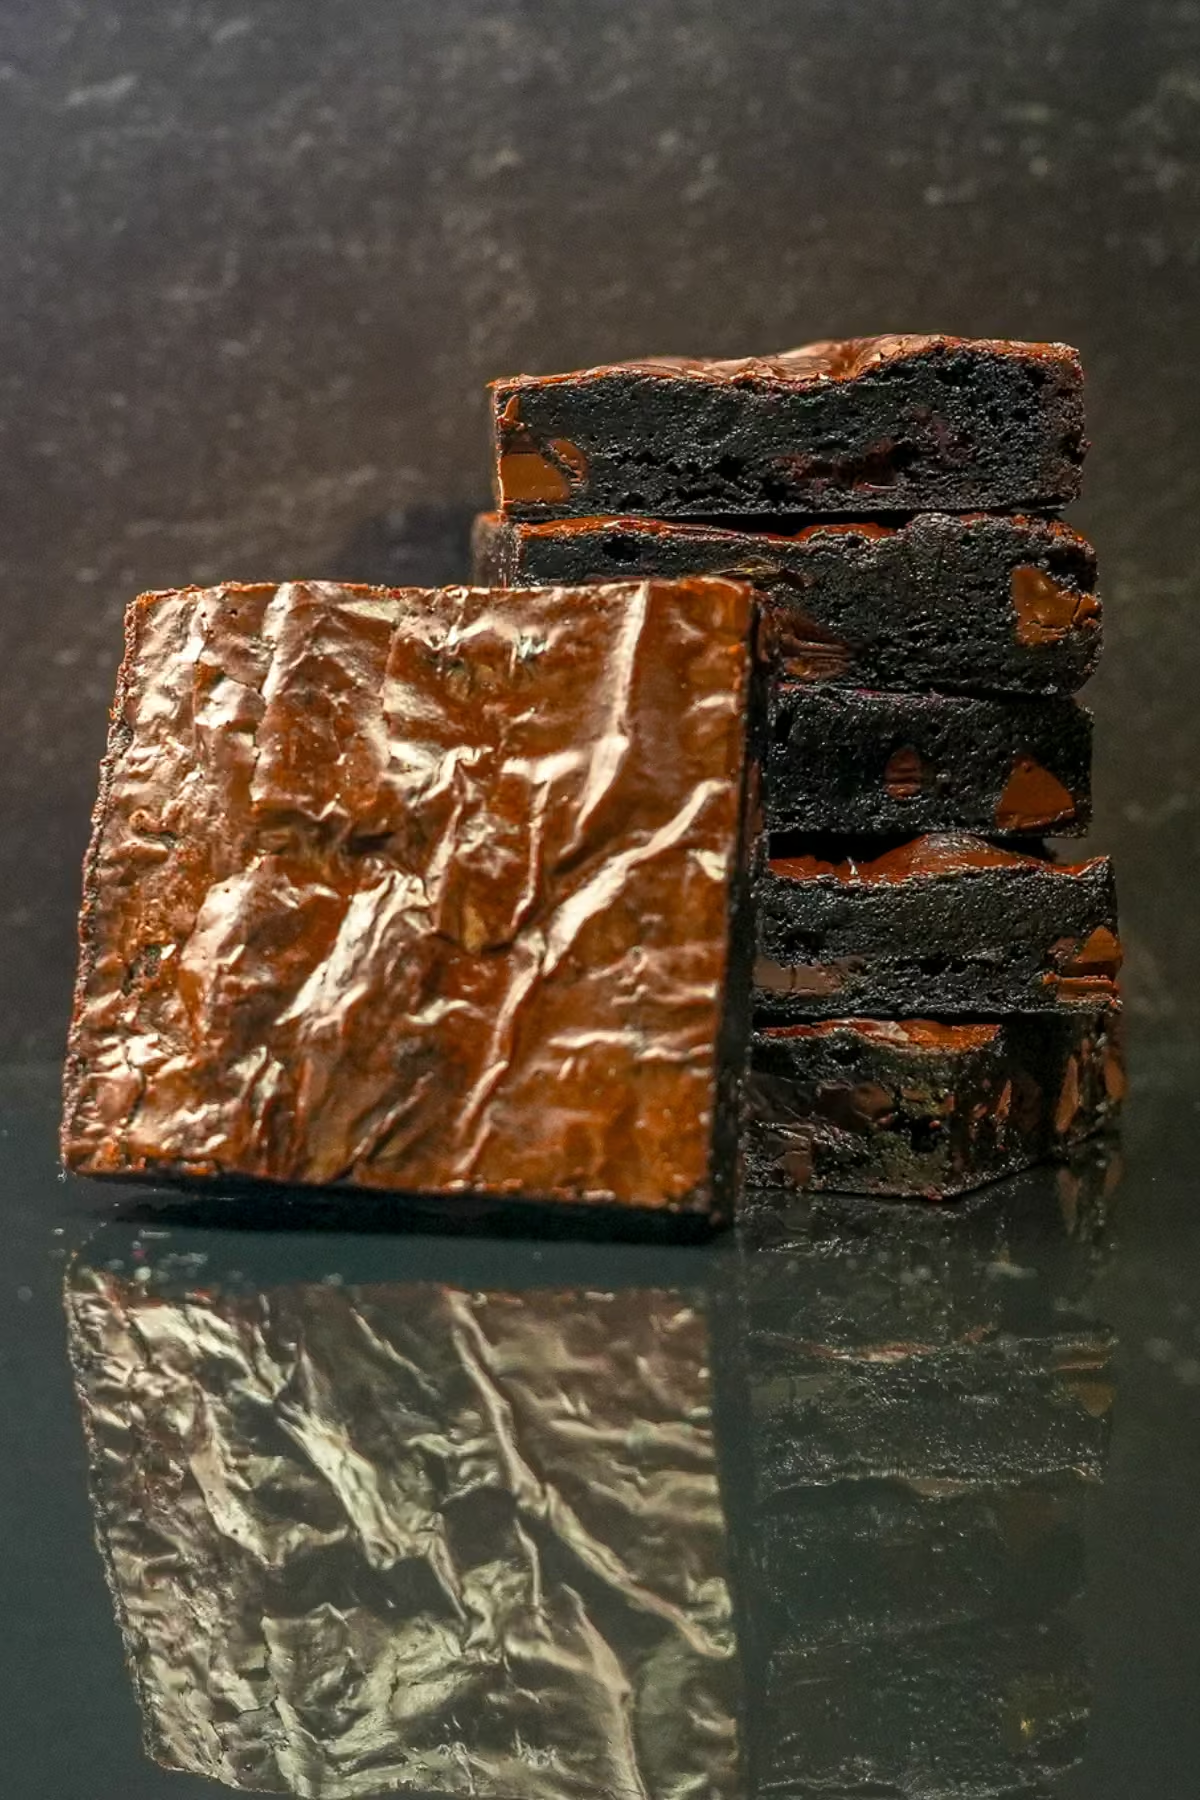
I have two popular brownie recipes on my site: Gooey Fudgy Brownies and The Chewy Brownies (the post you’re currently reading). It's hard for me to say which one is more popular, as bakers have told me that they like both. And although they are somewhat similar, I like to leave both recipes up because it’s easier for you to bake from a specifically tailored recipe than for me to annotate all the changes in a single recipe.
So what’s the difference between the two?
- The Chewy Brownies (the one on this page)
TEXTURE: Prioritizes a chewy bite throughout with a fudgy center
FLAVOR/TASTE: Intensely cocoa forward with a light sweetness
METHOD: Uses whole eggs plus egg yolks and slightly more flour to increase chewinessAPPEARANCE: Beautiful crackly, glossy top due to sucrose dissolving - Fudgy Gooey Brownies (located on this page)
TEXTURE: Prioritizes a soft, fudgy bite with a very slight chew along the perimeters as it cools
FLAVOR/TASTE: Intensely cocoa-forward with a light sweetness
METHOD: Uses whole eggs (2 or 4 eggs, depending on the size of your pan) and slightly less flour for the ultimate fudginess
APPEARANCE: Beautiful crackly, glossy top due to sucrose dissolving
In summary, you'll get the same flavor with either choice. So instead of choosing by flavor, think about whether you want to use extra yolks (I know that’s a sticking point for some bakers) and whether you want to prioritize a specific texture (chewy vs. fudgy).
What is the texture of The Chewy Brownie?
.avif)
My chewy brownies are extraordinarily chewy due to the low water content. Paired with the higher ratio of starches (from the flour and cocoa powder) and the proteins in the eggs, the brownies offer a nice fudgy, chewy bite that gets even better as they sit.
What ingredients do you need for my Chewy Brownies?
.png)
DUTCH-PROCESSED (EUROPEAN-STYLE) UNSWEETENED COCOA is the primary source of chocolate flavor in this brownie. It is an alkalized form of natural cocoa, which imparts a darker hue and more mellow flavor. And although you can make this recipe using natural cocoa, I always use Dutch-processed as I enjoy the flavor much more.
Structurally, cocoa powder also adds a bit of starch, protein, fat, and fibrous plant material. This assists with texture and body, particularly in this brownie, since we use quite a bit of it in the recipe.
KOSHER SALT and VANILLA are flavor enhancers that balance the sweetness and bring out the chocolate flavor.
UNSALTED BUTTER is the primary source of fat in this recipe. In this recipe, we’ll brown the butter, which melts the butterfat, evaporates the water, and toasts the milk solids. This toasting is done via the <span class="def-term" data-term="maillard-reaction">Maillard reaction</span>, which, in addition to browning the milk proteins, releases flavorful compounds into the butterfat.
I also tend to use unsalted butter in most baking applications because salted butter varies in salt concentration and, used in large quantities, can make your recipes overly salty.
EGGS/EGG YOLKS provide structure from proteins and also add water. In fact, eggs are the primary water source in this brownie recipe, helping dissolve the sugar to create the crispy crust atop the brownies and providing a touch of moisture. This recipe uses yolks in addition to whole eggs to increase protein content and reduce water content, enhancing the chewy texture.
POWDERED SUGAR is one type of sugar used in this brownie. It provides a finely granulated source of <span class="def-term" data-term="sucrose">sucrose</span>, which is necessary to create the crystallized (or intricately organized) sugar molecules atop the brownie to create the beautiful shiny top. It also, of course, adds sweetness to the brownie.
ALL-PURPOSE FLOUR, along with the bit of starch contained in the cocoa powder, adds structure to the brownie. There’s not quite enough moisture in most cookies and brownies for these starches to <span class="def-term" data-term="gelatinization">gelatinize</span> unless you’re making brownies that veer towards a “cakey” texture. These brownies definitely fit more into the chewy-fudgy category. Hence, the flour serves more as a solid structural element than a squishy or bouncy one (as in cakes).
BROWN SUGAR adds moisture and chewiness. Its molasses content contributes subtle caramel notes while helping keep the brownies soft after they cool. Feel free to use either light or dark brown sugar for this recipe. Dark brown sugar has a slightly higher molasses content and therefore imparts a deeper flavor.
CHOCOLATE CHUNKS OR CHIPS add to the intense chocolate flavor and texture. Flavor-wise, you can use semisweet, bittersweet, milk chocolate, or a combination depending on how sweet you like your brownies. If there’s a percentage on the labeling of your chocolate, that’s an indication of how cocoa-forward your chocolate is, with the higher numbers containing more cocoa solids (cocoa mass and cocoa butter) and less sugar.
Now, brownies fall into one of two categories when it comes to the chocolate’s contribution to the texture. The first method is if the chocolate is melted. In this scenario, it is incorporated into the batter along with all the molecular components that make up the chocolate during manufacturing (sugars, fats in the form of cocoa butter and cocoa mass, such as fibrous bits, and starches).
The texture and flavor of the brownie will therefore be dependent on the type of chocolate you choose. For example, milk chocolate will create a sweeter, less cocoa-forward brownie batter than 72% chocolate will. And if a brownie recipe contains a substantial amount of melted chocolate and develops a shiny, crackly top, the melted chocolate is likely the primary contributor, as it already contains dissolved sugar that can migrate to the surface during baking.
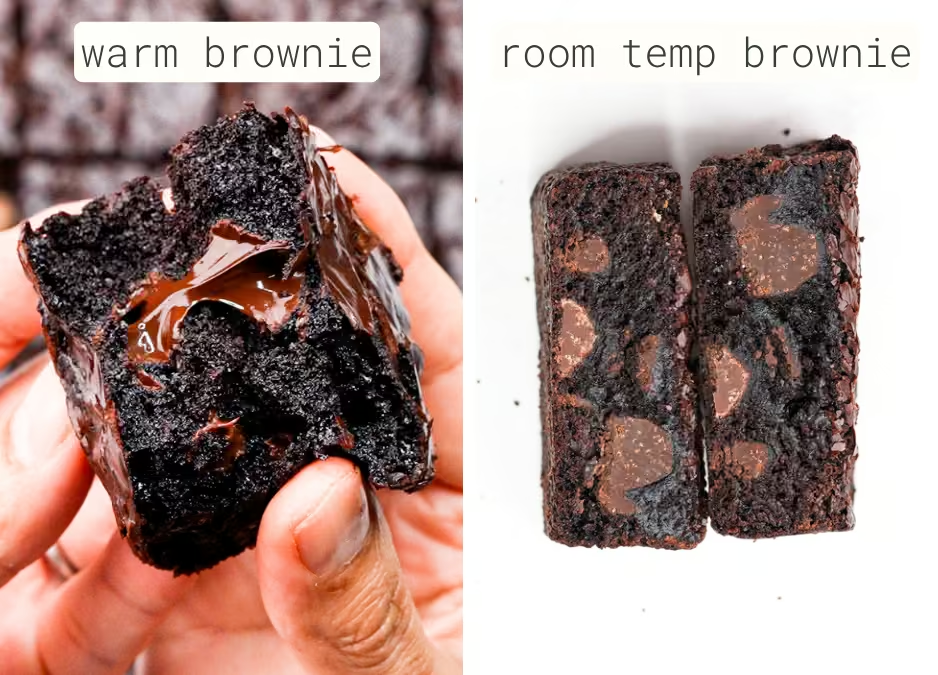
If you eat the brownies while they’re still warm (labeled “warm brownie”), these pockets of chocolate will provide a gooey, melty experience within a creamy, fudgy brownie. If you eat the brownies after they’ve completely cooled to room temperature (labeled “room temp brownie”), the cocoa butter (or other fats) in the chocolate pieces will solidify, and the brownie base will become more fudgy.
💡TIP: For these brownies, I like using a combination of chocolate chips and chopped chocolate from a bar to create a more interesting mix of flavor and texture. My favorite combination is semi-sweet chocolate chips with chopped 72% dark chocolate, but you can use whatever chocolate you enjoy most.
Since the chocolate isn't melted into the batter, your choice of chocolate has very little effect on the brownie's structure / how it bakes. Instead, it mainly changes the flavor. For example, a milk chocolate will produce a sweeter, milder brownie, while a higher-percentage dark chocolate will create a richer, more cocoa-forward flavor.
This was an intentional design choice when I formulated my brownie recipes. I’ve noticed that some brownie recipes call for melted chocolate in the batter without specifying what kind to use, even though the cocoa percentage and sugar content of the chocolate can significantly change both the flavor and the texture of the finished brownies. By keeping the chocolate as mix-ins instead, you can customize the flavor without changing how the recipe performs.
Step by step:
STEP 1 | PREP THE OVEN, PAN, EGGS, AND CHOCOLATE.
WHY:
Lining your baking pan with parchment (or foil) makes it easier to lift the cooled brownies out of the pan onto a cutting surface to cut them into neat squares. This technique is often used in scenarios where we shouldn’t invert the pan, lest we mess up the surface or destroy our baked goods. (Cheesecake pans are the pan-specific solution to this problem.)
Warming the eggs helps them dissolve more sugar, which encourages a crackly, shiny brownie top. And chopping the chocolate into evenly sized pieces helps it distribute throughout the batter.
HOW:
.avif)
Preheat the oven to 350°F/170°C. Line an 8 x 8-inch (20.3 x 20.3 cm) or 9 x 13-inch (23 x 33 cm) baking pan with parchment paper or foil and lightly grease it. (1a).
In this tutorial, I will demonstrate my recipe in an 8x8-inch pan.
Warm the eggs by placing them in a bowl of hot tap water, replacing the water a few times until the eggs feel slightly warm (1b). If using a chocolate bar instead of chocolate chips, chop it into chunks slightly larger than chocolate chips.
STEP 2 | BROWN THE BUTTER AND MAKE THE COCOA PASTE.
WHY:
Browning butter develops rich, nutty flavors through the <span class="def-term" data-term="maillard-reaction">Maillard reaction</span> as the milk solids toast. And to enhance the flavor of these brownies even further, we’ll pour the hot browned butter over the cocoa powder. This technique is often referred to as “blooming,” and it softens the starch granules and releases cocoa-based flavor compounds, some of which dissolve in fat and are directly incorporated into the butterfat. This serves as the base for the brownie's chocolate flavor, permeating every bite with a deep chocolate flavor.
With this technique, we want to ensure the melted butter-cocoa powder mixture isn’t too hot before moving on to the next steps; otherwise, it may cook the eggs prematurely. Don’t cool it too much; it’s best a bit warm, about 100–130°F / 38–54°C. I like to give temperatures in case you need to troubleshoot or just prefer to follow them. A warm batter ensures the sugars dissolve as much as possible before hitting the oven, which encourages that beautiful crinkly top on the baked brownie.
HOW:
.avif)
Place the cocoa powder and salt in a medium-to-large heatproof bowl large enough to hold the browned butter and cocoa powder (2a). Set that bowl aside for now.
Add the butter to a light-colored pan and melt on medium-low heat (2b). Once the butter has melted and started foaming, use a heat-proof spatula and stir and scrape the sides and bottom of the pan.
.avif)
Once you see the milk proteins turn light brown, turn off the heat and continue stirring until they turn medium brown (2c). Immediately pour the melted butter, scraping the milk solids from the pan, into the cocoa powder bowl (2d). Stir to mix and set aside to cool (2e).
Let the mixture cool until slightly warm (100–130°F / 38–54°C). This takes about 10–15 minutes for an 8 x 8 pan or 15–20 minutes for a 9 x 13 pan.
STEP 3 | WHISK THE EGGS WITH THE POWDERED SUGAR.
WHY:
The goal of this step is to dissolve most of the sugar in the water, with eggs as the primary source of water in this recipe. This, in turn, is responsible for the shiny crackly top on my brownies. There are a few rules one must follow to achieve the crackly top.
First, the sugar must be predominantly <span class="def-term" data-term="sucrose">sucrose</span>, which is present here as powdered sugar.
Second, the sugar must fully dissolve in water. Sucrose dissolves more readily in warmer water, hence the warm eggs. To facilitate the dissolution of sucrose, we’ll use powdered sugar, which dissolves much more readily than granulated sugar. It’s sometimes thought that sugar AND eggs are required to achieve shiny tops, but in fact we just need the water in the eggs. In my vegan brownies, I don’t use any eggs at all, yet I can get a crackly top by using just water.
And third, the sucrose must be at a fairly high concentration - approaching two times the mass of water to encourage the shiny, crackly tops.
I know this is a ton of information condensed into a tiny section, but don’t worry, I’ve figured out all the numbers and science for us, so just follow the recipe, and you’ll be rewarded with some beautiful brownies!
HOW:
.avif)
To a large mixing bowl, add powdered sugar, whole eggs, and egg yolk(s) (3a). Use a whisk to stir until no powdered sugar remains, then whisk for another minute. No need to be vigorous; just comfortably mix for a full minute (3b). The final egg mixture should have no visible traces of sugar (3c). If the powdered sugar is lumpy, let the mixture rest for 5 - 10 minutes, then whisk again until smooth.
STEP 4 | FINISH THE BROWNIE BATTER.
WHY:
Now that we’ve made the major components of the brownie batter (butter-cocoa powder for flavor, and eggs + sugar for texture and that glossy top), we’re now going to combine everything, including the flour for a bit of structure and some brown sugar for a depth of flavor.
First we’ll combine the cocoa powder mixture with the egg mixture, and at first, the batter will seem a bit thin. As you continue to stir, you should feel it get slightly thicker and shinier - this is an emulsion forming. Fold in the flour and brown sugar by hand to add a bit of structure and flavor to your batter emulsion while preventing the air pockets that can form when using a mixer. This will inevitably cause your brownies to become slightly aerated, which is not the texture we want in this brownie, which is dense and fudgy.
HOW:
.avif)
Once the cocoa-butter mixture has cooled slightly, stir in the vanilla extract. Pour the mixture into the bowl with the eggs and powdered sugar (4a). Use a spatula to stir the chocolate mixture into the eggs (4b). It will feel liquid and loose, and as you stir, it will suddenly thicken up (4c). (It’s now emulsified!)
.avif)
Ensure your brown sugar is not clumpy; smash any larger clumps with your fingers (4d). Fold that into the chocolate mixture (4e).
.avif)
Finally, fold in the flour until no dry streaks remain. The batter should be free of visible flour or sugar, though it will still feel slightly granular because some brown sugar crystals remain undissolved. (4f, g).
STEP 5 | ADD CHOCOLATE PIECES AND FILL THE PAN.
WHY:
Folding chocolate into the batter creates textural contrast by creating pockets of chocolate throughout the brownies. I like to reserve some batter without chocolate for the top to create a smoother surface that can encourage a more continuous, crackly crust. Alternatively, simply fold all the chocolate into the batter before spreading it into the pan.
HOW:
.avif)
For the crackliest top, reserve about ¼ of the batter in a separate bowl (5a). Fold the chocolate pieces into the remaining batter (5b, c).
.avif)
Spread the chocolate pieces into the prepared pan (5d). Then, add the reserved batter over the top and smooth the surface (5e). Alternatively, simply fold all of the chocolate into the entire batch of batter.
STEP 6 | BAKE.
WHY:
Learning when your baking is done can be difficult if you’re treating it as a skill you have to learn by experience and visual cues. I typically provide those cues by default as that’s how I was taught and how most books still teach baking. However, you can bypass all that and get perfectly baked treats every time by using a thermometer. Just like we use one to know if our steak is rare vs. well-done, we can assess the doneness of baked goods. Temperature is a quantitative observation that can be reliably measured and is an indication of whether or not the proteins have coagulated and the starches have gelatinized; in other words, it’s a sure-fire way to assess doneness.
HOW:
.avif)
Bake for about 20–25 minutes. For an 8 x 8-inch pan, begin checking around 18 minutes. For a 9 x 13-inch pan, begin checking around 20 minutes.
The brownies are ready when they have puffed slightly and developed a glossy, crystallized sugar crust. The edges may be firmer and less puffy than the center, while the middle should still jiggle slightly.
A toothpick inserted into the center should come out streaked with wet batter (6a).
For the most accurate test, remove the brownies when the center reaches 190–200°F (88–93°C) (6b).
STEP 7 | COOL COMPLETELY BEFORE SLICING.
Allow the brownies to cool completely in the pan before lifting them out and slicing.
Fresh from the oven, these high-fat, low-moisture brownies may appear slightly oily. This is normal and will disappear as they cool.
Store cooled brownies in an airtight container at room temperature. For an even denser, fudgier texture, wrap them well and refrigerate them—I also enjoy them cold.
How to store brownies?
Brownies are very forgiving but are best when eaten within 48 hours of baking.
Usually, I just cut my brownies into squares after they've cooled completely and place them in a zip-top bag. I store them on my countertop at room temperature.
Baked brownies also freeze incredibly well. For that, you’d need to wrap the brownies in plastic wrap, then foil, to keep freezer odors out and moisture in. Then, I label the brownies in a zip-top freezer bag with the date. When you’re ready to serve, just remove them from the freezer and let them thaw at room temperature for a few hours.
Video
Here is a youtube video going over how this brownie recipe was created:
Honors Members Section
This extra material is accessible to Sugarologie Honors members.
Become a member to view extended research notes, technique analysis, and supplemental materials! Learn more about Sugarologie Honors here.
Already a member?
Before starting the recipe, please read this!
Measure by weight, if possible.
Measuring by weight is the best way for you to replicate my recipes. I develop recipes using ingredients (even liquids) measured in grams, which is why you see them listed first in the recipe cards. For measurements under 5 grams, I will typically only list the volumetric measurements (teaspoons, etc.), as most home scales are not precise for such small weights.
In most cases, I have converted grams to volumetric measurements (aka US customary units) for bakers who prefer this method. However, the measurements are not as precise and may have awkward proportions. The recipes should still work, but for the ultimate precision, try to use weight.
This is the OXO scale I use daily. I also purchased this budget version of a good scale, which I keep at my Mom’s house for baking. If you’re interested in other tools I use for my baking, I’ve compiled a list here.
Use room temperature ingredients.
All my ingredients should be used at room temperature, or 65-75 °F/18-24 °C. I will always indicate if you need something outside this range. If no details are given, room temperature is the default.
Pay attention to the ingredient descriptions.
I try not to be brand-specific, but I will always note an interesting result from a type of ingredient, be it negative or positive.
A specific note regarding salt: I use Diamond Crystal Kosher salt for everything on this site except for frostings. In frostings, you want the salt to dissolve more easily, and kosher salt tends to leave granules behind. If you substitute table salt (more finely granulated) for recipes that list kosher salt, you must use half the volume indicated in my recipes.
Substitutions are hard.
That said, substitutions aren’t impossible but can be the toughest part of recipe development. Small swaps, like reduced-fat milk (2% fat) for whole milk (3.5% fat), usually work fine. However, bigger changes—such as replacing oil with applesauce or sour cream with Greek yogurt—can significantly impact texture and density.
Be wary of general, all-purpose substitutions in baking; I find that usually there is never a one size-fits-all solution. I carefully select ingredients for my recipes, so for the best results, start with the original recipe and modify with caution.
Read all the recipe instructions before beginning.
I’m in the “Pre-read the Chapter before Class Lecture” club... and I invite you to join! Baking new recipes can be intimidating, so let’s set you up for success. I want you to think about timeframes. Most fillings and frostings can be made ahead of time, and give you an extra day for mental space. Also, as you become a more proficient baker, you can anticipate and recognize steps. (“Oh, this has a meringue step, so I’ll need an extra clean bowl…” etc.) Ensure you go down the ingredient list and have everything at the right temperature.
.avif)
.avif)
.png)
%20(1)%20(1).avif)
The Chewy Brownie
- 60 g (⅔ cup) Dutch-processed cocoa powder*
- ½ teaspoon salt (I use Diamond Crystal Kosher)
- 113 g (8 tablespoons) unsalted butter
- 75 g (6 ½ tablespoons or 1 ½ large) eggs (beat whole eggs, then measure out)
- 20 g (1 large) egg yolk
- 165 g (1 ¼ cup + 2 tablespoons) powdered sugar, unsifted is ok
- 7 g (1 ½ teaspoon) vanilla extract
- 53 g (¼ cup) brown sugar, light or dark
- 60 g (½ cup) all-purpose flour, unbleached
- 140 g (about 2 ½ ounces/ ¾ cup) chocolate chunks or chips**
- 60 g (⅔ cup) Dutch-processed cocoa powder*
- ½ teaspoon salt (I use Diamond Crystal Kosher)
- 113 g (8 tablespoons) unsalted butter
- 75 g (6 ½ tablespoons or 1 ½ large) eggs (beat whole eggs, then measure out)
- 20 g (1 large) egg yolk
- 165 g (1 ¼ cup + 2 tablespoons) powdered sugar, unsifted is ok
- 7 g (1 ½ teaspoon) vanilla extract
- 53 g (¼ cup) brown sugar, light or dark
- 60 g (½ cup) all-purpose flour, unbleached
- 140 g (about 2 ½ ounces/ ¾ cup) chocolate chunks or chips**
- 120 g (1 ⅓ cup) Dutch-processed cocoa powder*
- 1 teaspoon salt (I use Diamond Crystal Kosher)
- 226 g (1 cup) unsalted butter
- 150 g (3 large) eggs
- 40 g (2 large) egg yolks
- 330 g (2 ¾ cups) powdered sugar, unsifted is ok
- 15 g (1 tablespoon) vanilla extract
- 107 g (½ cup) brown sugar, light or dark
- 120 g (1 cup) all-purpose flour, unbleached
- 280 g (about 5 ounces/ 1 ½ cups) chocolate chunks or chips**
- Prep the oven, pan, eggs, and chocolate.
Arrange a rack in the middle of your oven and preheat to 350°F/180°C.
Line an 8x8-inch (20.3x20.3 cm) or 9x13-inch (23x33 cm) pan with parchment or foil and lightly grease.
Warm the eggs by placing them in a bowl of hot tap water, changing the water a few times until the eggs feel slightly warm. If using a chocolate bar, chop it into chunks slightly larger than chocolate chips. - Brown the butter/make cocoa powder paste.
You’ll need a medium-large, heat-proof bowl that can hold both the cocoa powder and melted, browned butter. First, add the cocoa powder and salt to that bowl and set it aside for now.
Melt the butter in a light-colored saucepan over medium heat. Once melted, continue cooking, stirring frequently and scraping the bottom of the pan, until the milk solids turn deep golden brown. Immediately pour the browned butter, including all the browned bits, over the cocoa powder and stir until smooth.
Let the mixture cool until slightly warm (about 100–130°F / 38–54°C), about 10–15 minutes for an 8x8 pan or 15–20 minutes for a 9x13 pan. - Mix the eggs/yolk(s) with powdered sugar.
Meanwhile, whisk the warm eggs and yolk(s) with the powdered sugar until smooth and pale. If the sugar is lumpy, let it sit for 5–10 minutes, then whisk again. - Add the remaining ingredients to the egg mixture.
When the cocoa powder-brown butter mixture is slightly cooled, stir the vanilla extract. Then pour the mixture into the bowl with the powdered sugar and eggs. Use a spatula to mix; it will gradually go from thin and runny to shiny and very thick. It may seem overly thick, but this is normal.
Ensure the brown sugar has no clumps, and fold that into your batter with a spatula. Fold in the flour. The batter should have no traces of flour or sugar but will still be slightly granular from the undissolved brown sugar crystals. - Pour batter into pan and add chocolate pieces.
For the crackliest top, reserve about ¼ of the batter into another bowl to spread on the top.
Fold the chocolate into the remaining batter and spread it into the prepared pan. Top with the reserved batter and smooth the surface. (Or simply mix all the chocolate into all of the batter.) - Bake for about 20-25 minutes***.
For the 8x8 pan, start checking at 18 minutes. For the 9x13 pan, start checking around 20 minutes.
The final brownies should have puffed up with a glossy crystallized sugar top. There may be a perimeter along the edge of the pan that is less puffy and more firmly baked, while the center of the brownies will be slightly jiggly.
A toothpick inserted in the middle will come out streaked with wet batter. This may be difficult if you hit a piece of chocolate, as that will leave your toothpick wet with molten chocolate whether your brownies are done or not.
If you have a thermometer, I remove my brownies when their centers are around 190-200°F/88-93°C. - Cool brownies completely in the pan.
Cool completely in the pan before lifting out and slicing.
Fresh from the oven, high-fat, low-moisture cookies and brownies (such as this one) may look/feel oily; this is normal. As they cool, the butterfat solidifies, creating their fudgy texture. Store cooled brownies in an airtight container at room temperature. I also enjoy these brownies cold! Just store well-wrapped brownies in the fridge.

Recipe Card - Adriana's Notes
*This recipe works with either natural or Dutch-processed cocoa powder, but I prefer the latter. It has a beautiful dark color and mellow chocolate flavor.
**Feel free to use any flavor of chocolate here, coming from either chips or cut-up chunks from a bar. If you prefer a sweeter brownie, go for a mix of semi-sweet and milk chocolate. Sometimes, I also like to use thin chocolate squares with filling (Ghirardheli makes some good ones) so that when you bite into your brownie, you get a fun, gooey filling of raspberry, caramel, or mint.
***Pans of varying materials will conduct heat differently and require different baking times. All of my brownies are tested in light-colored aluminized steel pans (you can see mine here on Amazon), but if you use a different pan, such as glass or ceramic, I suggest reading this post from King Arthur Baking to ensure you get your baking times correct.
.avif)
.avif)
.avif)

Got room for more dessert?
Subscribe to my Crumby Data newsletter! I share behind-the-scenes looks at recipe development, flavor testing for the Cakeculator, and life as a content creator. It’s free, lands in your inbox every few weeks, and you can unsubscribe anytime...no strings attached :)
Feel free to take a look at previous newsletters here!

.ico)
