No dye black cake (that tastes like Oreos)


UPDATE: This post contains the older version of my black cocoa cake, which has been updated for an easier, tastier version. It's live in the Cakeculator if you'd like to use it. Choose "Black Velvet Cake"
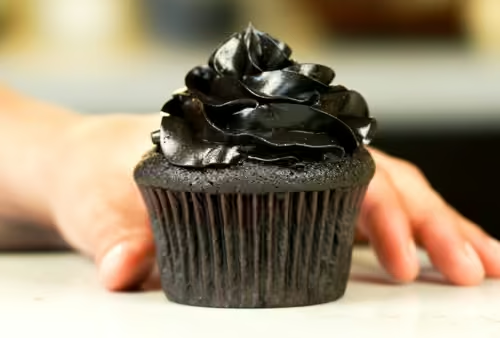
This beautiful black cake is made without synthetic dye and needs no mixer - just a whisk and bowl. The color comes from black cocoa powder, giving it a deep, smoky flavor reminiscent of Oreo cookies.

Here’s my black layer cake filled with marshmallow cream and frosted with my black buttercream. Check out the texture and crumb on this cake; it's super moist and closely textured, which gives it a super fudgey and deeply chocolate feel. You're going to want to make this cake for anyone in love with Oreos.

In this post, I will only show you how to make my black cake layers. The black buttercream is in another dedicated post, which you can see here. That is a more involved recipe, and it’s better if you read up on how to make it rather than summarizing it in this post.
The marshmallow cream is located in the description of this YouTube video. I haven't yet written a dedicated post here for that yet, but you can watch the vid and follow the written instructions underneath.
What ingredients do you need for my black Oreo cake?

Black cocoa powder is the star of this cake and is the main ingredient used in classic Oreo (and Hydrox) cookies. If you’ve ever thought about an Oreo’s flavor, it is very unique. It’s smoky and sweet and has a slightly alkaline taste. Black cocoa is made via the alkalization of natural cocoa, which changes its color, flavor, solubility, and pH. This ingredient is hard to get in stores, so I buy mine online. It's the Cocoa Trader brand, which is super dark and tasty. (See here to buy on Amazon)
Dark chocolate lends another level of chocolate flavor. I use Trader Joe’s Dark Pound Plus bar, but you can use any dark chocolate. Dark chocolate offers a bit of sweetness and fat from the cocoa butter and a rich chocolate flavor to the cake.
Brown sugar brings a molasses-rich sweetness to this cake. I love the smoky flavor paired with chocolate cakes. You can use either light or dark.
Kosher salt is a flavoring agent. Remember to use half the volume indicated in my recipes if you use fine salt.
Boiling water is the primary liquid contributor. We need it to be boiling hot because we bloom the cocoa powder with it at the beginning of making the batter. It precooks and slightly gelatinizes the cocoa starch particles, giving the cake a deeper chocolate flavor.
Canola (or vegetable) oil is the main fat for this cake and gives it a smooth and rich texture.
Sour cream ups the fat level and increases the batter's acidity, so it’s not too alkaline.
All-purpose flour (or plain flour) is best for this cake. Most of my chocolate cakes (except for my chiffon) use all-purpose flour instead of cake flour because the batter tends to be slightly fatty. The all-purpose flour offers more structure for the cake.
Baking powder is the leavening agent for this cake. It will allow our cake to rise into that lovely fluffy texture.
Egg yolks and whole eggs are both used in this recipe to bring moisture and structure.
Step by step:
(This is a visual tutorial for making the black Oreo cake layers. The black buttercream recipe is located in another post, here.)
Step 1. Preheat oven.
Preheat the oven to 350°F (180°C)
Step 2. Prepare pans.
Butter or oil the insides of three 6" cake pans and line the bottoms with a circle of parchment paper.
Step 3. Bloom cocoa powder.

Black cocoa powder contains many elements from the cacao pod, including starches which will give out more flavor when they swell in hot water (3a), so add that to a bowl along with chopped dark chocolate, brown sugar, salt, and boiling water (3b). Whisk until thoroughly combined (3c).
Step 4. Whisk in all other ingredients.

Whisk in the fats (oil and sour cream) (4a), dry ingredients (flour and baking powder) (4b), and eggs (4c).
Step 5. Pour batter into pans.

Step 6. Bake and cool cake layers.

Step 6. Remove and wrap cake layers.

I like to remove my cakes while slightly warm to preserve moisture. I usually remove the cakes from their pans, peel off the parchment paper, trim the tops (7a) and wrap them in plastic (7b).
Make sure your cake layers are completely cool to the touch before assembling into your layer cake.

Use the recipe below or customize a cake using my Cakeculator
The recipe below is just for the cake component of this layer cake. If you’re looking for the black frosting, you’ll need to go to another blog post that explains things in more detail. For this size of cake, you’ll need the 4.5 cup recipe.
Or you can use any other type of frosting that I have in my Cakeculator. You can go here and select “Oreo Chocolate” for the cake flavor, and “3 layer 6 inch round” for the pan size (that’s the size of cake you see in this post, but feel free to use any other size) and then choose the frosting of you choice.
IMPORTANT NOTE: You can perfectly replicate all my cake and frosting recipes using gram measurements. Weighing is the most accurate way to bake and I use it exclusively.
For American bakers, I have converted grams to estimated volumes (cups, teaspoons, etc.), which are not as accurate and may have awkward proportions, but they still work.
This is the OXO scale I use on a daily basis. If you’re interested in other tools I use for my baking, I’ve compiled a list here.
Video
Here's a video of me assembling this 3 layer cake. I talk about the marshmallow fluff in the beginning of the video but if you skip to the 5:20 mark in the video, I start assembly.
Honors Members Section
This extra material is accessible to Sugarologie Honors members.
Become a member to view extended research notes, technique analysis, and supplemental materials! Learn more about Sugarologie Honors here.
Already a member?
Before starting the recipe, please read this!
Measure by weight, if possible.
Measuring by weight is the best way for you to replicate my recipes. I develop recipes using ingredients (even liquids) measured in grams, which is why you see them listed first in the recipe cards. For measurements under 5 grams, I will typically only list the volumetric measurements (teaspoons, etc.), as most home scales are not precise for such small weights.
In most cases, I have converted grams to volumetric measurements (aka US customary units) for bakers who prefer this method. However, the measurements are not as precise and may have awkward proportions. The recipes should still work, but for the ultimate precision, try to use weight.
This is the OXO scale I use daily. I also purchased this budget version of a good scale, which I keep at my Mom’s house for baking. If you’re interested in other tools I use for my baking, I’ve compiled a list here.
Use room temperature ingredients.
All my ingredients should be used at room temperature, or 65-75 °F/18-24 °C. I will always indicate if you need something outside this range. If no details are given, room temperature is the default.
Pay attention to the ingredient descriptions.
I try not to be brand-specific, but I will always note an interesting result from a type of ingredient, be it negative or positive.
A specific note regarding salt: I use Diamond Crystal Kosher salt for everything on this site except for frostings. In frostings, you want the salt to dissolve more easily, and kosher salt tends to leave granules behind. If you substitute table salt (more finely granulated) for recipes that list kosher salt, you must use half the volume indicated in my recipes.
Substitutions are hard.
That said, substitutions aren’t impossible but can be the toughest part of recipe development. Small swaps, like reduced-fat milk (2% fat) for whole milk (3.5% fat), usually work fine. However, bigger changes—such as replacing oil with applesauce or sour cream with Greek yogurt—can significantly impact texture and density.
Be wary of general, all-purpose substitutions in baking; I find that usually there is never a one size-fits-all solution. I carefully select ingredients for my recipes, so for the best results, start with the original recipe and modify with caution.
Read all the recipe instructions before beginning.
I’m in the “Pre-read the Chapter before Class Lecture” club... and I invite you to join! Baking new recipes can be intimidating, so let’s set you up for success. I want you to think about timeframes. Most fillings and frostings can be made ahead of time, and give you an extra day for mental space. Also, as you become a more proficient baker, you can anticipate and recognize steps. (“Oh, this has a meringue step, so I’ll need an extra clean bowl…” etc.) Ensure you go down the ingredient list and have everything at the right temperature.

Black Oreo Cake


- 1/2 cup (46g) black cocoa powder*
- 3 1/2 oz (100g) dark chocolate, chopped into small pieces**
- 1 1/4 cups (257g) brown sugar (light or dark)
- 1 teaspoon kosher salt (I use Diamond Crystal Kosher; if using fine salt, use half)
- 3/4 cup + 2 tablespoons (210g) water, boiling hot
- 1/2 cup + 2 tablespoons (124g) oil, flavorless such as canola or veg
- 1 3/4 tablespoons (24g) sour cream, full fat
- 1 1/4 cups (158g) all-purpose flour
- 1 3/4 teaspoons baking powder
- 2 large (50g) egg yolks
- 3 large (150g) eggs
- Preheat oven: Move your oven rack to the middle position. Preheat the oven to 350°F (180°C).
- Prepare pans: Butter or oil the insides of three 6" cake pans and line the bottoms with a circle of parchment paper.
- Bloom cocoa powder: In a large mixing bowl, add the black cocoa, chopped dark chocolate, brown sugar, salt, and boiling hot water. (Make sure the water is boiling hot so it will melt the chocolate.) Whisk until thoroughly combined. Set aside your bowl for at least 5 minutes for the chocolate flavor to deepen and bloom.
- Whisk in rest of ingredients: Add oil and sour cream to the bowl of chocolate and whisk. You may see the oil separate on the top, but keep whisking until it's slightly thicker, glossy, and thoroughly combined.
Whisk in the all-purpose flour and baking powder until no traces of flour remain.
Whisk in the yolks and eggs for about a minute until the batter is thoroughly mixed and velvety black. - Pour batter into pans: Evenly distribute the batter into the prepared pans. (It may start to bubble; that's normal. It's the baking powder interacting with the other ingredients. You can wait about 5-10 minutes after pouring the batter in your pans and then tap the pans on the counter a few times to get super smooth cake tops if that's what you're going for.)
- Bake and cool: Bake for about 23-28 mins. You can bake each layer individually or all three at once if you have three pans.
Start checking for doneness at 20 minutes. You can use a skewer and poke the middle - you’ll want to see some wet crumbs but not wet batter. Or take the temperature - around 200°F/93°C in the center is perfect.
Move the pans to a cooling rack and let the cake cool slightly - about 5-10 minutes. - Remove and wrap cakes: I like to remove my cakes while they are still warm to preserve moisture. Loosen the edges of the cakes using an offset spatula or butter knife, and flip the cakes out onto a cooling rack so you can peel off the parchment bottom. I then usually trim the domes off (if you want) and then wrap my cakes in plastic wrap until I’m ready to frost. Make sure they are completely cool before attempting to assemble.

Recipe Card - Adriana's Notes
*Black cocoa powder is natural cocoa that has been alkalized, which changes specific properties of the cocoa, including its solubility, flavor, and color. It's tough to find in stores, so I buy mine online. I use the one from Cocoa Trader (see it on Amazon here). King Arthur Baking also has great black cocoa (see it on Amazon, here), but it has a warmer brown tone in the black cocoa than Cocoa Trader. Also - try always to measure cocoa powder by weight if you can. The powder is so fine that getting the correct volume measurements is tricky.
**Chocolate pieces are hard to measure using volume (cups, etc.), so I only use weights for chocolate pieces in my recipes. In my recipes, my dark chocolate is usually either Trader Joe's Dark Pound Plus bars or Ghirardelli. Other bakers have told me that chips work too, but I have yet to try that.


.png)

.avif)

