.avif)
The Complete Guide to making Cakesicles


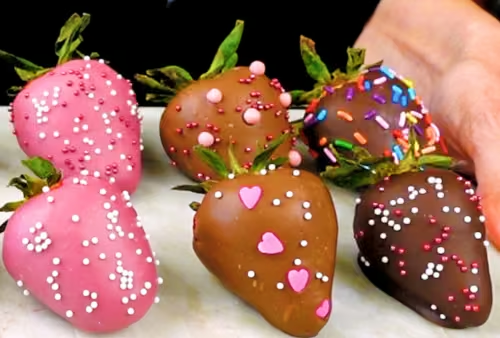
Cakesicles are small popsicle-shaped cakes covered in chocolate and eaten on a stick. Make cakesicles by filling a mold with cake or other sweets, such as cookies, ganache, or brownies. To decorate, drizzle with chocolate, or add sprinkles, fondant, or candies.
Cakesicles are great for any celebration, and are especially popular for kid’s birthdays. My absolute favorite occasion to make them is with my donation cakes to Cake4Kids or Icing Smiles. When I get a layer cake request, I will often save the cake scraps to make cakesicles as a special treat for the birthday boy/girl.
If you're familiar with making cake pops, this is a great project to try. Just like cake pops, they are easily customized in terms of flavor combos. In addition, the technique is very similar.
There are a couple great advantages to making cakesicles, (other than their inherent cuteness).
A key advantage to making cakesicles is their size.

Cakesicles are smaller than an ice cream-based popsicle, (such as Dove Bars) but they are typically about twice the size of a standard cake pop. (The cakesicles pictured here contain about 1/3 cups of cake crumbs.)

In my opinion, it’s about the equivalent of eating a single cupcake. As it is bigger than a cake pop, this is a perfect single serving dessert size for birthday parties.
Another advantage of cakesicles over cake pops is their flat shape. Cakesicles have a large, flat surface area. With cake pops, we are limited to designing on spheres.
Cakesicles offer a greater surface area for decorating. They are a great canvas for design elements, such as piping, drizzling, or fondant creations. I’ve seen some really amazing cakesicles, including characters, animals, abstract designs and buttercream flowers.
It’s a great medium for displaying your creativity.
How do you make cakesicles?
Cakesicles are one of my favorite treats to make, but making them can seem intimidating. There’s a bit of knowledge that will be helpful if you’re starting out, and I’ve collected every single bit I know this post.
This is your complete guide to cakesicles. We will go cover:
- two main methods for making cakesicles,
- what types of fillings you can use,
- how and what to coat them with, and
- some decorating ideas and inspiration!
As with anything in baking, cakesicles need a bit of practice and patience. I will outline every detail to ensure you create beautiful and delicious cakesicles every time.
Let’s get started. 🤓

The Two Methods for making Cakesicles
There are two ways to make cakesicles. You should decide at the very beginning which one you'd like to use. The type of method you choose will largely depend on:
- the type of filling you want; and
- your preference for chocolate coating type/thickness
I've made a video tutorial comparing the two methods here:
Dipping or Inside-out Method
The dipping or inside-out method is when you create the cakesicle from the inside and work outwards.
If you're familiar with making cake pops by dipping them in chocolate/candy coatings, then this method may be your go-to for making cakesicles.
First, you fill the mold with a dense cake pop mix (or something else firm, like a hard chocolate ganache) and insert the popsicle stick. You chill the mold, making sure that it is sturdy enough to pop out of the silicone mold without breaking.
You would then remove the filling from the mold. Then, dip the cakesicle into melted chocolate that has been thinned with coconut out or paramount crystals, and let the excess drip off. Then place the cakesicle on a parchment covered tray and allow it to harden completely.
A sign that someone has used this method is by looking at where the popsicle stick meets the cakesicle. If there is a little of the chocolate/coating on the stick, then the cakesicle was made with the dipping method.
Conversely, a shelling method cakesicle will have a clean stick. Sometimes there's even a hole around the stick if the silicone wasn't coated properly.
Advantages for the dipping method include cakesicles that:
- can have a thinner outer coating. Because we are using the mold to create the shape and stability with the filling only, we can customize the thickness of the outer shell since it is dipped. This is great if you want a super thin, crispy shell as the outer layer of your cakesicle, kind of like a frozen Dove bar. You will, however, need a sturdy filling, such as very dense cake pop mix, chocolate ganache, or something else that will not crumble when you try to remove it from the mold.
- are slightly easier to make. No need to brush the insides of the mold with chocolate, waiting for it to set before filling. We won’t need any extra tools like paintbrushes since we’re going to be dipping the fillings in tall cups containing your chocolate or coating. It still requires some technique though to get a good looking exterior! This may be easier for those who are experienced with making traditional cake pops.
- you can make more at time, and use molds with more cavities. This is because you don’t have to paint the mold interiors and wait for them to dry. Just fill all your cakesicle molds with cake pop mix, freeze, and move onto the dipping part of the recipe.
Drawbacks for the dipping method include:
- uneven cakesicle shapes and surfaces. Some fillings like cake pop mixes or nutty ganaches will not create smooth surfaces when placed in silicone moldings. Dipping in chocolate can accentuate these lumpy fillings. You won't always be able to get that super smooth surface, if that's your goal. The cakesicles still look great though and if you're looking for a more artistic and rustic treat, this is a great method. It's a personal preference.
- using dense fillings. This could very well be an advantage of the dipping technique, say if you were making solid chocolate fillings, which are deliciously thick and dense. But if you’re using cake pop mix, you have to make the mix quite dense. This is actually something that I really don’t enjoy eating, as I strive to bake my cakes as light and fluffy as possible. I feel like smashing them into these compact balls kind of ruins the appeal of them. For this reason, for cake-filled cakesicles, I almost always use the shelling method, below.
- more melted chocolate/coating. You won't end up using it all, but the dipping method requires at least 4-5x more chocolate. You will need to fill a clear glass or tall bowl with enough coating to submerge the cakesicle. If you're using the Silikomart molds that I prefer, you will need at least 4 inches of melted coating. You can save the leftover chocolate (if you didn't get any crumbs in it) for your next baking project.
Shelling or Outside-in Method
The shelling or outside-in method is when we coat the interior of the silicone mold with chocolate or coating first. We allow the chocolate or “shell” (also sometimes called a cast) to harden completely before filling the cavities. We work around the popsicle stick, leaving a small gap at the top. Then we fill that gap with more chocolate closing the "shell" of chocolate. We allow it all to harden before removing it from the mold.
Here's a tutorial on how I use the shelling method for some plain and marbled cakesicles:
Advantages of the shelling method include:
- using lighter, airier, and softer fillings. We are using the mold to create our cakesicles by making the chocolate coating first, so we can go as light as we’d like for our fillings. When making cakesicles using leftover cake, this is my ideal method because I can fill the interiors lightly with crumbled cake. I’ve even used layers of crumbled cake with jam and I also did one with caramel sauce. I don’t have to rely on that being firm to remove the cakesicle from the mold.
- beautiful, consistent popsicle shapes. Using the mold to cast or shell the chocolate can give beautiful results. The silicone provides a super smooth surface. If you remove the air bubbles and tap the mold to get complete coverage, your cakesicles will have a smooth surface every time.
Some drawbacks for using the shelling method is that it:
- requires a thicker coating. Unless you're using a dense filling, like solid chocolate or something almost as dense as that, you will need to make sure that your sides, corners and base of the interior of the cakesicle are thoroughly reinforced with chocolate. I paint interiors twice for this reason, and even do another coating where the popsicle stick meets the mold. I’ve never had anyone complain about a thick chocolate coating, but if you’re looking to do a super thin and delicate outer shell, try the dipping method instead.
- is slightly more technically difficult. Although more challenging, this is my favorite method because the results are just fantastically gorgeous. You will break a few at first until you get the hang of the durability of your cakesicles (every coating and filling is going to act differently) but broken cakesicles are still delicious. (Most baking mistakes are delicious mistakes, which is why I love baking.) It’s really exciting to see your first shiny and perfect cakesicle come out of the mold.
- is more time consuming. The interiors have to be painted or shelled and set completely before filling. This means it is only practical to shell a few at a time and allow them to set. You can rotate molds, but this also means that you will need more molds.
Still not sure which cakesicle method is right for you? I’ve made a handy table:
Cakesicle Method Comparison Table
Dipping (Inside-Out)Shelling (Outside-In)Coating ThicknessThin or thickrequires thick shellCakesicle Shape ConsistencyCan be irregular if filling is not smoothVery consistent with a smooth surfaceFilling TypesMust be very dense (e.g. firm cake pop mix and ganaches)Versatile, as long as coating is a thick shell.DifficultyLess difficultSlightly more difficultDecoratingOutside the shell only, e.g., drizzling, piping, or fondantCan incorporate designs within the shell and on top of the shell as with dipping method
Molds:
At first when I started seeing silicone molds everywhere I would wonder why anyone would ever want to use them. They flop around everywhere. This didn’t sound like a great time with large amounts of liquid batter.
After trying them, I LOVE THEM. The flexibility allows you to remove the cakesicles with perfect shells. Just place them on a cookie sheet when moving them around.
I have a whole box full of them, including sets for my cakesicles.
Cakesicle molds are the most important tool to make perfectly sized and professional looking cakesicles.
You may find (or have) popsicle molds, but you can’t use those. Traditional popsicle molds make, well, popsicles. They are upright molds that you pour into vertically and then place the top on with the popsicle stick in it.
You need a mold that allows you to pour chocolate/cake pop mix while the molds are laying flat, not positioned upright.
The best cakesicle molds have:
- 4-8 cavities per mold. If this is your first foray into making cakesicles, start with 4 cavity mold. Even if you get the ones with more cavities, make only a couple at a time first. I like to have molds that contain 4 cavities because that’s the size that fits in my freezer. Also, I prefer to make cakesicles using the shelling method and I can comfortably 4 make at a time. I do have extra molds that I swap out when one is cooling.
- holes for popsicle sticks. Yes, some molds don’t have these holes for the sticks. I honestly don’t know why one would want to make your life more difficult by not having them already cut into the molds.
- a basic, rounded popsicle shape. At least for beginners, a small rounded shape is going to be easier to shape, fill, and most importantly, remove from the mold. Clean, sharp corners are generally more difficult to create, especially in the chocolate world. the basic shape and then move onto others when you are confident in your cakesicle skills.
This is my favorite cakesicle mold. (Actually, Silikomart makes awesome silicone molds for baking that are amazing. I’m not a sponsor for them, I just enjoy baking with their products.) This is what I call their “Easy Level” mold. It’s the classic recognizable “popsicle” shape and is small and rounded, which is ideal for beginners.

I also have this one, which is really cool. This is what I would call a “Intermediate Level” mold. It has a few sharp corners, but generally rounded in shape with ample room for different types of fillings. Very modern looking and will definitely get you wondering about what’s on the inside.

I don’t have this mold. YET. But just looking at it makes me a little crazy, if not tempted. I definitely like a challenge but this one will definitely keep me busy. I can just tell by looking at it. Check the edges on this thing! 😈

Chocolates and Coatings:
Now let's talk about what types of chocolate/coatings we can use on cakesicles. These chocolates and coatings are what give the cakesicles the outer layer. You can color them depending on the occasion, or use natural chocolate colors and flavorings.
Each chocolate/coating has different requirements. Some are easier to work with than others. And some taste better. We'll dive into the details below.
There are three main categories of chocolates/coatings to coat our cakesicles:
Chocolate
Compound chocolate
Candy coatings
The easiest way to think about which type we're working with is to remember:
By definition, real chocolate must contain two ingredients: chocolate liquor and cocoa butter as its fat.
Knowing this, you can read any chocolate or candy coating ingredient label to identify
- what type of chocolate you have, and
- how to properly prepare it for use.
There are other clues too, and we will go over that in detail below.
Before we start getting into our options, I’d like to reiterate that I’m a hobby baker and not a professional chocolatier. Chefs can spend years perfecting their skills with chocolate, which is a beautifully complex ingredient.
That said, I’m not going to get into tempering quite yet, as I want to delve into the chemistry with a dedicated and very thorough blog post.
For the sake of simplicity and brevity, I’m going to use the lazy method for melting chocolate (I’m not sure I’d call it tempering), which works well enough for our purposes.
In my experience, the cakesicles still look great and more importantly, still taste fantastic.
Ok, onto the chocolates.
Chocolate
Ah, real chocolate. One of the loves of my life. These are your chocolates that contain chocolate liquor and cocoa butter *only* as its fat and no other fat (palm oil, etc.)
I categorize my ‘real’ chocolate in two ways:
Couverture Chocolate (aka “the fancy chocolate”)
The word “couverture” has a French origin, from the word couvrir, meaning ‘to cover’. Couveture chocolate is made for the enrobing or covering desserts.
Couverture has a higher percentage of cocoa butter, which gives it that amazingly smooth mouthfeel and super glossy finish. It also contains a certain higher percentage of chocolate liquor, giving it a very rich and deep taste.
Working with couverture requires tempering or the surface will bloom (have a white appearance.) If you’re into fancy chocolate, you might recognize the names like Callebaut and Valrhona, as they make great couverture.
When you’re trying to impress with your cakesicles and have some experience with tempering, this is the chocolates to use.
Examples of couverture:

Grocery Store Chocolate 😄
This is what I use most of the time for my hobby baking! I’m talking about your Ghirardelli's, Guittard’s, and whatever you have available in your local Target.
You can also use some really high end chocolates here, Valrhona, etc., but for the most part I'm using what's available to me at my local grocery stores, since I do quite a bit of baking and experimenting. (Does anyone ever realize how expensive hobby baking can be?)
My favorite chocolate that's excellent for the price?

Trader Joe's Pound Plus Chocolate is the best tasting chocolate for the cheapest price. It's $5 for a whole giant bar, so I usually pick up every flavor when I swing by Trader Joe's.
The dark chocolate flavor is great for straight eating and baking. There is also a milk chocolate version that my kids like to eat in cookies. I just chop up what I need for my recipes. Delicious for cakesicle coatings.
This is still real chocolate, but good affordable chocolate. It works with my lazy tempering, which I'll go over in a sec.
If I’m making cakesicles for kids (which actually, is most of the time), they can’t tell between the artisanal couverture chocolate harvested from Peruvian cacao beans with earthy peach notes, and um, Ghirardelli's.
Now in working with this chocolate, like I said, I’m not tempering with a thermometer. I will only do that when I am working with couverture (fancy chocolate).
My lazy “tempering” method to working with real chocolate:
- If not using chips or discs, chop chocolate into small pieces.
- Weigh out 75% of the chocolate into a microwave safe bowl.
- Microwave on 50% power until it is almost completely melted. The total amount of time depending on how much chocolate you have in the bowl. My favorite molds (see above) need about 110g of chocolate total for 4 shelling method cakesicles, so I put 75g into a bowl and microwave in 20 second bursts, stirring each time. The darker the chocolate, the longer it may take to melt.
- Add remaining 35g of unmelted chocolate to the bowl, stirring to combine completely. This brings the temperature of the chocolate down and helps to create the pretty, shiny surface for your cakesicles.
Compound Chocolate
These are not considered "real" chocolate. Instead of chocolate liquor and cocoa butter, compound chocolates contain cocoa powder and vegetable oil. The result is a chocolate that does not need tempering. It does not contain cocoa butter and thus is cheaper.
A hint that you’re working with compound chocolate: they are often sold in little discs or round pieces. Since it’s made for enrobing and dipping, companies usually make them in little pieces to melt uniformly. (This is not to be confused with chocolate chips, which are made primarily for holding their chip shape during baking.)
Think of these as your made-for-melting chocolates. The tradeoff here for ease-of-use is definitely taste. You will not get that rich and creamy mouthfeel from using real chocolate that contains cocoa butter and chocolate liquor.
The one big bonus here is that you don’t have to temper your chocolate!
Here are some examples of meltable compound chocolates:

Buy Ghirardelli Dark Melting wafers

Buy Merckens Chocolate Coating Wafers
Candy Coatings
Candy coatings are not considered chocolate. Some are chocolate flavored, but they often have extra oils to help them melt and contain no chocolate liquor.
They look like little colored disks and are used all the time to make cake pops and other candies. They melt and remelt easily (no tempering!), come in a wide variety of colors and flavors, and are not expensive.
You can even use those handy coupons at Michaels or wherever and get a whole bunch of them for a great deal. 💵
In addition to their ease of use, a main reason to use candy coatings are their colors!
Chocolate will obviously only give brown coatings. You can use colored white chocolate, which I do often with Whole Food’s mini white chocolate chips. However, I don't always have coloring oils on hand. In my experience, sometimes it’s easier and cheaper to get a bag of these colored candy coatings.
There is only one drawback to working with candy melts. And it’s kind of a big one - and that’s the taste. They border on a creamy, kind of milky taste that is very sweet. Some people don’t care for the taste, saying they taste artificial or too sweet.
Don’t let that deter you though, especially with kiddos. I’ve never had a kid that said they didn’t like the taste.
And quite frankly, they are so incredibly easy to work with, that I suggest you start your cakesicle journey with them first. They are a dream to remove from the molds.
Also, you can take your sweet time with these melts. If they harden, you just pop the bowl back into the microwave and keep moving at a pace that’s comfortable for you.
Even when I’ use real or compound chocolates to make my cakesicles, I will always grab my candy coatings. They are excellent for decorative piping and sprinkle adhesives. Candy coatings are a staple in any well-stocked baking pantry.
There are many brands that make melt-able candy discs. I’ve listed 3 affordable kinds here that I like working with:
- Merken’s Coating Wafers

Mercken's make my favorite candy coatings!
I actually like the chocolate flavored ones too, which are considered a compound chocolate, listed above.
Mercken's has a very creamy texture, a non-artificial flavor, and is very easy to work with. Not as many color choices as Wilton's Candy Melts, but you can add candy coloring (oil-based) to get the colors you need. If you you're using a large quantity of candy coatings for your desserts, this is the one to use.
The only caveat - it's a little more difficult to find. I order mine online at Amazon in big bulk bags. Trust me, if you are a solid hobby baker, you will be using these enough to justify buying them in bulk.
Ingredients: Sugar, Partially Hydrogenated Palm Kernel and Cottonseed Oils, Nonfat Dry Milk, Cocoa Processed with Alkali, Cocoa, Glyceryl Lacto Esters of Fatty Acids, Soy Lecithin Added as an Emulsifier, Salt.
- Chocomaker Natural Wafers

These are my second favorite candy coating. The primary reason these taste better is probably because it uses a natural vanilla flavor.
They come in a few popular colors but again, not as much as Wilton’s candy melts. The White Candy flavor is a muted white color that you can easily tint using candy colors. Can buy these at Michael's with a coupon 🙂
Here are the ingredients for the ChocoMaker Vanilla Natural that I keep in my pantry:
Ingredients: Cane sugar, Palm oil, Milk Powder, Sunflower Lecithin and Natural Vanilla Extract.
- Wilton’s Candy Melts

Although these taste the most artificial, you can’t beat the color and flavor selection. You need hot pink, lime green, and bright red? They have it.
It’s as easy as going to your local craft store and picking up a bag. Or seven, like I do. The only thing to be aware of is that they use artificial vanilla, which may have a strong taste to some people.
Ingredients: Sugar, Partially Hydrogenated Palm Kernel Oil, Reduced Mineral Whey Powder, Whole Milk Solids, Nonfat Dry Milk Solids, Soy Lecithin, Salt, Artificial Flavor.
Ok, so that was lots of information on different types of coatings! Here's a handy summary table for you so you can choose what’s right for your cakesicle project.
Fillings:
With fillings, we have so many options! Just remember: the filling density/type you choose will affect what coating technique you can use (Shelling or Dipping.)
Check out some cakesicle filling ideas here:
Cake Pop Mix fillings
This is the standard filling for cake pops - also known as cake pop mix.
If you have cake scraps, making cakesicles is an excellent way to use them up. I often torte, or trim and level my cakes when I make large layer cakes. I like to then freeze these cake scraps in a freezer ziploc bag so they are ready for my next cakesicle project!
To use frozen cake, just leave it out on the counter for about 20-30 minutes and it’s thawed out a bit. You can certainly use fresh cake too, just make sure that it’s been cooled down completely, otherwise you will melt the buttercream and it will be quite goopy.
Making cake pop mix is fairly easy.
Standard cake pop mix requires only two ingredients: cake crumbs and buttercream/frosting.
For my favorite mold, which I’ve shown above, you will need approximately 1 ⅓ cups total of cake mixture. I use about ⅓ cup per cakesicle. The exact amount will depend on how densely you pack your cakesicle cavities.
To make cake pop mix filling:
- In a large bowl, take your cake scraps and break them apart until they are loose crumbs. Aim for about 1 ⅓ cups of crumbs.
- Add room temperature buttercream, a TB at a time, and gently mix with your fingers to distribute the buttercream.
- You will know it is the right amount when you pinch the cake mixture and it sticks and doesn’t fall apart.
A couple things to keep in mind: Like I said earlier, I don’t like a dense cakesicle interior, especially if I'm using the shelling method. The texture is not appealing to me, so I like to keep it light and somewhat airy even at this mixing stage. So not too much buttercream. You’ll be surprised that a little is all you need to get the cake to adhere into moldable shapes.
However, if you’re of the camp that likes a dense cake mixture, keep adding buttercream until you reach the density that you would like.
Non-cake cakesicle fillings
The main question here is, can it still be called a cakesicle if there’s theoretically no “cake” inside? Well, if we're going to get technical, appending “-sicle” to a word implies that it is frozen. (“-sicle” actually means frozen, e.g., icicle, popsicle...)
More accurate would be cake-skewers, cake-en-brochette, cake….kebabs (??), all of which sound highly unappealing 😕.
So the word cakesicle itself is a little inaccurate. However, I don't think this naming business should limit our creativity here.
Anyways, what I’m getting at here is that you can (and should!) fill your cakesicles with whatever you can think of. I've always liked adding "pop" to the fillings sounded great.
Ganache-pops! Brownie pops!
Here are some non-cake filling ideas for your cakesicles:
Do you kind of see where I’m going with this? It is really up to you and your flavor preferences. There are some really amazing flavor combinations out there, we just need to use them!
Decorating Cakesicles:
Now that we've gone over the mechanics of making cakesicles, we can decorate! There are so many options beyond this list here, but I’ll go over a few to get started.
Cakesicles come out so beautifully from the mold that they really don’t require any additional decor. There’s something about the minimalist look of these and the element of surprise if you don’t know what’s inside.
However, if you’re thinking of adding some more to your cakesicles, I categorize decorating into two sections. You can:
- Decorate/paint directly onto the mold before shelling, and the design will integrate with the shell coating, or
- Decorate the finished cakesicle, after unmolding or dipping.
Decorating the mold before shelling:
Hand Painting Cakesicles
If you have with some food safe paint brushes, you may enjoy painting some cool designs onto the mold. Let the designs air dry before performing your shelling step to coat the entire interior of the mold.
The key thing to remember is that when we pop them out, you will be presenting the mirror image of your design.
This is how I achieved the swirly look for my galaxy cakesicles. Take a look at how I hand paint molds here:
Drizzling/spattering candy on the silicone mold
You can also channel your inner Jackson Pollock. Create abstract designs by brushing different colors or applying droplets to the surface of the mold.
After unmolding/dipping
The alternative to decorating directly on the mold itself is to decorate onto the cakesicle itself. Once you remove the cakesicle from the mold or after dipping, you can finish off with some piped designs or sprinkles.
You can also use fondant to make the cutest cakesicles. I am not a fondant expert but I’ll point you to Shaun Teo for inspiration, who is a gifted pastry chef and cakesicle maker, especially with cartoon characters:

source: Shaun Teo Creations
Aren't these so creative? Some people just have a way with fondant. I'm still learning!
Cakesicle Storage:
Room temperature
For cake-filled cakesicles, I like to say that cakesicles can be stored at room temperature as long as you would store a cupcake at room temperature. As long as you didn’t use dairy, like cream cheese, to mix with the cake crumbs, it should be good at room temperature for a few days.
Fridge
You can keep these in the fridge, but I would use cation if you’re using real chocolate. Real chocolate collects condensation on its surface in humid environments. This often happens when removing cold chocolates from the fridge to room temperature.
I have not had any problem refrigerating cakesicles made with compound chocolates (candy melts, etc).
Freeze
If you plan to freeze your cakesicles, first, make sure that you used the shelling method and lightly packed cake pop mix. (I have not tried this with other fillings.) Because it has a lower density filling inside, it has a lower chance of cracking the shell due to water expansion.
Refrigerate the cakesicles first for 24 hours, then move them over to the freezer to give them a gradual decrease in temperature. Store in an airtight container.
Cakesicle Packaging:
Take a look at my recommended tools page for cakesicle packaging that I use.
Ok, I hope that has given you a head start on your cakesicle projects! I often post little side projects, including more cakesicle and spontaneous dessert pics on my instagram, and that’s also a good way to message me if you have any problems or questions.
Also, I provide in-depth video tutorials on my youtube channel, so if you need more visual instruction head over that way 👉🏼 Tasty Pastry Kitchen YouTube 👩🏻🍳
Happy Cakesicle-ing Friends 🌈
Step by step:
Video
Honors Members Section
This extra material is accessible to Sugarologie Honors members.
Become a member to view extended research notes, technique analysis, and supplemental materials! Learn more about Sugarologie Honors here.
Already a member?
Before starting the recipe, please read this!
Measure by weight, if possible.
Measuring by weight is the best way for you to replicate my recipes. I develop recipes using ingredients (even liquids) measured in grams, which is why you see them listed first in the recipe cards. For measurements under 5 grams, I will typically only list the volumetric measurements (teaspoons, etc.), as most home scales are not precise for such small weights.
In most cases, I have converted grams to volumetric measurements (aka US customary units) for bakers who prefer this method. However, the measurements are not as precise and may have awkward proportions. The recipes should still work, but for the ultimate precision, try to use weight.
This is the OXO scale I use daily. I also purchased this budget version of a good scale, which I keep at my Mom’s house for baking. If you’re interested in other tools I use for my baking, I’ve compiled a list here.
Use room temperature ingredients.
All my ingredients should be used at room temperature, or 65-75 °F/18-24 °C. I will always indicate if you need something outside this range. If no details are given, room temperature is the default.
Pay attention to the ingredient descriptions.
I try not to be brand-specific, but I will always note an interesting result from a type of ingredient, be it negative or positive.
A specific note regarding salt: I use Diamond Crystal Kosher salt for everything on this site except for frostings. In frostings, you want the salt to dissolve more easily, and kosher salt tends to leave granules behind. If you substitute table salt (more finely granulated) for recipes that list kosher salt, you must use half the volume indicated in my recipes.
Substitutions are hard.
That said, substitutions aren’t impossible but can be the toughest part of recipe development. Small swaps, like reduced-fat milk (2% fat) for whole milk (3.5% fat), usually work fine. However, bigger changes—such as replacing oil with applesauce or sour cream with Greek yogurt—can significantly impact texture and density.
Be wary of general, all-purpose substitutions in baking; I find that usually there is never a one size-fits-all solution. I carefully select ingredients for my recipes, so for the best results, start with the original recipe and modify with caution.
Read all the recipe instructions before beginning.
I’m in the “Pre-read the Chapter before Class Lecture” club... and I invite you to join! Baking new recipes can be intimidating, so let’s set you up for success. I want you to think about timeframes. Most fillings and frostings can be made ahead of time, and give you an extra day for mental space. Also, as you become a more proficient baker, you can anticipate and recognize steps. (“Oh, this has a meringue step, so I’ll need an extra clean bowl…” etc.) Ensure you go down the ingredient list and have everything at the right temperature.
.avif)

.avif)


Recipe Card - Adriana's Notes
Recommended Sugar Lab Recipes + Experiments


Got room for more dessert?
Subscribe to my Crumby Data newsletter! I share behind-the-scenes looks at recipe development, flavor testing for the Cakeculator, and life as a content creator. It’s free, lands in your inbox every few weeks, and you can unsubscribe anytime...no strings attached :)
Feel free to take a look at previous newsletters here!
.ico)