.png)
.png)
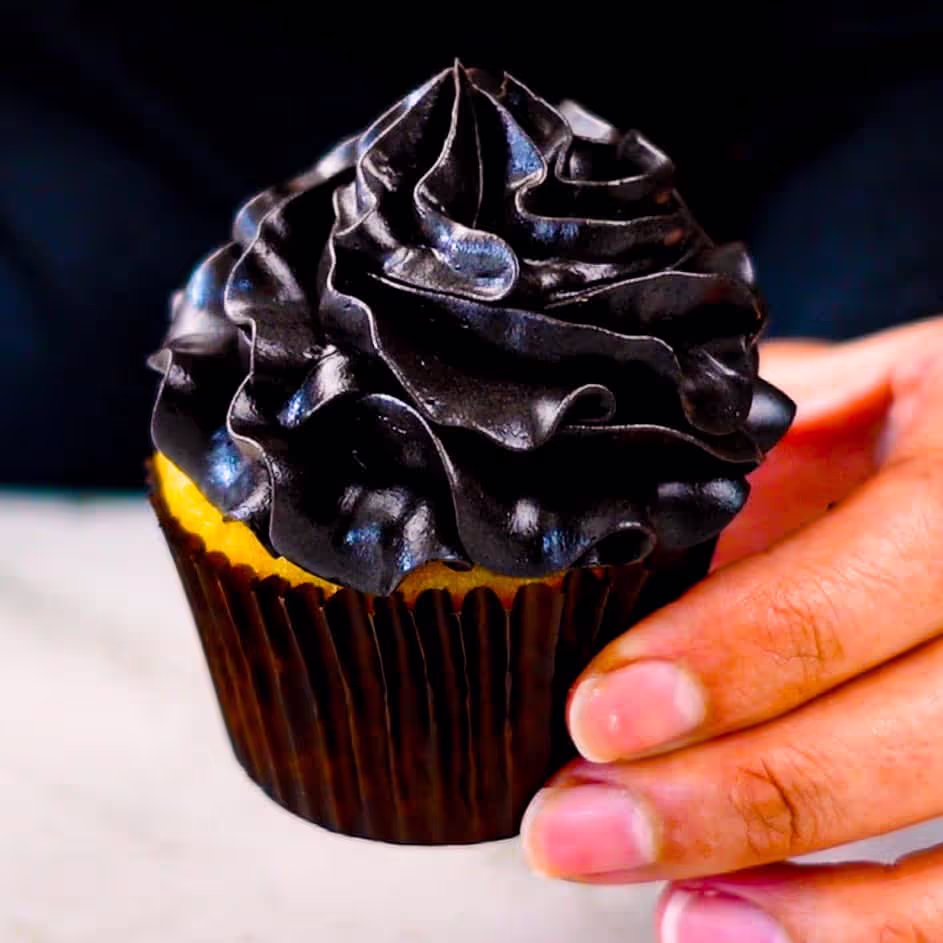
Black buttercream version one (sugar syrup cooking method)


🌟 UPDATE: There is a newer and easier version of this frosting! You can see The Black Buttercream recipe here.
I rarely use this one anymore as the newer is much easier. I'm still leaving it up because some of you prefer this one, however, if it's your first time making my black buttercream, I highly suggest the newer one, specifically the food processor method.
This frosting uses only black cocoa powder to achieve the deepest and most beautiful black color. It is, by far, the best black buttercream I've ever tasted. To make it, I cook the black cocoa with sugar to create a syrup that is then combined with butter. This creates a creamy frosting with a buttery Oreo flavor that pipes and frosts smoothly onto your cakes.

HEADS UP, this frosting uses my Sugarologie Method for frostings, which means it's one of the more difficult recipes on this site.
It requires weighing ingredients, cooking a syrup to a precise temperature, and knowing how to use the stand mixer to emulsify the butter. This will need an instant read thermometer, scale, and stand mixer. If you've made a Swiss or Italian meringue buttercream, you should be ok with this recipe. If you haven't attempted an emulsion buttercream before (Swiss meringue, Italian meringue, German, French, etc.) just be sure to read everything carefully and start small before trying the larger quantities of frosting.
I've added a one-cup recipe as a tester if you want to try out this frosting first.
I don't like to stratify bakers for attempting my recipes, but I just you like to know before you start that this is not a beginner-type recipe. But as always, I will give you every detail I know about this process to help you succeed.
Ultimately, I believe that if you're ready to learn, I'm ready to help you. Let's do this.
Does this frosting stain your teeth/tongue?
Ah yes, the most common question when it comes to black frosting. This frosting uses only black cocoa powder and no food dye. So if you like eating Oreo cookies, it's the same thing. Yeah, maybe you'll get some crumbs from the cookies between your teeth, but it typically doesn't "stain" like frostings with food dye.
Gel food coloring is comprised of water-based super concentrated color pigment. If the baker doesn't homogenize the food dye thoroughly, what you get are patches of super-concentrated droplets unevenly distributed in the frosting. The frosting is primarily fat-based (butter) and so it may not look like there's dye but its hiding everywhere.
Once the frosting hits your mouth (your saliva is water-based), and the butterfat melts, the water-based food dye is quickly disbursed (kinda explodes) everywhere and dyes everything black in your mouth.
What is black cocoa powder?
It’s a type of cocoa powder that’s been alkalized, which gives it a deep black color and smoky, intense flavor.
Here is a summary of unsweetened cocoa powders you may encounter in the baking world:

For the most part, cocoa powders are not interchangeable unless the recipe states specific instructions. See how the pH changes based on the type of cocoa powder? Depending on the other ingredients in your recipe, this can affect the texture, rise, and overall quality of your baking.
For this recipe, you will need black cocoa, which is hard to source, so I buy mine online. You can buy the one I use in my videos (here from Amazon). King Arthur Flour also has excellent baking products, including their black cocoa here. (Though I've not used this one myself.)
What ingredients do you need for my black frosting?

Black cocoa powder is an alkalized version of natural cocoa, giving it a rich and super black color. (Here is the one I buy.) Alkalization is a process used in chocolate production to change the specific properties of chocolate products, including color, flavor, solubility, and pH. (Alkaline products have a higher pH or are “basic” or “alkaline”) I’m using it specifically for its color, which is a rich black, but this also imparts a slightly bitter flavor to the frosting. You can correct this using cream of tartar, down below.
White granulated sugar is the sweet ingredient for this frosting. I use granulated because we’re going to dissolve the sugar in the water anyways, and it’s easier to use than powdered. The sugar dissolves and melts a little during the heating step, creating a syrup and giving the finished frosting a smooth texture and glossy appearance.
Salt is the flavoring agent for this frosting. I always use unsalted butter so I can customize the flavor at the end. Don’t skip this - salt also helps balance out bitter flavors, and this will help make the frosting taste more like an Oreo.
Water is the liquid ingredient that helps cook the cocoa powder and dissolve the sugar. A portion of the black cocoa powder is made of starches, which break open and swell when placed in hot water, creating a thicker and smoother consistency for the syrup.
Cream of tartar is an acidic powder that is a by-product of wine production. It contains tartaric acid, which can help neutralize the alkaline flavor when using black cocoa powder. I’ve trained myself to taste for alkaline flavors when baking because that’s often a sign of a leavener imbalance, so I’m pretty sensitive to it. If it doesn’t bother you, you can skip this ingredient.
Unsalted butter is the fat source of this frosting, and it mellows the chocolate flavor and adds stability to the finished frosting. Make sure the butter is very cold before adding. This helps equilibrate the temperature of the sauce, which is very hot from cooking. The cold butter brings the temperature down faster and prevents the butter from getting too warm. Heating butter past a certain temp (around 170F) can mess with the proteins, which help pull the frosting together (also called emulsifying) in the end. Don't worry about these details too much, just make sure the butter is frozen in the first step I outline in the recipe, below.
How stable is this black frosting?
This is a new type of frosting that I've developed. I've experimented with it for the past few months. Here are my observations:
- It will seem thin and loose and first, but will thicken as it stands. I believe this has to do with the sugar syrup settling within the buttercream. If you can make this frosting the day ahead, you'll see if thicken overnight. Just keep it in a covered container at room temperature.
- If you want to use it right after making, that's fine too. It pipes beautifully and frosts nicely for fillings. It has a super smooth texture, especially if you use the immersion blender trick. The texture is like a denser, slightly soft Swiss meringue buttercream. If you ever watch bakers frost cakes with a Swiss meringue buttercream that almost looks like it's going to slide off the cake (but never does) that's how this one feels.
- After you frost your cake, if you want it to set even quicker, just place it in the fridge. The timing will depend on the size of your cake, but if it's a 6 or 8 inch round, 30 minutes should be sufficient.
- I've had many many bakers send me pictures of their finished cakes with this frosting. For the most part, I'm seeing small mini cakes up to what looks like an 8 inch round tall (3-4 layers) of cake. Some people have asked me if this would be suitable for a wedding cake. That I'm not sure of - I'm not a cake decorator nor do I sell my cakes, but functionally and structurally, I know that the butter content and syrup stage that we cook this to will lend great stability, much like a condensed milk buttercream (Russian Buttercream).
I have had pro bakers make wedding cakes with other recipes of mine. If you do this, I'd love love love to see the results. Many of you are so talented when it comes to cake decorating and I love seeing your art.
Step by step:
NOTE: you will need an accurate thermometer (instant read preferably) and a stand mixer. Optionally, you may need an immersion blender to achieve a shiny jet black. Some have also told me that a food processor works as well.
Step 1: Cut and chill the butter cubes.

Cut the butter into chunks and chill in the freezer for at least 30 minutes.
Step 2: Cook the starches in the cocoa powder.

Add the black cocoa powder and water to a pan (2a). Turn heat onto low/medium-low and whisk the cocoa powder into the water until it's disbursed throughout (2b). Cook until you see the tiniest bubbles start to form and a bit of steam rising.
Add the sugar and whisk until fully dissolved (2c).
Step 3: Cook until syrup reaches 230-234°F (110-112°C).

Turn to medium-high heat and cook the syrup until it reaches 230-234F. This may take up to 10 minutes. Use a spatula to scrape the sides if you see any cocoa powder there.
Step 4: Cool the syrup until it reaches 145-150°F (63-66°C).

Pour the hot syrup into the bowl of the stand mixer (4a). Add about 10% of the frozen butter (about a chunk or two), the cream of tartar, and salt (4b) and stir until all the butter is melted. Keep stirring with the spatula until syrup reaches 145-150°F (63-66°C) (4c).

Then add in the rest of the frozen butter (4d). Stir until the butter is around 80-90% melted (4e).
Step 5: Mix (emulsify) using the stand mixer.
*NOTE* in the pics, you'll see me use the paddle attachment. For smaller quantities of frosting (3 cups and under) this works ok. For above those amounts, use the whisk attachment first because it's going to emulsify much faster for you. Then switch over to the paddle at the end to smooth things out.

Once the butter has melted slightly, using the paddle attachment, pulse on low speed (so butter chunks don't go flying out of the bowl) and once the mixer can manage, mix on low speed until it reaches around 68-75°F (20-24°C). Then adjust the mixer to medium-high speed and mix until the frosting comes together (emulsifies) (5a).
This may take a few minutes, depending on the air temp, the temp of your butter and starting temp of your syrup. The important thing is to identify when it's about to emulsify. Once you see little white dots or bumps (like in 5b), the frosting is about to thicken and will be smooth and creamy (5c).
If your frosting remains syrupy and glossy black, it's likely the temp is still too high. You can check with the thermometer. Ideally, you'll want the syrup to be between 68-75°F (20-24°C) for it to emulsify. If it's to warm, stick in the freezer for no more than 5 minutes just to get a chill on the bowl. Then mix again and see if it will come together.
After the buttercream is nice and creamy, mix for an additional minute on high speed, then mix on low speed to get out any large air pockets and smooth out.
The frosting is now ready to use. (If your final frosting is gray or you want a glossy black, move to the next step.)
Step 6: Homogenize with an immersion blender (optional).

I’ve used an immersion blender as a homogenizer for frostings, usually for piping, because it makes the frosting a little denser and glossier. It works well in this case if you need a super shiny, jet-black color. Just be aware that it does create a denser buttercream, which can feel more buttery when you eat it.
If you want to a watch videos of me making this frosting, I have a couple.
Also, there is this YouTube video, which is an older version of my recipe technique. I don't use this method anymore, but if you want to see what the buttercream looks like for frosting a cake, you can skip to the end.
IMPORTANT NOTE: You can perfectly replicate all my cake and frosting recipes using gram measurements. Weighing is the most accurate way to bake and I use it exclusively.
For American bakers who prefer it, I have converted grams to estimated volumes (cups, teaspoons, etc.). These are not as accurate and may have awkward proportions.
This is the OXO scale I use on a daily basis. If you’re interested in other tools I use for my baking, I’ve compiled a list here.
Video
This is my most recent video that shows the method you'll be using to make this buttercream. In the video though, you'll see me make the red velvet flavor, but again, the method will be very similar.
Honors Members Section
This extra material is accessible to Sugarologie Honors members.
Become a member to view extended research notes, technique analysis, and supplemental materials! Learn more about Sugarologie Honors here.
Already a member?
Before starting the recipe, please read this!
Measure by weight, if possible.
Measuring by weight is the best way for you to replicate my recipes. I develop recipes using ingredients (even liquids) measured in grams, which is why you see them listed first in the recipe cards. For measurements under 5 grams, I will typically only list the volumetric measurements (teaspoons, etc.), as most home scales are not precise for such small weights.
In most cases, I have converted grams to volumetric measurements (aka US customary units) for bakers who prefer this method. However, the measurements are not as precise and may have awkward proportions. The recipes should still work, but for the ultimate precision, try to use weight.
This is the OXO scale I use daily. I also purchased this budget version of a good scale, which I keep at my Mom’s house for baking. If you’re interested in other tools I use for my baking, I’ve compiled a list here.
Use room temperature ingredients.
All my ingredients should be used at room temperature, or 65-75 °F/18-24 °C. I will always indicate if you need something outside this range. If no details are given, room temperature is the default.
Pay attention to the ingredient descriptions.
I try not to be brand-specific, but I will always note an interesting result from a type of ingredient, be it negative or positive.
A specific note regarding salt: I use Diamond Crystal Kosher salt for everything on this site except for frostings. In frostings, you want the salt to dissolve more easily, and kosher salt tends to leave granules behind. If you substitute table salt (more finely granulated) for recipes that list kosher salt, you must use half the volume indicated in my recipes.
Substitutions are hard.
That said, substitutions aren’t impossible but can be the toughest part of recipe development. Small swaps, like reduced-fat milk (2% fat) for whole milk (3.5% fat), usually work fine. However, bigger changes—such as replacing oil with applesauce or sour cream with Greek yogurt—can significantly impact texture and density.
Be wary of general, all-purpose substitutions in baking; I find that usually there is never a one size-fits-all solution. I carefully select ingredients for my recipes, so for the best results, start with the original recipe and modify with caution.
Read all the recipe instructions before beginning.
I’m in the “Pre-read the Chapter before Class Lecture” club... and I invite you to join! Baking new recipes can be intimidating, so let’s set you up for success. I want you to think about timeframes. Most fillings and frostings can be made ahead of time, and give you an extra day for mental space. Also, as you become a more proficient baker, you can anticipate and recognize steps. (“Oh, this has a meringue step, so I’ll need an extra clean bowl…” etc.) Ensure you go down the ingredient list and have everything at the right temperature.
%20(1).png)

.avif)

Black Cocoa Frosting
*For 1 cup of frosting*
- 15g black cocoa powder*
- 1/4 cup (53g) water
- 1/2 cup (100g) white granulated sugar
- couple pinches salt
- 1/8-1/4 teaspoons cream of tartar
- 1/2 cups (113g) unsalted butter, cut into 1 tablespoon chunks *COLD FROM FREEZER*
*For 3 cups of frosting*
- 45g black cocoa powder*
- 2/3 cup (160g) water
- 1 1/2 cups (300g) white granulated sugar
- couple pinches salt
- 1/2 to 3/4 teaspoons cream of tartar
- 1 1/2 cups (339g) unsalted butter, cut into 1 tablespoon chunks *COLD FROM FREEZER*
*For 4 1/2 cups of frosting*
- 68g black cocoa powder*
- 1 cup (240g) water
- 2 1/4 cups (450g) white granulated sugar
- couple pinches salt
- 3/4 to 1 teaspoons cream of tartar
- 2 1/4 cups (510g) unsalted butter, cut into 1 tablespoon chunks *COLD FROM FREEZER*
- Cut the butter into approximately one half-inch chunks and place them in the freezer while preparing the next steps.
- Add the black cocoa powder and water to a large pan. Turn the heat onto low/medium-low and whisk until no lumps remain and the cocoa powder is evenly disbursed.
- Once you start to see the tiniest bubbles and steam start to rise from the pan, add in the sugar. Turn the heat to medium/medium-high and, whisking the entire time, cook until the mixture is to a rolling boil. Cook until the syrup reaches 230-234°F (110-112°C). This may take 10 minutes or more and it should be dark with a texture like Hershey's syrup from the bottle.
- Pour the hot syrup (careful!) into the stand mixer bowl. Add about 10% of the frozen butter (a chunk is usually good, no need to be precise) and stir. Put the rest of the butter back into the freezer. Add the salt and cream of tartar and taste the buttercream. The cream of tartar should remove some alkalinity and the salt will enhance the chocolate flavor. Adjust as needed.
Allow the syrup to cool until it reaches 145-150F (63-66C), then add the rest of the frozen butter. Stir with a spatula until the butter is covered in syrup. - Add the bowl to your stand mixer. The butter chunks will still be pretty big, so with a paddle attachment, pulse on low speed to prevent butter chunks from flying out. Then once the mixer can manage, turn onto low speed and mix until the butter-syrup mixture reaches 68-75F (20-24C). Turn the mixer onto medium-high speed and mix until the frosting comes together. Once the frosting has emulsified and is thick and creamy, mix for additional minute on high speed, then on low speed for a minute. Your frosting should be dark and beautiful and ready to use.
- Optionally, if you're aiming for a glossy jet black, you can use an immersion blender to mix the frosting until you like the color and consistency.

Recipe Card - Adriana's Notes
*Black cocoa powder is an alkalized version of natural cocoa powder, which in addition to raising the pH, turns the cocoa black. It has a smoky, mellow, and sometimes alkaline flavor reminiscent of Oreo cookies. It’s hard to source in stores, so I buy mine online. (I get it at Amazon, here.)
**If you find that your buttercream is gray, that means that the butter is still too cold or it needs to be emulsified a little more aggressively. There is enough black cocoa powder in this recipe that the frosting should be black if the cocoa powder is dispersed evenly within all the butterfat. There are a couple of things you can do: You can continue to mix, even using the whisk attachment if you want. The whisk used at high speed, along with the butterfat rising in temperature as it tries to reach room temperature will help mix the cocoa syrup into the butter more evenly. Place your hands on the bowl too - your body heat will warm the butter to allow it to emulsify faster. You can also use a hair dryer on a low setting, but be careful because you don't want to liquefy the butterfat, just soften it.
The next best option is to move to an immersion blender. This is a super high-speed way to emulsify things and you should instantly see the frosting turn darker.
Recommended Sugar Lab Recipes + Experiments
.avif)


Got room for more dessert?
Subscribe to my Crumby Data newsletter! I share behind-the-scenes looks at recipe development, flavor testing for the Cakeculator, and life as a content creator. It’s free, lands in your inbox every few weeks, and you can unsubscribe anytime...no strings attached :)
Feel free to take a look at previous newsletters here!
.ico)